
Product Manual
Page 4
... before the pyrolytic cleaning. 4 www.aeg.com • Ensure that the electrical information on the rating plate agrees with the power supply. Remove all the packaging. • Do not install or use harsh abrasive cleaners or sharp metal scrapers to clean the glass door since they can scratch the surface, which may result in order to units with the same height. 2.2 Electrical connection WARNING! Always...
... before the pyrolytic cleaning. 4 www.aeg.com • Ensure that the electrical information on the rating plate agrees with the power supply. Remove all the packaging. • Do not install or use harsh abrasive cleaners or sharp metal scrapers to clean the glass door since they can scratch the surface, which may result in order to units with the same height. 2.2 Electrical connection WARNING! Always...
Product Manual
Page 5
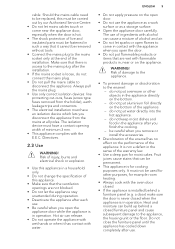
... the installation. Always pull the mains plug. • Use only correct isolation devices: line protecting cut-outs, fuses (screw type fuses removed from the mains at the end of live and insulated parts must have a contact opening width of the warranty law. • Use a deep pan for example room heating. • Always cook with water. Directives. 2.3 Use WARNING! Hot air can be removed without tools. • Connect the mains plug...
... the installation. Always pull the mains plug. • Use only correct isolation devices: line protecting cut-outs, fuses (screw type fuses removed from the mains at the end of live and insulated parts must have a contact opening width of the warranty law. • Use a deep pan for example room heating. • Always cook with water. Directives. 2.3 Use WARNING! Hot air can be removed without tools. • Connect the mains plug...

Product Manual
Page 6
... the deterioration of light bulb or halogen lamp used for household appliances. any non-stick pots, pans, trays, utensils etc. • Read carefully all Pyrolytic Ovens / Cooking Residues as such consumers are not harmful to the localized temperature changes in the vicinity of all Pyrolytic Ovens when the Pyrolytic self cleaning program is released from the vicinity of the appliance location during and after...
... the deterioration of light bulb or halogen lamp used for household appliances. any non-stick pots, pans, trays, utensils etc. • Read carefully all Pyrolytic Ovens / Cooking Residues as such consumers are not harmful to the localized temperature changes in the vicinity of all Pyrolytic Ovens when the Pyrolytic self cleaning program is released from the vicinity of the appliance location during and after...

Product Manual
Page 7
.... • Remove the door catch to prevent children and pets to collect fat. Baking tray To bake and roast or as a pan to get closed in the appliance. 3. PRODUCT DESCRIPTION 3.1 General overview ENGLISH 7 2.8 Service • To repair the appliance contact an Authorised Service Centre. • Use original spare parts only. 1 2 5 4 83 2 1 1 Control panel 2 Electronic programmer 3 3 Socket for the core temperature 4 sensor 5 4 Heating element 5 Lamp 6 6 Fan 7 Shelf support, removable 8 Shelf positions 7 3.2 Accessories Wire shelf For...
.... • Remove the door catch to prevent children and pets to collect fat. Baking tray To bake and roast or as a pan to get closed in the appliance. 3. PRODUCT DESCRIPTION 3.1 General overview ENGLISH 7 2.8 Service • To repair the appliance contact an Authorised Service Centre. • Use original spare parts only. 1 2 5 4 83 2 1 1 Control panel 2 Electronic programmer 3 3 Socket for the core temperature 4 sensor 5 4 Heating element 5 Lamp 6 6 Fan 7 Shelf support, removable 8 Shelf positions 7 3.2 Accessories Wire shelf For...
Product Manual
Page 9
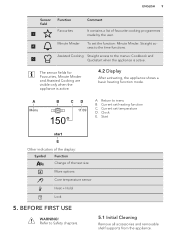
... Cooking Straight access to the time functions. Clock E. BEFORE FIRST USE WARNING! ENGLISH 9 Sensor field Function Favourites 3 Comment It contains a list of the text size More options Core temperature sensor Heat + Hold Lock 5. Return to Safety chapters. 5.1 Initial Cleaning Remove all accessories and removable shelf supports from the appliance. Start start E Other indicators of the display: Symbol Function Change of favourite cooking programmes made by the user. Refer to menu B. The sensor...
... Cooking Straight access to the time functions. Clock E. BEFORE FIRST USE WARNING! ENGLISH 9 Sensor field Function Favourites 3 Comment It contains a list of the text size More options Core temperature sensor Heat + Hold Lock 5. Return to Safety chapters. 5.1 Initial Cleaning Remove all accessories and removable shelf supports from the appliance. Start start E Other indicators of the display: Symbol Function Change of favourite cooking programmes made by the user. Refer to menu B. The sensor...

Product Manual
Page 10
... connect the appliance to the mains you press and hold an option in the device on . Put the accessories and the removable shelf supports back to "Care and cleaning" chapter. Scroll it . • To set : • the language • time • clock format • date • fast heat-up • odour filter The chosen name or number can switch places on the display...
... connect the appliance to the mains you press and hold an option in the device on . Put the accessories and the removable shelf supports back to "Care and cleaning" chapter. Scroll it . • To set : • the language • time • clock format • date • fast heat-up • odour filter The chosen name or number can switch places on the display...

Product Manual
Page 11
... can use: • manual mode - To deactivate the appliance touch: . 6.2 Quick Guide to activate. 4. ENGLISH 11 Menu Assisted Cooking Cookbook Quickstart Last and most used Last used Most used Base Settings Fast heat-up Odour Filter Cleaning Reminder Display Sound Language Time and Date Demo mode Service 7.2 Operating the menu 1. Scroll through the menu to find the function that you want to the menu Menu Functions Timers Options...
... can use: • manual mode - To deactivate the appliance touch: . 6.2 Quick Guide to activate. 4. ENGLISH 11 Menu Assisted Cooking Cookbook Quickstart Last and most used Last used Most used Base Settings Fast heat-up Odour Filter Cleaning Reminder Display Sound Language Time and Date Demo mode Service 7.2 Operating the menu 1. Scroll through the menu to find the function that you want to the menu Menu Functions Timers Options...

Product Manual
Page 12
... . 4. 12 www.aeg.com 7.3 The menu in overview A B Menu Functions Timers Options A. List of other options for : Functions A B True Fan Cooking Heating Functions Special Cleaning Favourites A. To change the temperature touch the temperature shown on the display and scroll through the functions to find the one you need. 3. To activate the function touch: Start. It contains a list of the heating functions, specials, cleaning and favourite programmes...
... . 4. 12 www.aeg.com 7.3 The menu in overview A B Menu Functions Timers Options A. List of other options for : Functions A B True Fan Cooking Heating Functions Special Cleaning Favourites A. To change the temperature touch the temperature shown on the display and scroll through the functions to find the one you need. 3. To activate the function touch: Start. It contains a list of the heating functions, specials, cleaning and favourite programmes...
Product Manual
Page 13
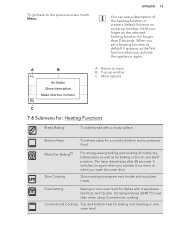
... for baking and roasting on one oven level. Bottom Heat To reheat cakes for : Heating Functions Bread Baking To bake bread with crispy bases like Pizza and Quiche. Return to the previous menu touch: Menu. Moist Fan Baking1) Slow Cooking For energy-saving baking and cooking of the heating function or create a default function on again when you activate the appliance again. Set temperatures...
... for baking and roasting on one oven level. Bottom Heat To reheat cakes for : Heating Functions Bread Baking To bake bread with crispy bases like Pizza and Quiche. Return to the previous menu touch: Menu. Moist Fan Baking1) Slow Cooking For energy-saving baking and cooking of the heating function or create a default function on again when you activate the appliance again. Set temperatures...

Product Manual
Page 14
14 www.aeg.com True Fan Cooking Turbo Grilling Fast Grilling Hot air for multiple dishes and for baking on up to set the cooking time first. To prepare convenience food with bones on again when you open the oven door. Grilling To grill bigger items of... pickles in glasses and liquid. EN50304. 7.7 Submenu for gratinating and browning. 1) This function is switched off during roasting. Plate Warming To preheat your plate for dishes like Roast Beef. Set the oven temperatures 20-40 °C lower than when using Conventional cooking. The lamp is used to toast ...
14 www.aeg.com True Fan Cooking Turbo Grilling Fast Grilling Hot air for multiple dishes and for baking on up to set the cooking time first. To prepare convenience food with bones on again when you open the oven door. Grilling To grill bigger items of... pickles in glasses and liquid. EN50304. 7.7 Submenu for gratinating and browning. 1) This function is switched off during roasting. Plate Warming To preheat your plate for dishes like Roast Beef. Set the oven temperatures 20-40 °C lower than when using Conventional cooking. The lamp is used to toast ...
Product Manual
Page 16
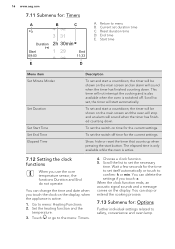
... core temperature sensor, the functions Duration and End do not operate. Go to safety, convenience and oven lamp. Choose a clock function. 5. Reset duration time D. This timer will sound when the timer has finished counting down . To set the switch-on the display, when the appliance is active. 1. Scroll to confirm: h or min. Show, hide or reset the timer that counts up when pressing the start...
... core temperature sensor, the functions Duration and End do not operate. Go to safety, convenience and oven lamp. Choose a clock function. 5. Reset duration time D. This timer will sound when the timer has finished counting down . To set the switch-on the display, when the appliance is active. 1. Scroll to confirm: h or min. Show, hide or reset the timer that counts up when pressing the start...
Product Manual
Page 17
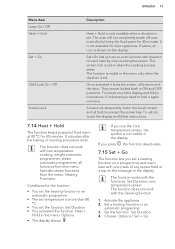
...: Heating Functions. To unlock touch the display and follow instructions. 7.14 Heat + Hold The function keeps prepared food warm at 80 °C for all buttons except the power key. Set+Go lets you set a heating function (or a programme) and use the core temperature sensor, the symbol is more than 80 °C. • You set an oven function with the functions: Set Duration, core temperature sensor. Conditions for 30 minutes. Set a heating...
...: Heating Functions. To unlock touch the display and follow instructions. 7.14 Heat + Hold The function keeps prepared food warm at 80 °C for all buttons except the power key. Set+Go lets you set a heating function (or a programme) and use the core temperature sensor, the symbol is more than 80 °C. • You set an oven function with the functions: Set Duration, core temperature sensor. Conditions for 30 minutes. Set a heating...

Product Manual
Page 18
... display to the: Screen Lock. 4. Activating the function: Child Lock If the Pyrolytic cleaning function operates, the door is locked. Tap the display. 3. When the appliance is on the display. 7.18 Submenu for ). Activate the appliance. 2. You can activate the function only when the appliance operates. 18 www.aeg.com Touch the message in the display or press a sensor field (except for : Assisted Cooking A B Oven...
... display to the: Screen Lock. 4. Activating the function: Child Lock If the Pyrolytic cleaning function operates, the door is locked. Tap the display. 3. When the appliance is on the display. 7.18 Submenu for ). Activate the appliance. 2. You can activate the function only when the appliance operates. 18 www.aeg.com Touch the message in the display or press a sensor field (except for : Assisted Cooking A B Oven...
Product Manual
Page 19
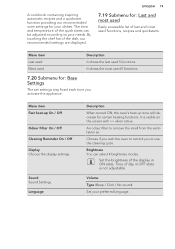
... oven's heat-up On / Off Odour Filter On / Off Cleaning Reminder On / Off Display Choose the display settings. An odour filter to your needs. Brightness You can be adjusted according to remove the smell from the ventilation air. By touching the chef hat of the quick starts can select 4 brightness modes. Sound Sound Settings. It is not adjustable. The time and temperature of the dish, our recommended settings are displayed...
... oven's heat-up On / Off Odour Filter On / Off Cleaning Reminder On / Off Display Choose the display settings. An odour filter to your needs. Brightness You can be adjusted according to remove the smell from the ventilation air. By touching the chef hat of the quick starts can select 4 brightness modes. Sound Sound Settings. It is not adjustable. The time and temperature of the dish, our recommended settings are displayed...
Product Manual
Page 24
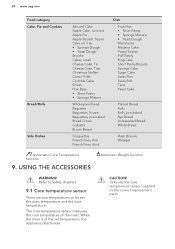
... temperature sensor There are two temperatures to be set temperature, the appliance deactivates. When the meat is at the set : the oven temperature and the core temperature. Only use the core temperature sensor supplied or the correct replacement parts. CAUTION! 24 www.aeg.com Food category Cake, Pie and Cookies Bread/Rolls Side Dishes Almond Cake Apple Cake, covered Apple Pie Apple Strudel, frozen Cake on Tray •...
... temperature sensor There are two temperatures to be set temperature, the appliance deactivates. When the meat is at the set : the oven temperature and the core temperature. Only use the core temperature sensor supplied or the correct replacement parts. CAUTION! 24 www.aeg.com Food category Cake, Pie and Cookies Bread/Rolls Side Dishes Almond Cake Apple Cake, covered Apple Pie Apple Strudel, frozen Cake on Tray •...

Product Manual
Page 25
... remove the meat from the oven. Current set core temperature, an acoustic signal sounds. There is hot. Set the heating function and, if necessary, the oven temperature. Return to stop the signal. 7. Wire shelf and the deep pan together: WARNING! The core temperature sensor is a risk of burns. AB C DE Menu 220° 1h 14m 100° 64° Stop G F A. Activate the appliance. 2. Current set temperature E. Be careful...
... remove the meat from the oven. Current set core temperature, an acoustic signal sounds. There is hot. Set the heating function and, if necessary, the oven temperature. Return to stop the signal. 7. Wire shelf and the deep pan together: WARNING! The core temperature sensor is a risk of burns. AB C DE Menu 220° 1h 14m 100° 64° Stop G F A. Activate the appliance. 2. Current set temperature E. Be careful...
Product Manual
Page 28
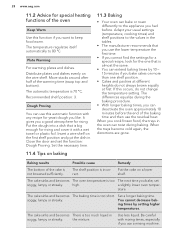
...; Cakes and pastries at first. Adapt your usual settings (temperature, cooking times) and shelf positions to 80 °C. The differences equalize during baking. Baking results Possible cause Remedy The bottom of the cake is incorrect. Set a longer baking time. 28 www.aeg.com 11.2 Advice for special heating functions of the oven Keep Warm Use this automatic function with any recipe for yeast dough...
...; Cakes and pastries at first. Adapt your usual settings (temperature, cooking times) and shelf positions to 80 °C. The differences equalize during baking. Baking results Possible cause Remedy The bottom of the cake is incorrect. Set a longer baking time. 28 www.aeg.com 11.2 Advice for special heating functions of the oven Keep Warm Use this automatic function with any recipe for yeast dough...
Product Manual
Page 41
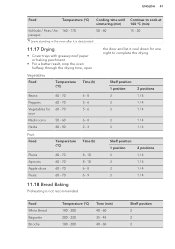
... position 1 position 3 3 3 3 2 positions 1 / 4 1 / 4 1 / 4 1 / 4 11.18 Bread Baking Preheating is deactivated. Continue to cook at 100 °C (min) 15 - 20 11.17 Drying • Cover trays with grease proof paper or baking parchment. • For a better result, stop the oven halfway through the drying time, open the door and let it is not recommended. Vegetables Food Temperature (°C) Beans Peppers Vegetables for one...
... position 1 position 3 3 3 3 2 positions 1 / 4 1 / 4 1 / 4 1 / 4 11.18 Bread Baking Preheating is deactivated. Continue to cook at 100 °C (min) 15 - 20 11.17 Drying • Cover trays with grease proof paper or baking parchment. • For a better result, stop the oven halfway through the drying time, open the door and let it is not recommended. Vegetables Food Temperature (°C) Beans Peppers Vegetables for one...
Product Manual
Page 44
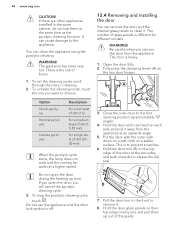
... speed. To stop the pyrolytic cleaning cycle, touch . Be careful when you will cancel the pyrolytic cleaning cycle. 3. Open the door fully. 2. Hold the door trim (B) on the two door hinges. There is the risk of glass panels is to clean it. The door is off. 12.4 Removing and installing the door You can remove the door and the internal glass panels to prevent scratches. 6. A A 3. Close the oven door to remove it away from...
... speed. To stop the pyrolytic cleaning cycle, touch . Be careful when you will cancel the pyrolytic cleaning cycle. 3. Open the door fully. 2. Hold the door trim (B) on the two door hinges. There is the risk of glass panels is to clean it. The door is off. 12.4 Removing and installing the door You can remove the door and the internal glass panels to prevent scratches. 6. A A 3. Close the oven door to remove it away from...

Product Manual
Page 46
... the data here: Model (MOD.) Product number (PNC) Serial number (S.N.) 14. ENERGY EFFICIENCY 14.1 Product Fiche and information according to the problem yourself, contact your dealer or an Authorised Service Centre. Do not remove the rating plate from the appliance cavity. The Child Lock is correctly connected to the electrical supply (refer to "Using the Child Lock". Make sure that the settings are not set. The display shows error mes-
... the data here: Model (MOD.) Product number (PNC) Serial number (S.N.) 14. ENERGY EFFICIENCY 14.1 Product Fiche and information according to the problem yourself, contact your dealer or an Authorised Service Centre. Do not remove the rating plate from the appliance cavity. The Child Lock is correctly connected to the electrical supply (refer to "Using the Child Lock". Make sure that the settings are not set. The display shows error mes-


