Product Manual
Page 4
... the wiring rules. • Only use harsh abrasive cleaners or sharp metal scrapers to clean the glass door since they can scratch the surface, which may result in shattering of the glass. • If the supply cord is damaged, it is heavy. 4 www.aeg.com • Ensure that the electrical information on the rating plate agrees with the power supply. Install the shelf supports...
... the wiring rules. • Only use harsh abrasive cleaners or sharp metal scrapers to clean the glass door since they can scratch the surface, which may result in shattering of the glass. • If the supply cord is damaged, it is heavy. 4 www.aeg.com • Ensure that the electrical information on the rating plate agrees with the power supply. Install the shelf supports...
Product Manual
Page 5
... be removed without tools. • Connect the mains plug to the enamel: - Risk of burns and damage to disconnect the appliance. Steam can release. 2.5 Care and cleaning WARNING! Always pull the mains plug. • Use only correct isolation devices: line protecting cut-outs, fuses (screw type fuses removed from the holder), earth leakage trips and contactors. • The electrical installation must have a contact opening width...
... be removed without tools. • Connect the mains plug to the enamel: - Risk of burns and damage to disconnect the appliance. Steam can release. 2.5 Care and cleaning WARNING! Always pull the mains plug. • Use only correct isolation devices: line protecting cut-outs, fuses (screw type fuses removed from the holder), earth leakage trips and contactors. • The electrical installation must have a contact opening width...
Product Manual
Page 6
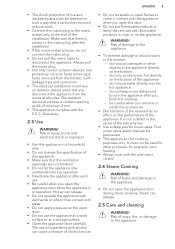
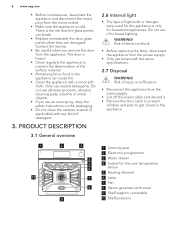
... core temperature 5 6 sensor 4 5 Heating element 10 3 7 6 Lamp 2 7 Fan 1 8 8 Steam generator with any kind of injury or suffocation. • Disconnect the appliance from the power supply. • Only use abrasive products, abrasive cleaning pads, solvents or metal objects. • If you remove the door from the mains socket. • Make sure the appliance is cold. Contact the Service. • Be careful when you use an oven spray...
... core temperature 5 6 sensor 4 5 Heating element 10 3 7 6 Lamp 2 7 Fan 1 8 8 Steam generator with any kind of injury or suffocation. • Disconnect the appliance from the power supply. • Only use abrasive products, abrasive cleaning pads, solvents or metal objects. • If you remove the door from the mains socket. • Make sure the appliance is cold. Contact the Service. • Be careful when you use an oven spray...

Product Manual
Page 10
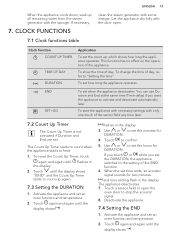
... new time. 5.3 Changing the time You can use . 5.2 Setting the time After the first connection to Safety chapters. 6.1 Operating the appliance To operate the appliance you optimize the energy consumption during cooking. Quarter Steam + To bake bread, roast large pieces of day, refer to warm Heat up chilled and frozen meals. It is off , the display shows h and 12:00. 1. 10 www.aeg.com 5. Refer to "Care and cleaning...
... new time. 5.3 Changing the time You can use . 5.2 Setting the time After the first connection to Safety chapters. 6.1 Operating the appliance To operate the appliance you optimize the energy consumption during cooking. Quarter Steam + To bake bread, roast large pieces of day, refer to warm Heat up chilled and frozen meals. It is off , the display shows h and 12:00. 1. 10 www.aeg.com 5. Refer to "Care and cleaning...
Product Manual
Page 11
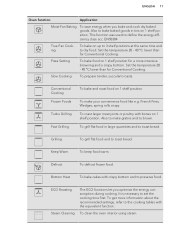
... dry food. EN50304 True Fan Cooking To bake on 1 shelf position. To roast larger meat joints or poultry with bones on up to 3 shelf positions at the same time and to toast bread. ENGLISH 11 Oven function Application Moist Fan Baking To save energy when you optimize the energy consumption during cooking. To clean the oven interior using steam. Pizza Setting To bake food on 1 shelf position...
... dry food. EN50304 True Fan Cooking To bake on 1 shelf position. To roast larger meat joints or poultry with bones on up to 3 shelf positions at the same time and to toast bread. ENGLISH 11 Oven function Application Moist Fan Baking To save energy when you optimize the energy consumption during cooking. To clean the oven interior using steam. Pizza Setting To bake food on 1 shelf position...

Product Manual
Page 12
... three seconds. The Temperature / Time display shows the temperature in the control panel. Set the steam function (refer to its initial position. 4. If necessary, touch to "Setting the END" or "Setting the DURATION"). Activate the appliance. 5. 12 www.aeg.com 6.3 Setting the oven function 1. Touch or function. Touch or the appliance starts automatically after approximately 2 minutes. To activate the Fast heat up function operates. If you...
... three seconds. The Temperature / Time display shows the temperature in the control panel. Set the steam function (refer to its initial position. 4. If necessary, touch to "Setting the END" or "Setting the DURATION"). Activate the appliance. 5. 12 www.aeg.com 6.3 Setting the oven function 1. Touch or function. Touch or the appliance starts automatically after approximately 2 minutes. To activate the Fast heat up function operates. If you...
Product Manual
Page 13
... and again until the display shows "00:00" and the Count Up Timer starts to count up all remaining water from the steam generator with the door open the oven door to set an oven function and temperature. 2. Activate the appliance and set the minutes for two minutes. flashes in the display. 3. Use or to stop the acoustic signal. 8. Touch to heat. 1. If you touch or...
... and again until the display shows "00:00" and the Count Up Timer starts to count up all remaining water from the steam generator with the door open the oven door to set an oven function and temperature. 2. Activate the appliance and set the minutes for two minutes. flashes in the display. 3. Use or to stop the acoustic signal. 8. Touch to heat. 1. If you touch or...
Product Manual
Page 14
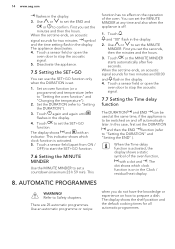
....aeg.com flashes in the display. When the set time ends, an acoustic signal sounds for two minutes and 00:00 and flash in the Clock / residual heat display. 8. Deactivate the appliance. 7.5 Setting the SET+GO You can use the SET+GO function only when the DURATION is on the operation of the oven function, with an indicator. Set an oven function (or a programme) and temperature...
....aeg.com flashes in the display. When the set time ends, an acoustic signal sounds for two minutes and 00:00 and flash in the Clock / residual heat display. 8. Deactivate the appliance. 7.5 Setting the SET+GO You can use the SET+GO function only when the DURATION is on the operation of the oven function, with an indicator. Set an oven function (or a programme) and temperature...
Product Manual
Page 16
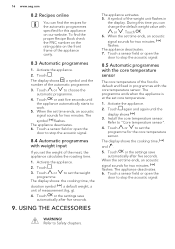
... display shows the cooking time, and . 5. Activate the appliance. 2. Touch . USING THE ACCESSORIES The appliance activates. 5. Touch a sensor field or open the door to stop the acoustic signal. Touch a sensor field or open the door to stop the acoustic signal. 8.5 Automatic programmes with the core temperature sensor. The symbol flashes. Touch . 6. Install the core temperature sensor. flashes. The display shows , a symbol and the number of measurement (kg, g). 4. When the set time ends...
... display shows the cooking time, and . 5. Activate the appliance. 2. Touch . USING THE ACCESSORIES The appliance activates. 5. Touch a sensor field or open the door to stop the acoustic signal. Touch a sensor field or open the door to stop the acoustic signal. 8.5 Automatic programmes with the core temperature sensor. The symbol flashes. Touch . 6. Install the core temperature sensor. flashes. The display shows , a symbol and the number of measurement (kg, g). 4. When the set time ends...
Product Manual
Page 17
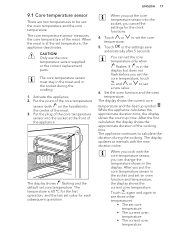
... the core temperature sensor in the display. The core temperature sensor measures the core temperature of the cooking time. When the meat is at the front of the core temperature sensor into the socket, you can set core temperature. Touch or the settings save automatically after 5 seconds. After you set the core temperature, touch and or a new value. Only use the core temperature sensor supplied or the correct replacement parts. While the...
... the core temperature sensor in the display. The core temperature sensor measures the core temperature of the cooking time. When the meat is at the front of the core temperature sensor into the socket, you can set core temperature. Touch or the settings save automatically after 5 seconds. After you set the core temperature, touch and or a new value. Only use the core temperature sensor supplied or the correct replacement parts. While the...
Product Manual
Page 18
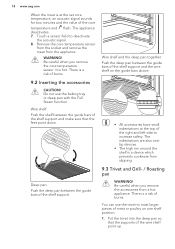
... careful when you remove the accessories from a hot appliance. Wire shelf: Push the shelf between the guide bars of the shelf support. Remove the core temperature sensor from the socket and remove the meat from slipping. 9.3 Trivet and Grill- / Roasting pan WARNING! Deep pan: Push the deep pan between the guide bars of the shelf support and the wire shelf on one shelf position. 1. WARNING! Do not use...
... careful when you remove the accessories from a hot appliance. Wire shelf: Push the shelf between the guide bars of the shelf support. Remove the core temperature sensor from the socket and remove the meat from slipping. 9.3 Trivet and Grill- / Roasting pan WARNING! Deep pan: Push the deep pan between the guide bars of the shelf support and the wire shelf on one shelf position. 1. WARNING! Do not use...
Product Manual
Page 19
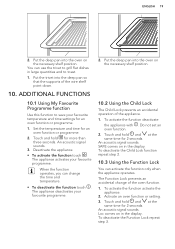
... repeat step 2. 10.3 Using the Function Lock You can change of the wire shelf point down. 10. Put the deep pan into the oven on in the display. The appliance deactivates your favourite programme. You can use the trivet to grill flat dishes in large quantities and to save your favourite temperature and time settings for an oven function or programme. 2. Deactivate...
... repeat step 2. 10.3 Using the Function Lock You can change of the wire shelf point down. 10. Put the deep pan into the oven on in the display. The appliance deactivates your favourite programme. You can use the trivet to grill flat dishes in large quantities and to save your favourite temperature and time settings for an oven function or programme. 2. Deactivate...

Product Manual
Page 20
... (apart from ON / OFF), the display goes back to operate the appliance again. Temperature 30 °C - 115 °C 120 °C - 195 °C Switch-off time 12.5 h 8.5 h 200 °C - 230 °C 5.5 h After the Automatic switch-off does not work with the functions: Core temperature sensor, Light, Slow Cooking, Duration, End, Time delay. 10.6 Brightness of the display There are two modes of display brightness: • Night brightness...
... (apart from ON / OFF), the display goes back to operate the appliance again. Temperature 30 °C - 115 °C 120 °C - 195 °C Switch-off time 12.5 h 8.5 h 200 °C - 230 °C 5.5 h After the Automatic switch-off does not work with the functions: Core temperature sensor, Light, Slow Cooking, Duration, End, Time delay. 10.6 Brightness of the display There are two modes of display brightness: • Night brightness...

Product Manual
Page 21
... side of the door you cook rice, use a ratio of food, fresh or frozen. Refer to the chapter "Care and cleaning". • The tables give data for typical dishes. • Start the procedure with steam • Use only heat and corrosion resistant cookware or chrome steel food containers (for...cook, warm, defrost, poach or blanch vegetables, meat, fish, pasta, rice, sweet corn, semolina and eggs. They depend on the recipes and the quality and quantity of the ingredients used. 11.1 Inner side of the appliance cool. 11. The temperature and baking times in the tables are in one operation...
... side of the door you cook rice, use a ratio of food, fresh or frozen. Refer to the chapter "Care and cleaning". • The tables give data for typical dishes. • Start the procedure with steam • Use only heat and corrosion resistant cookware or chrome steel food containers (for...cook, warm, defrost, poach or blanch vegetables, meat, fish, pasta, rice, sweet corn, semolina and eggs. They depend on the recipes and the quality and quantity of the ingredients used. 11.1 Inner side of the appliance cool. 11. The temperature and baking times in the tables are in one operation...
Product Manual
Page 27
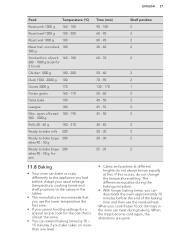
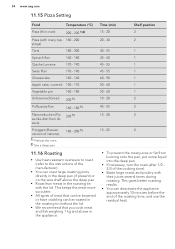
... always brown equally at different heights do not change the temperature setting. When the trays become cold again, the distortions are gone. ENGLISH 27 Food Temperature (°C) Roast pork 1000 g 160 - 180 Roast beef 1000 g 180 - 200 Roast veal 1000 g 180 Meat loaf, uncooked, 180 500 g Smoked loin of the baking time and then use the lower temperature the first time. • If you cannot...
... always brown equally at different heights do not change the temperature setting. When the trays become cold again, the distortions are gone. ENGLISH 27 Food Temperature (°C) Roast pork 1000 g 160 - 180 Roast beef 1000 g 180 - 200 Roast veal 1000 g 180 Meat loaf, uncooked, 180 500 g Smoked loin of the baking time and then use the lower temperature the first time. • If you cannot...
Product Manual
Page 34
... recommend that you cook meat and fish weighing 1 kg and above the deep pan. • Roast lean meats in the appliance. • To prevent the meat juices or fat from Alsace) 230 1) 12 - 20 2 Piroggen (Russian version of calzone) 180 - 200 1) 15 - 25 2 1) Preheat the oven. 2) Use a deep pan. 11.16 Roasting • Use heat-resistant ovenware to roast (refer to the instructions of the...
... recommend that you cook meat and fish weighing 1 kg and above the deep pan. • Roast lean meats in the appliance. • To prevent the meat juices or fat from Alsace) 230 1) 12 - 20 2 Piroggen (Russian version of calzone) 180 - 200 1) 15 - 25 2 1) Preheat the oven. 2) Use a deep pan. 11.16 Roasting • Use heat-resistant ovenware to roast (refer to the instructions of the...
Product Manual
Page 42
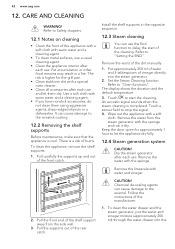
... the water drawer into the steam generator. 2. Pull carefully the supports up and out of the dirt manually. 1. Refer to "Oven functions". Remove the water from the side wall. 3. Keep the door open for the grill pan. • Clean stubborn dirt with warm water and a cleaning agent. • To clean metal surfaces, use a usual cleaning agent. • Clean the appliance interior after each use . To clean the appliance, remove the shelf supports. 1. Remove the...
... the water drawer into the steam generator. 2. Pull carefully the supports up and out of the dirt manually. 1. Refer to "Oven functions". Remove the water from the side wall. 3. Keep the door open for the grill pan. • Clean stubborn dirt with warm water and a cleaning agent. • To clean metal surfaces, use a usual cleaning agent. • Clean the appliance interior after each use . To clean the appliance, remove the shelf supports. 1. Remove the...
Product Manual
Page 43
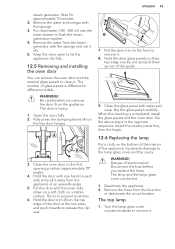
...) into the water drawer to the first opening position (approximately 70° angle). 4. The door is completed, install the glass panels and the oven door. Pull the door trim to the front to remove it away from the fuse box or deactivate the circuit breaker. Clean the glass panel with the sponge. 3. Install the smaller panel first, then the larger. 12.6 Replacing the lamp Put a cloth on the two door hinges. Do the...
...) into the water drawer to the first opening position (approximately 70° angle). 4. The door is completed, install the glass panels and the oven door. Pull the door trim to the front to remove it away from the fuse box or deactivate the circuit breaker. Clean the glass panel with the sponge. 3. Install the smaller panel first, then the larger. 12.6 Replacing the lamp Put a cloth on the two door hinges. Do the...
Product Manual
Page 44
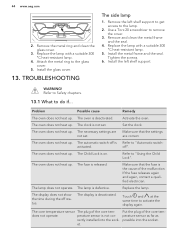
... fuse is on. The lamp does not operate. perature sensor is deactivated. Remove the metal ring and clean the glass cover. 3. Install the metal frame and the seal. The oven is not cor- The necessary settings are correct. Touch and at the same time to remove the cover. 3. 44 www.aeg.com 2. Replace the lamp with a suitable 300 °C heat-resistant lamp. 5. TROUBLESHOOTING The side lamp 1. Remove and clean...
... fuse is on. The lamp does not operate. perature sensor is deactivated. Remove the metal ring and clean the glass cover. 3. Install the metal frame and the seal. The oven is not cor- The necessary settings are correct. Touch and at the same time to remove the cover. 3. 44 www.aeg.com 2. Replace the lamp with a suitable 300 °C heat-resistant lamp. 5. TROUBLESHOOTING The side lamp 1. Remove and clean...
Product Manual
Page 45
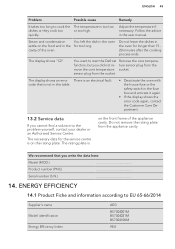
... start the Defrost Remove the core temperafunction, but you did not re- Adjust the temperature if necessary. Follow the advice in the fuse box and activate it again. • If the display shows the error code again, contact the Customer Care Department. 13.2 Service data If you write the data here: Model (MOD.) Product number (PNC) Serial number (S.N.) 14. code that you cannot find a solution to the problem...
... start the Defrost Remove the core temperafunction, but you did not re- Adjust the temperature if necessary. Follow the advice in the fuse box and activate it again. • If the display shows the error code again, contact the Customer Care Department. 13.2 Service data If you write the data here: Model (MOD.) Product number (PNC) Serial number (S.N.) 14. code that you cannot find a solution to the problem...


