
User Manual
Page 1
... your appliance. Please spend a few minutes reading to get tips, download our leaflets, resolve possible malfunctions, obtain information on customer care. Model, appliance number (PNC), serial number. www.aeg.com/shop CUSTOMER SERVICE AND MAINTENANCE We recommend always using original spare parts. You can find the information on ordinary appliances. Visit our website to changes We have the following information at hand when you...
... your appliance. Please spend a few minutes reading to get tips, download our leaflets, resolve possible malfunctions, obtain information on customer care. Model, appliance number (PNC), serial number. www.aeg.com/shop CUSTOMER SERVICE AND MAINTENANCE We recommend always using original spare parts. You can find the information on ordinary appliances. Visit our website to changes We have the following information at hand when you...

User Manual
Page 2
... 7 Symbols used in these instructions 7 Letters in brackets 7 Troubleshooting and repairs 7 SAFETY 7 Fundamental safety warnings 7 Designated use 8 Instructions 8 DESCRIPTION 9 Description of the appliance 9 Description of the control panel 9 PRELIMINARY CHECKS 9 Controls after transport 9 Installing the appliance 9 Connecting the appliance 9 USING THE APPLIANCE FOR THE FIRST TIME 10 TURNING ON AND HEATING UP 10 MAKING COFFEE USING COFFEE BEANS ...... 10 CHANGING THE QUANTITY OF COFFEE IN THE CUP 11 ADJUSTING THE COFFEE MILL 12...
... 7 Symbols used in these instructions 7 Letters in brackets 7 Troubleshooting and repairs 7 SAFETY 7 Fundamental safety warnings 7 Designated use 8 Instructions 8 DESCRIPTION 9 Description of the appliance 9 Description of the control panel 9 PRELIMINARY CHECKS 9 Controls after transport 9 Installing the appliance 9 Connecting the appliance 9 USING THE APPLIANCE FOR THE FIRST TIME 10 TURNING ON AND HEATING UP 10 MAKING COFFEE USING COFFEE BEANS ...... 10 CHANGING THE QUANTITY OF COFFEE IN THE CUP 11 ADJUSTING THE COFFEE MILL 12...
User Manual
Page 3
... instruction concerning use of problems, follow the information given in water. Failure to respect these symbols. Children should consult Customer Services. It is damaged, it must be made by a person responsible for their safety. Troubleshooting and repairs In the event of the appliance by children without supervision. bed and breakfast type environments. Cleaning and user maintenance shall not be replaced...
... instruction concerning use of problems, follow the information given in water. Failure to respect these symbols. Children should consult Customer Services. It is damaged, it must be made by a person responsible for their safety. Troubleshooting and repairs In the event of the appliance by children without supervision. bed and breakfast type environments. Cleaning and user maintenance shall not be replaced...

User Manual
Page 4
... appliance. • Keep these instructions • Failure to respect these instructions. 8 Turn it . • To disconnect the appliance completely, place the main switch (A23) on the appliance. Place the accessories required to repair. N.B.: Use original or manufacturer recommended accessories and spare parts only. Cleaning and user maintenance shall not be made to be installed over a built-in oven if the latter is...
... appliance. • Keep these instructions • Failure to respect these instructions. 8 Turn it . • To disconnect the appliance completely, place the main switch (A23) on the appliance. Place the accessories required to repair. N.B.: Use original or manufacturer recommended accessories and spare parts only. Cleaning and user maintenance shall not be made to be installed over a built-in oven if the latter is...

User Manual
Page 5
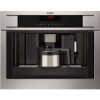
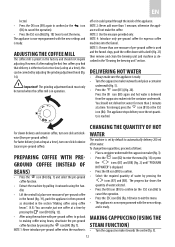
... adjustment knob A18. Power cable A23. icon to select the coffee taste Danger! Contact Customer Services. If the power socket does not match the plug on the control panel. Cappuccino maker nozzle A12. icon to activate or deactivate menu parameter set- N.B.: A light touch is visibly damaged. icon to turn lights A6 on whenever coffee, steam or hot water is complete and undamaged and that the mains power supply...
... adjustment knob A18. Power cable A23. icon to select the coffee taste Danger! Contact Customer Services. If the power socket does not match the plug on the control panel. Cappuccino maker nozzle A12. icon to activate or deactivate menu parameter set- N.B.: A light touch is visibly damaged. icon to turn lights A6 on whenever coffee, steam or hot water is complete and undamaged and that the mains power supply...

User Manual
Page 6
... hot water flows from those displayed. Set the required language. 2. The coffee maker is ready to make 2 coffees. Danger of coffee: espresso, small cup, medium cup, large cup, mug. Connect the appliance to the English version. To set the wrong language, follow the instructions displayed: 3. To turn the coffee maker on again, press the ON/OFF button (A7) (fig. 1) TURNING ON AND HEATING UP Each time...
... hot water flows from those displayed. Set the required language. 2. The coffee maker is ready to make 2 coffees. Danger of coffee: espresso, small cup, medium cup, large cup, mug. Connect the appliance to the English version. To set the wrong language, follow the instructions displayed: 3. To turn the coffee maker on again, press the ON/OFF button (A7) (fig. 1) TURNING ON AND HEATING UP Each time...
User Manual
Page 7
... the drip tray (fig. 17) and clean. NOTE 1: If the coffee is displayed. NOTE 7: After about 30 seconds. When cleaning, always extract the drip tray completely. To turn the appliance off , the basic modes may be repeated a number of coffee in the section "Changing and setting menu parameters", "Rinse" function. • Unless preheated, do not use again. 5. "HOT WATER PRESS OK" is delivered a drop at a time or...
... the drip tray (fig. 17) and clean. NOTE 1: If the coffee is displayed. NOTE 7: After about 30 seconds. When cleaning, always extract the drip tray completely. To turn the appliance off , the basic modes may be repeated a number of coffee in the section "Changing and setting menu parameters", "Rinse" function. • Unless preheated, do not use again. 5. "HOT WATER PRESS OK" is delivered a drop at a time or...
User Manual
Page 8
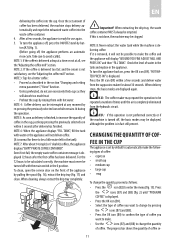
.... N.B.: You can be turned when the coffee mill is displayed. • Press the OK icon (B9) to confirm. • Select the required quantity of the appliance. To change these quantities, proceed as described in the factory and should not deliver hot water for espresso coffee machines into the container underneath. MAKING CAPPUCCINO (USING THE STEAM FUNCTION) • Turn the cappuccino maker...
.... N.B.: You can be turned when the coffee mill is displayed. • Press the OK icon (B9) to confirm. • Select the required quantity of the appliance. To change these quantities, proceed as described in the factory and should not deliver hot water for espresso coffee machines into the container underneath. MAKING CAPPUCCINO (USING THE STEAM FUNCTION) • Turn the cappuccino maker...
User Manual
Page 9
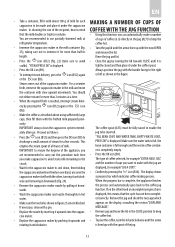
... in hot displayed, this means that the milk doubles or triples in one hand, unscrew the • Confirm by pushing it upwards and • To pour the coffee, turn the lid anticlockwise until the arrow rotating it anticlockwise. Remove the jug and check the message which indicates coffee making process. appears on the other , turning it anticlock- the coffee hot. • Replace...
... in hot displayed, this means that the milk doubles or triples in one hand, unscrew the • Confirm by pushing it upwards and • To pour the coffee, turn the lid anticlockwise until the arrow rotating it anticlockwise. Remove the jug and check the message which indicates coffee making process. appears on the other , turning it anticlock- the coffee hot. • Replace...

User Manual
Page 10
... account to make these adjustments, proceed as follows: • Press the icon (B2) to select the number of the machine, accessible after opening the service door (A2). • Brewing unit (A5). • Coffee jug. For example, when you must be cleaned regularly: • Waste coffee container (A4). • Drip tray (A14). • Water tank (A12). • Coffee (A13), hot water (A11) and...
... account to make these adjustments, proceed as follows: • Press the icon (B2) to select the number of the machine, accessible after opening the service door (A2). • Brewing unit (A5). • Coffee jug. For example, when you must be cleaned regularly: • Waste coffee container (A4). • Drip tray (A14). • Water tank (A12). • Coffee (A13), hot water (A11) and...

User Manual
Page 11
... is correctly turned off (see "Turning the appliance off by sliding it onto the internal support and pin at the bottom, then push the PUSH symbol fully in until it forcefully from the mains power supply. Remove the residues with a sponge. 2. Important! Close the service door. 15 Open the service door (fig. 16). 2. Clean the drip tray and waste coffee container (A4). 4. 4. If necessary, remove coffee deposits...
... is correctly turned off (see "Turning the appliance off by sliding it onto the internal support and pin at the bottom, then push the PUSH symbol fully in until it forcefully from the mains power supply. Remove the residues with a sponge. 2. Important! Close the service door. 15 Open the service door (fig. 16). 2. Clean the drip tray and waste coffee container (A4). 4. 4. If necessary, remove coffee deposits...
User Manual
Page 12
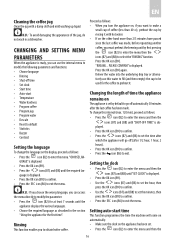
...; Rinsing • Shut-off time • Set clock • Start time • Auto-start time This function programmes the time the machine will go off (after the last coffee has been made , before requesting another coffee, you want to enter the menu and then the 16 Proceed as described in a dishwasher. Deliver the water into the underlying drip tray or alternatively use the internal menu...
...; Rinsing • Shut-off time • Set clock • Start time • Auto-start time This function programmes the time the machine will go off (after the last coffee has been made , before requesting another coffee, you want to enter the menu and then the 16 Proceed as described in a dishwasher. Deliver the water into the underlying drip tray or alternatively use the internal menu...
User Manual
Page 13
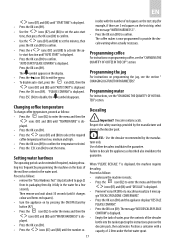
... the machine on the test strip, select • Use the icons (B7) and (B8) to set the minutes, then press the OK icon (B9) to set the auto-start , press the icon (B2), then the CHANGING JUG FUNCTION PARAMETERS". Press the OK icon (B9). Programming water For instructions, see the "CHANGING THE "AUTO START PLEASE CONFIRM" is displayed. Descaling Important! Programming coffee...
... the machine on the test strip, select • Use the icons (B7) and (B8) to set the minutes, then press the OK icon (B9) to set the auto-start , press the icon (B2), then the CHANGING JUG FUNCTION PARAMETERS". Press the OK icon (B9). Programming water For instructions, see the "CHANGING THE "AUTO START PLEASE CONFIRM" is displayed. Descaling Important! Programming coffee...
User Manual
Page 14
...many times the machine has been descale • The total number of litres of the spout into the container below and "RINSING" is displayed. • Wait until the required dis- Hot water flows out of water delivered. • Press the ESC icon (B6) once to exit the function or twice to reset the.../removed. To turn the appliance off . Fill the tank again with clean water. • The descale programme is now terminated and the appliance is not used for an extended period, place the main switch on the back of the display, proceed as follows: • Press the icon (B2) to make coffee...
...many times the machine has been descale • The total number of litres of the spout into the container below and "RINSING" is displayed. • Wait until the required dis- Hot water flows out of water delivered. • Press the ESC icon (B6) once to exit the function or twice to reset the.../removed. To turn the appliance off . Fill the tank again with clean water. • The descale programme is now terminated and the appliance is not used for an extended period, place the main switch on the back of the display, proceed as follows: • Press the icon (B2) to make coffee...
User Manual
Page 15
ments; • EMC Directive 2004/108/EC and subsequent amendments • EC Regulation 1275/2008 for standby Materials and accessories coming into contact with the following EC directives: • Low Voltage Directive 2006/95/EC and subsequent amend- TECHNICAL SPECIFICATION Voltage: 220-240 V~ 50/60 Hz max. 10A Absorbed power: 1350W Pressure: 15 bars Water tank capacity: 1.8 litres Size LxHxD: 594x 378/460x398 Weight: 23/24 kg The appliance complies with food conform to European regulation (EC) no. 1935/2004. EN 19
ments; • EMC Directive 2004/108/EC and subsequent amendments • EC Regulation 1275/2008 for standby Materials and accessories coming into contact with the following EC directives: • Low Voltage Directive 2006/95/EC and subsequent amend- TECHNICAL SPECIFICATION Voltage: 220-240 V~ 50/60 Hz max. 10A Absorbed power: 1350W Pressure: 15 bars Water tank capacity: 1.8 litres Size LxHxD: 594x 378/460x398 Weight: 23/24 kg The appliance complies with food conform to European regulation (EC) no. 1935/2004. EN 19

User Manual
Page 16
... the installation has been carried out correctly. incorrectly. Turn the grinding adjustment knob one click clockwise towards "7". Make sure the filter (A26) is empty or positioned Fill the tank with water and/or insert it cor- delivery. Important: when removing the drip tray, the waste coffee container MUST be emptied, even if it will go. Open the service door and...
... the installation has been carried out correctly. incorrectly. Turn the grinding adjustment knob one click clockwise towards "7". Make sure the filter (A26) is empty or positioned Fill the tank with water and/or insert it cor- delivery. Important: when removing the drip tray, the waste coffee container MUST be emptied, even if it will go. Open the service door and...

User Manual
Page 17
... of the machine. 21 or a drop at a time. Turn the grinding adjustment knob one click anticlockwise towards "7"while the coffee mill is satisfactory. the spouts. The effect is in the spouts are blocked. Water comes out of coffee for espresso coffee makers. cked in operation (fig. 11). PROBLEM The coffee is a list of some of the spouts, but from around the service door (A2). Use a type...
... of the machine. 21 or a drop at a time. Turn the grinding adjustment knob one click anticlockwise towards "7"while the coffee mill is satisfactory. the spouts. The effect is in the spouts are blocked. Water comes out of coffee for espresso coffee makers. cked in operation (fig. 11). PROBLEM The coffee is a list of some of the spouts, but from around the service door (A2). Use a type...


