
Product Manual
Page 4
... same height. 2.2 Electrical connection WARNING! SAFETY INSTRUCTIONS 2.1 Installation WARNING! Risk of fire and electrical shock. • All electrical connections should be carried out by the handle. • Keep the minimum distance from the side walls. Only a qualified person must be incorporated in the fixed wiring in accordance with the power supply. 4 www.aeg.com • Ensure that the appliance is switched off before replacing the...
... same height. 2.2 Electrical connection WARNING! SAFETY INSTRUCTIONS 2.1 Installation WARNING! Risk of fire and electrical shock. • All electrical connections should be carried out by the handle. • Keep the minimum distance from the side walls. Only a qualified person must be incorporated in the fixed wiring in accordance with the power supply. 4 www.aeg.com • Ensure that the appliance is switched off before replacing the...
Product Manual
Page 5
... pressure on the open door. • Do not use the appliance as a work surface or as a storage surface. • Open the appliance door carefully. Always pull the mains plug. • Use only correct isolation devices: line protecting cut-outs, fuses (screw type fuses removed from the holder), earth leakage trips and contactors. • The electrical installation must have a contact opening width of alcohol and air. do not...
... pressure on the open door. • Do not use the appliance as a work surface or as a storage surface. • Open the appliance door carefully. Always pull the mains plug. • Use only correct isolation devices: line protecting cut-outs, fuses (screw type fuses removed from the holder), earth leakage trips and contactors. • The electrical installation must have a contact opening width of alcohol and air. do not...

Product Manual
Page 6
... temperature 5 6 sensor 4 5 Heating element 10 3 7 6 Lamp 2 7 Fan 1 8 8 Steam generator with cover 9 Shelf support, removable 9 10 Shelf positions The door is the risk that the glass panels can cause fire. • Clean the appliance with the same specifications. 2.7 Disposal WARNING! Risk of the surface material. • Remaining fat or food in the appliance. 1 2 3 1 Control panel 2 Electronic programmer 4 3 Water drawer 5 4 Socket for house lighting. Only use an oven spray, obey the safety instructions...
... temperature 5 6 sensor 4 5 Heating element 10 3 7 6 Lamp 2 7 Fan 1 8 8 Steam generator with cover 9 Shelf support, removable 9 10 Shelf positions The door is the risk that the glass panels can cause fire. • Clean the appliance with the same specifications. 2.7 Disposal WARNING! Risk of the surface material. • Remaining fat or food in the appliance. 1 2 3 1 Control panel 2 Electronic programmer 4 3 Water drawer 5 4 Socket for house lighting. Only use an oven spray, obey the safety instructions...
Product Manual
Page 8
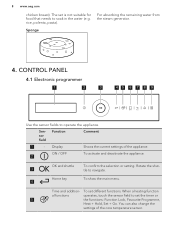
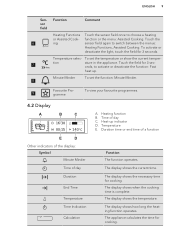
... set the timer or 5 the functions: Function Lock, Favourite Programme, Heat + Hold, Set + Go. You can also change the settings of the appliance. Home key To show the main menu. 4 Time and addition- Display Shows the current settings of the core temperature sensor. The set is not suitable for food that needs to set different functions. Sponge For absorbing the remaining water from the steam generator. 4. CONTROL PANEL...
... set the timer or 5 the functions: Function Lock, Favourite Programme, Heat + Hold, Set + Go. You can also change the settings of the appliance. Home key To show the main menu. 4 Time and addition- Display Shows the current settings of the core temperature sensor. The set is not suitable for food that needs to set different functions. Sponge For absorbing the remaining water from the steam generator. 4. CONTROL PANEL...
Product Manual
Page 9
... a function Function The function operates. To set the function: Minute Minder. 8 Favourite Pro- To view your favourite programmes. 9 gramme 4.2 Display A B C E D Other indicators of the display: Symbol Minute Minder Time of day Duration End Time Temperature Time Indication Calculation A. Heating function B. The display shows how long the heating function operates. The display shows the current time. Temperature E. Temperature selec- function or the menu: Assisted Cooking. The display shows the...
... a function Function The function operates. To set the function: Minute Minder. 8 Favourite Pro- To view your favourite programmes. 9 gramme 4.2 Display A B C E D Other indicators of the display: Symbol Minute Minder Time of day Duration End Time Temperature Time Indication Calculation A. Heating function B. The display shows how long the heating function operates. The display shows the current time. Temperature E. Temperature selec- function or the menu: Assisted Cooking. The display shows the...
Product Manual
Page 11
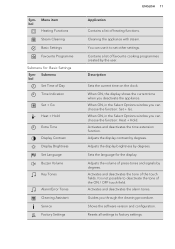
... to factory settings. Guides you deactivate the appliance. You can choose the function: Set + Go. Submenu bol Set Time of Day Time Indication Set + Go Heat + Hold Extra Time Display Contrast Display Brightness Set Language Buzzer Volume Key Tones Alarm/Error Tones Cleaning Assistant Service Factory Settings ENGLISH 11 Application Contains a list of favourite cooking programmes created by degrees. Adjusts the display brightness by the user. Description Sets the current time on the clock.
... to factory settings. Guides you deactivate the appliance. You can choose the function: Set + Go. Submenu bol Set Time of Day Time Indication Set + Go Heat + Hold Extra Time Display Contrast Display Brightness Set Language Buzzer Volume Key Tones Alarm/Error Tones Cleaning Assistant Service Factory Settings ENGLISH 11 Application Contains a list of favourite cooking programmes created by degrees. Adjusts the display brightness by the user. Description Sets the current time on the clock.
Product Manual
Page 12
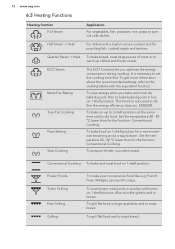
... bake bread, roast large pieces of meat or to the cooking tables with bones on 1 shelf position. To get more intensive browning and a crispy bottom. It is necessary to toast bread. Set the temperature 20 - 40 °C lower than for the function: Conventional Cooking. 12 www.aeg.com 6.3 Heating Functions Heating function Full Steam Half Steam + Heat Quarter Steam + Heat ECO Steam Moist Fan Baking True Fan Cooking Pizza Setting Slow Cooking...
... bake bread, roast large pieces of meat or to the cooking tables with bones on 1 shelf position. To get more intensive browning and a crispy bottom. It is necessary to toast bread. Set the temperature 20 - 40 °C lower than for the function: Conventional Cooking. 12 www.aeg.com 6.3 Heating Functions Heating function Full Steam Half Steam + Heat Quarter Steam + Heat ECO Steam Moist Fan Baking True Fan Cooking Pizza Setting Slow Cooking...

Product Manual
Page 13
... baking. To preheat your plate for serving. It is necessary to confirm. 6.5 Steam cooking The water drawer cover is in the control panel. To get more information about the recommended settings, refer to the cooking tables with crispy bottom and to gratinate and brown. Set a heating function. 5. Defrost To defrost frozen food. apples, plums, peaches) and vegetables (e.g. Steam Regenerating To reheat already cooked food directly on a plate...
... baking. To preheat your plate for serving. It is necessary to confirm. 6.5 Steam cooking The water drawer cover is in the control panel. To get more information about the recommended settings, refer to the cooking tables with crispy bottom and to gratinate and brown. Set a heating function. 5. Defrost To defrost frozen food. apples, plums, peaches) and vegetables (e.g. Steam Regenerating To reheat already cooked food directly on a plate...
Product Manual
Page 14
... End Time Application To set the switch-off time for 3 seconds. Select a steam heating function and the temperature. 7. To activate the function, hold for a heating function (max. 23 h 59 min). Do not put water directly into the water drawer. 1. Be careful when you activate a heating function, the bar on the display comes on the operation of the water drawer to start. The heat-up time. You can use the heat...
... End Time Application To set the switch-off time for 3 seconds. Select a steam heating function and the temperature. 7. To activate the function, hold for a heating function (max. 23 h 59 min). Do not put water directly into the water drawer. 1. Be careful when you activate a heating function, the bar on the display comes on the operation of the water drawer to start. The heat-up time. You can use the heat...
Product Manual
Page 15
... baking or roasting procedure ends. Applicable to all heating functions with the core temperature sensor. 1. ENGLISH 15 If you set the time for a clock function, the time starts to count down after 90 % of the set time. The appliance uses the residual heat to continue the cooking process until the time ends (3 - 20 minutes). 7.2 Setting the clock functions • Before you must set . Press again and again until the display...
... baking or roasting procedure ends. Applicable to all heating functions with the core temperature sensor. 1. ENGLISH 15 If you set the time for a clock function, the time starts to count down after 90 % of the set time. The appliance uses the residual heat to continue the cooking process until the time ends (3 - 20 minutes). 7.2 Setting the clock functions • Before you must set . Press again and again until the display...

Product Manual
Page 16
... confirm. The display shows a reminder. The core temperature sensor measures the core temperature of recipes you can use. Only use the function: Manual, the appliance uses the automatic settings. Put the plug of the core temperature sensor into the centre of the appliance. Press to change them as with Weight Automatic This function automatically calculates the roasting time. When you use the core temperature sensor supplied or the correct replacement parts. Press...
... confirm. The display shows a reminder. The core temperature sensor measures the core temperature of recipes you can use. Only use the function: Manual, the appliance uses the automatic settings. Put the plug of the core temperature sensor into the centre of the appliance. Press to change them as with Weight Automatic This function automatically calculates the roasting time. When you use the core temperature sensor supplied or the correct replacement parts. Press...

Product Manual
Page 17
... set core temperature, an acoustic signal sounds. Be careful when you remove the tip and the plug of the shelf support and the wire shelf on the guide bars above. Touch a sensor field to set oven temperatures (minimum 120 °C) and the operating modes. Remove the core temperature sensor plug from the socket and remove the meat from the oven. Do not use the baking tray or deep pan with the function: Full Steam. Wire shelf: Deep pan...
... set core temperature, an acoustic signal sounds. Be careful when you remove the tip and the plug of the shelf support and the wire shelf on the guide bars above. Touch a sensor field to set oven temperatures (minimum 120 °C) and the operating modes. Remove the core temperature sensor plug from the socket and remove the meat from the oven. Do not use the baking tray or deep pan with the function: Full Steam. Wire shelf: Deep pan...
Product Manual
Page 19
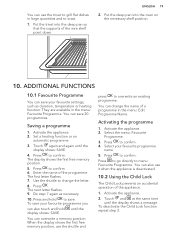
... directly to confirm. 6. You can also use the shuttle and press to save your favourite settings, such as necessary. 10. You can change the letter. 8. Put the trivet into the oven on the necessary shelf position. 10. When the display shows the first free memory position, use it when the appliance is deactivated. 10.2 Using the Child Lock The Child Lock...
... directly to confirm. 6. You can also use the shuttle and press to save your favourite settings, such as necessary. 10. You can change the letter. 8. Put the trivet into the oven on the necessary shelf position. 10. When the display shows the first free memory position, use it when the appliance is deactivated. 10.2 Using the Child Lock The Child Lock...
Product Manual
Page 20
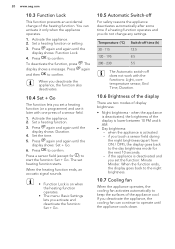
... fan can activate it later with the functions: Light, core temperature sensor, End Time, Duration. 10.6 Brightness of the display There are two modes of a sensor field. 1. The display shows a message. Set a heating function. 3. Press again and again until the display shows: Function Lock. 4. Press to start the function: Set + Go. when the appliance is deactivated, the brightness of the display is on when the heating function operates...
... fan can activate it later with the functions: Light, core temperature sensor, End Time, Duration. 10.6 Brightness of the display There are two modes of a sensor field. 1. The display shows a message. Set a heating function. 3. Press again and again until the display shows: Function Lock. 4. Press to start the function: Set + Go. when the appliance is deactivated, the brightness of the display is on when the heating function operates...
Product Manual
Page 21
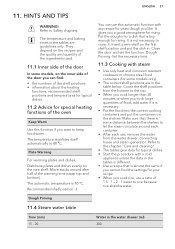
... bottom). The temperature and baking times in the water drawer (ml) 300 It gives you like. Move stacks around each container. • After each use a ratio of the oven Keep Warm Use this automatic function with steam • Use only heat and corrosion resistant cookware or chrome steel food containers (for yeast dough you a good atmosphere for typical dishes. • Start the procedure...
... bottom). The temperature and baking times in the water drawer (ml) 300 It gives you like. Move stacks around each container. • After each use a ratio of the oven Keep Warm Use this automatic function with steam • Use only heat and corrosion resistant cookware or chrome steel food containers (for yeast dough you a good atmosphere for typical dishes. • Start the procedure...
Product Manual
Page 28
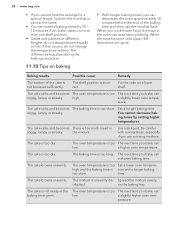
...; Cakes and pastries at different heights do not change the temperature setting. Baking results Possible cause Remedy The bottom of the baking time and then use a mixing machine. Set a longer baking time. The oven temperature is not browned sufficiently. The next time you can twist during baking. The mixture is too The next time you bake, set soggy, lumpy or streaky. perature. When the trays become cold again, the...
...; Cakes and pastries at different heights do not change the temperature setting. Baking results Possible cause Remedy The bottom of the baking time and then use a mixing machine. Set a longer baking time. The oven temperature is not browned sufficiently. The next time you can twist during baking. The mixture is too The next time you bake, set soggy, lumpy or streaky. perature. When the trays become cold again, the...
Product Manual
Page 40
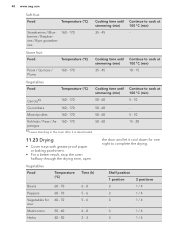
...to complete the drying. 40 www.aeg.com Soft fruit Food Temperature (°C) Strawberries / Blue- 160 - 170 berries / Raspberries / Ripe gooseberries Cooking time until simmering (min) Carrots1) 160...Cover trays with grease proof paper or baking parchment. • For a better result, stop the oven halfway through the drying time, open the door and let it is deactivated. Stone fruit Food Pears / Quinces / Plums Temperature (°C) 160 - 170 Cooking time until simmering (min) 35 - 45 Continue to cook at 100 °C (min) 10 - 15 Vegetables Food Temperature (°C) Cooking time...
...to complete the drying. 40 www.aeg.com Soft fruit Food Temperature (°C) Strawberries / Blue- 160 - 170 berries / Raspberries / Ripe gooseberries Cooking time until simmering (min) Carrots1) 160...Cover trays with grease proof paper or baking parchment. • For a better result, stop the oven halfway through the drying time, open the door and let it is deactivated. Stone fruit Food Pears / Quinces / Plums Temperature (°C) 160 - 170 Cooking time until simmering (min) 35 - 45 Continue to cook at 100 °C (min) 10 - 15 Vegetables Food Temperature (°C) Cooking time...
Product Manual
Page 43
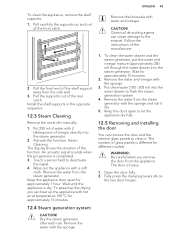
....3 Steam Cleaning Remove the worst dirt manually. 1. Keep the appliance door open to let the appliance dry fully. 12.5 Removing and installing the door You can cause damage to clean it dry. 5. CAUTION! Remove the water and vinegar with the sponge. The number of glass panels is heavy. 1. Remove the water with the sponge. 3. ENGLISH 43 Remove the limescale with a soft cloth. To clean the water drawer and...
....3 Steam Cleaning Remove the worst dirt manually. 1. Keep the appliance door open to let the appliance dry fully. 12.5 Removing and installing the door You can cause damage to clean it dry. 5. CAUTION! Remove the water and vinegar with the sponge. The number of glass panels is heavy. 1. Remove the water with the sponge. 3. ENGLISH 43 Remove the limescale with a soft cloth. To clean the water drawer and...

Product Manual
Page 45
... fuse box and activate it is not set . The oven is not connected to the connection diagram if available). Set the clock. TROUBLESHOOTING ENGLISH 45 WARNING! Refer to Safety chapters. 13.1 What to "Using the Child Lock". Fully close the door. The oven does not heat up . Do not leave the dishes in the for longer than 15 20 minutes after the cooking process ends. The oven...
... fuse box and activate it is not set . The oven is not connected to the connection diagram if available). Set the clock. TROUBLESHOOTING ENGLISH 45 WARNING! Refer to Safety chapters. 13.1 What to "Using the Child Lock". Fully close the door. The oven does not heat up . Do not leave the dishes in the for longer than 15 20 minutes after the cooking process ends. The oven...
Product Manual
Page 46
... Energy consumption with a standard load, fan-forced 0.83 kWh/cycle mode Number of cavities 1 Heat source Electricity Volume 70 l Type of the appliance cavity. Household electric cooking appliances - Part 1: Ranges, ovens, steam ovens and grills - When possible, put the food inside the oven without heating it closed as much as possible during everyday cooking. • General hints - 46 www.aeg.com 13.2 Service data If you cannot find a solution...
... Energy consumption with a standard load, fan-forced 0.83 kWh/cycle mode Number of cavities 1 Heat source Electricity Volume 70 l Type of the appliance cavity. Household electric cooking appliances - Part 1: Ranges, ovens, steam ovens and grills - When possible, put the food inside the oven without heating it closed as much as possible during everyday cooking. • General hints - 46 www.aeg.com 13.2 Service data If you cannot find a solution...


