
Product Manual
Page 2
... have the following data available: Model, PNC, Serial Number. SAFETY INSTRUCTIONS 5 3. BEFORE FIRST USE...10 6. USING THE ACCESSORIES 20 11. The information can be found on ordinary appliances. CLOCK FUNCTIONS...18 9. CARE AND CLEANING 40 14. MICROWAVE MODE...13 8. We have created it . 2 www.aeg.com CONTENTS 1. When contacting our Authorised Service Centre, ensure that help make life simpler features you for your product for...
... have the following data available: Model, PNC, Serial Number. SAFETY INSTRUCTIONS 5 3. BEFORE FIRST USE...10 6. USING THE ACCESSORIES 20 11. The information can be found on ordinary appliances. CLOCK FUNCTIONS...18 9. CARE AND CLEANING 40 14. MICROWAVE MODE...13 8. We have created it . 2 www.aeg.com CONTENTS 1. When contacting our Authorised Service Centre, ensure that help make life simpler features you for your product for...
Product Manual
Page 3
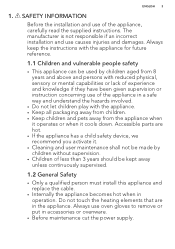
SAFETY INFORMATION Before the installation and use oven gloves to remove or put in the appliance. Accessible parts are in accessories or ovenware. • Before maintenance cut the power supply. Do not touch the heating elements that are hot. • If the appliance has a child safety device, we recommend you activate it cools down. Always keep the instructions with the appliance for future...
SAFETY INFORMATION Before the installation and use oven gloves to remove or put in the appliance. Accessible parts are in accessories or ovenware. • Before maintenance cut the power supply. Do not touch the heating elements that are hot. • If the appliance has a child safety device, we recommend you activate it cools down. Always keep the instructions with the appliance for future...

Product Manual
Page 4
... shaken and the temperature checked before replacing the lamp to avoid the possibility of electric shock. • Do not use a steam cleaner to clean the appliance. • Do not use harsh abrasive cleaners or sharp metal scrapers to clean the glass door since they can scratch the surface, which gives protection against exposure to microwave energy. • Do not heat liquids and...
... shaken and the temperature checked before replacing the lamp to avoid the possibility of electric shock. • Do not use a steam cleaner to clean the appliance. • Do not use harsh abrasive cleaners or sharp metal scrapers to clean the glass door since they can scratch the surface, which gives protection against exposure to microwave energy. • Do not heat liquids and...

Product Manual
Page 5
...; Always use a correctly installed shockproof socket. • Do not use a damaged appliance. • Obey the installation instruction supplied with the power supply. Should the mains cable need to deterioration of the surface that it is heavy. Directives. Make sure that there is access to the mains plug after microwave heating has ended. • The appliance should be cleaned regularly and any food deposits removed. •...
...; Always use a correctly installed shockproof socket. • Do not use a damaged appliance. • Obey the installation instruction supplied with the power supply. Should the mains cable need to deterioration of the surface that it is heavy. Directives. Make sure that there is access to the mains plug after microwave heating has ended. • The appliance should be cleaned regularly and any food deposits removed. •...
Product Manual
Page 6
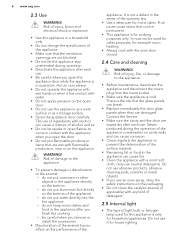
... not change the specification of light bulb or halogen lamp used for other objects in , near or on the bottom of injury, fire, or damage to prevent the deterioration of the warranty law. • Use a deep pan for example room heating. • Always cook with a moist soft cloth. 6 www.aeg.com 2.3 Use WARNING! Contact the Service. • Make sure the cavity and the door...
... not change the specification of light bulb or halogen lamp used for other objects in , near or on the bottom of injury, fire, or damage to prevent the deterioration of the warranty law. • Use a deep pan for example room heating. • Always cook with a moist soft cloth. 6 www.aeg.com 2.3 Use WARNING! Contact the Service. • Make sure the cavity and the door...

Product Manual
Page 7
... electrical shock. • Before replacing the lamp, disconnect the appliance from the mains supply. • Cut off the mains cable and discard it. • Remove the door catch to prevent children and pets to get closed in the appliance. 1 2 4 83 2 1 1 Control panel 2 Electronic programmer 3 3 Heating element 4 4 Microwave generator 5 5 Lamp 6 6 Fan 7 Shelf support, removable 8 Shelf positions 7 3.2 Accessories Wire shelf Baking tray For cookware, cake tins, roasts. PRODUCT DESCRIPTION 3.1 General...
... electrical shock. • Before replacing the lamp, disconnect the appliance from the mains supply. • Cut off the mains cable and discard it. • Remove the door catch to prevent children and pets to get closed in the appliance. 1 2 4 83 2 1 1 Control panel 2 Electronic programmer 3 3 Heating element 4 4 Microwave generator 5 5 Lamp 6 6 Fan 7 Shelf support, removable 8 Shelf positions 7 3.2 Accessories Wire shelf Baking tray For cookware, cake tins, roasts. PRODUCT DESCRIPTION 3.1 General...

Product Manual
Page 8
... operate the appliance. Temperature se- Touch the field for 3 seconds. Sensor field Function Comment 1 - Microwave func- When you use 4 the Microwave function with the function: Duration for more than 7 minutes and in the appliance. CONTROL PANEL 4.1 Electronic programmer 1 234 56 78 9 10 11 Use the sensor fields to switch between the menus: Heating Functions, Assisted Cooking. Display Shows the current settings of the appliance. vate or deactivate the light...
... operate the appliance. Temperature se- Touch the field for 3 seconds. Sensor field Function Comment 1 - Microwave func- When you use 4 the Microwave function with the function: Duration for more than 7 minutes and in the appliance. CONTROL PANEL 4.1 Electronic programmer 1 234 56 78 9 10 11 Use the sensor fields to switch between the menus: Heating Functions, Assisted Cooking. Display Shows the current settings of the appliance. vate or deactivate the light...

Product Manual
Page 9
...Heat Up Indicator Weight Automatic Function The function operates. To set the function: Minute Minder. 4.2 Display A B C A) Heating function or Microwave function B) Time of day C) Heat-up indicator D) Temperature or power of the microwave E) Duration time or end time of a function E D Other indicators of the display: Symbol Minute Minder Time of day Duration End Time Temperature Time Indication Heat-up time. Press and at the same time to set the timer or the functions: Function Lock, Favourite Programme, Heat + Hold, Set + Go. The display shows that weight can be changed...
...Heat Up Indicator Weight Automatic Function The function operates. To set the function: Minute Minder. 4.2 Display A B C A) Heating function or Microwave function B) Time of day C) Heat-up indicator D) Temperature or power of the microwave E) Duration time or end time of a function E D Other indicators of the display: Symbol Minute Minder Time of day Duration End Time Temperature Time Indication Heat-up time. Press and at the same time to set the timer or the functions: Function Lock, Favourite Programme, Heat + Hold, Set + Go. The display shows that weight can be changed...

Product Manual
Page 10
... initial position. 6. Assisted Cooking Contains a list of heating functions. Refer to select the menu 3. to Safety chapters. 5.1 Initial Cleaning Remove all accessories and removable shelf supports from the appliance. 10 www.aeg.com Symbol Heat + Hold Function The function is active. 5. Refer to set other settings. DAILY USE 5.2 First Connection When you connect the appliance to the mains or after the power cut, you can use . Press to Safety chapters...
... initial position. 6. Assisted Cooking Contains a list of heating functions. Refer to select the menu 3. to Safety chapters. 5.1 Initial Cleaning Remove all accessories and removable shelf supports from the appliance. 10 www.aeg.com Symbol Heat + Hold Function The function is active. 5. Refer to set other settings. DAILY USE 5.2 First Connection When you connect the appliance to the mains or after the power cut, you can use . Press to Safety chapters...
Product Manual
Page 11
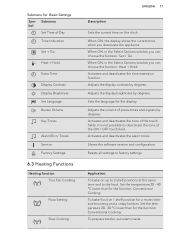
...- To prepare tender, succulent roasts. Submenu for the display. Adjusts the display brightness by degrees. Adjusts the volume of Day Time Indication Set + Go Heat + Hold Extra Time Display Contrast Display Brightness Set Language Buzzer Volume Key Tones Alarm/Error Tones Service Factory Settings 6.3 Heating Functions Heating function True Fan Cooking Pizza Setting Slow Cooking ENGLISH 11 Description Sets the current time on the clock. Activates and deactivates the tone of the ON / OFF touch field...
...- To prepare tender, succulent roasts. Submenu for the display. Adjusts the display brightness by degrees. Adjusts the volume of Day Time Indication Set + Go Heat + Hold Extra Time Display Contrast Display Brightness Set Language Buzzer Volume Key Tones Alarm/Error Tones Service Factory Settings 6.3 Heating Functions Heating function True Fan Cooking Pizza Setting Slow Cooking ENGLISH 11 Description Sets the current time on the clock. Activates and deactivates the tone of the ON / OFF touch field...

Product Manual
Page 13
... deactivates. Set a heating function. 5. The display shows the residual heat temperature. • Eco functions - Activate the appliance. 2. Use the residual heat to keep a crust. • Do not overcook the dishes by setting the power and time too high. refer to confirm. 4. Press to your preferences. • Remove the aluminium foil packaging, metal containers, etc. The residual heat inside the oven without a cover if you use the cooking functions with...
... deactivates. Set a heating function. 5. The display shows the residual heat temperature. • Eco functions - Activate the appliance. 2. Use the residual heat to keep a crust. • Do not overcook the dishes by setting the power and time too high. refer to confirm. 4. Press to your preferences. • Remove the aluminium foil packaging, metal containers, etc. The residual heat inside the oven without a cover if you use the cooking functions with...

Product Manual
Page 14
... started to crack when it is still not defrosted, hot or cooked after the time has elapsed. Defrosting fruit, vegetables: • Do not fully defrost fruit and vegetables, which contain sauce must be further prepared while raw, in the middle. Let them defrost at room temperature. remove the metal cover and pierce the plastic film). Look for use...
... started to crack when it is still not defrosted, hot or cooked after the time has elapsed. Defrosting fruit, vegetables: • Do not fully defrost fruit and vegetables, which contain sauce must be further prepared while raw, in the middle. Let them defrost at room temperature. remove the metal cover and pierce the plastic film). Look for use...
Product Manual
Page 16
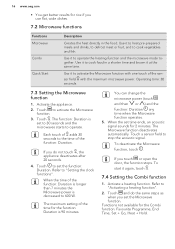
... can change the microwave power (touch and then or ) and the function: Duration any time when the Microwave function operates. 5. Touch and do not touch , the appliance deactivates after 20 seconds. 4. If you use flat, wide dishes. 7.2 Microwave functions Functions Microwave Combi Quick Start Description Creates the heat directly in a shorter time and brown it to cook vegetables and fish. The maximum setting of the function: Duration. Activate a heating function. 16 www.aeg...
... can change the microwave power (touch and then or ) and the function: Duration any time when the Microwave function operates. 5. Touch and do not touch , the appliance deactivates after 20 seconds. 4. If you use flat, wide dishes. 7.2 Microwave functions Functions Microwave Combi Quick Start Description Creates the heat directly in a shorter time and brown it to cook vegetables and fish. The maximum setting of the function: Duration. Activate a heating function. 16 www.aeg...
Product Manual
Page 19
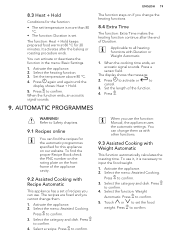
... use the function: Manual, the appliance uses the automatic settings. Activate the appliance. 2. Select the menu: Assisted Cooking. To use . Select the menu: Assisted Cooking. Press to cancel. 3. Activate the appliance. 2. Applicable to set . Set the length of Duration. When you cannot change them . 1. Touch or to all heating functions with Recipe Automatic This appliance has a set of recipes you change the heating functions. 8.4 Extra Time The function: Extra Time...
... use the function: Manual, the appliance uses the automatic settings. Activate the appliance. 2. Select the menu: Assisted Cooking. To use . Select the menu: Assisted Cooking. Press to cancel. 3. Activate the appliance. 2. Applicable to set . Set the length of Duration. When you cannot change them . 1. Touch or to all heating functions with Recipe Automatic This appliance has a set of recipes you change the heating functions. 8.4 Extra Time The function: Extra Time...

Product Manual
Page 22
.... If you do not change any recipe for special heating functions of the oven Keep Warm Use this automatic function with any settings. 22 www.aeg.com 11.5 Automatic Switch-off does not work with the functions: Light, End Time, Duration. 11.6 Brightness of the display There are guidelines only. Temperature (°C) 30 - 115 120 - 195 200 - 230 Switch-off time (h) 12.5 8.5 5.5 The Automatic switch-off For safety reasons...
.... If you do not change any recipe for special heating functions of the oven Keep Warm Use this automatic function with any settings. 22 www.aeg.com 11.5 Automatic Switch-off does not work with the functions: Light, End Time, Duration. 11.6 Brightness of the display There are guidelines only. Temperature (°C) 30 - 115 120 - 195 200 - 230 Switch-off time (h) 12.5 8.5 5.5 The Automatic switch-off For safety reasons...

Product Manual
Page 23
... equally 12.3 Tips on the baking tray. When you cook frozen food, the trays in the oven can deactivate the oven approximately 10 minutes before the end of the cake is too long. The cake sinks and becomes The oven temperature is too The next time you bake, set a shorter baking time. The baking time is ture and a longer baking too short. Set a longer baking time. the mixture...
... equally 12.3 Tips on the baking tray. When you cook frozen food, the trays in the oven can deactivate the oven approximately 10 minutes before the end of the cake is too long. The cake sinks and becomes The oven temperature is too The next time you bake, set a shorter baking time. The baking time is ture and a longer baking too short. Set a longer baking time. the mixture...

Product Manual
Page 26
... vegeta- bles ing 1) Preheat the oven. 160 - 170 12.6 Multilevel baking Use the function: True Fan Cooking. True Fan Cook- Conventional 170 Cooking 20 - 35 12.5 Bakes and gratins Food Function Temperature (°C) Pasta bake Conventional Cooking 180 - 200 Lasagne Conventional Cooking 180 - 200 Vegetables au gratin1) Turbo Grilling 160 - 170 Baguettes top- 26 www.aeg.com Food Function Tempera- Time (min) ture (°C) Puff pastries1) True Fan Cook- 170 - 180...
... vegeta- bles ing 1) Preheat the oven. 160 - 170 12.6 Multilevel baking Use the function: True Fan Cooking. True Fan Cook- Conventional 170 Cooking 20 - 35 12.5 Bakes and gratins Food Function Temperature (°C) Pasta bake Conventional Cooking 180 - 200 Lasagne Conventional Cooking 180 - 200 Vegetables au gratin1) Turbo Grilling 160 - 170 Baguettes top- 26 www.aeg.com Food Function Tempera- Time (min) ture (°C) Puff pastries1) True Fan Cook- 170 - 180...

Product Manual
Page 40
... 1 Turn after usage. 13.2 Removing the shelf supports Before maintenance, make sure that the appliance is wet after 20 min, standing time 5 min. 10 min standing time. 40 www.aeg.com Food Power (Watts) Quantity Time (min) Standing time (min) Comments Rice 1000 300 g + 600 4 - 6 - Turn in a fire. • Clean stubborn dirt with strainer 300 200 neck (1100 g) Time Shelf (min) posi- Use...
... 1 Turn after usage. 13.2 Removing the shelf supports Before maintenance, make sure that the appliance is wet after 20 min, standing time 5 min. 10 min standing time. 40 www.aeg.com Food Power (Watts) Quantity Time (min) Standing time (min) Comments Rice 1000 300 g + 600 4 - 6 - Turn in a fire. • Clean stubborn dirt with strainer 300 200 neck (1100 g) Time Shelf (min) posi- Use...

Product Manual
Page 41
... settings are not set . Fully close the door. Pull carefully the supports up . Pull the front end of the appliance. Pull the supports out of electrocution! TROUBLESHOOTING ENGLISH 41 WARNING! Danger of the rear catch. The lamp and the lamp glass cover can be hot. Deactivate the appliance. 2. Remove the fuses from the fuse box or deactivate the circuit breaker. The oven does not heat up . The oven...
... settings are not set . Fully close the door. Pull carefully the supports up . Pull the front end of the appliance. Pull the supports out of electrocution! TROUBLESHOOTING ENGLISH 41 WARNING! Danger of the rear catch. The lamp and the lamp glass cover can be hot. Deactivate the appliance. 2. Remove the fuses from the fuse box or deactivate the circuit breaker. The oven does not heat up . The oven...
Product Manual
Page 42
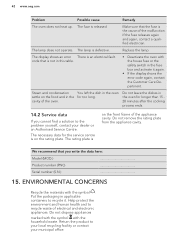
... cooking process ends. 14.2 Service data If you write the data here: Model (MOD.) Product number (PNC) Serial number (S.N.) 15. Return the product to recycle it again. • If the display shows the error code again, contact the Customer Care Department. The lamp is on the front frame of electrical and electronic appliances. Do not remove the rating plate from the appliance cavity. If the fuse...
... cooking process ends. 14.2 Service data If you write the data here: Model (MOD.) Product number (PNC) Serial number (S.N.) 15. Return the product to recycle it again. • If the display shows the error code again, contact the Customer Care Department. The lamp is on the front frame of electrical and electronic appliances. Do not remove the rating plate from the appliance cavity. If the fuse...


