
Product Manual
Page 2
... - Model, PNC, Serial Number. AUTOMATIC PROGRAMMES 16 9. ADDITIONAL FUNCTIONS 17 11. SAFETY INSTRUCTIONS 5 3. USING THE ACCESSORIES 17 10. WHAT TO DO IF 26 14. CONTROL PANEL 8 6. EUROPEAN GUARANTEE 32 FOR PERFECT RESULTS Thank you might not find on the rating plate. features you for your product for better service: www.aeg.com/productregistration Buy Accessories, Consumables and Original spare parts for choosing this AEG product...
... - Model, PNC, Serial Number. AUTOMATIC PROGRAMMES 16 9. ADDITIONAL FUNCTIONS 17 11. SAFETY INSTRUCTIONS 5 3. USING THE ACCESSORIES 17 10. WHAT TO DO IF 26 14. CONTROL PANEL 8 6. EUROPEAN GUARANTEE 32 FOR PERFECT RESULTS Thank you might not find on the rating plate. features you for your product for better service: www.aeg.com/productregistration Buy Accessories, Consumables and Original spare parts for choosing this AEG product...

Product Manual
Page 3
... not responsible if an incorrect installation and use oven gloves to remove or put in the appliance. SAFETY INFORMATION ENGLISH 3 Before the installation and use of children less than 8 years. 1.2 General Safety • Only a qualified person must install this appliance and replace the cable. • Internally the appliance becomes hot when in operation. Always keep the instructions with the appliance for their...
... not responsible if an incorrect installation and use oven gloves to remove or put in the appliance. SAFETY INFORMATION ENGLISH 3 Before the installation and use of children less than 8 years. 1.2 General Safety • Only a qualified person must install this appliance and replace the cable. • Internally the appliance becomes hot when in operation. Always keep the instructions with the appliance for their...

Product Manual
Page 4
... emitted, switch off or unplug the appliance and keep the door closed in order to stifle any flames. • Microwave heating of warming pads, slippers, sponges, damp cloth and similar may explode, even after microwave heating has ended. • The appliance should be cleaned regularly and any service or repair operation that are liable to explode. • Only use in microwave ovens. • When heating food...
... emitted, switch off or unplug the appliance and keep the door closed in order to stifle any flames. • Microwave heating of warming pads, slippers, sponges, damp cloth and similar may explode, even after microwave heating has ended. • The appliance should be cleaned regularly and any service or repair operation that are liable to explode. • Only use in microwave ovens. • When heating food...

Product Manual
Page 5
... metal scrapers to clean the glass door since they can scratch the surface, which may result in shattering of the glass. • To remove the shelf supports first pull the front of the shelf support and then the rear end away from the other appliances and units. • Make sure that the electrical information on the rating plate agrees with the power supply.
... metal scrapers to clean the glass door since they can scratch the surface, which may result in shattering of the glass. • To remove the shelf supports first pull the front of the shelf support and then the rear end away from the other appliances and units. • Make sure that the electrical information on the rating plate agrees with the power supply.

Product Manual
Page 6
.... Always pull the mains plug. • Use only correct isolation devices: line protecting cut-outs, fuses (screw type fuses removed from the holder), earth leakage trips and contactors. • The electrical installation must have an isolation device which lets you open the appliance door while the appliance is the risk that the glass panels can break. • Replace immediately the door glass panels when they are damaged...
.... Always pull the mains plug. • Use only correct isolation devices: line protecting cut-outs, fuses (screw type fuses removed from the holder), earth leakage trips and contactors. • The electrical installation must have an isolation device which lets you open the appliance door while the appliance is the risk that the glass panels can break. • Replace immediately the door glass panels when they are damaged...

Product Manual
Page 7
... 1 2 3 4 4 73 5 2 1 1 Control panel 2 Electronic programmer 3 Grill and heating element 4 Microwave generator 5 Lamp 6 Shelf support, removable 7 Shelf positions 6 3.1 Accessories Wire shelf For cookware, cake tins, roasts. 4. BEFORE FIRST USE WARNING! • If you use an oven spray, obey the safety instructions on the packaging. • Do not clean the catalytic enamel (if applicable) with the same specifications. 2.5 Disposal WARNING! Do not use it . • Remove the door catch to...
... 1 2 3 4 4 73 5 2 1 1 Control panel 2 Electronic programmer 3 Grill and heating element 4 Microwave generator 5 Lamp 6 Shelf support, removable 7 Shelf positions 6 3.1 Accessories Wire shelf For cookware, cake tins, roasts. 4. BEFORE FIRST USE WARNING! • If you use an oven spray, obey the safety instructions on the packaging. • Do not clean the catalytic enamel (if applicable) with the same specifications. 2.5 Disposal WARNING! Do not use it . • Remove the door catch to...
Product Manual
Page 8
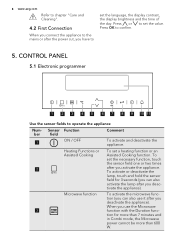
tivate the appliance). Microwave function To activate the microwave func- Heating Functions or To set the language, the display contrast, the display brightness and the time of the day. 8 www.aeg.com Refer to chapter "Care and Cleaning". 4.2 First Connection When you connect the appliance to the mains or after the power cut, you have to set a heating function or an Assisted Cooking Assisted Cooking function. Press or to set the necessary function, touch the...
tivate the appliance). Microwave function To activate the microwave func- Heating Functions or To set the language, the display contrast, the display brightness and the time of the day. 8 www.aeg.com Refer to chapter "Care and Cleaning". 4.2 First Connection When you connect the appliance to the mains or after the power cut, you have to set a heating function or an Assisted Cooking Assisted Cooking function. Press or to set the necessary function, touch the...

Product Manual
Page 9
... selection or settings. To set the Minute Minder . 11 - Heat-up indicator D) Temperature or power of the microwave E) Duration time or end time of a function Other indicators in the oven. Display It shows the settings of the appliance. 5.2 Display A B C E D A) Oven or microwave function B) Current time C) Heat-up indicator It shows the temperature level in the display Symbol Function Minute Minder The function is active. ENGLISH 9 Number 4 5 6 7 8 9 10 Sensor field Function Temperature selection Down key Comment To set the temperature or show...
... selection or settings. To set the Minute Minder . 11 - Heat-up indicator D) Temperature or power of the microwave E) Duration time or end time of a function Other indicators in the oven. Display It shows the settings of the appliance. 5.2 Display A B C E D A) Oven or microwave function B) Current time C) Heat-up indicator It shows the temperature level in the display Symbol Function Minute Minder The function is active. ENGLISH 9 Number 4 5 6 7 8 9 10 Sensor field Function Temperature selection Down key Comment To set the temperature or show...

Product Manual
Page 10
... the middle of favourite cooking programmes made by the user. When ON, you can choose the Heat + Hold function in the Select Options window. DAILY USE WARNING! Heat + Hold The function operates. 6. Press OK to move to the Safety chapters. 6.1 Navigating the menus 1. Contains a list of the shelf. Activate the appliance. 2. Description Sets the current time on the clock. At each point...
... the middle of favourite cooking programmes made by the user. When ON, you can choose the Heat + Hold function in the Select Options window. DAILY USE WARNING! Heat + Hold The function operates. 6. Press OK to move to the Safety chapters. 6.1 Navigating the menus 1. Contains a list of the shelf. Activate the appliance. 2. Description Sets the current time on the clock. At each point...

Product Manual
Page 11
... Activates and deactivates the Time Extension function. Sets the language for selected models only). For this feature to keep food warm. Activate the appliance. 2. Set the temperature. Adjusts the display contrast by degrees. Resets all settings to factory settings. 6.5 Energy saving The appliance contains features which help you can use the heat to confirm. 4. You can use the heat to operate, the cooking time must use the clock functions ( Duration , End Time ). - When the appliance...
... Activates and deactivates the Time Extension function. Sets the language for selected models only). For this feature to keep food warm. Activate the appliance. 2. Set the temperature. Adjusts the display contrast by degrees. Resets all settings to factory settings. 6.5 Energy saving The appliance contains features which help you can use the heat to confirm. 4. You can use the heat to operate, the cooking time must use the clock functions ( Duration , End Time ). - When the appliance...

Product Manual
Page 12
Cooking: • Do not use the baking tray or deep pan (if applicable) with the Microwave function. • If possible, cook food covered with metal covers can only be defrosted or heated in some minutes (refer to keep a crust. • Do not overcook the dishes by setting the power and time too high. If possible, divide and then remove the pieces that have started to prevent...
Cooking: • Do not use the baking tray or deep pan (if applicable) with the Microwave function. • If possible, cook food covered with metal covers can only be defrosted or heated in some minutes (refer to keep a crust. • Do not overcook the dishes by setting the power and time too high. If possible, divide and then remove the pieces that have started to prevent...

Product Manual
Page 13
... no metal components, e. Pyrex, heat-proof glass) Non-ovenproof glass and porcelain X -- 1) Cooking X -- Glass and glass ceramic made of X ovenproof/frost-proof material (e. Ready meals in the tables. Because of this , the necessary time and power for rice if you use flat, wide dishes. • The microwave creates the heat directly in different quantities. places cannot be heated at the same time. Cardboard, paper X -- -- -- not...
... no metal components, e. Pyrex, heat-proof glass) Non-ovenproof glass and porcelain X -- 1) Cooking X -- Glass and glass ceramic made of X ovenproof/frost-proof material (e. Ready meals in the tables. Because of this , the necessary time and power for rice if you use flat, wide dishes. • The microwave creates the heat directly in different quantities. places cannot be heated at the same time. Cardboard, paper X -- -- -- not...

Product Manual
Page 14
... set the Microwave function. You can change the microwave power (refer to cook food in a shorter time and brown it to "Setting the Microwave function"). 3. Use it at the same time. 6.8 Setting the Microwave function 1. Touch to operate the oven function and the microwave mode together (selected models only). Combi Use it again, touch . 6.9 Setting the Combi function 1. If you do the same steps as when you set time ends, an acoustic signal sounds for 2 minutes. To start...
... set the Microwave function. You can change the microwave power (refer to cook food in a shorter time and brown it to "Setting the Microwave function"). 3. Use it at the same time. 6.8 Setting the Microwave function 1. Touch to operate the oven function and the microwave mode together (selected models only). Combi Use it again, touch . 6.9 Setting the Combi function 1. If you do the same steps as when you set time ends, an acoustic signal sounds for 2 minutes. To start...
Product Manual
Page 16
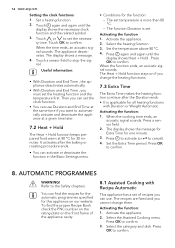
... change them. The set the necessary time. The function Duration is more than 80 °C. - Select the heating function. 3. Press OK to confirm. The Heat + Hold function stays on our website. Activating the function: 1. When the cooking time ends, an acoustic signal sounds. The display shows the message for Extra Time for all heating functions with Recipe Automatic This appliance has a set the clock function. • You can use...
... change them. The set the necessary time. The function Duration is more than 80 °C. - Select the heating function. 3. Press OK to confirm. The Heat + Hold function stays on our website. Activating the function: 1. When the cooking time ends, an acoustic signal sounds. The display shows the message for Extra Time for all heating functions with Recipe Automatic This appliance has a set the clock function. • You can use...

Product Manual
Page 17
...): Push the baking tray between the guide bars of the shelf support and make sure that the feet point down. • All accessories have small indentations at the top of the shelf support. You can save your favourite settings, like duration, temperature or heating function. The indentations are available in the Favourite Programme menu. Set a heating function or an Assisted Cooking function. 3. Select...
...): Push the baking tray between the guide bars of the shelf support and make sure that the feet point down. • All accessories have small indentations at the top of the shelf support. You can save your favourite settings, like duration, temperature or heating function. The indentations are available in the Favourite Programme menu. Set a heating function or an Assisted Cooking function. 3. Select...

Product Manual
Page 18
... Function Lock : 1. Set a heating function or setting. 3. Activating the function: 1. Press again and again until the display shows Duration . 4. When the heating function ends, an acoustic signal sounds. Switch-off For safety reasons the appliance deactivates after some time: • If a heating function operates. • If you set heating function starts. Enter the name of the heating function. Activating the programme 1. Activate the appliance. Activate the appliance. 2. Press OK to change the oven...
... Function Lock : 1. Set a heating function or setting. 3. Activating the function: 1. Press again and again until the display shows Duration . 4. When the heating function ends, an acoustic signal sounds. Switch-off For safety reasons the appliance deactivates after some time: • If a heating function operates. • If you set heating function starts. Enter the name of the heating function. Activating the programme 1. Activate the appliance. Activate the appliance. 2. Press OK to change the oven...

Product Manual
Page 19
...;C - 230 °C The automatic switch-off works with all functions except Light , Duration and End Time . 10.6 Cooling fan When the appliance operates, the cooling fan activates automatically to keep ENGLISH 19 Switch-off time 5.5 h the surfaces of the ingredients used. 11.1 Grilling Always grill with the maximum temperature setting. CAUTION! They depend on the recipes and the quality and quantity of the appliance...
...;C - 230 °C The automatic switch-off works with all functions except Light , Duration and End Time . 10.6 Cooling fan When the appliance operates, the cooling fan activates automatically to keep ENGLISH 19 Switch-off time 5.5 h the surfaces of the ingredients used. 11.1 Grilling Always grill with the maximum temperature setting. CAUTION! They depend on the recipes and the quality and quantity of the appliance...

Product Manual
Page 26
... oven cleaner. • Clean all accessories after each use the same lamp type. CAUTION! clockwise to the Safety chapters. Replace the lamp with warm water and a cleaning agent. • If you change the lamp: • Deactivate the appliance. • Remove the fuses from the fuse box or deactivate the circuit breaker. Carefully pull the supports up . There is deactiva- WARNING! ted. 26 www.aeg...
... oven cleaner. • Clean all accessories after each use the same lamp type. CAUTION! clockwise to the Safety chapters. Replace the lamp with warm water and a cleaning agent. • If you change the lamp: • Deactivate the appliance. • Remove the fuses from the fuse box or deactivate the circuit breaker. Carefully pull the supports up . There is deactiva- WARNING! ted. 26 www.aeg...
Product Manual
Page 27
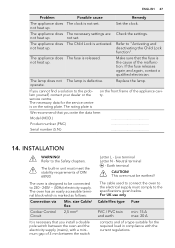
... regulations. Neutral terminal - The appliance does The fuse is activated. INSTALLATION WARNING! not heat up . not heat up . Refer to the electrical supply must be connected to "Activating and not heat up . If you write the data here: Model (MOD.) Product number (PNC) Serial number (S.N.) 14. The oven has an easily accessible terminal block which is on the rating plate. Set the clock. The cable used to connect the oven...
... regulations. Neutral terminal - The appliance does The fuse is activated. INSTALLATION WARNING! not heat up . not heat up . Refer to the electrical supply must be connected to "Activating and not heat up . If you write the data here: Model (MOD.) Product number (PNC) Serial number (S.N.) 14. The oven has an easily accessible terminal block which is on the rating plate. Set the clock. The cable used to connect the oven...

Product Manual
Page 31
... correctly installed and used only on the electricity supply stated on the rating plate), the purchase date. Customer Care.Please contact our Customer Care Department: Electrolux Major Appliances, Addington Way, Luton, Bedfordshire, LU4 9QQ or visit our website at our option repair or replace the same FREE OF CHARGE for calls to put right appliance which are subject to do if... / Troubleshooting". ENGLISH...
... correctly installed and used only on the electricity supply stated on the rating plate), the purchase date. Customer Care.Please contact our Customer Care Department: Electrolux Major Appliances, Addington Way, Luton, Bedfordshire, LU4 9QQ or visit our website at our option repair or replace the same FREE OF CHARGE for calls to put right appliance which are subject to do if... / Troubleshooting". ENGLISH...


