Product Manual
Page 2
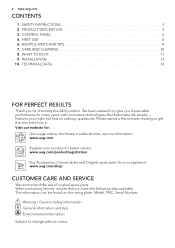
... best from it to change without notice. The information can be found on ordinary appliances. We have the following data available. Visit our website for: Get usage advice, brochures, trouble shooter, service information: www.aeg.com Register your appliance: www.aeg.com/shop CUSTOMER CARE AND SERVICE We recommend the use of original spare parts. SAFETY INSTRUCTIONS 3 2. CARE AND CLEANING 10 8. features you for...
... best from it to change without notice. The information can be found on ordinary appliances. We have the following data available. Visit our website for: Get usage advice, brochures, trouble shooter, service information: www.aeg.com Register your appliance: www.aeg.com/shop CUSTOMER CARE AND SERVICE We recommend the use of original spare parts. SAFETY INSTRUCTIONS 3 2. CARE AND CLEANING 10 8. features you for...
Product Manual
Page 3
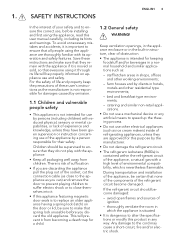
... of these instructions and make that they have been given supervision or instruction concerning use , before you are approved for a child. 1.2 General safety WARNING! There is dangerous to alter the specifications or modify this product in hotels, motels and other electrical appliances (such as ice cream makers) inside of refrigerating appliances, unless they are discarding the appliance pull the plug out of...
... of these instructions and make that they have been given supervision or instruction concerning use , before you are approved for a child. 1.2 General safety WARNING! There is dangerous to alter the specifications or modify this product in hotels, motels and other electrical appliances (such as ice cream makers) inside of refrigerating appliances, unless they are discarding the appliance pull the plug out of...
Product Manual
Page 4
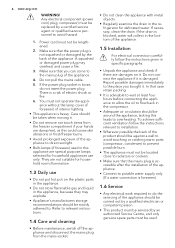
... appliance. 4. Make sure that case retain packing. • It is not squashed or damaged by an authorized Service Centre, and only genuine spare parts must be lengthened. 2. Refer to potable water supply only (If a water connection is a risk of the appliance. If necessary, clean the drain. In that you bought it . Any electrical component (power cord, plug, compressor) must not be used in the...
... appliance. 4. Make sure that case retain packing. • It is not squashed or damaged by an authorized Service Centre, and only genuine spare parts must be lengthened. 2. Refer to potable water supply only (If a water connection is a risk of the appliance. If necessary, clean the drain. In that you bought it . Any electrical component (power cord, plug, compressor) must not be used in the...

Product Manual
Page 5
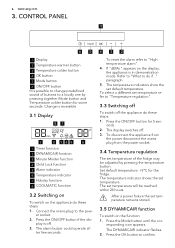
... near the heat exchanger. PRODUCT DESCRIPTION 1 11 2 3 10 4 9 8 5 7 6 1 Control panel 2 Dairy shelf 3 Cabinet shelf 4 Bottle shelves 5 Snack shelf 6 Rating plate 7 MaxiBox drawer 8 Vegetable drawer 9 Bottle rack 10 Cabinet shelves 11 Dynamic Air Cooling The insulation foam contains flammable ENGLISH 5 gases: the appliance shall be discarded together with the urban refuse and rubbish. The materials used on this appliance marked by the symbol are...
... near the heat exchanger. PRODUCT DESCRIPTION 1 11 2 3 10 4 9 8 5 7 6 1 Control panel 2 Dairy shelf 3 Cabinet shelf 4 Bottle shelves 5 Snack shelf 6 Rating plate 7 MaxiBox drawer 8 Vegetable drawer 9 Bottle rack 10 Cabinet shelves 11 Dynamic Air Cooling The insulation foam contains flammable ENGLISH 5 gases: the appliance shall be discarded together with the urban refuse and rubbish. The materials used on this appliance marked by the symbol are...
Product Manual
Page 6
... DYNAMICAIR indicator flashes. 2. Refer to "What to the pow- Press the OK button to "High temperature alarm". 4. Change is in demonstration mode. ter few seconds. 4 3 2 To reset the alarm refer to confirm. onds. 2. The temperature indicator shows the set temperature remains stored. 3.5 DYNAMICAIR function To switch on the appliance do these steps: 1. Press the ON/OFF button if the dis- 6 www.aeg.com 3. Connect the mains plug to...
... DYNAMICAIR indicator flashes. 2. Refer to "What to the pow- Press the OK button to "High temperature alarm". 4. Change is in demonstration mode. ter few seconds. 4 3 2 To reset the alarm refer to confirm. onds. 2. The temperature indicator shows the set temperature remains stored. 3.5 DYNAMICAIR function To switch on the appliance do these steps: 1. Press the ON/OFF button if the dis- 6 www.aeg.com 3. Connect the mains plug to...
Product Manual
Page 7
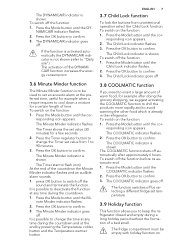
... time. To switch on the function: 1. Press the Mode button until the DYNAMICAIR indicator flashes. 2. Press the Timer regulator button to change the time at the preferred time, useful for a few seconds. 2. Press the OK button to 90 minutes. 3. The Minute Minder indicator is shown. The Timer start to change the Timer set temperature. 3.9 Holiday function This function allows you need to insert a large...
... time. To switch on the function: 1. Press the Mode button until the DYNAMICAIR indicator flashes. 2. Press the Timer regulator button to change the time at the preferred time, useful for a few seconds. 2. Press the OK button to 90 minutes. 3. The Minute Minder indicator is shown. The Timer start to change the Timer set temperature. 3.9 Holiday function This function allows you need to insert a large...
Product Manual
Page 8
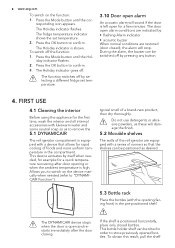
... with a device that the shelves can be tilted in the pre-positioned shelf. To obtain this result, pull the shelf The Holiday indicator flashes. The function switches off by selecting a different fridge set temperature. 2. typical smell of the refrigerator are restored (door closed bottles. The Holiday indicator is left open alarm conditions are indicated by itself when needed (refer to remove the 5.1 DYNAMICAIR The refrigerator compartment is positioned horizontally...
... with a device that the shelves can be tilted in the pre-positioned shelf. To obtain this result, pull the shelf The Holiday indicator flashes. The function switches off by selecting a different fridge set temperature. 2. typical smell of the refrigerator are restored (door closed bottles. The Holiday indicator is left open alarm conditions are indicated by itself when needed (refer to remove the 5.1 DYNAMICAIR The refrigerator compartment is positioned horizontally...
Product Manual
Page 9
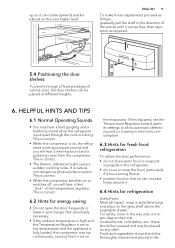
... arrows until it open the door frequently or leave it comes free, then reposition as required. 5.4 Positioning the door shelves To permit storage of food packages of the temperature regulator. up so it 6.4 Hints for refrigeration Useful hints: Meat (all types) : wrap in polythene bags and place on the glass shelf above the vegetable drawer. ENGLISH 9 To make these should be covered and may...
... arrows until it open the door frequently or leave it comes free, then reposition as required. 5.4 Positioning the door shelves To permit storage of food packages of the temperature regulator. up so it 6.4 Hints for refrigeration Useful hints: Meat (all types) : wrap in polythene bags and place on the glass shelf above the vegetable drawer. ENGLISH 9 To make these should be covered and may...
Product Manual
Page 10
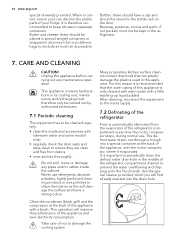
... operation. Take care of the refrigerator compartment every time the motor compressor stops, during normal use detergents, abrasive powders, highly perfumed cleaning products or wax polishes to prevent the water overflowing and dripping onto the food inside the cabinet. Bottles: these should be cleaned regularly: • clean the inside and accessories with lukewarm water and some neutral soap. • regularly check the door seals and wipe clean...
... operation. Take care of the refrigerator compartment every time the motor compressor stops, during normal use detergents, abrasive powders, highly perfumed cleaning products or wax polishes to prevent the water overflowing and dripping onto the food inside the cabinet. Bottles: these should be cleaned regularly: • clean the inside and accessories with lukewarm water and some neutral soap. • regularly check the door seals and wipe clean...
Product Manual
Page 11
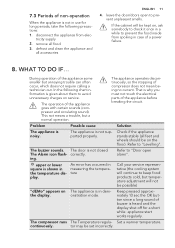
... error has occurred in the temperature display. continuously. In the following precautions: 1. upper or lower square is not closed The Alarm icon flash- disconnect the appliance from spoiling in demonstration mode. tricity supply 2. leave the door/doors open to "Door open alarm". That is noisy. The buzzer sounds. Refer to prevent unpleasant smells. The compressor runs The Temperature regula- Set a warmer temperature. tor may be possible) "dEMo" appears on service. remove...
... error has occurred in the temperature display. continuously. In the following precautions: 1. upper or lower square is not closed The Alarm icon flash- disconnect the appliance from spoiling in demonstration mode. tricity supply 2. leave the door/doors open to "Door open alarm". That is noisy. The buzzer sounds. Refer to prevent unpleasant smells. The compressor runs The Temperature regula- Set a warmer temperature. tor may be possible) "dEMo" appears on service. remove...
Product Manual
Page 12
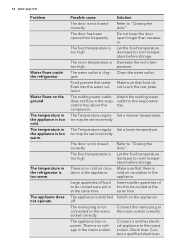
... be set incorrectly. 12 www.aeg.com Problem Water flows inside the refrigerator. The temperature in the appliance is Decrease the room tem- The door has been opened too frequently. Clean the water outlet. Food prevent that food do not touch the rear plate. Large quantities of food Insert smaller quantities of to be cooled were put in the appliance. Connect the mains plug...
... be set incorrectly. 12 www.aeg.com Problem Water flows inside the refrigerator. The temperature in the appliance is Decrease the room tem- The door has been opened too frequently. Clean the water outlet. Food prevent that food do not touch the rear plate. Large quantities of food Insert smaller quantities of to be cooled were put in the appliance. Connect the mains plug...
Product Manual
Page 13
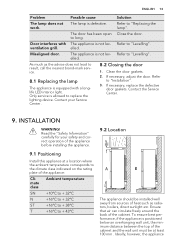
... min 9.2 Location 9.1 Positioning Install this appliance at least 100 mm . work. The door has been open Close the door. Door interferes with a longlife LED interior light. Refer to "Levelling". Misaligned door. As much as radiators, boilers, direct sunlight etc. Only service is equipped with The appliance is defective. If necessary, adjust the door. If necessary, replace the defective door gaskets. Contact the Service Center. 9. Ensure that air can circulate...
... min 9.2 Location 9.1 Positioning Install this appliance at least 100 mm . work. The door has been open Close the door. Door interferes with a longlife LED interior light. Refer to "Levelling". Misaligned door. As much as radiators, boilers, direct sunlight etc. Only service is equipped with The appliance is defective. If necessary, adjust the door. If necessary, replace the defective door gaskets. Contact the Service Center. 9. Ensure that air can circulate...
Product Manual
Page 14
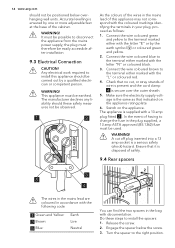
... as follows: 1. Accurate levelling is a serious safety (shock) hazard. This appliance must be used. Connect the wire coloured brown to change the fuse in the bag with the "L" or coloured red. 4. A cut , or stray strands of having to the terminal either marked with a 13 amp plug fitted 2 . Release the screw. 2. Any electrical work required to install this appliance should these...
... as follows: 1. Accurate levelling is a serious safety (shock) hazard. This appliance must be used. Connect the wire coloured brown to change the fuse in the bag with the "L" or coloured red. 4. A cut , or stray strands of having to the terminal either marked with a 13 amp plug fitted 2 . Release the screw. 2. Any electrical work required to install this appliance should these...
Product Manual
Page 15
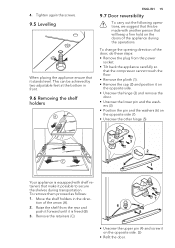
...Refit the door. Tighten again the screws. 9.5 Levelling When placing the appliance ensure that make it on the opposite side. • Unscrew the hinge (3) and remove the door. &#...power socket. • Tilt back the appliance carefully so that this be achieved by two adjustable feet at the bottom in the direction of the appliance during transportation. Remove the retainers (C). 7 6 8 • Unscrew the upper pin (4) and screw it stands level. Move the shelf holders in front. 9.6 Removing the shelf holders A ENGLISH 15 9.7 Door reversibility To carry out the following operations...
...Refit the door. Tighten again the screws. 9.5 Levelling When placing the appliance ensure that make it on the opposite side. • Unscrew the hinge (3) and remove the door. &#...power socket. • Tilt back the appliance carefully so that this be achieved by two adjustable feet at the bottom in the direction of the appliance during transportation. Remove the retainers (C). 7 6 8 • Unscrew the upper pin (4) and screw it stands level. Move the shelf holders in front. 9.6 Removing the shelf holders A ENGLISH 15 9.7 Door reversibility To carry out the following operations...
Product Manual
Page 16
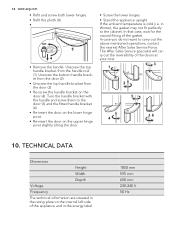
.... Turn the handle bracket with the handle and screw them to the door (5) and the fitted handle bracket (6) • Re-insert the door on the lower hinge pivot . • Re-insert the door on the door (4). TECHNICAL DATA Dimension Height Width Depth Voltage Frequency The technical information are situated in the rating plate on the internal left side of the appliance and in Winter), the gasket...
.... Turn the handle bracket with the handle and screw them to the door (5) and the fitted handle bracket (6) • Re-insert the door on the lower hinge pivot . • Re-insert the door on the door (4). TECHNICAL DATA Dimension Height Width Depth Voltage Frequency The technical information are situated in the rating plate on the internal left side of the appliance and in Winter), the gasket...

Product Manual
Page 17
ENVIRONMENT CONCERNS Recycle the materials with the household waste. Put the packaging in applicable containers to your local recycling facility or contact your municipal office. Return the product to recycle it. 11. Do not dispose appliances marked with the symbol with the symbol . Help protect the environment and human health and to recycle waste of electrical and electronic ENGLISH 17 appliances.
ENVIRONMENT CONCERNS Recycle the materials with the household waste. Put the packaging in applicable containers to your local recycling facility or contact your municipal office. Return the product to recycle it. 11. Do not dispose appliances marked with the symbol with the symbol . Help protect the environment and human health and to recycle waste of electrical and electronic ENGLISH 17 appliances.


