Specification Sheet
Page 1
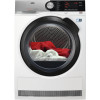
... the temperature of the drying cycle. BESPOKE PROTECTION FOR YOUR CLOTHES The programmes in energy used. •Heat pump condenser dryer •ProTex soft drum •Delay start option •Sensor dryer •Time controlled drying •Bed linen programme •Cotton programmes •Synthetics programmes •Easy iron programme •Wool care programme •Sports programme •Reverse tumble action •Child safety •Optional stacking kit available Technical Specs : • Energy...
... the temperature of the drying cycle. BESPOKE PROTECTION FOR YOUR CLOTHES The programmes in energy used. •Heat pump condenser dryer •ProTex soft drum •Delay start option •Sensor dryer •Time controlled drying •Bed linen programme •Cotton programmes •Synthetics programmes •Easy iron programme •Wool care programme •Sports programme •Reverse tumble action •Child safety •Optional stacking kit available Technical Specs : • Energy...
User Manual
Page 2
SAFETY INSTRUCTIONS 5 3. PRODUCT DESCRIPTION 7 4. BEFORE FIRST USE 13 8. CARE AND CLEANING 16 11. We have the following data available: Model, PNC, Serial Number. Please spend a few minutes reading to get the very best from it to change without notice. 1. When contacting our Authorised Service Centre, ensure that help make life simpler features you might not find on the rating plate. SAFETY...
SAFETY INSTRUCTIONS 5 3. PRODUCT DESCRIPTION 7 4. BEFORE FIRST USE 13 8. CARE AND CLEANING 16 11. We have the following data available: Model, PNC, Serial Number. Please spend a few minutes reading to get the very best from it to change without notice. 1. When contacting our Authorised Service Centre, ensure that help make life simpler features you might not find on the rating plate. SAFETY...
User Manual
Page 3
... knowledge if they have been given supervision or instruction concerning the use the stacking kit. ENGLISH 3 manufacturer is in operation at all times. • Keep all packaging away from children and dispose of incorrect installation or usage. Always keep the instructions in the instructions, supplied with the appliance specified in a safe and accessible location for any injuries or damages that are...
... knowledge if they have been given supervision or instruction concerning the use the stacking kit. ENGLISH 3 manufacturer is in operation at all times. • Keep all packaging away from children and dispose of incorrect installation or usage. Always keep the instructions in the instructions, supplied with the appliance specified in a safe and accessible location for any injuries or damages that are...
User Manual
Page 4
... as timer, or connected to avoid an electrical hazard. • Do not exceed the maximum load of the installation process. Make sure that the mains plug is accessible after each use. • Do not dry unwashed items in the located room to avoid the backflow of unwanted gases into the room from appliances burning gas or other fuels, including open fires. • Exhaust air...
... as timer, or connected to avoid an electrical hazard. • Do not exceed the maximum load of the installation process. Make sure that the mains plug is accessible after each use. • Do not dry unwashed items in the located room to avoid the backflow of unwanted gases into the room from appliances burning gas or other fuels, including open fires. • Exhaust air...

User Manual
Page 5
..., adjust the feet accordingly. 2.2 Electrical connection WARNING! Risk of the drying cycle unless all the packaging. • Do not install or use a damaged appliance. • Follow the installation instruction supplied with the appliance. • Always take care when moving the appliance as lighters or matches. • Never stop a tumble dryer before being moved. • The rear surface of the appliance must...
..., adjust the feet accordingly. 2.2 Electrical connection WARNING! Risk of the drying cycle unless all the packaging. • Do not install or use a damaged appliance. • Follow the installation instruction supplied with the appliance. • Always take care when moving the appliance as lighters or matches. • Never stop a tumble dryer before being moved. • The rear surface of the appliance must...

User Manual
Page 6
... the instructions on the rating plate are applicable to the appliance. • Do not use neutral detergents. Do not use multi-plug adapters and extension cables. • Do not pull the mains cable to the cooling system be reused for other lighting purposes. • To replace the internal light, contact the Authorised Service Centre. 2.5 Care and cleaning WARNING! Risk of injury, electrical shock...
... the instructions on the rating plate are applicable to the appliance. • Do not use neutral detergents. Do not use multi-plug adapters and extension cables. • Do not pull the mains cable to the cooling system be reused for other lighting purposes. • To replace the internal light, contact the Authorised Service Centre. 2.5 Care and cleaning WARNING! Risk of injury, electrical shock...
User Manual
Page 7
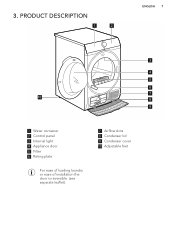
3. PRODUCT DESCRIPTION 1 2 ENGLISH 7 3 4 5 6 7 10 8 9 1 Water container 2 Control panel 3 Internal light 4 Appliance door 5 Filter 6 Rating plate For ease of loading laundry or ease of installation the door is reversible. (see separate leaflet). 7 Airflow slots 8 Condenser lid 9 Condenser cover 10 Adjustable feet
3. PRODUCT DESCRIPTION 1 2 ENGLISH 7 3 4 5 6 7 10 8 9 1 Water container 2 Control panel 3 Internal light 4 Appliance door 5 Filter 6 Rating plate For ease of loading laundry or ease of installation the door is reversible. (see separate leaflet). 7 Airflow slots 8 Condenser lid 9 Condenser cover 10 Adjustable feet
User Manual
Page 9
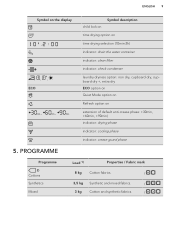
... the display - ,, , ECO , , child lock on Symbol description time drying option on time drying selection (10min-2h) indicator: drain the water container indicator: clean filter indicator: check condenser laundry dryness option: iron dry, cupboard dry, cupboard dry +, extra dry ECO option on Quiet Mode option on Refresh option on extension of default anti-crease phase: +30min, +60min, +90min) indicator: drying phase indicator: cooling phase indicator: crease...
... the display - ,, , ECO , , child lock on Symbol description time drying option on time drying selection (10min-2h) indicator: drain the water container indicator: clean filter indicator: check condenser laundry dryness option: iron dry, cupboard dry, cupboard dry +, extra dry ECO option on Quiet Mode option on Refresh option on extension of default anti-crease phase: +30min, +60min, +90min) indicator: drying phase indicator: cooling phase indicator: crease...
User Manual
Page 10
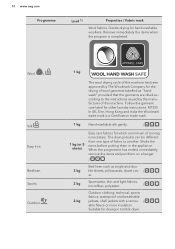
... wool drying cycle of wool garments labelled as single and double sheets, pillowcases, duvet cov- / er. 2 kg Sportswear, thin and light fabrics, microfiber, polyester. / 2 kg Outdoor clothing, technical, sports fabrics, waterproof and breathable jackets, shell jackets with a remov- / able fleece or inner insulation. When the programme has ended, immediately remove the items and put them in tumble dryer. Follow...
... wool drying cycle of wool garments labelled as single and double sheets, pillowcases, duvet cov- / er. 2 kg Sportswear, thin and light fabrics, microfiber, polyester. / 2 kg Outdoor clothing, technical, sports fabrics, waterproof and breathable jackets, shell jackets with a remov- / able fleece or inner insulation. When the programme has ended, immediately remove the items and put them in tumble dryer. Follow...

User Manual
Page 12
... - level. - The appliance operates slowly with longer cycle time. 6.3 ECO This option is on by default with low noise without effect on the drying quality. After drying phase drum rotates time to time what prevents the clothes from minimum of 30 minutes to maximum of 2 hours (in storage. Maximal load cannot exceed 1 kg. 6.6 Time Drying For cottons, synthetics and mixed. if the program...
... - level. - The appliance operates slowly with longer cycle time. 6.3 ECO This option is on by default with low noise without effect on the drying quality. After drying phase drum rotates time to time what prevents the clothes from minimum of 30 minutes to maximum of 2 hours (in storage. Maximal load cannot exceed 1 kg. 6.6 Time Drying For cottons, synthetics and mixed. if the program...

User Manual
Page 13
... drying. Rear drum packaging is removed automatically when dryer is suitable for tumble drying. 3. Fabric label Description Laundry is activated for the first time: • Clean the tumble dryer drum with a moist cloth. • Start a short programme (e.g. 30 minutes) with light colours. Before you set a correct programme suitable for tumble drying. DAILY USE 8.1 Preparing the laundry • Close the zippers. • Close the fasteners of the drying cycle...
... drying. Rear drum packaging is removed automatically when dryer is suitable for tumble drying. 3. Fabric label Description Laundry is activated for the first time: • Clean the tumble dryer drum with a moist cloth. • Start a short programme (e.g. 30 minutes) with light colours. Before you set a correct programme suitable for tumble drying. DAILY USE 8.1 Preparing the laundry • Close the zippers. • Close the fasteners of the drying cycle...
User Manual
Page 14
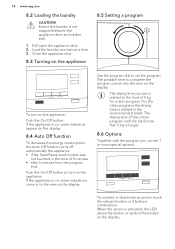
... the relevant button or 2 buttons combination. The drying time you can set the program. For the other programs the drying time is related to complete the program comes into the view on , some indicators appear on the display. 8.4 Auto Off function To decrease the energy consumption, the Auto Off function turns off automatically the appliance: • if the Start/Pause touch button was...
... the relevant button or 2 buttons combination. The drying time you can set the program. For the other programs the drying time is related to complete the program comes into the view on , some indicators appear on the display. 8.4 Auto Off function To decrease the energy consumption, the Auto Off function turns off automatically the appliance: • if the Start/Pause touch button was...
User Manual
Page 15
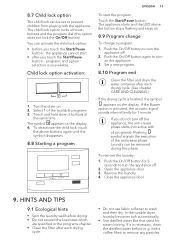
... Start/Pause button - Close the appliance door. 9. 8.7 Child lock option The child lock can be removed during this option does not lock the On/Off button). Set a new program. 8.10 Program end Clean the filter and drain the water container after each drying cycle. (See chapter CARE AND CLEANING.) If the drying cycle is activated, the acoustic signal sounds intermittently for steam ironing. The symbol appears on . 2. You can be set to turn...
... Start/Pause button - Close the appliance door. 9. 8.7 Child lock option The child lock can be removed during this option does not lock the On/Off button). Set a new program. 8.10 Program end Clean the filter and drain the water container after each drying cycle. (See chapter CARE AND CLEANING.) If the drying cycle is activated, the acoustic signal sounds intermittently for steam ironing. The symbol appears on . 2. You can be set to turn...
User Manual
Page 16
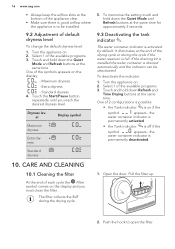
... drying cycle. 5. To memorise the setting touch and hold down Refresh and Time Drying buttons at the end of default dryness level To change the default dryness level: 1. Select 1 of the available programs. 3. Push the hook to be deactivated. Extra dryness - One of each cycle the Filter symbol comes on the display and you reach the desired dryness level. 16 www.aeg...
... drying cycle. 5. To memorise the setting touch and hold down Refresh and Time Drying buttons at the end of default dryness level To change the default dryness level: 1. Select 1 of the available programs. 3. Push the hook to be deactivated. Extra dryness - One of each cycle the Filter symbol comes on the display and you reach the desired dryness level. 16 www.aeg...
User Manual
Page 17
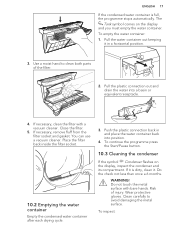
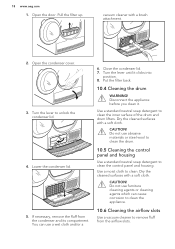
.... Clean carefully to clean both parts of injury. If necessary, remove fluff from the filter socket and gasket. To continue the programme press the Start/Pause button. 10.3 Cleaning the condenser If the symbol Condenser flashes on the display and you must empty the water container. WARNING! Wear protective gloves. To empty the water container: 1. Pull the plastic connection out and drain the water...
.... Clean carefully to clean both parts of injury. If necessary, remove fluff from the filter socket and gasket. To continue the programme press the Start/Pause button. 10.3 Cleaning the condenser If the symbol Condenser flashes on the display and you must empty the water container. WARNING! Wear protective gloves. To empty the water container: 1. Pull the plastic connection out and drain the water...
User Manual
Page 18
... cloth. Do not use furniture cleaning agents or cleaning agents which can use abrasive materials or steel wool to clean the drum. 10.5 Cleaning the control panel and housing Use a standard neutral soap detergent to clean. You can cause corrosion to clean the appliance. 10.6 Cleaning the airflow slots Use a vacuum cleaner to remove fluff from the condenser and its compartment. Open the door. Open the condenser cover. 3. If necessary, remove...
... cloth. Do not use furniture cleaning agents or cleaning agents which can use abrasive materials or steel wool to clean the drum. 10.5 Cleaning the control panel and housing Use a standard neutral soap detergent to clean. You can cause corrosion to clean the appliance. 10.6 Cleaning the airflow slots Use a vacuum cleaner to remove fluff from the condenser and its compartment. Open the door. Open the condenser cover. 3. If necessary, remove...

User Manual
Page 19
... connected Connect to higher level. Change the program or option as required. No drum light Defective drum lamp. 11. TROUBLESHOOTING ENGLISH 19 Problem 1) Possible cause Remedy The tumble dryer is clogged. to replace the drum lamp. The tumble dryer does not operate. The On/Off button was too large. Push the On/Off button. The Start/Pause button was set to Turn the tumble dryer off and on. Touch the Start/Pause button...
... connected Connect to higher level. Change the program or option as required. No drum light Defective drum lamp. 11. TROUBLESHOOTING ENGLISH 19 Problem 1) Possible cause Remedy The tumble dryer is clogged. to replace the drum lamp. The tumble dryer does not operate. The On/Off button was too large. Push the On/Off button. The Start/Pause button was set to Turn the tumble dryer off and on. Touch the Start/Pause button...

User Manual
Page 20
...- the display. Drain the water container, push the Start/Pause button. 3) Load size is calculated ration time on . Do not exceed the maximum load size. The drying duration is small. To dry 1 item or a small amount of 5 hours the drying cycle ends automatically. 12. TECHNICAL DATA Height x Width x Depth Max. ness. the appliance is too dry. The laundry is working correctly. Drying cycle too long 6) The laundry was...
...- the display. Drain the water container, push the Start/Pause button. 3) Load size is calculated ration time on . Do not exceed the maximum load size. The drying duration is small. To dry 1 item or a small amount of 5 hours the drying cycle ends automatically. 12. TECHNICAL DATA Height x Width x Depth Max. ness. the appliance is too dry. The laundry is working correctly. Drying cycle too long 6) The laundry was...

User Manual
Page 21
...Gas designation R134a Weight 0,300 kg Global-warming potential (GWP) 1430 1) With reference to EN 61121. 8kg of cotton centrifuged at 1000 rpm. 2) Energy consumption per cycle will depend on 160 drying cycles of the standard cotton program at full and partial load, and the consumption of the low-power modes. Actual energy... consumption per year in kWh, based on how the appliance is used (REGULATION ...
...Gas designation R134a Weight 0,300 kg Global-warming potential (GWP) 1430 1) With reference to EN 61121. 8kg of cotton centrifuged at 1000 rpm. 2) Energy consumption per cycle will depend on 160 drying cycles of the standard cotton program at full and partial load, and the consumption of the low-power modes. Actual energy... consumption per year in kWh, based on how the appliance is used (REGULATION ...
User Manual
Page 22
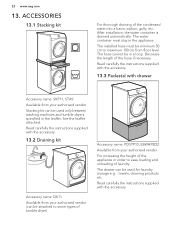
... storage e.g. : towels, cleaning products etc. The water container must be minimum 50 cm to maximum 100 cm from your authorised vendor. Read carefully the instructions supplied with the accessory. 13.3 Pedestal with the accessory. 22 www.aeg.com 13. Stacking kit can be in order to some types of tumble dryer) Accessory name: PDSTP10, E6WHPED2. Read carefully the instructions supplied with the...
... storage e.g. : towels, cleaning products etc. The water container must be minimum 50 cm to maximum 100 cm from your authorised vendor. Read carefully the instructions supplied with the accessory. 13.3 Pedestal with the accessory. 22 www.aeg.com 13. Stacking kit can be in order to some types of tumble dryer) Accessory name: PDSTP10, E6WHPED2. Read carefully the instructions supplied with the...