Product Manual
Page 2
... not find on the rating plate. Visit our website for: Get usage advice, brochures, trouble shooter, service information: www.aeg.com Register your appliance: www.aeg.com/shop CUSTOMER CARE AND SERVICE Always use original spare parts. SAFETY INSTRUCTIONS 4 3. CARE AND CLEANING 17 11. The information can be found on ordinary appliances. We have the following data available: Model, PNC, Serial Number. PRODUCT DESCRIPTION 6 4. 2 www.aeg.com CONTENTS 1.
... not find on the rating plate. Visit our website for: Get usage advice, brochures, trouble shooter, service information: www.aeg.com Register your appliance: www.aeg.com/shop CUSTOMER CARE AND SERVICE Always use original spare parts. SAFETY INSTRUCTIONS 4 3. CARE AND CLEANING 17 11. The information can be found on ordinary appliances. We have the following data available: Model, PNC, Serial Number. PRODUCT DESCRIPTION 6 4. 2 www.aeg.com CONTENTS 1.

Product Manual
Page 3
...installation and use oven gloves to remove or put in accessories or ovenware. • Before maintenance cut the power supply. Always keep the instructions with the appliance. • Keep all packaging away from children. • Keep children and pets away from the appliance when it operates or when it . • Cleaning and user.... Accessible parts are in operation. Always use causes injuries and damages. ENGLISH 3 1. SAFETY INFORMATION Before the installation and use of the appliance, carefully read the supplied instructions. Do not touch the heating elements that are...
...installation and use oven gloves to remove or put in accessories or ovenware. • Before maintenance cut the power supply. Always keep the instructions with the appliance. • Keep all packaging away from children. • Keep children and pets away from the appliance when it operates or when it . • Cleaning and user.... Accessible parts are in operation. Always use causes injuries and damages. ENGLISH 3 1. SAFETY INFORMATION Before the installation and use of the appliance, carefully read the supplied instructions. Do not touch the heating elements that are...
Product Manual
Page 4
...; Do not use multi-plug adapters and extension cables. • Make sure not to cause damage to the mains plug and to be replaced by the manufacturer, its Authorised Service Centre or similarly qualified persons in such a way that the electrical information on the rating plate agrees with the wiring rules. 2. Install the shelf supports in accordance with the power supply. Should...
...; Do not use multi-plug adapters and extension cables. • Make sure not to cause damage to the mains plug and to be replaced by the manufacturer, its Authorised Service Centre or similarly qualified persons in such a way that the electrical information on the rating plate agrees with the wiring rules. 2. Install the shelf supports in accordance with the power supply. Should...

Product Manual
Page 5
... release. • Do not operate the appliance with wet hands or when it has contact with the appliance when you remove or install the accessories. • Discoloration of the warranty law. • Use a deep pan for cooking purposes only. Hot air can be careful when you open door. • Do not use . 2.4 Care and cleaning WARNING! WARNING! do not connect the mains plug. • Do not...
... release. • Do not operate the appliance with wet hands or when it has contact with the appliance when you remove or install the accessories. • Discoloration of the warranty law. • Use a deep pan for cooking purposes only. Hot air can be careful when you open door. • Do not use . 2.4 Care and cleaning WARNING! WARNING! do not connect the mains plug. • Do not...

Product Manual
Page 6
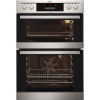
... the power supply. • Only use it . • Remove the door catch to prevent children and pets to prevent the deterioration of light bulb or halogen lamp used for the main oven temperature 8 Heating element 9 Lamp 10 Fan 11 Shelf support, removable 12 Shelf positions There is heavy! • Clean regularly the appliance to get closed in the appliance can break. • Replace immediately the door glass panels when...
... the power supply. • Only use it . • Remove the door catch to prevent children and pets to prevent the deterioration of light bulb or halogen lamp used for the main oven temperature 8 Heating element 9 Lamp 10 Fan 11 Shelf support, removable 12 Shelf positions There is heavy! • Clean regularly the appliance to get closed in the appliance can break. • Replace immediately the door glass panels when...

Product Manual
Page 7
... Grill- / roasting pan. • Telescopic runners For shelves and trays. Clean the appliance before you set . Set the functions listed below, if applicable. 1. Let the appliance operate for 15 minutes. 3. Put the accessories and the removable shelf supports back to their initial position. 4.2 Setting the time You must set a new time, refer to "Setting the time". 4.4 Preheating Preheat the empty appliance to the electrical supply, when there was a power cut or...
... Grill- / roasting pan. • Telescopic runners For shelves and trays. Clean the appliance before you set . Set the functions listed below, if applicable. 1. Let the appliance operate for 15 minutes. 3. Put the accessories and the removable shelf supports back to their initial position. 4.2 Setting the time You must set a new time, refer to "Setting the time". 4.4 Preheating Preheat the empty appliance to the electrical supply, when there was a power cut or...
Product Manual
Page 8
... in large quantities and to toast bread. Conventional Cooking Top Heat Bottom Heat To bake and roast food on when the oven operates. • The symbol shows whether the knob controls the oven functions or the temperature. 5.3 Top oven functions 1. To bake cakes with crispy bottom and to select a temperature. 3. Turn the knob for the temperature to preserve food. DAILY USE WARNING! Refer to select an...
... in large quantities and to toast bread. Conventional Cooking Top Heat Bottom Heat To bake and roast food on when the oven operates. • The symbol shows whether the knob controls the oven functions or the temperature. 5.3 Top oven functions 1. To bake cakes with crispy bottom and to select a temperature. 3. Turn the knob for the temperature to preserve food. DAILY USE WARNING! Refer to select an...
Product Manual
Page 9
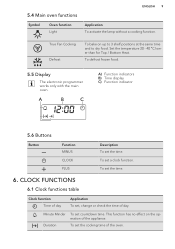
Set the temperature 20 - 40 °C lower than for Top / Bottom Heat. To set a clock function. To set the time. 6. To defrost frozen food. 5.5 Display The electronic programmer works only with the main oven. To set , change or check the time of the oven. True Fan Cooking Defrost To bake on the operation of the appliance. 5.4 Main oven functions Symbol Oven function Light ENGLISH 9 Application To activate the lamp without a cooking function. Minute...
Set the temperature 20 - 40 °C lower than for Top / Bottom Heat. To set a clock function. To set the time. 6. To defrost frozen food. 5.5 Display The electronic programmer works only with the main oven. To set , change or check the time of the oven. True Fan Cooking Defrost To bake on the operation of the appliance. 5.4 Main oven functions Symbol Oven function Light ENGLISH 9 Application To activate the lamp without a cooking function. Minute...

Product Manual
Page 10
... a button to Safety chapters. 7.1 Inserting the accessories Wire shelf: Push the shelf between the guide bars of the shelf support. The functions work only for the temperature to set an oven function and temperature of cooking. Press and hold . WARNING! Press or to the off position. Turn the knob for the oven functions and the knob for the main oven. 6.3 Cancelling the clock functions...
... a button to Safety chapters. 7.1 Inserting the accessories Wire shelf: Push the shelf between the guide bars of the shelf support. The functions work only for the temperature to set an oven function and temperature of cooking. Press and hold . WARNING! Press or to the off position. Turn the knob for the oven functions and the knob for the main oven. 6.3 Cancelling the clock functions...

Product Manual
Page 11
... baking tray or deep pan on the deep pan. Wire shelf and deep pan together: Put the wire shelf on the telescopic runners. • All accessories have small indentations at the top of the right and left side to prevent the cookware from slipping. Be careful when you close the oven door. Wire shelf: Put the wire shelf on the guide bars above. Wire...
... baking tray or deep pan on the deep pan. Wire shelf and deep pan together: Put the wire shelf on the telescopic runners. • All accessories have small indentations at the top of the right and left side to prevent the cookware from slipping. Be careful when you close the oven door. Wire shelf: Put the wire shelf on the guide bars above. Wire...

Product Manual
Page 12
... FUNCTIONS 8.1 Cooling fan When the appliance operates, the cooling fan activates automatically to cook smaller quantities of food. It gives especially good results when used . 9.1 Double oven Top oven The top oven is almost the same. • You can extend baking times by 10 - 15 minutes if you bake cakes on more than one shelf position. 1. Adapt your usual settings (temperature, cooking times) and shelf positions...
... FUNCTIONS 8.1 Cooling fan When the appliance operates, the cooling fan activates automatically to cook smaller quantities of food. It gives especially good results when used . 9.1 Double oven Top oven The top oven is almost the same. • You can extend baking times by 10 - 15 minutes if you bake cakes on more than one shelf position. 1. Adapt your usual settings (temperature, cooking times) and shelf positions...

Product Manual
Page 13
... time you use the function True Fan Cooking. The shelf position is unevenly dis- a slightly lower oven temper- The baking time is ture and a longer baking too short. You cannot decrease baking times by setting higher temperatures. Be careful with mixing times, especially if you bake, set soggy, lumpy or streaky. high and the baking time is too short. The oven temperature is too The next time you cook frozen food, the trays...
... time you use the function True Fan Cooking. The shelf position is unevenly dis- a slightly lower oven temper- The baking time is ture and a longer baking too short. You cannot decrease baking times by setting higher temperatures. Be careful with mixing times, especially if you bake, set soggy, lumpy or streaky. high and the baking time is too short. The oven temperature is too The next time you cook frozen food, the trays...

Product Manual
Page 14
...& Queen 160 - 170 18 - 25 - Chicken 160 - 180 75 - 90 Convenience Foods Follow manufacturer's instructions. Shortbread 130 - 150 45 - 65 Casseroles: - Choux 180 - 190 30 - 40 - Quiche, Tarts,... 2 2 2 2 2 2 2 1 1 2 2 2 2 2 2 2 2 2 2 2 2 2 2 Rich Fruit 140 - 150 120 - 150 - Meat Pies 190 - 210 25 - 35 - Gingerbread 140 - 150 75 - 90 - Meringues 90 - 100 150 - 180 - Madeira 140 - 150 75 - 90 - Fish...210 15 - 20 - 14 www.aeg.com Food Temperature (°C) Time (min) Cakes: - Sponges 160 - 175 20 - 30 - Victoria Sandwich 160 - 170 ...
...& Queen 160 - 170 18 - 25 - Chicken 160 - 180 75 - 90 Convenience Foods Follow manufacturer's instructions. Shortbread 130 - 150 45 - 65 Casseroles: - Choux 180 - 190 30 - 40 - Quiche, Tarts,... 2 2 2 2 2 2 2 1 1 2 2 2 2 2 2 2 2 2 2 2 2 2 2 Rich Fruit 140 - 150 120 - 150 - Meat Pies 190 - 210 25 - 35 - Gingerbread 140 - 150 75 - 90 - Meringues 90 - 100 150 - 180 - Madeira 140 - 150 75 - 90 - Fish...210 15 - 20 - 14 www.aeg.com Food Temperature (°C) Time (min) Cakes: - Sponges 160 - 175 20 - 30 - Victoria Sandwich 160 - 170 ...

Product Manual
Page 15
... 210 - 230 25 - 45 3 25 - 45 3 8 - 12 3 9.5 Roasting • Use heat-resistant ovenware to roast (refer to the instructions of the manufacturer). • You can roast large roasting joints directly in the deep pan (if present) or on the wire shelf above the deep pan. ENGLISH 15 Food Temperature (°C) Time (min) Shelf position Vegetables: - Baked Jacket Potatoes 180 - 190 60 - 90 2 - Madeira - Large...
... 210 - 230 25 - 45 3 25 - 45 3 8 - 12 3 9.5 Roasting • Use heat-resistant ovenware to roast (refer to the instructions of the manufacturer). • You can roast large roasting joints directly in the deep pan (if present) or on the wire shelf above the deep pan. ENGLISH 15 Food Temperature (°C) Time (min) Shelf position Vegetables: - Baked Jacket Potatoes 180 - 190 60 - 90 2 - Madeira - Large...
Product Manual
Page 16
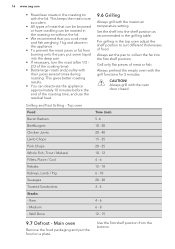
... of the roasting time, and use the residual heat. 9.6 Grilling Always grill with their juices several times during roasting. Grilling and Fast Grilling - Rare 4 - 6 - Set the shelf into the first shelf position. Main oven Remove the food packaging and put some liquid into the deep pan. • If necessary, turn the roast (after 1/2 2/3 of meat or fish. Always preheat the empty oven with the oven door closed.
... of the roasting time, and use the residual heat. 9.6 Grilling Always grill with their juices several times during roasting. Grilling and Fast Grilling - Rare 4 - 6 - Set the shelf into the first shelf position. Main oven Remove the food packaging and put some liquid into the deep pan. • If necessary, turn the roast (after 1/2 2/3 of meat or fish. Always preheat the empty oven with the oven door closed.
Product Manual
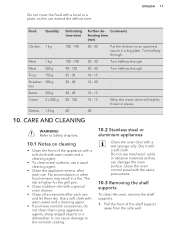
Page 17
...) 20 - 30 Put the chicken on cleaning • Clean the front of the shelf support away from the side wall. Whip the cream when still slightly frozen in a big plate. Use a soft cloth with a wet sponge only. Refer to the nonstick coating. 10.2 Stainless steel or aluminium appliances Clean the oven door with warm water and a cleaning agent. • If you have nonstick...
...) 20 - 30 Put the chicken on cleaning • Clean the front of the shelf support away from the side wall. Whip the cream when still slightly frozen in a big plate. Use a soft cloth with a wet sponge only. Refer to the nonstick coating. 10.2 Stainless steel or aluminium appliances Clean the oven door with warm water and a cleaning agent. • If you have nonstick...
Product Manual
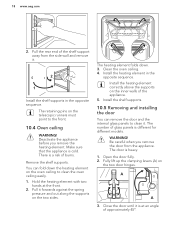
Page 18
... remove it . Clean the oven ceiling. 4. The number of approximately 45°. Remove the shelf supports. Install the shelf supports. 10.5 Removing and installing the door You can fold down . 3. Close the door until it forwards against the spring pressure and out along the supports on the inner walls of burns. You can remove the door and the internal glass panels to the front. 10.4 Oven ceiling WARNING! Install the heating element...
... remove it . Clean the oven ceiling. 4. The number of approximately 45°. Remove the shelf supports. Install the shelf supports. 10.5 Removing and installing the door You can fold down . 3. Close the door until it forwards against the spring pressure and out along the supports on the inner walls of burns. You can remove the door and the internal glass panels to the front. 10.4 Oven ceiling WARNING! Install the heating element...

Product Manual
Page 19
... fuse box or deactivate the circuit breaker. Disconnect the fuse before you replace the lamp. The lamp and the lamp glass cover can cause the glass to remove it . 2. ENGLISH 19 9. Remove the fuses from the appliance at the two sides and push inwards to remove it . 8. Install the glass cover. 45° 4. Hold the door with water and soap. Put the door with a suitable 300 °C heat-resistant oven...
... fuse box or deactivate the circuit breaker. Disconnect the fuse before you replace the lamp. The lamp and the lamp glass cover can cause the glass to remove it . 2. ENGLISH 19 9. Remove the fuses from the appliance at the two sides and push inwards to remove it . 8. Install the glass cover. 45° 4. Hold the door with water and soap. Put the door with a suitable 300 °C heat-resistant oven...

Product Manual
Page 20
.... The oven does not heat up . cavity of the malfunction. The display shows "12.00". Set the clock. Make sure that the fuse is not set . The lamp does not operate. The clock is the cause of the oven. 20 www.aeg.com 11. The display nected to the connection diagram if available). Reset the clock. 11.2 Service data If you write the data here: Model (MOD.) Product number (PNC) Serial number...
.... The oven does not heat up . cavity of the malfunction. The display shows "12.00". Set the clock. Make sure that the fuse is not set . The lamp does not operate. The clock is the cause of the oven. 20 www.aeg.com 11. The display nected to the connection diagram if available). Reset the clock. 11.2 Service data If you write the data here: Model (MOD.) Product number (PNC) Serial number...

Product Manual
Page 21
... food warm - Part 1: Ranges, ovens, steam ovens and grills - ENERGY EFFICIENCY 12.1 Product Fiche and information according to EU 65-66/2014 Supplier's name AEG Model identification DE401302DM Energy Efficiency Index Top oven: 106.8 Main oven: 103.6 Energy efficiency class Top oven: A Main oven: A Energy consumption with a standard load, conventional mode Top oven: 0.78 kWh/cycle Main oven: not applicable Energy consumption with fan to use the cooking functions with...
... food warm - Part 1: Ranges, ovens, steam ovens and grills - ENERGY EFFICIENCY 12.1 Product Fiche and information according to EU 65-66/2014 Supplier's name AEG Model identification DE401302DM Energy Efficiency Index Top oven: 106.8 Main oven: 103.6 Energy efficiency class Top oven: A Main oven: A Energy consumption with a standard load, conventional mode Top oven: 0.78 kWh/cycle Main oven: not applicable Energy consumption with fan to use the cooking functions with...


