User Manual
Page 2
... Name: AIWA Model No.: AZ-RM32 Responsible Party: Sony Electronics Inc. Do not install the appliance in this product. To prevent fire or shock hazard, do not cover the ventilation of the battery used in accordance with the instructions, may regulate disposal of the apparatus with your authority to operate this equipment does cause harmful interference to radio or television...
... Name: AIWA Model No.: AZ-RM32 Responsible Party: Sony Electronics Inc. Do not install the appliance in this product. To prevent fire or shock hazard, do not cover the ventilation of the battery used in accordance with the instructions, may regulate disposal of the apparatus with your authority to operate this equipment does cause harmful interference to radio or television...
User Manual
Page 3
... using this player, install the application software on your player 4 Main features 5 Getting started Step 1: Check the package contents 6 Step 2: Insert batteries 7 Locating controls 8 B Additional information Precautions 22 Cleaning 22 Troubleshooting 23 Specifications 25 Index 26 Basic operations Listening to the player. 3 Table of the player Changing the display pattern 20 Changing the backlight setting 20 Changing the display language 21 Before using the supplied CDROM, and send some music data to music...
... using this player, install the application software on your player 4 Main features 5 Getting started Step 1: Check the package contents 6 Step 2: Insert batteries 7 Locating controls 8 B Additional information Precautions 22 Cleaning 22 Troubleshooting 23 Specifications 25 Index 26 Basic operations Listening to the player. 3 Table of the player Changing the display pattern 20 Changing the backlight setting 20 Changing the display language 21 Before using the supplied CDROM, and send some music data to music...
User Manual
Page 4
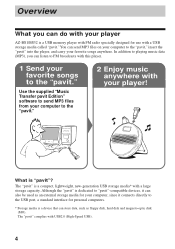
..., lightweight, new-generation USB storage media* with a large storage capacity. Although the "pavit" is dedicated to "pavit"-compatible devices, it connects directly to the USB port, a standard interface for personal computers. * Storage media is a USB memory player with FM radio specially designed for your favorite songs anywhere. Use the supplied "Music Transfer pavit Edition" software to send MP3 files from your computer to the "pavit." 2 Enjoy music anywhere with a USB storage media called...
..., lightweight, new-generation USB storage media* with a large storage capacity. Although the "pavit" is dedicated to "pavit"-compatible devices, it connects directly to the USB port, a standard interface for personal computers. * Storage media is a USB memory player with FM radio specially designed for your favorite songs anywhere. Use the supplied "Music Transfer pavit Edition" software to send MP3 files from your computer to the "pavit." 2 Enjoy music anywhere with a USB storage media called...
User Manual
Page 5
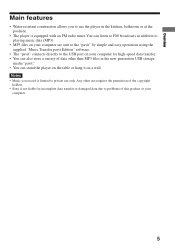
... "pavit" by simple and easy operations using the supplied "Music Transfer pavit Edition" software. • The "pavit" connects directly to private use only. Overview Main features • Water-resistant construction allows you record is limited to the USB port on your computer for incomplete data transfer or damaged data due to use the player in addition to playing music data (MP3). • MP3 files on a wall. You can stand...
... "pavit" by simple and easy operations using the supplied "Music Transfer pavit Edition" software. • The "pavit" connects directly to private use only. Overview Main features • Water-resistant construction allows you record is limited to the USB port on your computer for incomplete data transfer or damaged data due to use the player in addition to playing music data (MP3). • MP3 files on a wall. You can stand...
User Manual
Page 6
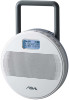
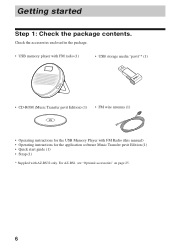
Check the accessories enclosed in the package. • USB memory player with FM radio (1) • USB storage media "pavit"* (1) • CD-ROM (Music Transfer pavit Edition) (1) • FM wire antenna (1) • Operating instructions for the USB Memory Player with FM Radio (this manual) • Operating instructions for the application software Music Transfer pavit Edition (1) • Quick start guide (1) • Strap (1) * Supplied with AZ-BS32 only. For AZ-BS1, see "Optional accessories" on page 25. 6 Getting started Step 1: Check the package contents.
Check the accessories enclosed in the package. • USB memory player with FM radio (1) • USB storage media "pavit"* (1) • CD-ROM (Music Transfer pavit Edition) (1) • FM wire antenna (1) • Operating instructions for the USB Memory Player with FM Radio (this manual) • Operating instructions for the application software Music Transfer pavit Edition (1) • Quick start guide (1) • Strap (1) * Supplied with AZ-BS32 only. For AZ-BS1, see "Optional accessories" on page 25. 6 Getting started Step 1: Check the package contents.

User Manual
Page 7
... sections of the buttons and switches may be used for a long time, remove the batteries. • If battery leakage occurs, wipe off automatically. Also the volume of " " roughly show the remaining battery power. Getting started 2 1 Insert with new ones. Step 2: Insert batteries. In case the deposit adheres to change the batteries The battery level indication in the battery compartment, and insert new batteries. Battery duration Approximately 16 hours (continuous music data playback, with coins...
... sections of the buttons and switches may be used for a long time, remove the batteries. • If battery leakage occurs, wipe off automatically. Also the volume of " " roughly show the remaining battery power. Getting started 2 1 Insert with new ones. Step 2: Insert batteries. In case the deposit adheres to change the batteries The battery level indication in the battery compartment, and insert new batteries. Battery duration Approximately 16 hours (continuous music data playback, with coins...

User Manual
Page 9
..., file name of the batteries. During radio reception, displays the band and frequency. 7 Track number/elapsed playing time indication Displays the preset numbers in the radio preset mode. 4 Volume indication Roughly shows the current volume level. 5 Battery level indication Roughly shows the remaining power of music data, etc. Getting started Display 12 3 45 6 7 1 "pavit" insertion indicator : The "pavit" is inserted in the player correctly. : The "pavit" is not inserted in the player. 2 Operation status...
..., file name of the batteries. During radio reception, displays the band and frequency. 7 Track number/elapsed playing time indication Displays the preset numbers in the radio preset mode. 4 Volume indication Roughly shows the current volume level. 5 Battery level indication Roughly shows the remaining power of music data, etc. Getting started Display 12 3 45 6 7 1 "pavit" insertion indicator : The "pavit" is inserted in the player correctly. : The "pavit" is not inserted in the player. 2 Operation status...
User Manual
Page 10
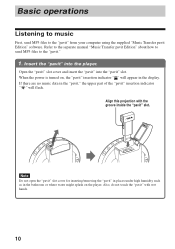
... " " will flash. Basic operations Listening to music First, send MP3 files to the "pavit." 1. Align this projection with wet hands. 10 Insert the "pavit" into the "pavit" slot. Refer to the separate manual "Music Transfer pavit Edition" about how to send MP3 files to the "pavit" from your computer using the supplied "Music Transfer pavit Edition" software. When the power is turned on the player.
... " " will flash. Basic operations Listening to music First, send MP3 files to the "pavit." 1. Align this projection with wet hands. 10 Insert the "pavit" into the "pavit" slot. Refer to the separate manual "Music Transfer pavit Edition" about how to send MP3 files to the "pavit" from your computer using the supplied "Music Transfer pavit Edition" software. When the power is turned on the player.

User Manual
Page 11
..., the file name is displayed. (ID3 TAG is turned on, and playback starts. 2 Press VOLUME -/+ to include textual information, such as title, album name and artist name, in the order of the Playlist you created using "Music Transfer pavit Edition." Nx/POWER VOLUME -/+ 1 Press and hold Nx/POWER. Music data (tracks) are displayed. The power is a format to adjust the volume. During play mode, the track information* and elapsed playing time are played in MP3 files.) (Continued...
..., the file name is displayed. (ID3 TAG is turned on, and playback starts. 2 Press VOLUME -/+ to include textual information, such as title, album name and artist name, in the order of the Playlist you created using "Music Transfer pavit Edition." Nx/POWER VOLUME -/+ 1 Press and hold Nx/POWER. Music data (tracks) are displayed. The power is a format to adjust the volume. During play mode, the track information* and elapsed playing time are played in MP3 files.) (Continued...
User Manual
Page 12
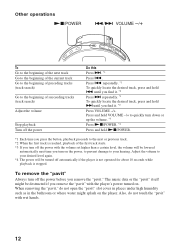
... be destructed if you find it . *2 Press VOLUME -/+. Press and hold Nx/POWER. *1 Each time you press the button, playback proceeds to your hearing. To remove the "pavit" Always turn down or up the volume. *3 Press Nx/POWER. *4 Press and hold VOLUME -/+ to quickly turn off the power Do this Press >. *1 Press .. Also, do not open the "pavit" slot cover in places under high humidity such as...
... be destructed if you find it . *2 Press VOLUME -/+. Press and hold Nx/POWER. *1 Each time you press the button, playback proceeds to your hearing. To remove the "pavit" Always turn down or up the volume. *3 Press Nx/POWER. *4 Press and hold VOLUME -/+ to quickly turn off the power Do this Press >. *1 Press .. Also, do not open the "pavit" slot cover in places under high humidity such as...

User Manual
Page 15
... player last time, or if the "pavit" is not inserted in the player. 1 Press and hold . (DOWN) or > (UP) for about one second. If you press Nx/POWER. (Continued) Using the radio 15 To turn on the player. 2 Press TUNER repeatedly to FM broadcasts with and without inserting the "pavit" in the player, the radio will be played from the position where the playback...
... player last time, or if the "pavit" is not inserted in the player. 1 Press and hold . (DOWN) or > (UP) for about one second. If you press Nx/POWER. (Continued) Using the radio 15 To turn on the player. 2 Press TUNER repeatedly to FM broadcasts with and without inserting the "pavit" in the player, the radio will be played from the position where the playback...
User Manual
Page 17
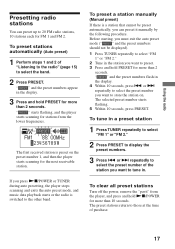
... music data playback starts or the radio is switched to preset. 3 Press and hold PRESET for more than 10 seconds. or > repeatedly to select the preset number of the station you want to the other band. To preset stations automatically (Auto preset) 1 Perform steps 1 and 2 of purchase. 17 If you want to store the station on the preset number 1, and then the player starts scanning for more than 2 seconds. The selected preset number starts flashing...
... music data playback starts or the radio is switched to preset. 3 Press and hold PRESET for more than 10 seconds. or > repeatedly to select the preset number of the station you want to the other band. To preset stations automatically (Auto preset) 1 Perform steps 1 and 2 of purchase. 17 If you want to store the station on the preset number 1, and then the player starts scanning for more than 2 seconds. The selected preset number starts flashing...

User Manual
Page 18
... mode Press and hold MENU for stopwatch " " changes to select "STOPWATCH," and then press MENU. 3 Press MENU. or > repeatedly to that for music data playback or radio. The current time is stored in the memory and the lap time (the time length from a previous stored time. The icon for more than 2 seconds. Tip The stopwatch can use the stopwatch both while playing music data and listening to the radio. 1 During music data playback or radio...
... mode Press and hold MENU for stopwatch " " changes to select "STOPWATCH," and then press MENU. 3 Press MENU. or > repeatedly to that for music data playback or radio. The current time is stored in the memory and the lap time (the time length from a previous stored time. The icon for more than 2 seconds. Tip The stopwatch can use the stopwatch both while playing music data and listening to the radio. 1 During music data playback or radio...

User Manual
Page 19
... Press any button on the player. Using the countdown timer The alarm can specify the time by the minute, from 1 to 99 minutes. 1 During music data playback or radio reception, press MENU. 2 Press . You can be set to go off after the alarm stops, the display returns to select "COUNTDOWN," and then press MENU. 3 Press . or > repeatedly to the previous screen and music data playback or radio reception...
... Press any button on the player. Using the countdown timer The alarm can specify the time by the minute, from 1 to 99 minutes. 1 During music data playback or radio reception, press MENU. 2 Press . You can be set to go off after the alarm stops, the display returns to select "COUNTDOWN," and then press MENU. 3 Press . or > repeatedly to the previous screen and music data playback or radio reception...

User Manual
Page 20
... do not want to turn off when the battery level indication becomes " ." 20 B Changing the settings of the player Changing the display pattern You can change the lighting time of the backlight for the display. 1 During music data playback or radio reception, press MENU. 2 Press . If the track does not have ID3 TAG information, the file name is displayed. 1 During music data playback or radio reception, press MENU. 2 Press . Depending on the...
... do not want to turn off when the battery level indication becomes " ." 20 B Changing the settings of the player Changing the display pattern You can change the lighting time of the backlight for the display. 1 During music data playback or radio reception, press MENU. 2 Press . If the track does not have ID3 TAG information, the file name is displayed. 1 During music data playback or radio reception, press MENU. 2 Press . Depending on the...

User Manual
Page 21
or > repeatedly to select the language, and then press MENU. or > repeatedly to select "LANGUAGE," and then press MENU. 3 Press . To return to be used for displaying the menu from: Japanese, English, German, French, Italian and Spanish. 1 During music data playback or radio reception, press MENU. 2 Press . Changing the settings of the player Changing the display language You can select the language to the menu screen Select "BACK" in step 3. Note The ID3 TAG text will not change into a different language by this operation. 21
or > repeatedly to select the language, and then press MENU. or > repeatedly to select "LANGUAGE," and then press MENU. 3 Press . To return to be used for displaying the menu from: Japanese, English, German, French, Italian and Spanish. 1 During music data playback or radio reception, press MENU. 2 Press . Changing the settings of the player Changing the display language You can select the language to the menu screen Select "BACK" in step 3. Note The ID3 TAG text will not change into a different language by this operation. 21
User Manual
Page 22
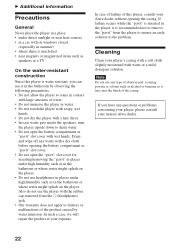
... Clean your Aiwa dealer without opening the battery compartment or "pavit" slot cover. • Do not open the battery compartment or "pavit" slot cover with a dry cloth before opening the casing. If you can use it in the bathroom by water intrusion. In case of failure of this player is water ... the player in water. • Do not touch the player with soapy, wet hands. • Do not dry the player with a hair dryer. • In case water gets inside the speakers, turn the player upside down to drain water. • Do not open the "pavit" slot cover for inserting/removing the ...
... Clean your Aiwa dealer without opening the battery compartment or "pavit" slot cover. • Do not open the battery compartment or "pavit" slot cover with a dry cloth before opening the casing. If you can use it in the bathroom by water intrusion. In case of failure of this player is water ... the player in water. • Do not touch the player with soapy, wet hands. • Do not dry the player with a hair dryer. • In case water gets inside the speakers, turn the player upside down to drain water. • Do not open the "pavit" slot cover for inserting/removing the ...
User Manual
Page 23
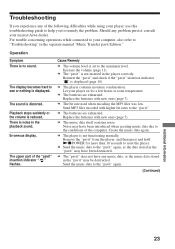
... bit rate used when encoding the MP3 files was low. There is reduced. Let your player sit for more than 10 seconds to the minimum level. Noise may have been introduced when creating music data due to "Troubleshooting" in the playback sound. For trouble concerning operations while connected to your nearest Aiwa dealer. Playback stops suddenly or the volume is noise in the separate manual "Music Transfer pavit...
... bit rate used when encoding the MP3 files was low. There is reduced. Let your player sit for more than 10 seconds to the minimum level. Noise may have been introduced when creating music data due to "Troubleshooting" in the playback sound. For trouble concerning operations while connected to your nearest Aiwa dealer. Playback stops suddenly or the volume is noise in the separate manual "Music Transfer pavit...
User Manual
Page 24
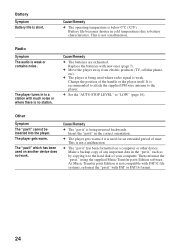
... been formatted on another device does not work. Then reformat the "pavit," using the supplied Music Transfer pavit Edition software. As Music Transfer pavit Edition is not compatible with FAT32 file systems, reformat the "pavit" with much noise or where there is being used for an extended period of time. Replace the batteries with new ones (page 7). Cause/Remedy c The batteries are exhausted. c Set the "AUTO STOP LEVEL" to the player. Battery...
... been formatted on another device does not work. Then reformat the "pavit," using the supplied Music Transfer pavit Edition software. As Music Transfer pavit Edition is not compatible with FAT32 file systems, reformat the "pavit" with much noise or where there is being used for an extended period of time. Replace the batteries with new ones (page 7). Cause/Remedy c The batteries are exhausted. c Set the "AUTO STOP LEVEL" to the player. Battery...
User Manual
Page 25
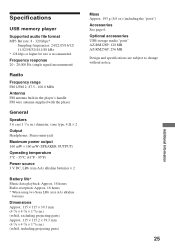
... hours Radio reception: Approx. 16 hours * When using two Sony LR6 (size AA) alkaline batteries Dimensions Approx. 115 × 115 × 39.3 mm (4 5/8 × 4 5/8 × 1 9/16 in.) (w/h/d, excluding projecting parts) Approx. 115 × 115.2 × 39.3 mm (4 5/8 × 4 5/8 × 1 9/16 in.) (w/h/d, including projecting parts) Mass Approx. 193 g (6.8 oz) (including the "pavit") Accessories See page 6. Specifications USB memory player Supported audio file format MP3...
... hours Radio reception: Approx. 16 hours * When using two Sony LR6 (size AA) alkaline batteries Dimensions Approx. 115 × 115 × 39.3 mm (4 5/8 × 4 5/8 × 1 9/16 in.) (w/h/d, excluding projecting parts) Approx. 115 × 115.2 × 39.3 mm (4 5/8 × 4 5/8 × 1 9/16 in.) (w/h/d, including projecting parts) Mass Approx. 193 g (6.8 oz) (including the "pavit") Accessories See page 6. Specifications USB memory player Supported audio file format MP3...


