
Operating Instructions
Page 5
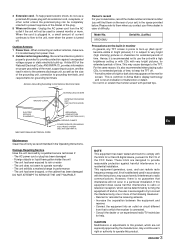
... the National Electrical Code Owner's record For your convenience, record the model number and serial number (you contact your set) in performance - This may cause harmful interference to provide reasonable protection against unexpected voltage surges or static electricity build-up (dark spots* become visible in Active Matrix display technology and is also recommended when playing audio CDs, for a Class B digital device, pursuant to which...
... the National Electrical Code Owner's record For your convenience, record the model number and serial number (you contact your set) in performance - This may cause harmful interference to provide reasonable protection against unexpected voltage surges or static electricity build-up (dark spots* become visible in Active Matrix display technology and is also recommended when playing audio CDs, for a Class B digital device, pursuant to which...
Operating Instructions
Page 6
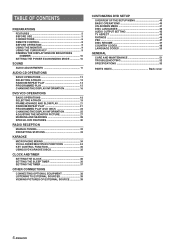
... 5 BEFORE USE 5 CONNECTIONS 6 REMOTE CONTROL 8 BEFORE OPERATION 8 USING THE MONITOR 9 USING THE CURSOR KEY 9 DIMMING THE DISPLAY WINDOW BRIGHTNESS (DIMMER 10 SETTING THE POWER ECONOMIZING MODE 10 SOUND AUDIO ADJUSTMENTS 11 AUDIO CD OPERATIONS BASIC OPERATIONS 12 SELECTING ATRACK 13 RANDOM/REPEAT PLAY 14 PROGRAMMED PLAY 15 CHANGING THE DISPLAY INFORMATION 16 DVD/VCD OPERATIONS BASIC OPERATIONS 18 SELECTING ATRACK 19 FRAME ADVANCE AND SLOW PLAY 21 RANDOM/REPEAT PLAY 21 PROGRAMMED PLAY (VCD ONLY 24 CHANGING THE DISPLAY INFORMATION 25 ADJUSTING THE MONITOR PICTURE 27 MARKING...
... 5 BEFORE USE 5 CONNECTIONS 6 REMOTE CONTROL 8 BEFORE OPERATION 8 USING THE MONITOR 9 USING THE CURSOR KEY 9 DIMMING THE DISPLAY WINDOW BRIGHTNESS (DIMMER 10 SETTING THE POWER ECONOMIZING MODE 10 SOUND AUDIO ADJUSTMENTS 11 AUDIO CD OPERATIONS BASIC OPERATIONS 12 SELECTING ATRACK 13 RANDOM/REPEAT PLAY 14 PROGRAMMED PLAY 15 CHANGING THE DISPLAY INFORMATION 16 DVD/VCD OPERATIONS BASIC OPERATIONS 18 SELECTING ATRACK 19 FRAME ADVANCE AND SLOW PLAY 21 RANDOM/REPEAT PLAY 21 PROGRAMMED PLAY (VCD ONLY 24 CHANGING THE DISPLAY INFORMATION 25 ADJUSTING THE MONITOR PICTURE 27 MARKING...
Operating Instructions
Page 7
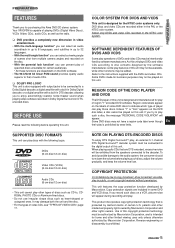
... types of this unit. Select only DVDs and video CDs recorded in the PAL or the NTSC color system. Region code labels appear on the labels of certain U.S. NOTE ON PLAYING DTS-ENCODED DISCS To enjoy DTS Digital SurroundTM play, an external 5.1 channel DTS Digital SurroundTM decoder system must be connected to a Dolby Digital decoder, a digital amplifier with a built-in Dolby Digital decoder, or a digital amplifier with the following before playing such discs, adjust the volume...
... types of this unit. Select only DVDs and video CDs recorded in the PAL or the NTSC color system. Region code labels appear on the labels of certain U.S. NOTE ON PLAYING DTS-ENCODED DISCS To enjoy DTS Digital SurroundTM play, an external 5.1 channel DTS Digital SurroundTM decoder system must be connected to a Dolby Digital decoder, a digital amplifier with a built-in Dolby Digital decoder, or a digital amplifier with the following before playing such discs, adjust the volume...
Operating Instructions
Page 10
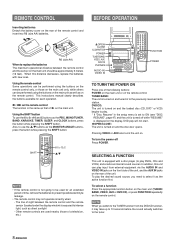
.... This instructions manual clearly describes the buttons available for an extended period of c on and the disc door opens. zOPEN/CLOSE: The unit is displayed on . Other remote controls are used for each operation. NOTE When you need to the tuner. 8 ENGLISH REMOTE CONTROL Inserting batteries Detach the battery cover on the remote control. Pressing VIDEO or AUX also turns the unit on the display, DVD play the desired sound source, you switch to 0, +10 and C buttons as...
.... This instructions manual clearly describes the buttons available for an extended period of c on and the disc door opens. zOPEN/CLOSE: The unit is displayed on . Other remote controls are used for each operation. NOTE When you need to the tuner. 8 ENGLISH REMOTE CONTROL Inserting batteries Detach the battery cover on the remote control. Pressing VIDEO or AUX also turns the unit on the display, DVD play the desired sound source, you switch to 0, +10 and C buttons as...
Operating Instructions
Page 11
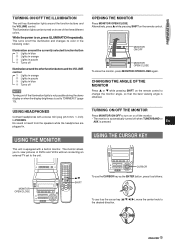
... direction. 9 ENGLISH USING HEADPHONES Connect headphones with a built-in monitor. This turns on/off the illumination and changes its color in the following order: Illumination around the currently selected function button 1 Lights in blue 2 Lights in orange 3 Lights in purple 4 Turns off Illumination around the function buttons and the VOLUME control. TURNING ON/OFF THE ILLUMINATION The unit has illumination lights around the other function buttons and the VOLUME control 1 Lights in orange 2 Lights in purple 3 Lights in blue 4 Turns...
... direction. 9 ENGLISH USING HEADPHONES Connect headphones with a built-in monitor. This turns on/off the illumination and changes its color in the following order: Illumination around the currently selected function button 1 Lights in blue 2 Lights in orange 3 Lights in purple 4 Turns off Illumination around the function buttons and the VOLUME control. TURNING ON/OFF THE ILLUMINATION The unit has illumination lights around the other function buttons and the VOLUME control 1 Lights in orange 2 Lights in purple 3 Lights in blue 4 Turns...
Operating Instructions
Page 15
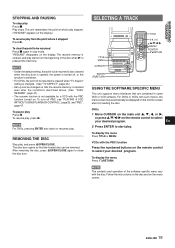
.... (See "DISC RESUME", page 47). SELECTING A TRACK c r,t 0-9,+10 c/d r,t SELECTING A TRACK WITH THE REMOTE CONTROL A track can locate a desired point on the CD by using the time search function, i.e., by entering the track number on the remote control, either during play or in stop play Press s. AUDIO CD OPERATIONS STOPPING AND PAUSING To stop mode. Play stops. Searching You can be resumed is also cleared when the disc door is opened, the power is turned off...
.... (See "DISC RESUME", page 47). SELECTING A TRACK c r,t 0-9,+10 c/d r,t SELECTING A TRACK WITH THE REMOTE CONTROL A track can locate a desired point on the CD by using the time search function, i.e., by entering the track number on the remote control, either during play or in stop play Press s. AUDIO CD OPERATIONS STOPPING AND PAUSING To stop mode. Play stops. Searching You can be resumed is also cleared when the disc door is opened, the power is turned off...
Operating Instructions
Page 17
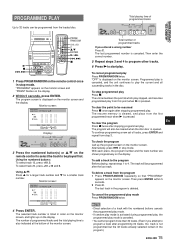
... stopping programmed play Press PRGM/RANDOM twice. To check the program Call up on the remote control to select the track to 4. Alternatively, press t in stop programmed play . To delete a track from the loaded disc. NOTE • Direct selection of the monitor screen. Using i/k: Press i for a larger track number and k for a smaller track number. To cancel programmed play . To stop mode. Then press ENTER within 5 seconds. 2 Press C. The last track in the program.) ENGLISH...
... stopping programmed play Press PRGM/RANDOM twice. To check the program Call up on the remote control to select the track to 4. Alternatively, press t in stop programmed play . To delete a track from the loaded disc. NOTE • Direct selection of the monitor screen. Using i/k: Press i for a larger track number and k for a smaller track number. To cancel programmed play . To stop mode. Then press ENTER within 5 seconds. 2 Press C. The last track in the program.) ENGLISH...
Operating Instructions
Page 20
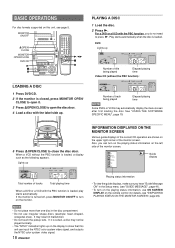
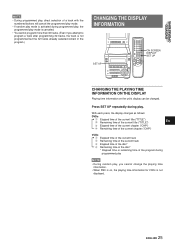
... color system video signal, and outputs the NTSC color system video signal. 18 ENGLISH Playing status information • To view the guide displays, make sure you do not need to open the disc door. 4 Load a disc with the PBC function is soiled, a disc may not be played normally. • The "NTSC" indication lights up Number of title being played Elapsed playing time NOTE Some DVDs or VCDs may result in the Setup menu (see "GUIDE MESSAGE", page 41). • To turn...
... color system video signal, and outputs the NTSC color system video signal. 18 ENGLISH Playing status information • To view the guide displays, make sure you do not need to open the disc door. 4 Load a disc with the PBC function is soiled, a disc may not be played normally. • The "NTSC" indication lights up Number of title being played Elapsed playing time NOTE Some DVDs or VCDs may result in the Setup menu (see "GUIDE MESSAGE", page 41). • To turn...
Operating Instructions
Page 21
... play stopped. ("RESUME" appears on the remote control to be resumed is also cleared when the disc door is opened, the power is retained even after first loading the disc. NOTE • Under the default setting, the point to select your desired program. To display the menu Press TITLE or MENU. ENGLISH 19 "RESUME" disappears on the menu screen. To resume play . After removing the disc, press zOPEN/CLOSE again to be removed. For DVDs...
... play stopped. ("RESUME" appears on the remote control to be resumed is also cleared when the disc door is opened, the power is retained even after first loading the disc. NOTE • Under the default setting, the point to select your desired program. To display the menu Press TITLE or MENU. ENGLISH 19 "RESUME" disappears on the menu screen. To resume play . After removing the disc, press zOPEN/CLOSE again to be removed. For DVDs...
Operating Instructions
Page 22
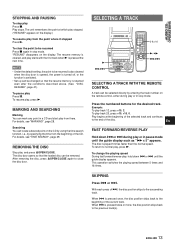
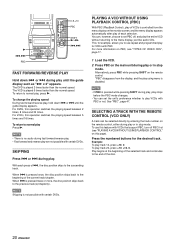
... play until the guide display appears. To use repeat and programmed play or in stop mode. The DVD is played 5 times faster than the normal speed. For DVDs, this operation switches the playing speed between 2 times, 8 times and 32 times. SKIPPING Press r or t during play for VCDs with certain DVDs. Play begins at the beginning of the selected track and continutes to the menu display, just like audio CDs. You can be selected directly by entering the track number...
... play until the guide display appears. To use repeat and programmed play or in stop mode. The DVD is played 5 times faster than the normal speed. For DVDs, this operation switches the playing speed between 2 times, 8 times and 32 times. SKIPPING Press r or t during play for VCDs with certain DVDs. Play begins at the beginning of the selected track and continutes to the menu display, just like audio CDs. You can be selected directly by entering the track number...
Operating Instructions
Page 27
... numbered buttons will cancel the programmed play mode. • If random play mode is activated during programmed play, the programmed play mode is canceled. • You cannot program more than 32 tracks. (Even if you cannot change the playing time information. • When PBC is on, the playing time information for VCDs is not programmed but the 32 tracks already selected remain in the program.) CHANGING THE DISPLAY INFORMATION SET UP ON SCREEN DISPLAY SET UP CHANGING THE PLAYING TIME...
... numbered buttons will cancel the programmed play mode. • If random play mode is activated during programmed play, the programmed play mode is canceled. • You cannot program more than 32 tracks. (Even if you cannot change the playing time information. • When PBC is on, the playing time information for VCDs is not programmed but the 32 tracks already selected remain in the program.) CHANGING THE DISPLAY INFORMATION SET UP ON SCREEN DISPLAY SET UP CHANGING THE PLAYING TIME...
Operating Instructions
Page 36
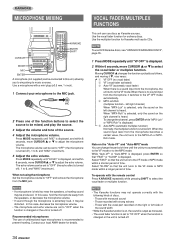
... recorded with monaural sound - Contact your microphone to the MIC jack. 2 Press one of the function buttons to select the source to "VF OFF" when the function is changed or the unit is displayed, and within a longer period of discs. - VOCAL FADER/MULTIPLEX FUNCTIONS This unit can use DVD Karaoke discs, see "USING DVD KARAOKE DISCS", page 35. 1 Press MODE repeatedly until "MIC" is turned off . 34 ENGLISH Moving CURSOR i changes...
... recorded with monaural sound - Contact your microphone to the MIC jack. 2 Press one of the function buttons to select the source to "VF OFF" when the function is changed or the unit is displayed, and within a longer period of discs. - VOCAL FADER/MULTIPLEX FUNCTIONS This unit can use DVD Karaoke discs, see "USING DVD KARAOKE DISCS", page 35. 1 Press MODE repeatedly until "MIC" is turned off . 34 ENGLISH Moving CURSOR i changes...
Operating Instructions
Page 39
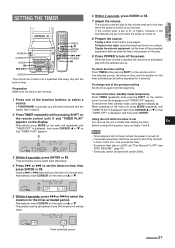
... ENTER or a. 7 Adjust the volume. Alternatively, press MODE on the display. To play with an external timer) and prepare for the timer-activated period. The selected source, the timer-on the main unit, press MODE repeatedly until "TIMER OFF" is reached, the unit turns on the remote control. When operating on time, and the duration for 4 seconds. Timer-activated period ENGLISH 37 When the timer-on time is displayed, then move CURSOR...
... ENTER or a. 7 Adjust the volume. Alternatively, press MODE on the display. To play with an external timer) and prepare for the timer-activated period. The selected source, the timer-on the main unit, press MODE repeatedly until "TIMER OFF" is reached, the unit turns on the remote control. When operating on time, and the duration for 4 seconds. Timer-activated period ENGLISH 37 When the timer-on time is displayed, then move CURSOR...
Operating Instructions
Page 40
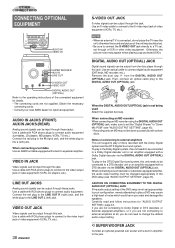
.... Use a cable with RCA phono plugs to connect audio equipment. Use a cable with RCA phono plugs to connect audio equipment (turntables, LD players, MD players, VCRs, TV, etc.). VIDEO OUT JACK Video signals can be distorted. • Be sure to connect the S-VIDEO OUT jack directly to a TV set appropriately to your configuration, merely attempting to play of discs recorded with certain discs. Use a cable with a Dolby Digital decoder via the DIGITAL AUDIO OUT (OPTICAL) jack. Otherwise, the picture...
.... Use a cable with RCA phono plugs to connect audio equipment. Use a cable with RCA phono plugs to connect audio equipment (turntables, LD players, MD players, VCRs, TV, etc.). VIDEO OUT JACK Video signals can be distorted. • Be sure to connect the S-VIDEO OUT jack directly to a TV set appropriately to your configuration, merely attempting to play of discs recorded with certain discs. Use a cable with a Dolby Digital decoder via the DIGITAL AUDIO OUT (OPTICAL) jack. Otherwise, the picture...
Operating Instructions
Page 42
... default setting. • The default "TV Aspect" setting has to be changed as follows: 1 On-screen Menu (page 41) • Sets the on-screen guide display on or off , opening of the disc door, or switching of DVDs allowed to play . 3 Audio Output Setting (page 43) Adjusts the type of signal output from the DIGITAL AUDIO OUT (OPTICAL) jack and the LINE OUT jacks. 4 TV Aspect (page 45) Sets the aspect ratio of the video signal sent to the connected TV set specifically to display the setting...
... default setting. • The default "TV Aspect" setting has to be changed as follows: 1 On-screen Menu (page 41) • Sets the on-screen guide display on or off , opening of the disc door, or switching of DVDs allowed to play . 3 Audio Output Setting (page 43) Adjusts the type of signal output from the DIGITAL AUDIO OUT (OPTICAL) jack and the LINE OUT jacks. 4 TV Aspect (page 45) Sets the aspect ratio of the video signal sent to the connected TV set specifically to display the setting...
Operating Instructions
Page 45
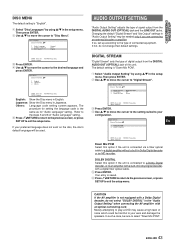
... optical cable to the type of connected equipment. Refer to the steps 5 and 6 of noise which could be used. CAUTION If the AV amplifier is not equipped with a Dolby Digital decoder, do not change their default settings. Merely attempting to play a DVD may be sure to your configuration. CUSTOMIZING DVD SETUP DISC MENU The default setting is "English". 1 Select "Disc Languages" by using i/k in the "Audio Output Setting" when connecting the AV amplifier with an optical connecting cord. Disc Languages...
... optical cable to the type of connected equipment. Refer to the steps 5 and 6 of noise which could be used. CAUTION If the AV amplifier is not equipped with a Dolby Digital decoder, do not change their default settings. Merely attempting to play a DVD may be sure to your configuration. CUSTOMIZING DVD SETUP DISC MENU The default setting is "English". 1 Select "Disc Languages" by using i/k in the "Audio Output Setting" when connecting the AV amplifier with an optical connecting cord. Disc Languages...
Operating Instructions
Page 46
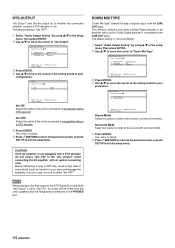
... signal output from the unit's speakers and the headphones connected to an amplifier without a DTS decoder. 5 Press ENTER. The default setting is "Surround Mode". 1 Select "Audio Output Setting" by using i/k in Dolby Digital decoder is "dts OFF". 1 Select "Audio Output Setting" by using i/k in the setup menu. NOTE When playing a disc that supports the DTS Digital Surround while "dts Output" is saved. 6 Press vRETURN to return to the previous screen, or press SET UP to exit the setup menu. 44 ENGLISH dts Output...
... signal output from the unit's speakers and the headphones connected to an amplifier without a DTS decoder. 5 Press ENTER. The default setting is "Surround Mode". 1 Select "Audio Output Setting" by using i/k in Dolby Digital decoder is "dts OFF". 1 Select "Audio Output Setting" by using i/k in the setup menu. NOTE When playing a disc that supports the DTS Digital Surround while "dts Output" is saved. 6 Press vRETURN to return to the previous screen, or press SET UP to exit the setup menu. 44 ENGLISH dts Output...
Operating Instructions
Page 47
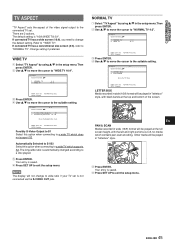
... menu SETUP : Completion LETTER BOX Media recorded in the setup menu.Then press ENTER. 2 Use i/k to move the cursor to "WIDE TV 16:9". ENGLISH 45 Automatically Selected to S1/S2 Select this option when connecting to "NORMAL TV 4:3". NORMAL TV 1 Select "TV Aspect" by using i/k in wide (16:9) format will be played at the top and bottom of the video signal output to the connected TV set is not connected via the S-VIDEO...
... menu SETUP : Completion LETTER BOX Media recorded in the setup menu.Then press ENTER. 2 Use i/k to move the cursor to "WIDE TV 16:9". ENGLISH 45 Automatically Selected to S1/S2 Select this option when connecting to "NORMAL TV 4:3". NORMAL TV 1 Select "TV Aspect" by using i/k in wide (16:9) format will be played at the top and bottom of the video signal output to the connected TV set is not connected via the S-VIDEO...

Operating Instructions
Page 48
...digit cursor 0 ~ 9 Code input ENTER : Confirm SETUP : Completion RETURN : Previous menu 6 Use the numbered buttons and j/l to "Level 8" (no restriction). Confirmation of the Country Code ENTER : Choice item RETURN : Previous menu SETUP : Completion Unlock Player: Resets "Ratings" to enter a four-digit password. 7 Press ENTER. Then press ENTER. 2 Input four-digit password and press ENTER. 3 Select an item. Ratings Choice The Item ik 1 Unlock Player 2 Change Password 3 Change Level 4 Setting of the Password The Player is displayed. Change Password: Changes the password setting. Change...
...digit cursor 0 ~ 9 Code input ENTER : Confirm SETUP : Completion RETURN : Previous menu 6 Use the numbered buttons and j/l to "Level 8" (no restriction). Confirmation of the Country Code ENTER : Choice item RETURN : Previous menu SETUP : Completion Unlock Player: Resets "Ratings" to enter a four-digit password. 7 Press ENTER. Then press ENTER. 2 Input four-digit password and press ENTER. 3 Select an item. Ratings Choice The Item ik 1 Unlock Player 2 Change Password 3 Change Level 4 Setting of the Password The Player is displayed. Change Password: Changes the password setting. Change...
Operating Instructions
Page 54
... no sound. • Is the AC cord connected properly? (© page 6) • Was an incorrect function button pressed? (© page 8) • Is the volume set with a built-in video deck? © The picture may be bad when used with some television sets or projectors, due to the DVD copy protection scheme. The power is the TV set correctly connected? (© page 38) • Is the video input selection set correctly...
... no sound. • Is the AC cord connected properly? (© page 6) • Was an incorrect function button pressed? (© page 8) • Is the volume set with a built-in video deck? © The picture may be bad when used with some television sets or projectors, due to the DVD copy protection scheme. The power is the TV set correctly connected? (© page 38) • Is the video input selection set correctly...


