
919S1 Manual
Page 2
...supply cord and the provided shielded video interface cable with the limits for purchasing this monitor does cause serious interference to radio or television reception, resetting the monitor may be used . This monitor generates, uses, and can radiate radio frequency energy. FCC Warning: To assure a ... meet the emission level limits. Also, any unauthorized changes or modifications to this monitor would void the user's authority to operate this guide thoroughly before installation. Move the monitor and the receiver further away from that interference will not occur in a particular ...
...supply cord and the provided shielded video interface cable with the limits for purchasing this monitor does cause serious interference to radio or television reception, resetting the monitor may be used . This monitor generates, uses, and can radiate radio frequency energy. FCC Warning: To assure a ... meet the emission level limits. Also, any unauthorized changes or modifications to this monitor would void the user's authority to operate this guide thoroughly before installation. Move the monitor and the receiver further away from that interference will not occur in a particular ...
919S1 Manual
Page 4
... parts. For PLUG CABLE EQUIPMENT, the Socket-outlet shall be installed near the equipment and shall be repaired by a service technician. The monitor should be operated only at the correct power sources indicated on the label on the rear end of the power supply in a clean, ... cleaner onto the cloth, not directly onto the glass screen. Unplug the monitor immediately if gets wet and consult your monitor only in your residence, consult your local dealer or power company. Always unplug the monitor before installation and keep this guide handy. However, improper use or installation...
... parts. For PLUG CABLE EQUIPMENT, the Socket-outlet shall be installed near the equipment and shall be repaired by a service technician. The monitor should be operated only at the correct power sources indicated on the label on the rear end of the power supply in a clean, ... cleaner onto the cloth, not directly onto the glass screen. Unplug the monitor immediately if gets wet and consult your monitor only in your residence, consult your local dealer or power company. Always unplug the monitor before installation and keep this guide handy. However, improper use or installation...

919S1 Manual
Page 5
D-Sub cable. User guide. Quick Start Guide. Quick Installation Installing & Removing the Base Install Remove 2 This monitor comes with the following accessories : Power cable. English First Setup Congratulation for purchasing this monitor of high performance!
D-Sub cable. User guide. Quick Start Guide. Quick Installation Installing & Removing the Base Install Remove 2 This monitor comes with the following accessories : Power cable. English First Setup Congratulation for purchasing this monitor of high performance!

919S1 Manual
Page 6
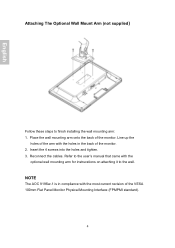
Remove the stand. 3 Lay the monitor face down on a soft surface. 1. English Preparing To Install The Optional Wall Mount Arm (Not Included) This monitor can purchase separately. Turn the power OFF then dis-connect the cables from the monitor before performing the procedure below. Remove the 4 screws holding the stand to a wall mounting arm you can be attached to the hinge. 2.
Remove the stand. 3 Lay the monitor face down on a soft surface. 1. English Preparing To Install The Optional Wall Mount Arm (Not Included) This monitor can purchase separately. Turn the power OFF then dis-connect the cables from the monitor before performing the procedure below. Remove the 4 screws holding the stand to a wall mounting arm you can be attached to the hinge. 2.
919S1 Manual
Page 7
... Attaching The Optional Wall Mount Arm (not supplied) Follow these steps to the user's manual that came with the most current revision of the monitor. 2. Line up the holes of the arm with the holes in compliance with the optional wall mounting arm for instrucstions on attaching it to... the wall. Refer to finish installing the wall mounting arm: 1. NOTE The AOC 919Sw-1 is in the back of the VESA 100mm Flat Panel Monitor Physical Mounting Interface (FPMPMI standard). 4 Reconnect the cables. Place the wall mounting arm onto the back of the...
... Attaching The Optional Wall Mount Arm (not supplied) Follow these steps to the user's manual that came with the most current revision of the monitor. 2. Line up the holes of the arm with the holes in compliance with the optional wall mounting arm for instrucstions on attaching it to... the wall. Refer to finish installing the wall mounting arm: 1. NOTE The AOC 919Sw-1 is in the back of the VESA 100mm Flat Panel Monitor Physical Mounting Interface (FPMPMI standard). 4 Reconnect the cables. Place the wall mounting arm onto the back of the...
919S1 Manual
Page 8
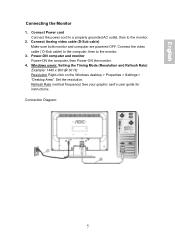
Connect the video cable ( D-Sub cable) to the computer, then to the monitor. 2. Windows users: Setting the Timing Mode (Resolution and Refresh Rate) Example: 1440 x 900 @ 60 Hz Resolution Right-click on the Windows desktop > Properties > ...Desktop Area". Connection Diagram: 5 Connect Power cord Connect the power cord to a properly grounded AC outlet, then to the monitor. 3. Power-ON computer and monitor Power-ON the computer, then Power-ON the monitor. 4. Refresh Rate (vertical frequency) See your graphic card's user guide for instructions. Set the resolution. Connect Analog video...
Connect the video cable ( D-Sub cable) to the computer, then to the monitor. 2. Windows users: Setting the Timing Mode (Resolution and Refresh Rate) Example: 1440 x 900 @ 60 Hz Resolution Right-click on the Windows desktop > Properties > ...Desktop Area". Connection Diagram: 5 Connect Power cord Connect the power cord to a properly grounded AC outlet, then to the monitor. 3. Power-ON computer and monitor Power-ON the computer, then Power-ON the monitor. 4. Refresh Rate (vertical frequency) See your graphic card's user guide for instructions. Set the resolution. Connect Analog video...

919S1 Manual
Page 13
English Supporting Timing Modes VGA VGA MAC VESA VESA VESA VESA VESA MAC VESA VESA VESA VESA VESA VESA VESA VESA VESA 720 x 400 @ 70Hz 640 x 480 @ 60Hz 640 x 480 @ 67Hz 640 x 480 @ 75Hz 800 x 600 @ 56Hz 800 x 600 @ 60Hz 800 x 600 @ 72Hz 800 x 600 @ 75Hz 832 x 624 @ 75Hz 1024 x 768 @ 60Hz 1024 x 768 @ 70Hz 1024 x 768 @ 75Hz 1152 x 864 @ 75Hz 1280 x 960 @ 60Hz 1280 x 1024 @ 60Hz 1280 x 1024 @ 75Hz 1440 x 900 @ 60Hz 1440 x 900 @ 75Hz Warning : Do not set the graphic card in permanent damage to exceed these maximum refresh rates. Doing so may result in your computer to your monitor. 10
English Supporting Timing Modes VGA VGA MAC VESA VESA VESA VESA VESA MAC VESA VESA VESA VESA VESA VESA VESA VESA VESA 720 x 400 @ 70Hz 640 x 480 @ 60Hz 640 x 480 @ 67Hz 640 x 480 @ 75Hz 800 x 600 @ 56Hz 800 x 600 @ 60Hz 800 x 600 @ 72Hz 800 x 600 @ 75Hz 832 x 624 @ 75Hz 1024 x 768 @ 60Hz 1024 x 768 @ 70Hz 1024 x 768 @ 75Hz 1152 x 864 @ 75Hz 1280 x 960 @ 60Hz 1280 x 1024 @ 60Hz 1280 x 1024 @ 75Hz 1440 x 900 @ 60Hz 1440 x 900 @ 75Hz Warning : Do not set the graphic card in permanent damage to exceed these maximum refresh rates. Doing so may result in your computer to your monitor. 10
919S1 Manual
Page 15
... it . You must bend harder to exceed 20 degree backward but no screen image Make sure the video cable supplied with the monitor is tightly secured to the power adapter and the power supply is installed in a well ventilated area. Power on but this range...Adjust the Panel within 0 degree leaning forward and 20 degree leaning backward. English Care and Maintenance Care Avoid exposing your monitor directly to repair your monitor yourself. Place your monitor away from magnets, motors, transformers, speakers, and TV sets. Keep your service center or a qualified technician to reduce...
... it . You must bend harder to exceed 20 degree backward but no screen image Make sure the video cable supplied with the monitor is tightly secured to the power adapter and the power supply is installed in a well ventilated area. Power on but this range...Adjust the Panel within 0 degree leaning forward and 20 degree leaning backward. English Care and Maintenance Care Avoid exposing your monitor directly to repair your monitor yourself. Place your monitor away from magnets, motors, transformers, speakers, and TV sets. Keep your service center or a qualified technician to reduce...
919S1 Manual
Page 16
Loose or broken pins in the cable connector could cause an improper connection. Connect the monitor to make sure it is securely connected. English Wrong or abnormal colors If any colors (red, green, blue) are missing, check the video cable to another computer. 13
Loose or broken pins in the cable connector could cause an improper connection. Connect the monitor to make sure it is securely connected. English Wrong or abnormal colors If any colors (red, green, blue) are missing, check the video cable to another computer. 13

919Swa1 Spec Sheet
Page 1
...Windows Vista and the Windows logo are subject to change without notice. *Wall mount arm & bracket not included. 919Swa1 Cabinet Color Panel Pixel Pitch Display Area Brightness Contrast Ratio Response Time Viewing Angle Compatibility Scanning Frequency Pixel Frequency Maximum ... inches) Dimensions w/o base (WxHxD inches) Weight Loading Qty w/pallet UPC Code VESA 100mm Wall Mount Compliant*, Kensington Security Slot Monitor: 449x367x195, Carton: 500x428x122 Monitor: 17.7x14.4x7.7, Carton: 19.7x16.9x4.8 Monitor: 17.7x12.4x2.5 10.5 lbs (4.75 kgs) Net 12.3 lbs (5.6 kgs) Gross 20' = 1000 pcs.; 40'...
...Windows Vista and the Windows logo are subject to change without notice. *Wall mount arm & bracket not included. 919Swa1 Cabinet Color Panel Pixel Pitch Display Area Brightness Contrast Ratio Response Time Viewing Angle Compatibility Scanning Frequency Pixel Frequency Maximum ... inches) Dimensions w/o base (WxHxD inches) Weight Loading Qty w/pallet UPC Code VESA 100mm Wall Mount Compliant*, Kensington Security Slot Monitor: 449x367x195, Carton: 500x428x122 Monitor: 17.7x14.4x7.7, Carton: 19.7x16.9x4.8 Monitor: 17.7x12.4x2.5 10.5 lbs (4.75 kgs) Net 12.3 lbs (5.6 kgs) Gross 20' = 1000 pcs.; 40'...


