
G2460PQU Data Sheet
Page 1
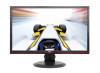
..., brilliant images, and 1ms response time for quick graphics rendering. The ultimate gaming monitor features the connectivity you need in a sleek design fit to 144Hz • 144Hz refresh rate with 1ms response time • VGA, DVI-Dual Link, HDMI, Display Port, 4 USB 2.0 ports (includes 1 fast charger) • 7 different display modes • Sleek-design with tilt, pivot, and height adjustability AOC Monitors LED monitor Gaming Monitor 24", 1920 x 1080 G2460PQU 24-inch Extreme Performance 144Hz Gaming Monitor AOC's G2460PQU is...
..., brilliant images, and 1ms response time for quick graphics rendering. The ultimate gaming monitor features the connectivity you need in a sleek design fit to 144Hz • 144Hz refresh rate with 1ms response time • VGA, DVI-Dual Link, HDMI, Display Port, 4 USB 2.0 ports (includes 1 fast charger) • 7 different display modes • Sleek-design with tilt, pivot, and height adjustability AOC Monitors LED monitor Gaming Monitor 24", 1920 x 1080 G2460PQU 24-inch Extreme Performance 144Hz Gaming Monitor AOC's G2460PQU is...

G2460PQU Data Sheet
Page 2
... as it should be with the rest of a normal USB port. Sleek Design with Height Adjustability AOC's gaming monitor is designed with VGA, DVI-Dual Link, HDMI, Display Port, and four USB 2.0 ports. Two USB ports can be found on the screen, making them . The 24-inch display has tilt, pivot, height adjustability, and can be used in 2watt speakers for Ultra Smooth Graphics Competitive and intense gaming demands the best gaming gear to hit. G2460PQU
... as it should be with the rest of a normal USB port. Sleek Design with Height Adjustability AOC's gaming monitor is designed with VGA, DVI-Dual Link, HDMI, Display Port, and four USB 2.0 ports. Two USB ports can be found on the screen, making them . The 24-inch display has tilt, pivot, height adjustability, and can be used in 2watt speakers for Ultra Smooth Graphics Competitive and intense gaming demands the best gaming gear to hit. G2460PQU

G2460PQU Data Sheet
Page 3
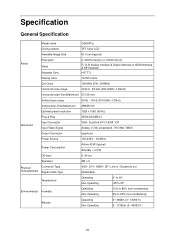
G2460PQU G2460PQU Specification Cabinet Color Panel Black TFT Active Matrix LCD, LED Backlight 24" Class Widescreen, 16:9 Aspect Ratio 24" Viewable Image Size, Diagonal Pixel Pitch 0.27675 (H) mm x 0.27675 (v) mm Display Area 531.36 mm x 298.89 mm Brightness 350 cd/m2 (typ) Contrast Ratio 80,000,000:1 (dynamic) Response Time Viewing Angle Scanning Frequency Optimal Resolution Recommended Supported Resolutions Color Depth 1ms Horizontal: 170 Degrees (CR>10) Vertical: 160 Degrees (CR>10) Horizontal: 30K~83KHz Vertical: 50...
G2460PQU G2460PQU Specification Cabinet Color Panel Black TFT Active Matrix LCD, LED Backlight 24" Class Widescreen, 16:9 Aspect Ratio 24" Viewable Image Size, Diagonal Pixel Pitch 0.27675 (H) mm x 0.27675 (v) mm Display Area 531.36 mm x 298.89 mm Brightness 350 cd/m2 (typ) Contrast Ratio 80,000,000:1 (dynamic) Response Time Viewing Angle Scanning Frequency Optimal Resolution Recommended Supported Resolutions Color Depth 1ms Horizontal: 170 Degrees (CR>10) Vertical: 160 Degrees (CR>10) Horizontal: 30K~83KHz Vertical: 50...
G2460PQU User Manual
Page 2
... ...8 Setup Stand & Base ...9 Adjusting Viewing Angle ...10 Connecting the Monitor...11 Wall Mounting ...12 Adjusting ...13 Setting Optimal Resolution ...13 Windows Vista ...13 Windows XP ...15 Windows ME/2000...16 Windows 8 ...17 Hotkeys...19 OSD Setting...20 Luminance ...21 Image Setup ...22 Color Setup...23 Picture Boost ...24 OSD Setup ...25 Extra ...26 Exit...27 LED Indicator ...27 Driver ...28 Monitor Driver ...28 Windows 8 ...28 Windows 7 ...32 Windows Vista ...36 Windows XP ...38 Windows 2000 ...41 Windows ME...41 i-Menu...42 e-Saver ...43 Screen+ ...44 Troubleshoot ...45 Specification...
... ...8 Setup Stand & Base ...9 Adjusting Viewing Angle ...10 Connecting the Monitor...11 Wall Mounting ...12 Adjusting ...13 Setting Optimal Resolution ...13 Windows Vista ...13 Windows XP ...15 Windows ME/2000...16 Windows 8 ...17 Hotkeys...19 OSD Setting...20 Luminance ...21 Image Setup ...22 Color Setup...23 Picture Boost ...24 OSD Setup ...25 Extra ...26 Exit...27 LED Indicator ...27 Driver ...28 Monitor Driver ...28 Windows 8 ...28 Windows 7 ...32 Windows Vista ...36 Windows XP ...38 Windows 2000 ...41 Windows ME...41 i-Menu...42 e-Saver ...43 Screen+ ...44 Troubleshoot ...45 Specification...
G2460PQU User Manual
Page 4
...) pin. For use the monitor only with power adapter). 4 Power The monitor should be operated only from damage due to power surges. Do not defeat the safety purpose of power supplied to your home, consult your outlet does not accommodate the three-wire plug, have appropriate configured receptacles marked between 100 - 240V ~, Min. 5A The wall socket shall be installed near the...
...) pin. For use the monitor only with power adapter). 4 Power The monitor should be operated only from damage due to power surges. Do not defeat the safety purpose of power supplied to your home, consult your outlet does not accommodate the three-wire plug, have appropriate configured receptacles marked between 100 - 240V ~, Min. 5A The wall socket shall be installed near the...

G2460PQU User Manual
Page 8
Setup Contents in Box Monitor CD Manual Stand Wire holder Power Cable DVI Cable Analog Cable Audio Cable HDMI Cable USB Cable DP Not all signal cables (Audio,Analog, DVI, DP, USB and HDMI cables) will be provided for confirmation. 8 Please check with the local dealer or AOC branch office for all countries and regions.
Setup Contents in Box Monitor CD Manual Stand Wire holder Power Cable DVI Cable Analog Cable Audio Cable HDMI Cable USB Cable DP Not all signal cables (Audio,Analog, DVI, DP, USB and HDMI cables) will be provided for confirmation. 8 Please check with the local dealer or AOC branch office for all countries and regions.

G2460PQU User Manual
Page 11
... monitor and connect the other end to the computer‟s HDMI port. 5 (Optional -Requires a video card with HDMI port) - Connecting the Monitor Cable Connections In Back of Monitor and Computer: 1 USB Device charging port 2 USB Device Interface 3 Power switch 4 Power 5 DP 6 D-SUB 7 DVI 8 HDMI 9 Audio in 10 Earphone To protect equipment, always turn off the PC and LCD monitor before connecting. 1 Connect the power cable to the AC port on your monitor displays an image, installation is complete. If your monitor and computer. 8 Video content supporting resolution: VGA / DVI...
... monitor and connect the other end to the computer‟s HDMI port. 5 (Optional -Requires a video card with HDMI port) - Connecting the Monitor Cable Connections In Back of Monitor and Computer: 1 USB Device charging port 2 USB Device Interface 3 Power switch 4 Power 5 DP 6 D-SUB 7 DVI 8 HDMI 9 Audio in 10 Earphone To protect equipment, always turn off the PC and LCD monitor before connecting. 1 Connect the power cable to the AC port on your monitor displays an image, installation is complete. If your monitor and computer. 8 Video content supporting resolution: VGA / DVI...

G2460PQU User Manual
Page 12
... the optional wall mounting arm for all models, please check with the dealer or official department of the monitor. 4 Insert the 4 screws into the holes and tighten. 5 Reconnect the cables. Follow these steps: 1 Remove the base. 2 Follow the manufacturer's instructions to the user's manual that came with the holes in the back of AOC. 12 Noted : VESA mounting screw holes are not available for instructions on attaching...
... the optional wall mounting arm for all models, please check with the dealer or official department of the monitor. 4 Insert the 4 screws into the holes and tighten. 5 Reconnect the cables. Follow these steps: 1 Remove the base. 2 Follow the manufacturer's instructions to the user's manual that came with the holes in the back of AOC. 12 Noted : VESA mounting screw holes are not available for instructions on attaching...
G2460PQU User Manual
Page 19
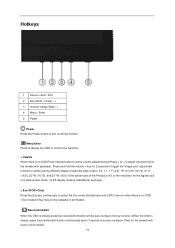
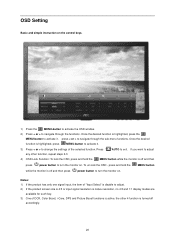
..., press Source/Auto/Exit button continuously about 3 second to select the Eco mode of brightness and DCR/I-Care on when there is closed, press Source/Auto/Exit button will be available in wide screen mode, no OSD,Press Volume button to active volume adjustment bar,Press < or > to turn on/off the monitor. Press and hold the volume > key for 2 seconds to trigger the "image size" adjustment function to switch among different display modes like wide screen...
..., press Source/Auto/Exit button continuously about 3 second to select the Eco mode of brightness and DCR/I-Care on when there is closed, press Source/Auto/Exit button will be available in wide screen mode, no OSD,Press Volume button to active volume adjustment bar,Press < or > to turn on/off the monitor. Press and hold the volume > key for 2 seconds to trigger the "image size" adjustment function to switch among different display modes like wide screen...
G2460PQU User Manual
Page 20
... signal input, the item of "Input Select" is disable to adjust. 2) If the product screen size is 4:3 or input signal resolution is native resolution, no 4:3 and 1:1 display modes are available for such key. 3) One of the selected function. Once the desired function is highlighted, press MENU-button to change the settings of DCR, Color Boost, i-Care, DPS and Picture Boost functions is active, the other function, repeat steps 2-3. 4) OSD Lock Function: To lock...
... signal input, the item of "Input Select" is disable to adjust. 2) If the product screen size is 4:3 or input signal resolution is native resolution, no 4:3 and 1:1 display modes are available for such key. 3) One of the selected function. Once the desired function is highlighted, press MENU-button to change the settings of DCR, Color Boost, i-Care, DPS and Picture Boost functions is active, the other function, repeat steps 2-3. 4) OSD Lock Function: To lock...
G2460PQU User Manual
Page 28
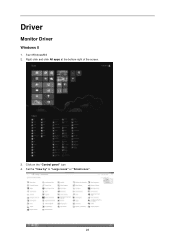
Click on the "Control panel" icon 4. Set the "View by" to "Large icons" or "Small icons". 28 Right click and click All apps at the bottom-right of the screen. 3. Start Windows® 8 2. Driver Monitor Driver Windows 8 1.
Click on the "Control panel" icon 4. Set the "View by" to "Large icons" or "Small icons". 28 Right click and click All apps at the bottom-right of the screen. 3. Start Windows® 8 2. Driver Monitor Driver Windows 8 1.

G2460PQU User Manual
Page 33
Click the "Monitor" tab and then click the "Properties" button. 7.Click the "Driver" tab. 33 Click the "Advanced Settings" button.
Click the "Monitor" tab and then click the "Properties" button. 7.Click the "Driver" tab. 33 Click the "Advanced Settings" button.

G2460PQU User Manual
Page 37
... 'Next' button. 9. Click on the following screens displayed in the figure below, click "Continue". 5. Click "Close" → "Close" → "OK" → "OK" on the 'Have disk...' The monitor can be used as shown in sequence. 37 Check the "Browse my computer for your monitor model and click on the 'Browse...' 4. If the message "Windows needs..." is displayed, as is completed. Click "Update Driver..."
... 'Next' button. 9. Click on the following screens displayed in the figure below, click "Continue". 5. Click "Close" → "Close" → "OK" → "OK" on the 'Have disk...' The monitor can be used as shown in sequence. 37 Check the "Browse my computer for your monitor model and click on the 'Browse...' 4. If the message "Windows needs..." is displayed, as is completed. Click "Update Driver..."

G2460PQU User Manual
Page 39
button. 39 If the 'Properties' button is inactive, it means your monitor is active, click on 'Properties' button. Please stop installation. - If the 'Properties' button is properly configured. Click on the 'Driver' tab and then click on the 'Advanced' button. 6. 5. Select the 'Settings' tab then click on 'Update Driver...' Select 'Monitor' tab - Please follow the steps below. 7.
button. 39 If the 'Properties' button is inactive, it means your monitor is active, click on 'Properties' button. Please stop installation. - If the 'Properties' button is properly configured. Click on the 'Driver' tab and then click on the 'Advanced' button. 6. 5. Select the 'Settings' tab then click on 'Update Driver...' Select 'Monitor' tab - Please follow the steps below. 7.
G2460PQU User Manual
Page 41
...' and then click on 'Control Panel'. 3. Click on 'Driver' and then click on the 'Display' Icon. 4. Double click on 'Update Driver...' Click on the 'Open' button, then click on 'Properties' button. Click on the 'OK' button. 10. Windows ME 1. Double click on 'Change...' Select the 'Monitor' button, then click on the 'Display' Icon. 4. Start Windows® 2000 2. Select 'Display a list of all the drivers in a specific location, so you can...
...' and then click on 'Control Panel'. 3. Click on 'Driver' and then click on the 'Display' Icon. 4. Double click on 'Update Driver...' Click on the 'Open' button, then click on 'Properties' button. Click on the 'OK' button. 10. Windows ME 1. Double click on 'Change...' Select the 'Monitor' button, then click on the 'Display' Icon. 4. Start Windows® 2000 2. Select 'Display a list of all the drivers in a specific location, so you can...
G2460PQU User Manual
Page 43
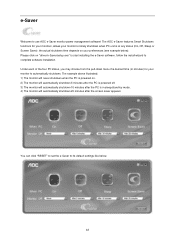
..., Sleep or Screen Saver); Please click on your monitor to use AOC e-Saver monitor power management software! e-Saver Welcome to timely shutdown when PC unit is in minutes) for your monitors, allows your preferences (see example below . 43 the actual shutdown time depends on "driver/e-Saver/setup.exe" to start installing the e-Saver software, follow the install wizard to its default settings like below ). You can click "RESET...
..., Sleep or Screen Saver); Please click on your monitor to use AOC e-Saver monitor power management software! e-Saver Welcome to timely shutdown when PC unit is in minutes) for your monitors, allows your preferences (see example below . 43 the actual shutdown time depends on "driver/e-Saver/setup.exe" to start installing the e-Saver software, follow the install wizard to its default settings like below ). You can click "RESET...

G2460PQU User Manual
Page 45
... images on the screen Use Windows 95/98/2000/ME/XP shut-down mode Adjust CLOCK and FOCUS. Adjust the Contrast and Brightness Controls. Inspect the monitor's video cable and make sure no pin is on every model. Can you are not using . We recommend plugging the monitor directly to the monitor. Troubleshoot Problem & Question Possible Solutions Power LED Is Not ON Make sure the power button is ON and the Power Cord is bent. Check the power cord connection and power supply. Monitor Is...
... images on the screen Use Windows 95/98/2000/ME/XP shut-down mode Adjust CLOCK and FOCUS. Adjust the Contrast and Brightness Controls. Inspect the monitor's video cable and make sure no pin is on every model. Can you are not using . We recommend plugging the monitor directly to the monitor. Troubleshoot Problem & Question Possible Solutions Power LED Is Not ON Make sure the power button is ON and the Power Cord is bent. Check the power cord connection and power supply. Monitor Is...
G2460PQU User Manual
Page 46
... Specification Model name G2460PQU Driving system TFT Color LCD Viewable Image Size 61.0 cm diagonal Panel Pixel pitch Video Separate Sync. 0. 27675 mm(H) x 0. 27675 mm(V) R, G, B Analog lnterface & Digital Interface & HDMI lnterface & DP Interface H/V TTL Display Color 16.7M Colors Dot Clock 165 MHz (DVI: 300MHz) Horizontal scan range 30 kHz - 83 kHz (DVI:30kHz~140kHz) Horizontal scan Size(Maximum) 531.36 mm Vertical scan range 50 Hz - 76 Hz (DVI:50Hz~120Hz) Vertical scan Size(Maximum) 298.89 mm Optimal...
... Specification Model name G2460PQU Driving system TFT Color LCD Viewable Image Size 61.0 cm diagonal Panel Pixel pitch Video Separate Sync. 0. 27675 mm(H) x 0. 27675 mm(V) R, G, B Analog lnterface & Digital Interface & HDMI lnterface & DP Interface H/V TTL Display Color 16.7M Colors Dot Clock 165 MHz (DVI: 300MHz) Horizontal scan range 30 kHz - 83 kHz (DVI:30kHz~140kHz) Horizontal scan Size(Maximum) 531.36 mm Vertical scan range 50 Hz - 76 Hz (DVI:50Hz~120Hz) Vertical scan Size(Maximum) 298.89 mm Optimal...

G2460PQU User Manual
Page 55
... its option, either repair the defective product with new or rebuilt parts, or replace it with the transportation of purchase, to the AOC Certified or Authorized Service Center under the following condition: Make sure the LCD Monitor is not responsible for any losses or damages that occur as *stated below. is not available for warranty instructions. This includes...
... its option, either repair the defective product with new or rebuilt parts, or replace it with the transportation of purchase, to the AOC Certified or Authorized Service Center under the following condition: Make sure the LCD Monitor is not responsible for any losses or damages that occur as *stated below. is not available for warranty instructions. This includes...
G2460PQU User Manual
Page 57
... commercial or industrial application Adjustment by non-authorized source Repair, modification, or installation of options or parts by anyone other than an EPI Authorized Service Center Improper environment Excessive or inadequate heating or air conditioning or electrical power failures, surges, or other irregularities This three-year limited warranty does not cover any of the product's firmware or hardware that...
... commercial or industrial application Adjustment by non-authorized source Repair, modification, or installation of options or parts by anyone other than an EPI Authorized Service Center Improper environment Excessive or inadequate heating or air conditioning or electrical power failures, surges, or other irregularities This three-year limited warranty does not cover any of the product's firmware or hardware that...


