
G2460PQU User Manual
Page 2
... Resolution ...13 Windows Vista ...13 Windows XP ...15 Windows ME/2000...16 Windows 8 ...17 Hotkeys...19 OSD Setting...20 Luminance ...21 Image Setup ...22 Color Setup...23 Picture Boost ...24 OSD Setup ...25 Extra ...26 Exit...27 LED Indicator ...27 Driver ...28 Monitor Driver ...28 Windows 8 ...28 Windows 7 ...32 Windows Vista ...36 ...48 Plug and Play ...50 Regulation...51 FCC Notice ...51 WEEE Declaration ...52 EPA Energy Star ...53 EPEAT Declaration ...54 Service ...55 EU WARRANTY FOR AOC MONITORS ...55 Warranty Statement for North & South America (excluding Brazil 57 TCO DOCUMENT ...59 2
... Resolution ...13 Windows Vista ...13 Windows XP ...15 Windows ME/2000...16 Windows 8 ...17 Hotkeys...19 OSD Setting...20 Luminance ...21 Image Setup ...22 Color Setup...23 Picture Boost ...24 OSD Setup ...25 Extra ...26 Exit...27 LED Indicator ...27 Driver ...28 Monitor Driver ...28 Windows 8 ...28 Windows 7 ...32 Windows Vista ...36 ...48 Plug and Play ...50 Regulation...51 FCC Notice ...51 WEEE Declaration ...52 EPA Energy Star ...53 EPEAT Declaration ...54 Service ...55 EU WARRANTY FOR AOC MONITORS ...55 Warranty Statement for North & South America (excluding Brazil 57 TCO DOCUMENT ...59 2

G2460PQU User Manual
Page 8
Please check with the local dealer or AOC branch office for all countries and regions. Setup Contents in Box Monitor CD Manual Stand Wire holder Power Cable DVI Cable Analog Cable Audio Cable HDMI Cable USB Cable DP Not all signal cables (Audio,Analog, DVI, DP, USB and HDMI cables) will be provided for confirmation. 8
Please check with the local dealer or AOC branch office for all countries and regions. Setup Contents in Box Monitor CD Manual Stand Wire holder Power Cable DVI Cable Analog Cable Audio Cable HDMI Cable USB Cable DP Not all signal cables (Audio,Analog, DVI, DP, USB and HDMI cables) will be provided for confirmation. 8
G2460PQU User Manual
Page 9
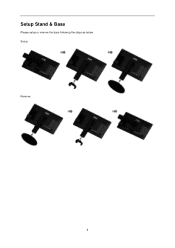
Setup: Remove: 9 Setup Stand & Base Please setup or remove the base following the steps as below.
Setup: Remove: 9 Setup Stand & Base Please setup or remove the base following the steps as below.
G2460PQU User Manual
Page 22
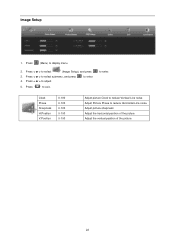
Press (Menu) to enter. to display menu. 2. Adjust Picture Phase to adjust. 5. Press < or > to select submenu, and press to reduce Vertical-Line noise. Clock Phase Sharpness H.Position V.Position 0-100 0-100 0-100 0-100 0-100 Adjust picture Clock to enter. 4. Adjust the vertical position of the picture. Press to select (Image Setup), and press 3. Press < or > to exit. Press < or > to reduce Horizontal-Line noise Adjust picture sharpness Adjust the horizontal position of the picture. 22 Image Setup 1.
Press (Menu) to enter. to display menu. 2. Adjust Picture Phase to adjust. 5. Press < or > to select submenu, and press to reduce Vertical-Line noise. Clock Phase Sharpness H.Position V.Position 0-100 0-100 0-100 0-100 0-100 Adjust picture Clock to enter. 4. Adjust the vertical position of the picture. Press to select (Image Setup), and press 3. Press < or > to exit. Press < or > to reduce Horizontal-Line noise Adjust picture sharpness Adjust the horizontal position of the picture. 22 Image Setup 1.
G2460PQU User Manual
Page 25
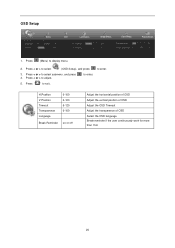
OSD Setup 1. Press < or > to enter. 5. to adjust. H.Position V.Position Timeout Transparence Language 0-100 0-100 5-120 0-100 Break Reminder on or off Adjust the horizontal position of OSD Adjust the vertical position of OSD Adjust the OSD Timeout Adjust the transparence of OSD Select the OSD language Break reminder if the user continuously work for more than 1hrs 25 Press < or > to enter. 3. Press < or > to select (OSD Setup), and press to select submenu, and press 4. Press to display menu. 2. Press (Menu) to exit.
OSD Setup 1. Press < or > to enter. 5. to adjust. H.Position V.Position Timeout Transparence Language 0-100 0-100 5-120 0-100 Break Reminder on or off Adjust the horizontal position of OSD Adjust the vertical position of OSD Adjust the OSD Timeout Adjust the transparence of OSD Select the OSD language Break reminder if the user continuously work for more than 1hrs 25 Press < or > to enter. 3. Press < or > to select (OSD Setup), and press to select submenu, and press 4. Press to display menu. 2. Press (Menu) to exit.
G2460PQU User Manual
Page 43
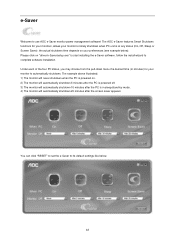
...click "RESET" to set the e-Saver to its default settings like below ). Please click on "driver/e-Saver/setup.exe" to start installing the e-Saver software, follow the install wizard to use AOC e-Saver monitor power management software! Under each of the four PC status, you may choose from the pull...by mode. 4) The monitor will automatically shutdown 10 minutes after the PC is at any status (On, Off, Sleep or Screen Saver); The AOC e-Saver features Smart Shutdown functions for your monitors, allows your monitor to timely shutdown when PC unit is in minutes) for your monitor to ...
...click "RESET" to set the e-Saver to its default settings like below ). Please click on "driver/e-Saver/setup.exe" to start installing the e-Saver software, follow the install wizard to use AOC e-Saver monitor power management software! Under each of the four PC status, you may choose from the pull...by mode. 4) The monitor will automatically shutdown 10 minutes after the PC is at any status (On, Off, Sleep or Screen Saver); The AOC e-Saver features Smart Shutdown functions for your monitors, allows your monitor to timely shutdown when PC unit is in minutes) for your monitor to ...