LM560 Manual
Page 2
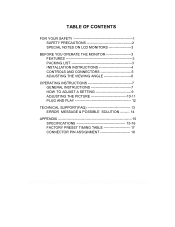
TABLE OF CONTENTS FOR YOUR SAFETY 1 SAFETY PRECAUTIONS 2 SPECIAL NOTES ON LCD MONITORS 3 BEFORE YOU OPERATE THE MONITOR 3 FEATURES 3 PACKING LIST 3 INSTALLATION INSTRUCTIONS 4 CONTROLS AND CONNECTORS 5 ADJUSTING THE VIEWING ANGLE 6 OPERATING INSTRUCTIONS 7 GENERAL INSTRUCTIONS 7 HOW TO ADJUST A SETTING 9 ADJUSTING THE PICTURE 10-11 PLUG AND PLAY 12 TECHNICAL SUPPORT(FAQ 13 ERROR MESSAGE & POSSIBLE SOLUTION -------- 14 APPENDIX 15 SPECIFICATIONS 15-16 FACTORY PRESET TIMING TABLE 17 CONNECTOR PIN ASSIGNMENT 18
TABLE OF CONTENTS FOR YOUR SAFETY 1 SAFETY PRECAUTIONS 2 SPECIAL NOTES ON LCD MONITORS 3 BEFORE YOU OPERATE THE MONITOR 3 FEATURES 3 PACKING LIST 3 INSTALLATION INSTRUCTIONS 4 CONTROLS AND CONNECTORS 5 ADJUSTING THE VIEWING ANGLE 6 OPERATING INSTRUCTIONS 7 GENERAL INSTRUCTIONS 7 HOW TO ADJUST A SETTING 9 ADJUSTING THE PICTURE 10-11 PLUG AND PLAY 12 TECHNICAL SUPPORT(FAQ 13 ERROR MESSAGE & POSSIBLE SOLUTION -------- 14 APPENDIX 15 SPECIFICATIONS 15-16 FACTORY PRESET TIMING TABLE 17 CONNECTOR PIN ASSIGNMENT 18

LM560 Manual
Page 3
... not expose the monitor to correct such interference. Connect the equipment into an outlet on , the user is the responsibilities of the following measures: 1. Refer servicing to which can radiate radio frequency energy, and if not installed and used in accordance with the instructions, may cause harmful interference to comply with the limits for a Class B digital device, pursuant to...
... not expose the monitor to correct such interference. Connect the equipment into an outlet on , the user is the responsibilities of the following measures: 1. Refer servicing to which can radiate radio frequency energy, and if not installed and used in accordance with the instructions, may cause harmful interference to comply with the limits for a Class B digital device, pursuant to...
LM560 Manual
Page 4
... parts causing a fire or electric shock. Please refer all servicing to power surges. Do not overload power strips and extension cords. Use only a cart or stand recommended by yourself; Do not place the monitor in a wet basement. Do not place the monitor on a wall or shelf, use an adapter to dangerous voltages and other hazards. opening or removing covers can expose you mount the monitor...
... parts causing a fire or electric shock. Please refer all servicing to power surges. Do not overload power strips and extension cords. Use only a cart or stand recommended by yourself; Do not place the monitor in a wet basement. Do not place the monitor on a wall or shelf, use an adapter to dangerous voltages and other hazards. opening or removing covers can expose you mount the monitor...
LM560 Manual
Page 5
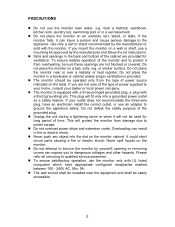
... the desktop pattern you use . Power Cord 4. Owner's Manual 3. The monitor will slowly recover from this. Turn off the Power Switch and then turn it on again to the nature of the LCD screen, an afterimage of the time. Due to make sure the flicker disappears. You may remain after switching the image when the same image has been displayed for Windows Recommened Resolutions: 1024X768 @75Hz ...
... the desktop pattern you use . Power Cord 4. Owner's Manual 3. The monitor will slowly recover from this. Turn off the Power Switch and then turn it on again to the nature of the LCD screen, an afterimage of the time. Due to make sure the flicker disappears. You may remain after switching the image when the same image has been displayed for Windows Recommened Resolutions: 1024X768 @75Hz ...
LM560 Manual
Page 6
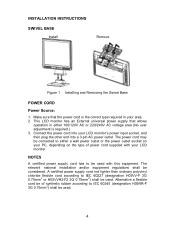
... your LCD monitor. INSTALLATION INSTRUCTIONS SWIVEL BASE Install Remove Figure 1 Installing and Removing the Swivel Base POWER CORD Power Source: 1. NOTES A certified power supply cord has to either 100/120V AC or 220/240V AC voltage area (No user adjustment is the correct type required in either a wall power outlet or the power outlet socket on the type of synthetic rubber according to IEC 60245 (designation H05RR-F 3G 0.75mm2) shall be connected to...
... your LCD monitor. INSTALLATION INSTRUCTIONS SWIVEL BASE Install Remove Figure 1 Installing and Removing the Swivel Base POWER CORD Power Source: 1. NOTES A certified power supply cord has to either 100/120V AC or 220/240V AC voltage area (No user adjustment is the correct type required in either a wall power outlet or the power outlet socket on the type of synthetic rubber according to IEC 60245 (designation H05RR-F 3G 0.75mm2) shall be connected to...

LM560 Manual
Page 7
...), install the proper grounding adapter (not supplied). AC Power Cord 2. The power cord may be connected to the computer's DSub port. D-Sub Cable 5 Connecting the Power Cord: Connect the power cord into a 3-pin AC power outlet. Figure 2 Connecting Cables 1. CONTROLS AND CONNECTORS VIDEO CABLE Connecting the D-Sub Cable: Connect one end of the 15-pin D-Sub cable to the back of the monitor and connect the other end into your LCD monitor's power input socket, and then plug the other end to either a wall power outlet...
...), install the proper grounding adapter (not supplied). AC Power Cord 2. The power cord may be connected to the computer's DSub port. D-Sub Cable 5 Connecting the Power Cord: Connect the power cord into a 3-pin AC power outlet. Figure 2 Connecting Cables 1. CONTROLS AND CONNECTORS VIDEO CABLE Connecting the D-Sub Cable: Connect one end of the 15-pin D-Sub cable to the back of the monitor and connect the other end into your LCD monitor's power input socket, and then plug the other end to either a wall power outlet...
LM560 Manual
Page 8
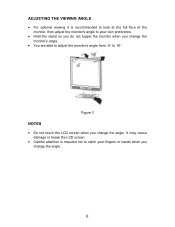
It may cause damage or break the LCD screen. Careful attention is recommended to look at the full face of the monitor, then adjust the monitor's angle to your own preference. Hold the stand so you do not topple the monitor when you change the monitor's angle. You are able to adjust the monitor's angle from -5 to catch your fingers or hands when you change the angle. 6 ADJUSTING THE VIEWING ANGLE For optimal viewing it is required not to 18. Figure 3 NOTES Do not touch the LCD screen when you change the angle.
It may cause damage or break the LCD screen. Careful attention is recommended to look at the full face of the monitor, then adjust the monitor's angle to your own preference. Hold the stand so you do not topple the monitor when you change the monitor's angle. You are able to adjust the monitor's angle from -5 to catch your fingers or hands when you change the angle. 6 ADJUSTING THE VIEWING ANGLE For optimal viewing it is required not to 18. Figure 3 NOTES Do not touch the LCD screen when you change the angle.
LM560 Manual
Page 9
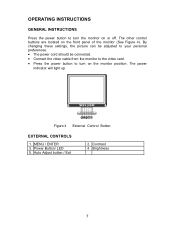
... light up. Figure 4 External Control Button EXTERNAL CONTROLS 1. Power Button/ LED 5. Auto Adjust button / Exit 2. Contrast 4. MENU / ENTER 3. Brightness 7 By changing these settings, the picture can be adjusted to your personal preferences. The power cord should be connected. Connect the video cable from the monitor to the video card. Press the power button to turn on the monitor position. The other control buttons are located on the front panel of the monitor (See Figure 4). OPERATING INSTRUCTIONS GENERAL INSTRUCTIONS Press the power button...
... light up. Figure 4 External Control Button EXTERNAL CONTROLS 1. Power Button/ LED 5. Auto Adjust button / Exit 2. Contrast 4. MENU / ENTER 3. Brightness 7 By changing these settings, the picture can be adjusted to your personal preferences. The power cord should be connected. Connect the video cable from the monitor to the video card. Press the power button to turn on the monitor position. The other control buttons are located on the front panel of the monitor (See Figure 4). OPERATING INSTRUCTIONS GENERAL INSTRUCTIONS Press the power button...
LM560 Manual
Page 10
... Volume Adjust OSD status. Brightness : Adjust brightness or function adjust. Contrast : Adjust contrast or function adjust. Auto Adjust button / Exit: 1. Power On mode. Off mode. MENU / ENTER : Activate OSD menu when OSD is OFF or activate/de-activate adjustment function when OSD is used to activate the Auto Adjustment function. The Auto Adjustment function is ON or Exit OSD menu when in handy if you ever have to turn the monitor on . press and hold the MENU button while the monitor...
... Volume Adjust OSD status. Brightness : Adjust brightness or function adjust. Contrast : Adjust contrast or function adjust. Auto Adjust button / Exit: 1. Power On mode. Off mode. MENU / ENTER : Activate OSD menu when OSD is OFF or activate/de-activate adjustment function when OSD is used to activate the Auto Adjustment function. The Auto Adjustment function is ON or Exit OSD menu when in handy if you ever have to turn the monitor on . press and hold the MENU button while the monitor...
LM560 Manual
Page 11
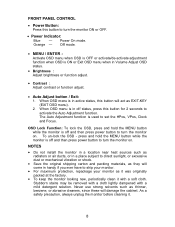
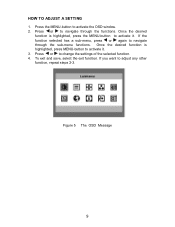
HOW TO ADJUST A SETTING 1. Press or to adjust any other function, repeat steps 2-3. If you want to change the settings of the selected function. 4. Press or to navigate through the functions. Figure 5 The OSD Message 9 Once the desired function is highlighted, press MENU-button to activate it . Once the desired function is highlighted, press the MENU-button to activate the OSD window. 2. If...
HOW TO ADJUST A SETTING 1. Press or to adjust any other function, repeat steps 2-3. If you want to change the settings of the selected function. 4. Press or to navigate through the functions. Figure 5 The OSD Message 9 Once the desired function is highlighted, press MENU-button to activate it . Once the desired function is highlighted, press the MENU-button to activate the OSD window. 2. If...

LM560 Manual
Page 12
Brightness Backlight Adjustment Image Setup Image Position Color Temp. Focus Adjust Picture Phase to reduce Horizontal-Line noise Clock Adjust picture Clock to reduce Vertical-Line noise. V. Position Adjust the verticalposition of the picture. Red Gain from EEPROM. N/A Recall sRGB Temperature from Digital-register. N/A Recall Cool Color Temperature from EEPROM. Warm Cool sRGB User / Red N/A Recall Warm Color Temperature from EEPROM. H. Position Adjust the horizontal position of the picture. Blue Gain from Digital-register. User / Green User / Blue ...
Brightness Backlight Adjustment Image Setup Image Position Color Temp. Focus Adjust Picture Phase to reduce Horizontal-Line noise Clock Adjust picture Clock to reduce Vertical-Line noise. V. Position Adjust the verticalposition of the picture. Red Gain from EEPROM. N/A Recall sRGB Temperature from Digital-register. N/A Recall Cool Color Temperature from EEPROM. Warm Cool sRGB User / Red N/A Recall Warm Color Temperature from EEPROM. H. Position Adjust the horizontal position of the picture. Blue Gain from Digital-register. User / Green User / Blue ...
LM560 Manual
Page 13
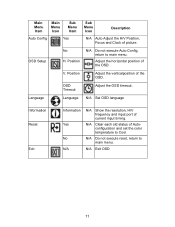
.... V. Position N/A Do not execute Auto Config, return to main menu. N/A Do not execute reset, return to main menu. Main Menu Item Main Menu Icon Sub Menu Item Auto Config Yes Sub Menu Icon Description N/A Auto Adjust the H/V Position, Focus and Clock of Autoconfiguration and set the color temperature to Cool. OSD Setup No H. Adjust the horizontal position of current input timing. Language Language N/A Set OSD language Information Reset Exit Information Yes No N/A N/A Show the resolution, H/V frequency and input port of the OSD. Position Adjust...
.... V. Position N/A Do not execute Auto Config, return to main menu. N/A Do not execute reset, return to main menu. Main Menu Item Main Menu Icon Sub Menu Item Auto Config Yes Sub Menu Icon Description N/A Auto Adjust the H/V Position, Focus and Clock of Autoconfiguration and set the color temperature to Cool. OSD Setup No H. Adjust the horizontal position of current input timing. Language Language N/A Set OSD language Information Reset Exit Information Yes No N/A N/A Show the resolution, H/V frequency and input port of the OSD. Position Adjust...
LM560 Manual
Page 14
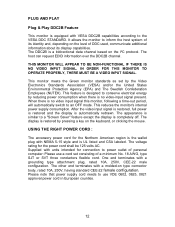
... channel based on the level of DDC used, communicate additional information about its display capabilities. Supplied with units intended for connection to the VESA DDC STANDARD. The host can request EDID information over the DDC2B channel. The display is restored by reducing power consumption when there is no video input signal this monitor, following a time-out period, will automatically switch to use a cord set by the Video...
... channel based on the level of DDC used, communicate additional information about its display capabilities. Supplied with units intended for connection to the VESA DDC STANDARD. The host can request EDID information over the DDC2B channel. The display is restored by reducing power consumption when there is no video input signal this monitor, following a time-out period, will automatically switch to use a cord set by the Video...
LM560 Manual
Page 15
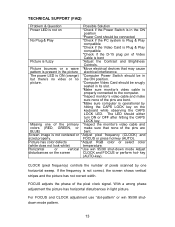
... monitor's video cable and colors (RED, GREEN, or make sure none of the pixel clock signal. TECHNICAL SUPPORT (FAQ) Problem & Question Possible Solution Power LED is not on the screen CLOCK and FOCUS or perform hot- The LED should be in the picture electrical interference. Picture has color defects *Adjust RGB color or select color (white does not look white) temperature. If the frequency is not centered or *Adjust pixel frequency (CLOCK) and sized properly. Missing one horizontal sweep. Horizontal or vertical *Use...
... monitor's video cable and colors (RED, GREEN, or make sure none of the pixel clock signal. TECHNICAL SUPPORT (FAQ) Problem & Question Possible Solution Power LED is not on the screen CLOCK and FOCUS or perform hot- The LED should be in the picture electrical interference. Picture has color defects *Adjust RGB color or select color (white does not look white) temperature. If the frequency is not centered or *Adjust pixel frequency (CLOCK) and sized properly. Missing one horizontal sweep. Horizontal or vertical *Use...
LM560 Manual
Page 16
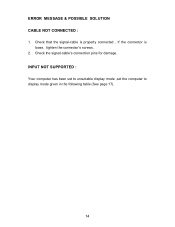
Check the signal-cable's connection pins for damage. INPUT NOT SUPPORTED : Your computer has been set to unsuitable display mode ,set the computer to display mode given in the following table (See page 17). 14 ERROR MESSAGE & POSSIBLE SOLUTION CABLE NOT CONNECTED : 1. Check that the signal-cable is properly connected , If the connector is loose, tighten the connector's screws. 2.
Check the signal-cable's connection pins for damage. INPUT NOT SUPPORTED : Your computer has been set to unsuitable display mode ,set the computer to display mode given in the following table (See page 17). 14 ERROR MESSAGE & POSSIBLE SOLUTION CABLE NOT CONNECTED : 1. Check that the signal-cable is properly connected , If the connector is loose, tighten the connector's screws. 2.

LM560 Manual
Page 17
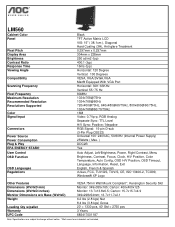
H/V TTL H-Frequency 30kHz - 60kHz V-Frequency 55-75Hz 16.2M Colors 80MHz 1024 × 768 @75Hz VESA DDC2BTM ON Mode APPENDIX SPECIFICATIONS LCD Panel Input Display Colors Dot Clock Max. Resolution Plug & Play EPA ENERGY STAR® Input Connector Input Video Signal Maximum Screen Size Power Source Environmental Considerations Dimension Weight (N. W.) Driving system TFT Color LCD Size 38.1cm(15") Pixel pitch 0.297mm( H ) × 0.297mm( V ) Video R,G,B Analog Interface Separate Sync.
H/V TTL H-Frequency 30kHz - 60kHz V-Frequency 55-75Hz 16.2M Colors 80MHz 1024 × 768 @75Hz VESA DDC2BTM ON Mode APPENDIX SPECIFICATIONS LCD Panel Input Display Colors Dot Clock Max. Resolution Plug & Play EPA ENERGY STAR® Input Connector Input Video Signal Maximum Screen Size Power Source Environmental Considerations Dimension Weight (N. W.) Driving system TFT Color LCD Size 38.1cm(15") Pixel pitch 0.297mm( H ) × 0.297mm( V ) Video R,G,B Analog Interface Separate Sync.

LM560 Manual
Page 18
Position V. Position Auto Center Language Information OSD Setup (Warm)Color (Cool)Color sRGB User Color temperature Reset Exit 30 Watts CE, FCC, TCO'99 16 Switch External Controls: Functions Power Consumption ( Maximum ) Regulatory Compliance Auto Adjust Key Brightness Contrast Power Button MENU Contrast Brightness Focus Clock H.
Position V. Position Auto Center Language Information OSD Setup (Warm)Color (Cool)Color sRGB User Color temperature Reset Exit 30 Watts CE, FCC, TCO'99 16 Switch External Controls: Functions Power Consumption ( Maximum ) Regulatory Compliance Auto Adjust Key Brightness Contrast Power Button MENU Contrast Brightness Focus Clock H.
LM560 Spec Sheet
Page 1
... pcs 3 Years 685417001187 Note: Specifications are subject to change without notice. *Wall mount arm & bracket not included. Carton: 400x400x125 Monitor: 13.7x13.8x6.5; LM560 Cabinet Color Panel Pixel Pitch Display Area Brightness Contrast Ratio Response Time Viewing Angle Compatibility Scanning Frequency Pixel Frequency Maximum Resolution Recommended Resolution Resolutions Supported Color Signal Input Connectors Power Source Power Consumption Plug & Play EPA ENERGY STAR® User Control OSD Function OSD Languages Regulations Black TFT Active Matrix LCD VIS: 15" ( 38.1cm ), Diagonal...
... pcs 3 Years 685417001187 Note: Specifications are subject to change without notice. *Wall mount arm & bracket not included. Carton: 400x400x125 Monitor: 13.7x13.8x6.5; LM560 Cabinet Color Panel Pixel Pitch Display Area Brightness Contrast Ratio Response Time Viewing Angle Compatibility Scanning Frequency Pixel Frequency Maximum Resolution Recommended Resolution Resolutions Supported Color Signal Input Connectors Power Source Power Consumption Plug & Play EPA ENERGY STAR® User Control OSD Function OSD Languages Regulations Black TFT Active Matrix LCD VIS: 15" ( 38.1cm ), Diagonal...


