
e1649fwu Spec Sheet
Page 1
...Code 685417037483 Note: Monitor cannot be used as your primary display. Windows 7 and the Windows logo are subject to change without notice. Specifications are trademarks or registered trademarks of Microsoft Corporation in the United States and/or other countries. e1649Fwu Cabinet Color Panel ...>10) Vertical: 50 Degrees (CR>10) Horizontal: 30K~60KHz Vertical: 30~50 Hz 85MHz 1366x768@60Hz 1366x768@60Hz 640x480@60Hz, 1366x768@60Hz 262K USB 2.0 USB 2.0 USB powered PC/MAC (Software Included) 8 Watts ( Max. ) cCSAus, FCC, ROHS, EPA 5.0 Ultra Slim, Foldable Stand, Mercury Free WLED, Low...
...Code 685417037483 Note: Monitor cannot be used as your primary display. Windows 7 and the Windows logo are subject to change without notice. Specifications are trademarks or registered trademarks of Microsoft Corporation in the United States and/or other countries. e1649Fwu Cabinet Color Panel ...>10) Vertical: 50 Degrees (CR>10) Horizontal: 30K~60KHz Vertical: 30~50 Hz 85MHz 1366x768@60Hz 1366x768@60Hz 640x480@60Hz, 1366x768@60Hz 262K USB 2.0 USB 2.0 USB powered PC/MAC (Software Included) 8 Watts ( Max. ) cCSAus, FCC, ROHS, EPA 5.0 Ultra Slim, Foldable Stand, Mercury Free WLED, Low...

User's Manual
Page 1
USB Monitor User Manual 1
USB Monitor User Manual 1

User's Manual
Page 2
... ® Windows® 7 ...11 For Microsoft® Windows Vista® ...13 For Microsoft® Windows® XP ...15 Setting the USB Monitor ...16 To Control the Display ...17 For Microsoft® Windows® 7 ...17 For Microsoft® Windows® XP and Microsoft® ...Windows Vista 17 Disconnecting the LCD Monitor ...17 Cleaning the LCD Monitor...17 Supported Media Player ...18 PC Requirements ...19 Troubleshooting ...22 Specification...23 General Specification ...23 Regulation...24 FCC Notice ...24...
... ® Windows® 7 ...11 For Microsoft® Windows Vista® ...13 For Microsoft® Windows® XP ...15 Setting the USB Monitor ...16 To Control the Display ...17 For Microsoft® Windows® 7 ...17 For Microsoft® Windows® XP and Microsoft® ...Windows Vista 17 Disconnecting the LCD Monitor ...17 Cleaning the LCD Monitor...17 Supported Media Player ...18 PC Requirements ...19 Troubleshooting ...22 Specification...23 General Specification ...23 Regulation...24 FCC Notice ...24...

User's Manual
Page 10
... on page 16 to configure your USB Monitor. Follow the procedure described starting on page 11 to 15 before connecting the USB monitor to your Laptop/PC. 1 Connecting the LCD monitor to your computer. 10 Connecting the Monitor Cable Connections In Rear of USB cable to the computer. - Your... computer should detect the USB Monitor automatically. Note: Some computers may not provide ...
... on page 16 to configure your USB Monitor. Follow the procedure described starting on page 11 to 15 before connecting the USB monitor to your Laptop/PC. 1 Connecting the LCD monitor to your computer. 10 Connecting the Monitor Cable Connections In Rear of USB cable to the computer. - Your... computer should detect the USB Monitor automatically. Note: Some computers may not provide ...

User's Manual
Page 11
The USB Monitor software end user license agreement window opens. 3. The installation box above will disappear but no message will be shown at the end of USB Graphic software on Setup.exe. Click Yes. DisplayLink Core software and DisplayLink Graphics installs. Note: The screen may flash or go black ... Control window opens (if enabled in the OS). 2. Click I Accept. Double click on your computer. 1. Installation of the installation. 11 Install the USB Graphic software first before connecting the USB monitor to your computer For Microsoft ® Windows® 7 Important!!
The USB Monitor software end user license agreement window opens. 3. The installation box above will disappear but no message will be shown at the end of USB Graphic software on Setup.exe. Click Yes. DisplayLink Core software and DisplayLink Graphics installs. Note: The screen may flash or go black ... Control window opens (if enabled in the OS). 2. Click I Accept. Double click on your computer. 1. Installation of the installation. 11 Install the USB Graphic software first before connecting the USB monitor to your computer For Microsoft ® Windows® 7 Important!!

User's Manual
Page 12
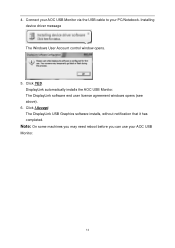
DisplayLink will be shown on the taskbar. Note: On some machines you may need reboot before you can use your PC/Notebook. Connect your AOC USB Monitor via the USB cable to your AOC USB Monitor. 12 Installing device driver message will automatically install the AOC USB Monitor. The Windows User Account control window opens. 5. Click YES. The DisplayLink software end user license agreement windows opens (see above). 6. The DisplayLink USB Graphics software installs, without notification that it has completed. 4. Click I Accept.
DisplayLink will be shown on the taskbar. Note: On some machines you may need reboot before you can use your PC/Notebook. Connect your AOC USB Monitor via the USB cable to your AOC USB Monitor. 12 Installing device driver message will automatically install the AOC USB Monitor. The Windows User Account control window opens. 5. Click YES. The DisplayLink software end user license agreement windows opens (see above). 6. The DisplayLink USB Graphics software installs, without notification that it has completed. 4. Click I Accept.

User's Manual
Page 13
Double click on Setup.exe. DisplayLink Core software and DisplayLink Graphics installs. Click Yes. Click I Accept. The installation box above will disappear but no message will be shown at the end of the installation. 13 The Windows User Account Control window opens (if enabled in the OS). 2. The USB Monitor software end user license agreement window opens. 3. DO NOT connect USB Monitor to your PC/Notebook before the software install. 1. Note: The screen may flash or go black during the installation. For Microsoft® Windows Vista® Important!!
Double click on Setup.exe. DisplayLink Core software and DisplayLink Graphics installs. Click Yes. Click I Accept. The installation box above will disappear but no message will be shown at the end of the installation. 13 The Windows User Account Control window opens (if enabled in the OS). 2. The USB Monitor software end user license agreement window opens. 3. DO NOT connect USB Monitor to your PC/Notebook before the software install. 1. Note: The screen may flash or go black during the installation. For Microsoft® Windows Vista® Important!!
User's Manual
Page 14
DisplayLink automatically installs the AOC USB Monitor. Click I Accept. 4. Installing device driver message The Windows User Account control window opens. 5. Connect your AOC USB Monitor via the USB cable to your AOC USB Monitor. 14 Note: On some machines you may need reboot before you can use your PC/Notebook. The DisplayLink software end user license agreement windows opens (see above). 6. The DisplayLink USB Graphics software installs, without notification that it has completed. Click YES.
DisplayLink automatically installs the AOC USB Monitor. Click I Accept. 4. Installing device driver message The Windows User Account control window opens. 5. Connect your AOC USB Monitor via the USB cable to your AOC USB Monitor. 14 Note: On some machines you may need reboot before you can use your PC/Notebook. The DisplayLink software end user license agreement windows opens (see above). 6. The DisplayLink USB Graphics software installs, without notification that it has completed. Click YES.

User's Manual
Page 15
... the installation. 15 Double click on Setup.exe. Click I Accept. The following message (or similar) will be seen. Connect your AOC USB Monitor via the USB cable to your PC/Notebook. Windows installs the AOC USB Monitor device. For Microsoft® Windows® XP Important!! The Windows User Account Control window opens (if enabled in the OS...
... the installation. 15 Double click on Setup.exe. Click I Accept. The following message (or similar) will be seen. Connect your AOC USB Monitor via the USB cable to your PC/Notebook. Windows installs the AOC USB Monitor device. For Microsoft® Windows® XP Important!! The Windows User Account Control window opens (if enabled in the OS...

User's Manual
Page 16
... upside down list to select a display to the table below for details on the display marked 2. Setting the USB Monitor Follow this procedure to switch mode. 16 To control the behavior of an attached AOC USB monitor, it is also possible to use Windows Key ( ) + P to display a menu (and cycle through it) to configure the...
... upside down list to select a display to the table below for details on the display marked 2. Setting the USB Monitor Follow this procedure to switch mode. 16 To control the behavior of an attached AOC USB monitor, it is also possible to use Windows Key ( ) + P to display a menu (and cycle through it) to configure the...

User's Manual
Page 17
... Vista® Right-click the " "icon in the system tray. 2. Disconnecting the LCD Monitor 1. Use a soft cloth to wipe the screen and other parts of your operating system....and Windows® XP, you can turn the monitor OFF by right-Clicking the " " icon in the system tray of the monitor - Always unplug the monitor before cleaning. - For Microsoft® Windows®...P to switch between different modes as shown below when cleaning the LCD Monitor: - Remove the USB cable from the computer and monitor. To Control the Display You can use harsh chemical products to clean it. ...
... Vista® Right-click the " "icon in the system tray. 2. Disconnecting the LCD Monitor 1. Use a soft cloth to wipe the screen and other parts of your operating system....and Windows® XP, you can turn the monitor OFF by right-Clicking the " " icon in the system tray of the monitor - Always unplug the monitor before cleaning. - For Microsoft® Windows®...P to switch between different modes as shown below when cleaning the LCD Monitor: - Remove the USB cable from the computer and monitor. To Control the Display You can use harsh chemical products to clean it. ...

User's Manual
Page 18
... or choppy. For windows 7) WinDVD 10 PowerDVD 9 RealPlayer 11 The DisplayLink USB Graphics device can ‟t guarantee performance, Media playback in mirror mode (XP) or in monitor to the configurations of the Mobile LCD monitor. The AOC USB Monitor utilizes an advanced video graphics controller to enter full screen DOS mode when using...
... or choppy. For windows 7) WinDVD 10 PowerDVD 9 RealPlayer 11 The DisplayLink USB Graphics device can ‟t guarantee performance, Media playback in mirror mode (XP) or in monitor to the configurations of the Mobile LCD monitor. The AOC USB Monitor utilizes an advanced video graphics controller to enter full screen DOS mode when using...

User's Manual
Page 20
...; Overall WEI score of at full screen. 1.2GHz Single Core CPU 512MB memory For 3 monitors where 1 could run full screen DVD video: 1.8GHz Core Duo 1GB memory At least one USB 2.0 port 30 megabytes (MB) of free disk space. Computer screen for use with the...
...; Overall WEI score of at full screen. 1.2GHz Single Core CPU 512MB memory For 3 monitors where 1 could run full screen DVD video: 1.8GHz Core Duo 1GB memory At least one USB 2.0 port 30 megabytes (MB) of free disk space. Computer screen for use with the...
User's Manual
Page 22
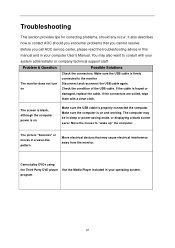
... is blank, although the computer power is on Make sure the USB cable is firmly connected to consult with a clean cloth. Problem & Question Possible Solutions The monitor does not turn on and working. Move the mouse to contact AOC should any occur. The picture "bounces" or moves in a ...wave-like pattern Move electrical devices that you call AOC service center, please read the troubleshooting advice in this manual and in your computer User's Manual. You may also want to the monitor Disconnect and reconnect the USB cable again. If the connectors are soiled, wipe them with...
... is blank, although the computer power is on Make sure the USB cable is firmly connected to consult with a clean cloth. Problem & Question Possible Solutions The monitor does not turn on and working. Move the mouse to contact AOC should any occur. The picture "bounces" or moves in a ...wave-like pattern Move electrical devices that you call AOC service center, please read the troubleshooting advice in this manual and in your computer User's Manual. You may also want to the monitor Disconnect and reconnect the USB cable again. If the connectors are soiled, wipe them with...

Service Manual
Page 1
15.6" LCD Monitor Service Service Service AOC e1649Fwu Description Table of Contents Page Description Page Table of Contents 1 Revision List 2 Important Safety Notice 3 1.Monitor Specification 4 2.LCD Monitor Description 5 3.Operation Instruction 6 3.1. Connecting the Monitor 6 3.2. CAUTION: USE A SEPARATE ISOLATION TRANSFOMER FOR THIS UNIT WHEN SERVICING R FOR TH 1 UNIT WHEN S Control the Display 6 3.3.Setting the USB Monitor 7 3.4.new technology 7 4 Panel Specification 8 4.1.General...
15.6" LCD Monitor Service Service Service AOC e1649Fwu Description Table of Contents Page Description Page Table of Contents 1 Revision List 2 Important Safety Notice 3 1.Monitor Specification 4 2.LCD Monitor Description 5 3.Operation Instruction 6 3.1. Connecting the Monitor 6 3.2. CAUTION: USE A SEPARATE ISOLATION TRANSFOMER FOR THIS UNIT WHEN SERVICING R FOR TH 1 UNIT WHEN S Control the Display 6 3.3.Setting the USB Monitor 7 3.4.new technology 7 4 Panel Specification 8 4.1.General...

Service Manual
Page 5
Monitor Block Diagram Panel 12V Main Board USB Board PC,5V 5 2.LCD Monitor Description The LCD monitor will contain a main board, a USB board,the PC will provide power.
Monitor Block Diagram Panel 12V Main Board USB Board PC,5V 5 2.LCD Monitor Description The LCD monitor will contain a main board, a USB board,the PC will provide power.

Service Manual
Page 6
... Windows® XP, you can turn off the computer before connecting. - Your computer should detect the USB Monitor automatically. For Microsoft® Windows® 7 only, you can use the AOC USB LCD monitor in the system tray of USB cable to configure your computer. 3.2 Control the Display You can select OFF by pressing the Windows key...
... Windows® XP, you can turn off the computer before connecting. - Your computer should detect the USB Monitor automatically. For Microsoft® Windows® 7 only, you can use the AOC USB LCD monitor in the system tray of USB cable to configure your computer. 3.2 Control the Display You can select OFF by pressing the Windows key...

Service Manual
Page 7
...75∘with the tilt angle within 30∘to configure the AOC Monitor 1. the " " icon in the system tray. 2. Remove the USB cable from the computer and monitor. 3.3 Setting the USB Monitor Follow this procedure to activate the auto-pivot function. Set the ...display options. If the auto-pivot is also possible to use Windows Key ( a menu (and cycle through it) to switch mode. ) + P to display 3.4 new technology The AOC e1649Fwu monitor...
...75∘with the tilt angle within 30∘to configure the AOC Monitor 1. the " " icon in the system tray. 2. Remove the USB cable from the computer and monitor. 3.3 Setting the USB Monitor Follow this procedure to activate the auto-pivot function. Set the ...display options. If the auto-pivot is also possible to use Windows Key ( a menu (and cycle through it) to switch mode. ) + P to display 3.4 new technology The AOC e1649Fwu monitor...

Service Manual
Page 26
Install the newest driver (DLsetup_7.0M1.exe), the driver provided by the Display Link 2. Connect USB Monitor to PC, as the follow picture 3. Double-click the icon "DL1x0-DL1x5 Tester.exe" Choose "Program Firmware" 26 Firmware and DDC Instruction Don't burn HDCP-KEY 1. 8.
Install the newest driver (DLsetup_7.0M1.exe), the driver provided by the Display Link 2. Connect USB Monitor to PC, as the follow picture 3. Double-click the icon "DL1x0-DL1x5 Tester.exe" Choose "Program Firmware" 26 Firmware and DDC Instruction Don't burn HDCP-KEY 1. 8.

Service Manual
Page 28
Burning off software, USB Monitor can be displayed 28
Burning off software, USB Monitor can be displayed 28


