
Spec Sheet_i2353Ph
Page 1
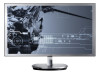
...: Specifications are subject to change without notice. *High-bandwidth Digital Content Protection: Enables viewing of High-Definition contents. **Wall mount arm & bracket not included. A04/11 i2353Ph Cabinet Color Chrome Bezel and Base, Piano Black Back Cover Panel TFT Active Matrix LCD, WLED Backlight 23", Widescreen 16:9 Aspect Ratio 23" Viewable Image...
...: Specifications are subject to change without notice. *High-bandwidth Digital Content Protection: Enables viewing of High-Definition contents. **Wall mount arm & bracket not included. A04/11 i2353Ph Cabinet Color Chrome Bezel and Base, Piano Black Back Cover Panel TFT Active Matrix LCD, WLED Backlight 23", Widescreen 16:9 Aspect Ratio 23" Viewable Image...

User's Manual_i2353Ph
Page 2
Safety...4 National Conventions...4 Power ...5 Installation...6 Cleaning ...7 Other...8 Setup ...9 Contents in Box ...9 Setup Stand & Base...10 Adjusting Viewing Angle...11 Connecting the Monitor...12 Wall Mounting ...13 Adjusting ...14 Setting Optimal Resolution ...14 Windows Vista ...14 Windows XP ...16 Windows ME/2000...17 Hotkeys ...18 ...
Safety...4 National Conventions...4 Power ...5 Installation...6 Cleaning ...7 Other...8 Setup ...9 Contents in Box ...9 Setup Stand & Base...10 Adjusting Viewing Angle...11 Connecting the Monitor...12 Wall Mounting ...13 Adjusting ...14 Setting Optimal Resolution ...14 Windows Vista ...14 Windows XP ...16 Windows ME/2000...17 Hotkeys ...18 ...
User's Manual_i2353Ph
Page 11
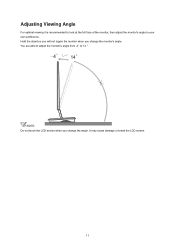
Adjusting Viewing Angle For optimal viewing it is recommended to look at the full face of the monitor, then adjust the monitor's angle to 14 °. -4 14 NOTE: Do not touch the LCD screen when you change the angle. You are able to adjust the monitor's angle from -4° to your own preference. It may cause damage or break the LCD screen. 11 Hold the stand so you will not topple the monitor when you change the monitor's angle.
Adjusting Viewing Angle For optimal viewing it is recommended to look at the full face of the monitor, then adjust the monitor's angle to 14 °. -4 14 NOTE: Do not touch the LCD screen when you change the angle. You are able to adjust the monitor's angle from -4° to your own preference. It may cause damage or break the LCD screen. 11 Hold the stand so you will not topple the monitor when you change the monitor's angle.

User's Manual_i2353Ph
Page 37
10. Click the "Have Disk" button. Click the "OK" button. 12. The files will automatically select the maximum refresh rate and corresponding Color Matching Profiles. 37 The system will be copied from the CD to the following directory: X:\Driver\module name (where X is the drive letter designator for the CD-ROM drive). 11. Restart the system. Select your hard disk drive. 13. Close all open windows and remove the CD. 14. Click on the "Browse" button and navigate to your monitor model and click the "Next" button. Select the "xxx.inf" file and click the "Open" button.
10. Click the "Have Disk" button. Click the "OK" button. 12. The files will automatically select the maximum refresh rate and corresponding Color Matching Profiles. 37 The system will be copied from the CD to the following directory: X:\Driver\module name (where X is the drive letter designator for the CD-ROM drive). 11. Restart the system. Select your hard disk drive. 13. Close all open windows and remove the CD. 14. Click on the "Browse" button and navigate to your monitor model and click the "Next" button. Select the "xxx.inf" file and click the "Open" button.

User's Manual_i2353Ph
Page 42
... the 'Next' button. 9. I will choose the driver to close the Display Properties dialog box. 42 button and then select the appropriate drive F: (CD-ROM Drive). 11. Select the 'Install from a list or specific location [advanced]' radio button and then click on the 'Next' button. - If you can see the 'has not...
... the 'Next' button. 9. I will choose the driver to close the Display Properties dialog box. 42 button and then select the appropriate drive F: (CD-ROM Drive). 11. Select the 'Install from a list or specific location [advanced]' radio button and then click on the 'Next' button. - If you can see the 'has not...

User's Manual_i2353Ph
Page 43
... for this device so that I can choose the driver you can choose a specific driver', then click on 'Next' and then click on the 'Next' button. 11. Click on the 'OK' button, select your monitor model and click on 'Have disk...'. 8. Click on the 'Start' button, point to 'Settings', and then click...
... for this device so that I can choose the driver you can choose a specific driver', then click on 'Next' and then click on the 'Next' button. 11. Click on the 'OK' button, select your monitor model and click on 'Have disk...'. 8. Click on the 'Start' button, point to 'Settings', and then click...
User's Manual_i2353Ph
Page 51
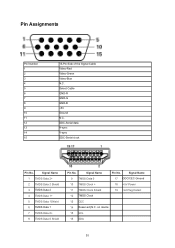
...Data 2+ 2 TMDS Data 2 Shield 3 TMDS Data 2 4 TMDS Data 1+ 5 TMDS Data 1Shield 6 TMDS Data 1 7 TMDS Data 0+ 8 TMDS Data 0 Shield Pin No. Pin Assignments Pin Number 1 2 3 4 5 6 7 8 9 10 11 12 13 14 15 15-Pin Side of the Signal Cable Video-Red Video-Green Video-Blue N.C. on device 15 SCL 16 SDA 51 Signal... Name 9 TMDS Data 0 17 DDC/CEC Ground 10 TMDS Clock + 18 +5V Power 11 TMDS Clock Shield 19 Hot Plug Detect 12 TMDS Clock 13 CEC 14 Reserved (N.C. Detect Cable GND-R GND-G GND-B +5V Ground N.C.
...Data 2+ 2 TMDS Data 2 Shield 3 TMDS Data 2 4 TMDS Data 1+ 5 TMDS Data 1Shield 6 TMDS Data 1 7 TMDS Data 0+ 8 TMDS Data 0 Shield Pin No. Pin Assignments Pin Number 1 2 3 4 5 6 7 8 9 10 11 12 13 14 15 15-Pin Side of the Signal Cable Video-Red Video-Green Video-Blue N.C. on device 15 SCL 16 SDA 51 Signal... Name 9 TMDS Data 0 17 DDC/CEC Ground 10 TMDS Clock + 18 +5V Power 11 TMDS Clock Shield 19 Hot Plug Detect 12 TMDS Clock 13 CEC 14 Reserved (N.C. Detect Cable GND-R GND-G GND-B +5V Ground N.C.