User Manual
Page 5
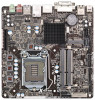
... If you require technical support related to quality and endurance. www.asrock.com/support/index.asp 1.1 Package Contents ASRock H77TM-ITX / B75TM-ITX / H61TM-ITX Motherboard (Thin Mini-ITX Form Factor: 6.7-in x 6.7-in, 17.0 cm x 17.0 cm) ASRock H77TM-ITX / B75TM-ITX / H61TM-ITX Quick Installation Guide ASRock H77TM-ITX / B75TM-ITX / H61TM-ITX Support CD 1 x I/O Panel Shield 5 In this manual, chapter 1 contains the introduction of this manual...
... If you require technical support related to quality and endurance. www.asrock.com/support/index.asp 1.1 Package Contents ASRock H77TM-ITX / B75TM-ITX / H61TM-ITX Motherboard (Thin Mini-ITX Form Factor: 6.7-in x 6.7-in, 17.0 cm x 17.0 cm) ASRock H77TM-ITX / B75TM-ITX / H61TM-ITX Quick Installation Guide ASRock H77TM-ITX / B75TM-ITX / H61TM-ITX Support CD 1 x I/O Panel Shield 5 In this manual, chapter 1 contains the introduction of this manual...

User Manual
Page 6
... DVI-I and LVDS Supports HDMI 1.4a Technology with Intel® Ivy Bridge CPU. 1.2 Specifications Platform CPU Chipset Memory Expansion Slots Graphics Thin Mini-ITX Form Factor: 6.7-in x 6.7-in, 17.0 cm x 17.0 cm (Compatible with Intel® Sandy Bridge CPU Max. resolution up to... with Mini-ITX) Solid Capacitors for CPU power Supports 3rd and 2nd Generation Intel® CoreTM i7 / i5 / i3 in LGA1155 Package Supports Intel® Turbo Boost 2.0 Technology Supports Hyper-Threading Technology Intel® H77/B75/H61 Supports Intel® Small Business Advantage (B75TM-ITX) Supports...
... DVI-I and LVDS Supports HDMI 1.4a Technology with Intel® Ivy Bridge CPU. 1.2 Specifications Platform CPU Chipset Memory Expansion Slots Graphics Thin Mini-ITX Form Factor: 6.7-in x 6.7-in, 17.0 cm x 17.0 cm (Compatible with Intel® Sandy Bridge CPU Max. resolution up to... with Mini-ITX) Solid Capacitors for CPU power Supports 3rd and 2nd Generation Intel® CoreTM i7 / i5 / i3 in LGA1155 Package Supports Intel® Turbo Boost 2.0 Technology Supports Hyper-Threading Technology Intel® H77/B75/H61 Supports Intel® Small Business Advantage (B75TM-ITX) Supports...

User Manual
Page 14
1 Intel H77 Chipset 2 SATA3 Connector (SATA_1) 3 USB 2.0 Header (USB8) 4 Chassis Fan Connector (CHA_FAN1) 5 Consumer Infrared Module Header (CIR1) 6 SATA3 Connector (SATA_0) 7 USB 2.0 Header (USB6_7) 8 Mini PCI Express Slot (MINI_PCIE1) 9 USB 3.0 Header (USB3_0_1) 10 SATA Power Connector (SATA_POW1) 11 Power LED Header (PLED1) 12 System Panel Header (PANEL1) 13 Backlight Power ...
1 Intel H77 Chipset 2 SATA3 Connector (SATA_1) 3 USB 2.0 Header (USB8) 4 Chassis Fan Connector (CHA_FAN1) 5 Consumer Infrared Module Header (CIR1) 6 SATA3 Connector (SATA_0) 7 USB 2.0 Header (USB6_7) 8 Mini PCI Express Slot (MINI_PCIE1) 9 USB 3.0 Header (USB3_0_1) 10 SATA Power Connector (SATA_POW1) 11 Power LED Header (PLED1) 12 System Panel Header (PANEL1) 13 Backlight Power ...

User Manual
Page 16
1 Intel B75 Chipset 2 SATA2 Connector (SATA_1) 3 USB 2.0 Header (USB8) 4 Chassis Fan Connector (CHA_FAN1) 5 Consumer Infrared Module Header (CIR1) 6 SATA3 Connector (SATA_0) 7 USB 2.0 Header (USB6_7) 8 Mini PCI Express Slot (MINI_PCIE1) 9 USB 3.0 Header (USB3_0_1) 10 SATA Power Connector (SATA_POW1) 11 Power LED Header (PLED1) 12 System Panel Header (PANEL1) 13 Backlight Power ...
1 Intel B75 Chipset 2 SATA2 Connector (SATA_1) 3 USB 2.0 Header (USB8) 4 Chassis Fan Connector (CHA_FAN1) 5 Consumer Infrared Module Header (CIR1) 6 SATA3 Connector (SATA_0) 7 USB 2.0 Header (USB6_7) 8 Mini PCI Express Slot (MINI_PCIE1) 9 USB 3.0 Header (USB3_0_1) 10 SATA Power Connector (SATA_POW1) 11 Power LED Header (PLED1) 12 System Panel Header (PANEL1) 13 Backlight Power ...

User Manual
Page 18
1 Intel H61 Chipset 2 SATA2 Connector (SATA_1) 3 USB 2.0 Header (USB8) 4 Chassis Fan Connector (CHA_FAN1) 5 Consumer Infrared Module Header (CIR1) 6 SATA2 Connector (SATA_0) 7 USB 2.0 Header (USB6_7) 8 Mini PCI Express Slot (MINI_PCIE1) 9 USB 3.0 Header (USB3_0_1) 10 SATA Power Connector (SATA_POW1) 11 Power LED Header (PLED1) 12 System Panel Header (PANEL1) 13 Backlight Power ...
1 Intel H61 Chipset 2 SATA2 Connector (SATA_1) 3 USB 2.0 Header (USB8) 4 Chassis Fan Connector (CHA_FAN1) 5 Consumer Infrared Module Header (CIR1) 6 SATA2 Connector (SATA_0) 7 USB 2.0 Header (USB6_7) 8 Mini PCI Express Slot (MINI_PCIE1) 9 USB 3.0 Header (USB3_0_1) 10 SATA Power Connector (SATA_POW1) 11 Power LED Header (PLED1) 12 System Panel Header (PANEL1) 13 Backlight Power ...

User Manual
Page 22
... before installing or removing the motherboard. Whenever you handle the components. 3. Make sure to ensure that comes with the components. 5. Chapter 2: Installation This is a Thin Mini-ITX form factor motherboard.
... before installing or removing the motherboard. Whenever you handle the components. 3. Make sure to ensure that comes with the components. 5. Chapter 2: Installation This is a Thin Mini-ITX form factor motherboard.
User Manual
Page 27
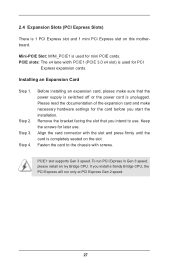
... will run PCI Express in Gen 3 speed, please install an Ivy Bridge CPU. Keep the screws for mini PCIE cards. 2.4 Expansion Slots (PCI Express Slots) There is 1 PCI Express slot and 1 mini PCI Express slot on the slot. Step 3. Align the card connector with screws. Step 2. Installing an ... Card Step 1. Before installing an expansion card, please make necessary hardware settings for PCI Express expansion cards. PCIE1 slot supports Gen 3 speed. Mini-PCIE Slot: MINI_PCIE1 is completely seated on this motherboard. If you start the installation. Fasten the card to use .
... will run PCI Express in Gen 3 speed, please install an Ivy Bridge CPU. Keep the screws for mini PCIE cards. 2.4 Expansion Slots (PCI Express Slots) There is 1 PCI Express slot and 1 mini PCI Express slot on the slot. Step 3. Align the card connector with screws. Step 2. Installing an ... Card Step 1. Before installing an expansion card, please make necessary hardware settings for PCI Express expansion cards. PCIE1 slot supports Gen 3 speed. Mini-PCIE Slot: MINI_PCIE1 is completely seated on this motherboard. If you start the installation. Fasten the card to use .