
User Manual
Page 6
... the updated version will be subject to quality and endurance. ASRock website: http://www.asrock.com. 1.1 Package Contents • DeskMini series Barebone System with robust design conforming to ASRock's commitment to change without further notice. Because the hardware specifications...please visit our website for specific information about the model you for purchasing DeskMini series, a reliable gaming barebone system produced under ASRock's consistently stringent quality control. DeskMini series Chapter 1 Introduction Thank you are missing or appear damaged, contact your authorized dealer....
... the updated version will be subject to quality and endurance. ASRock website: http://www.asrock.com. 1.1 Package Contents • DeskMini series Barebone System with robust design conforming to ASRock's commitment to change without further notice. Because the hardware specifications...please visit our website for specific information about the model you for purchasing DeskMini series, a reliable gaming barebone system produced under ASRock's consistently stringent quality control. DeskMini series Chapter 1 Introduction Thank you are missing or appear damaged, contact your authorized dealer....

User Manual
Page 8
DeskMini series Onboard Connectors Drive Bays • 2 x USB 2.0 Headers • 1 x COM Port Header (Optional) • 1 x Front Panel Header • 1 x CPU_Fan_1 Connector (4-Pin) • 1 x CPU_Fan_2 Connector (5-Pin) • 1 ...2 x 2.5" HDD or SSD Power Adapter Operation Temp. • 120W/19V Power Adapter • 0~35°C * For detailed product information, please visit our website: http://www.asrock.com Please realize that there is a certain risk involved with overclocking, including adjusting the setting in the BIOS, applying Untied Overclocking Technology, or using third...
DeskMini series Onboard Connectors Drive Bays • 2 x USB 2.0 Headers • 1 x COM Port Header (Optional) • 1 x Front Panel Header • 1 x CPU_Fan_1 Connector (4-Pin) • 1 x CPU_Fan_2 Connector (5-Pin) • 1 ...2 x 2.5" HDD or SSD Power Adapter Operation Temp. • 120W/19V Power Adapter • 0~35°C * For detailed product information, please visit our website: http://www.asrock.com Please realize that there is a certain risk involved with overclocking, including adjusting the setting in the BIOS, applying Untied Overclocking Technology, or using third...

User Manual
Page 9
Chapter 2 Product Overview This chapter provides diagrams showing the location of important components of the Beebox series. 2.1 Front View 2 1 3 4 5 6 7 No. Description 1 Power Button 2 Power LED 3 HDD LED 4 MIC-In 5 USB 3.0 Type-A Port 6 USB 3.0 Type-C Port 7 Headphone/Headset English 4
Chapter 2 Product Overview This chapter provides diagrams showing the location of important components of the Beebox series. 2.1 Front View 2 1 3 4 5 6 7 No. Description 1 Power Button 2 Power LED 3 HDD LED 4 MIC-In 5 USB 3.0 Type-A Port 6 USB 3.0 Type-C Port 7 Headphone/Headset English 4

User Manual
Page 10
ACT/LINK LED SPEED LED LAN Port Activity / Link LED Status Description Off Blinking On No Link Data Activity Link Speed LED Status Off Orange Green Description 10Mbps connection 100Mbps connection 1Gbps connection 5 English Description 1 DC Jack (Supports 19V 120W Power Adapters) 2 Display Port 3 HDMI Port 4 D-Sub Port 5 USB 3.0 Port 6 LAN RJ-45 Port* 7 Key Lock 8 Kensington Lock 9 USB 2.0 Port * There are two LEDs on the LAN port. Please refer to the table below for the LAN port LED indications. 2.2 Rear View DeskMini series 1 2 3 4 6 5 7 8 9 No.
ACT/LINK LED SPEED LED LAN Port Activity / Link LED Status Description Off Blinking On No Link Data Activity Link Speed LED Status Off Orange Green Description 10Mbps connection 100Mbps connection 1Gbps connection 5 English Description 1 DC Jack (Supports 19V 120W Power Adapters) 2 Display Port 3 HDMI Port 4 D-Sub Port 5 USB 3.0 Port 6 LAN RJ-45 Port* 7 Key Lock 8 Kensington Lock 9 USB 2.0 Port * There are two LEDs on the LAN port. Please refer to the table below for the LAN port LED indications. 2.2 Rear View DeskMini series 1 2 3 4 6 5 7 8 9 No.
User Manual
Page 14
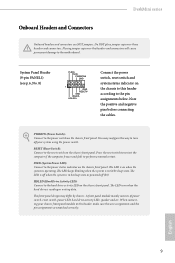
... S1/S3 sleep state. The front panel design may configure the way to the pin assignments below. When connecting your system using the power switch. DeskMini series Onboard Headers and Connectors Onboard headers and connectors are matched correctly. PWRBTN (Power Switch): Connect to the hard drive activity LED on the chassis front...
... S1/S3 sleep state. The front panel design may configure the way to the pin assignments below. When connecting your system using the power switch. DeskMini series Onboard Headers and Connectors Onboard headers and connectors are matched correctly. PWRBTN (Power Switch): Connect to the hard drive activity LED on the chassis front...
User Manual
Page 16
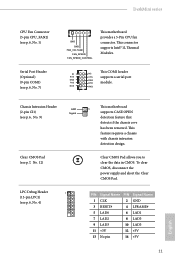
... CPU fan connector. To clear CMOS, disconnect the power supply and short the Clear CMOS Pad. This feature requires a chassis with chassis intrusion detection design. DeskMini series CPU Fan Connector (5-pin CPU_FAN2) (see p.6, No. 1) Serial Port Header (Optional) (9-pin COM1) (see p.6, No. 4) This motherboard 1 supports CASE OPEN detection feature that detects if...
... CPU fan connector. To clear CMOS, disconnect the power supply and short the Clear CMOS Pad. This feature requires a chassis with chassis intrusion detection design. DeskMini series CPU Fan Connector (5-pin CPU_FAN2) (see p.6, No. 1) Serial Port Header (Optional) (9-pin COM1) (see p.6, No. 4) This motherboard 1 supports CASE OPEN detection feature that detects if...

User Manual
Page 18
Unplug all power cables before installing the CPU. 1 A B 2 13 English Do not force to insert the CPU into the socket, please check if the PnP cap is on the socket, if the CPU surface is found. Otherwise, the CPU will be seriously damaged. 2. DeskMini series 3.2 Installing the CPU 1. Before you insert the 1151-Pin CPU into the socket if above situation is unclean, or if there are any bent pins in the socket.
Unplug all power cables before installing the CPU. 1 A B 2 13 English Do not force to insert the CPU into the socket, please check if the PnP cap is on the socket, if the CPU surface is found. Otherwise, the CPU will be seriously damaged. 2. DeskMini series 3.2 Installing the CPU 1. Before you insert the 1151-Pin CPU into the socket if above situation is unclean, or if there are any bent pins in the socket.

User Manual
Page 20
DeskMini series 3.3 Installing the CPU Fan and Heatsink DeskMini 110 series supports both Intel CPU Box Fan (65W) and third-party CPU fan cooler. Please note that the DeskMini 110 series chassis has 52mm height limitation for the CPU fan cooler. 1 2 3 CPU_FAN 15 English
DeskMini series 3.3 Installing the CPU Fan and Heatsink DeskMini 110 series supports both Intel CPU Box Fan (65W) and third-party CPU fan cooler. Please note that the DeskMini 110 series chassis has 52mm height limitation for the CPU fan cooler. 1 2 3 CPU_FAN 15 English
User Manual
Page 21
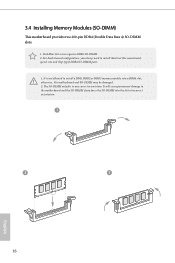
DeskMini 110 series requires DDR4 SO-DIMM. 2. It is not allowed to install identical (the same brand, speed, size and chip-type) DDR4 SO-DIMM pairs. 1. The SO-...
DeskMini 110 series requires DDR4 SO-DIMM. 2. It is not allowed to install identical (the same brand, speed, size and chip-type) DDR4 SO-DIMM pairs. 1. The SO-...

User Manual
Page 22
Tighten the screw to secure the WiFi Module Card to the WiFi Module. 17 English Insert the WiFi Module Card into the M.2 Slot for WiFi + BT Module. 2. Attach the SMA Wi-Fi Antenna Cables to the motherboard. 3. DeskMini series 3.5 Installing the WiFi Module 1.
Tighten the screw to secure the WiFi Module Card to the WiFi Module. 17 English Insert the WiFi Module Card into the M.2 Slot for WiFi + BT Module. 2. Attach the SMA Wi-Fi Antenna Cables to the motherboard. 3. DeskMini series 3.5 Installing the WiFi Module 1.
User Manual
Page 24
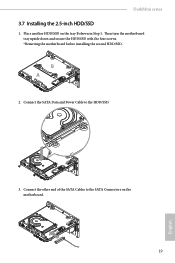
Connect the other end of the SATA Cables to the HDD/SSD. 3. Connect the SATA Data and Power Cable to the SATA Connectors on the tray B shown in Step 1. …Then turn the motherboard tray upside down and secure the HDD/SSD with the four screws. *Removing the motherboard before installing the second HDD/SSD. Place another HDD/SSD on the motherboard. 19 English DeskMini series 3.7 Installing the 2.5-inch HDD/SSD 1. B A 2.
Connect the other end of the SATA Cables to the HDD/SSD. 3. Connect the SATA Data and Power Cable to the SATA Connectors on the tray B shown in Step 1. …Then turn the motherboard tray upside down and secure the HDD/SSD with the four screws. *Removing the motherboard before installing the second HDD/SSD. Place another HDD/SSD on the motherboard. 19 English DeskMini series 3.7 Installing the 2.5-inch HDD/SSD 1. B A 2.
User Manual
Page 26
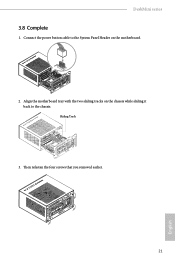
DeskMini series 3.8 Complete 1. Align the motherboard tray with the two sliding tracks on the chassis while sliding it back to the System Panel Header on the motherboard. PANEL1 2. Then refasten the four screws that you removed earlier. 21 English Connect the power button cable to the chassis. Sliding Track 3.
DeskMini series 3.8 Complete 1. Align the motherboard tray with the two sliding tracks on the chassis while sliding it back to the System Panel Header on the motherboard. PANEL1 2. Then refasten the four screws that you removed earlier. 21 English Connect the power button cable to the chassis. Sliding Track 3.
User Manual
Page 27
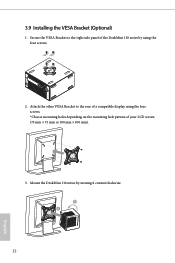
B A 22 English Secure the VESA Bracket to the rear of a compatible display using the four screws. 2. Mount the DeskMini 110 series by using the four screws. *Choose mounting holes depending on the mounting hole pattern of the DeskMini 110 series by turning it counterclockwise. Attach the other VESA Bracket to the right side panel of your LCD screen (75 mm × 75 mm or 100 mm × 100 mm). 3. 3.9 Installing the VESA Bracket (Optional) 1.
B A 22 English Secure the VESA Bracket to the rear of a compatible display using the four screws. 2. Mount the DeskMini 110 series by using the four screws. *Choose mounting holes depending on the mounting hole pattern of the DeskMini 110 series by turning it counterclockwise. Attach the other VESA Bracket to the right side panel of your LCD screen (75 mm × 75 mm or 100 mm × 100 mm). 3. 3.9 Installing the VESA Bracket (Optional) 1.
User Manual
Page 30
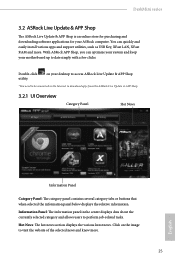
... category and allows users to visit the website of the selected news and know more . Double-click utility. Click on your desktop to access ASRock Live Update & APP Shop *You need to be connected to the Internet to date simply with a few clicks. You can optimize your system... and easily install various apps and support utilities, such as USB Key, XFast LAN, XFast RAM and more . 25 English DeskMini series 3.2 ASRock Live Update & APP Shop The ASRock Live Update & APP Shop is an online store for purchasing and downloading software applications for your motherboard up to download apps from...
... category and allows users to visit the website of the selected news and know more . Double-click utility. Click on your desktop to access ASRock Live Update & APP Shop *You need to be connected to the Internet to date simply with a few clicks. You can optimize your system... and easily install various apps and support utilities, such as USB Key, XFast LAN, XFast RAM and more . 25 English DeskMini series 3.2 ASRock Live Update & APP Shop The ASRock Live Update & APP Shop is an online store for purchasing and downloading software applications for your motherboard up to download apps from...

User Manual
Page 32
DeskMini series Step 3 If you can icon . *The trash icon may not appear for certain apps. 27 English To uninstall it, simply click on the trash can find the green "Installed" icon appears on the red icon to start downloading. Step 4 When installation completes, you want to install the app, click on the upper right corner.
DeskMini series Step 3 If you can icon . *The trash icon may not appear for certain apps. 27 English To uninstall it, simply click on the trash can find the green "Installed" icon appears on the red icon to start downloading. Step 4 When installation completes, you want to install the app, click on the upper right corner.

User Manual
Page 34
Click to select one or more details. Step 3 Click Update to see a list of recommended or critical updates for the BIOS or drivers. DeskMini series 3.2.3 BIOS & Drivers Installing BIOS or Drivers When the "BIOS & Drivers" tab is selected, you will see more items you want to update. Click on Step 2 to start the update process. 29 English Step 1 Please check the item information before update. Please update them all soon.
Click to select one or more details. Step 3 Click Update to see a list of recommended or critical updates for the BIOS or drivers. DeskMini series 3.2.3 BIOS & Drivers Installing BIOS or Drivers When the "BIOS & Drivers" tab is selected, you will see more items you want to update. Click on Step 2 to start the update process. 29 English Step 1 Please check the item information before update. Please update them all soon.
User Manual
Page 36
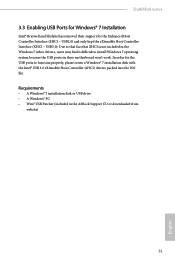
... Intel® USB 3.0 eXtensible Host Controller (xHCI) drivers packed into the ISO file. USB3.0). Due to that fact that XHCI is not included in the ASRock Support CD or downloaded from website) 31 English USB2.0) and only kept the eXtensible Host Controller Interface (XHCI - In order for the USB ports to... Windows 7 operating system because the USB ports on their support for Windows® 7 Installation Intel® Braswell and Skylake has removed their motherboard won't work. DeskMini series 3.3 Enabling USB Ports for the Enhanced Host Controller Interface (EHCI -
... Intel® USB 3.0 eXtensible Host Controller (xHCI) drivers packed into the ISO file. USB3.0). Due to that fact that XHCI is not included in the ASRock Support CD or downloaded from website) 31 English USB2.0) and only kept the eXtensible Host Controller Interface (XHCI - In order for the USB ports to... Windows 7 operating system because the USB ports on their support for Windows® 7 Installation Intel® Braswell and Skylake has removed their motherboard won't work. DeskMini series 3.3 Enabling USB Ports for the Enhanced Host Controller Interface (EHCI -

User Manual
Page 38
Step 6 Click "Start" to install Windows® 7 on Braswell or Skylake with the new burned CD. DeskMini series Step 5 Select the USB storage, compact disk or destination folder for the new Windows 7 installation file. Step 7 Now you are able to begin. Or please use the patched ISO image to make an OS USB drive to install the OS. 33 English
Step 6 Click "Start" to install Windows® 7 on Braswell or Skylake with the new burned CD. DeskMini series Step 5 Select the USB storage, compact disk or destination folder for the new Windows 7 installation file. Step 7 Now you are able to begin. Or please use the patched ISO image to make an OS USB drive to install the OS. 33 English
User Manual
Page 40
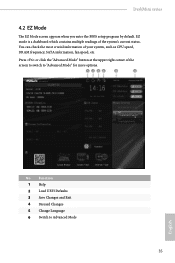
... of the system's current status. Function 1 Help 2 Load UEFI Defaults 3 Save Changes and Exit 4 Discard Changes 5 Change Language 6 Switch to "Advanced Mode" for more options. DeskMini series 4.2 EZ Mode The EZ Mode screen appears when you enter the BIOS setup program by default.
... of the system's current status. Function 1 Help 2 Load UEFI Defaults 3 Save Changes and Exit 4 Discard Changes 5 Change Language 6 Switch to "Advanced Mode" for more options. DeskMini series 4.2 EZ Mode The EZ Mode screen appears when you enter the BIOS setup program by default.

User Manual
Page 42
... the General Help Screen Add / Remove Favorite Discard changes and exit the SETUP UTILITY Load optimal default values for the descriptions of each navigation key. DeskMini series 4.3.2 Navigation Keys Use < > key or < > key to choose among the selections on the menu bar, and use the mouse to click your required item. You...
... the General Help Screen Add / Remove Favorite Discard changes and exit the SETUP UTILITY Load optimal default values for the descriptions of each navigation key. DeskMini series 4.3.2 Navigation Keys Use < > key or < > key to choose among the selections on the menu bar, and use the mouse to click your required item. You...