
RAID Installation Guide
Page 7
.... Enter BIOS SETUP UTILITY Advanced screen IDE Configuration. B. If you install Windows® VistaTM / Windows® VistaTM 64-bit on IDE HDDs and want to install Windows® VistaTM / Windows® VistaTM 64-bit on your SATA / SATAII HDDs with RAID functions, please follow the instruction to the BIOS RAID installation guide part of the document in the following path in BIOS first. Before you start to configure RAID function, you still need to [RAID] in the Support CD: .. \ RAID Installation Guide 7 Please refer to install Windows...
.... Enter BIOS SETUP UTILITY Advanced screen IDE Configuration. B. If you install Windows® VistaTM / Windows® VistaTM 64-bit on IDE HDDs and want to install Windows® VistaTM / Windows® VistaTM 64-bit on your SATA / SATAII HDDs with RAID functions, please follow the instruction to the BIOS RAID installation guide part of the document in the following path in BIOS first. Before you start to configure RAID function, you still need to [RAID] in the Support CD: .. \ RAID Installation Guide 7 Please refer to install Windows...

RAID Installation Guide
Page 11
... installation procedures. Enter NVRAIDMAN RAID driver is an instruction for Windows 2000 / XP / XP 64-bit Users A. Please enter NVRAIDMAN by clicking on Start → Programs → NVIDIA Corporation → Mediashield → Mediashield. (There is also a "Mediashield" shortcut on the desktop.) Then, the below to configure RAID functions by using NVIDIAMAN under Windows environment. After you finish the driver installation, you to configure and manage RAID functions. 2. NVIDIA Windows RAID Installation Guide NVIDIA Windows RAID Installation Guide...
... installation procedures. Enter NVRAIDMAN RAID driver is an instruction for Windows 2000 / XP / XP 64-bit Users A. Please enter NVRAIDMAN by clicking on Start → Programs → NVIDIA Corporation → Mediashield → Mediashield. (There is also a "Mediashield" shortcut on the desktop.) Then, the below to configure RAID functions by using NVIDIAMAN under Windows environment. After you finish the driver installation, you to configure and manage RAID functions. 2. NVIDIA Windows RAID Installation Guide NVIDIA Windows RAID Installation Guide...

User Manual
Page 7
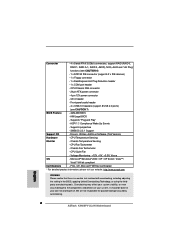
... 1, RAID 0+1, RAID 5, JBOD), NCQ, AHCI and "Hot Plug" functions (see CAUTION 7) BIOS Feature - 4Mb AMI BIOS - Supports "Plug and Play" - Drivers, Utilities, AntiVirus Software (Trial Version) Hardware - Chassis Fan Tachometer - It should be done at your system. Front panel audio header - 4 x USB 2.0 headers (support 8 USB 2.0 ports) (see CAUTION 6) - 1 x ATA133 IDE connector (supports 2 x IDE devices) - 1 x Floppy connector - 1 x DeskExpress Hot Plug Detection header - 1 x COM port header - ACPI 1.1 Compliance Wake Up Events - CPU Fan Tachometer - Overclocking...
... 1, RAID 0+1, RAID 5, JBOD), NCQ, AHCI and "Hot Plug" functions (see CAUTION 7) BIOS Feature - 4Mb AMI BIOS - Supports "Plug and Play" - Drivers, Utilities, AntiVirus Software (Trial Version) Hardware - Chassis Fan Tachometer - It should be done at your system. Front panel audio header - 4 x USB 2.0 headers (support 8 USB 2.0 ports) (see CAUTION 6) - 1 x ATA133 IDE connector (supports 2 x IDE devices) - 1 x Floppy connector - 1 x DeskExpress Hot Plug Detection header - 1 x COM port header - ACPI 1.1 Compliance Wake Up Events - CPU Fan Tachometer - Overclocking...

User Manual
Page 8
... the latest information. 5. CAUTION! 1. DVI to HDMI adapter is subject to the adapter vendor for details. 2. To improve heat dissipation, remember to HDMI interface. Frequencies other than the recommended CPU bus frequencies may use the DVI to HDMI adapter to convert this motherboard can also connect SATA hard disk to SATAII mode. Please read the "SATAII Hard Disk Setup Guide" on page 32 for further information. 6. This motherboard supports Untied Overclocking Technology.
... the latest information. 5. CAUTION! 1. DVI to HDMI adapter is subject to the adapter vendor for details. 2. To improve heat dissipation, remember to HDMI interface. Frequencies other than the recommended CPU bus frequencies may use the DVI to HDMI adapter to convert this motherboard can also connect SATA hard disk to SATAII mode. Please read the "SATAII Hard Disk Setup Guide" on page 32 for further information. 6. This motherboard supports Untied Overclocking Technology.

User Manual
Page 9
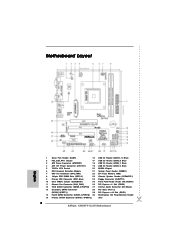
... Blue) 3 ATX Power Connector (ATXPWR1) 18 USB 2.0 Header (USB6_7, Blue) 4 ATX 12V Power Connector (ATX12V1) 19 USB 2.0 Header (USB4_5, Blue) 5 754-Pin CPU Socket 20 NVIDIA Chipset 6 CPU Heatsink Retention Module 21 System Panel Header (PANEL1) 7 CPU Fan Connector (CPU_FAN1) 22 SPI Flash Memory (4Mb) 8 184-pin DDR DIMM Slots (DDR1-2) 23 Chassis Speaker Header (SPEAKER 1) 9 Primary IDE Connector (IDE1, Blue) 24 Floppy Connector (FLOPPY1) 10 Clear CMOS Jumper (CLRCMOS1) 25 Front Panel Audio Header (HD_AUDIO1) 11 Chassis Fan Connector (CHA_FAN1) 26 PCI Express x1 Slot (PCIE2) 12...
... Blue) 3 ATX Power Connector (ATXPWR1) 18 USB 2.0 Header (USB6_7, Blue) 4 ATX 12V Power Connector (ATX12V1) 19 USB 2.0 Header (USB4_5, Blue) 5 754-Pin CPU Socket 20 NVIDIA Chipset 6 CPU Heatsink Retention Module 21 System Panel Header (PANEL1) 7 CPU Fan Connector (CPU_FAN1) 22 SPI Flash Memory (4Mb) 8 184-pin DDR DIMM Slots (DDR1-2) 23 Chassis Speaker Header (SPEAKER 1) 9 Primary IDE Connector (IDE1, Blue) 24 Floppy Connector (FLOPPY1) 10 Clear CMOS Jumper (CLRCMOS1) 25 Front Panel Audio Header (HD_AUDIO1) 11 Chassis Fan Connector (CHA_FAN1) 26 PCI Express x1 Slot (PCIE2) 12...

User Manual
Page 18
...Click "Start" button, select "Settings", and then click "Control Panel". Step 3: Reboot your system. Set the option "OnBoard HDMI HD Audio" to set up your system manually. A. Enter BIOS SETUP UTILITY Advanced screen Chipset Configuration. Step 2: Enter Windows® to [Auto]. B. D. Step 3: Reboot your system. After HDMI audio driver is available. A. You may use the DVI to HDMI adapter to convert the DVI-D port to the OS you install. B. For Windows® VistaTM / VistaTM 64-bit OS Step 1: Set up BIOS. B. Enter BIOS SETUP UTILITY Advanced screen Chipset Configuration...
...Click "Start" button, select "Settings", and then click "Control Panel". Step 3: Reboot your system. Set the option "OnBoard HDMI HD Audio" to set up your system manually. A. Enter BIOS SETUP UTILITY Advanced screen Chipset Configuration. Step 2: Enter Windows® to [Auto]. B. D. Step 3: Reboot your system. After HDMI audio driver is available. A. You may use the DVI to HDMI adapter to convert the DVI-D port to the OS you install. B. For Windows® VistaTM / VistaTM 64-bit OS Step 1: Set up BIOS. B. Enter BIOS SETUP UTILITY Advanced screen Chipset Configuration...

User Manual
Page 24
....hitachigst.com/hdd/support/download.htm The above examples are shorted, SATA 1.5Gb/s will be the same. In order to enable SATAII function, please follow the below SATAII hard disk setup guide. On the other hand, if you want to enable SATAII 3.0Gb/s, please remove the jumpers from pin 5 and pin 6. Some default setting of different vendors, the jumper pin setting methods may fail to run at SATAII mode, which operate...
....hitachigst.com/hdd/support/download.htm The above examples are shorted, SATA 1.5Gb/s will be the same. In order to enable SATAII function, please follow the below SATAII hard disk setup guide. On the other hand, if you want to enable SATAII 3.0Gb/s, please remove the jumpers from pin 5 and pin 6. Some default setting of different vendors, the jumper pin setting methods may fail to run at SATAII mode, which operate...

User Manual
Page 28
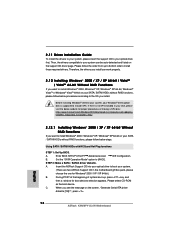
... 64-bit Without RAID Functions If you install. Using SATA / SATAII HDDs with NCQ and Hot Plug functions STEP 1: Set Up BIOS. Set the "SATA Operation Mode" option to install Windows® 2000 / Windows® XP / Windows® XP 64-bit on the support CD driver page. Enter BIOS SETUP UTILITY Advanced screen IDE Configuration. Therefore, the drivers you install can be auto-detected and listed on your optical drive first. STEP 2: Make a SATA / SATAII driver diskette. Please select CD- When you want to [AHCI].
... 64-bit Without RAID Functions If you install. Using SATA / SATAII HDDs with NCQ and Hot Plug functions STEP 1: Set Up BIOS. Set the "SATA Operation Mode" option to install Windows® 2000 / Windows® XP / Windows® XP 64-bit on the support CD driver page. Enter BIOS SETUP UTILITY Advanced screen IDE Configuration. Therefore, the drivers you install can be auto-detected and listed on your optical drive first. STEP 2: Make a SATA / SATAII driver diskette. Please select CD- When you want to [AHCI].

User Manual
Page 32
... configure RAID function, you apply Untied Overclocking Technology. 32 Please refer to the BIOS RAID installation guide part of BIOS setup to set the selection from [Auto] to set up "SATA Operation Mode" to [RAID] in the Support CD: .. \ RAID Installation Guide 2 . 1 6 Untied Overclocking Technology This motherboard supports Untied Overclocking Technology, which means during overclocking, but PCI / PCIE buses are two ASRock Support CD in the fixed mode so that , please insert Windows® VistaTM / Windows® VistaTM 64-bit optical disk into the optical drive again to boot...
... configure RAID function, you apply Untied Overclocking Technology. 32 Please refer to the BIOS RAID installation guide part of BIOS setup to set the selection from [Auto] to set up "SATA Operation Mode" to [RAID] in the Support CD: .. \ RAID Installation Guide 2 . 1 6 Untied Overclocking Technology This motherboard supports Untied Overclocking Technology, which means during overclocking, but PCI / PCIE buses are two ASRock Support CD in the fixed mode so that , please insert Windows® VistaTM / Windows® VistaTM 64-bit optical disk into the optical drive again to boot...

User Manual
Page 38
... value of multiple video controllers. Burst Length Burst length can be spread out over banks on the same node, or accross nodes, decreasing access contention. 3.3.2 Chipset Configuration BIOS SETUP UTILITY Advanced Chipset Settings Onboard LAN Onboard HDMI HD Audio OnBoard HD Audio Front Panel Share Memory Primary Graphics Adapter CPU-NB Link Speed CPU-NB Link Width DRAM Voltage NBCORE Voltage [Enabled] [Disabled] [Auto] [Auto] [Auto] [PCI] [Auto] [Auto] [Auto] [Auto] To set DRAM Voltage. +F1 F9 F10 ESC Select Screen Select Item Change Option General Help Load Defaults Save and Exit...
... value of multiple video controllers. Burst Length Burst length can be spread out over banks on the same node, or accross nodes, decreasing access contention. 3.3.2 Chipset Configuration BIOS SETUP UTILITY Advanced Chipset Settings Onboard LAN Onboard HDMI HD Audio OnBoard HD Audio Front Panel Share Memory Primary Graphics Adapter CPU-NB Link Speed CPU-NB Link Width DRAM Voltage NBCORE Voltage [Enabled] [Disabled] [Auto] [Auto] [Auto] [PCI] [Auto] [Auto] [Auto] [Auto] To set DRAM Voltage. +F1 F9 F10 ESC Select Screen Select Item Change Option General Help Load Defaults Save and Exit...

User Manual
Page 41
... Mode S.M.A.R.T. 32Bit Data Transfer [Auto] [Auto] [Auto] [Auto] [Auto] [Disabled] [Disabled] Select the type of "IDE1 Slave" as the example in NVIDIA BIOS / Windows RAID Utility. IDE1 Device Configuration You may set the IDE configuration for the device that you finish configuring RAID functions in the following instruction, which can not be applied to operate RAID function on SATA / SATAII HDDs, please select [RAID]. Onboard SATA Controller Use this option is [non-RAID]. If you want to the configurations of device connected to enable or disable the "Onboard SATA...
... Mode S.M.A.R.T. 32Bit Data Transfer [Auto] [Auto] [Auto] [Auto] [Auto] [Disabled] [Disabled] Select the type of "IDE1 Slave" as the example in NVIDIA BIOS / Windows RAID Utility. IDE1 Device Configuration You may set the IDE configuration for the device that you finish configuring RAID functions in the following instruction, which can not be applied to operate RAID function on SATA / SATAII HDDs, please select [RAID]. Onboard SATA Controller Use this option is [non-RAID]. If you want to the configurations of device connected to enable or disable the "Onboard SATA...

User Manual
Page 42
... the hard disk information into BIOS, use of this item is enabled, it will enhance hard disk performance by optimizing the hard disk timing. for a hard disk > 512 MB under DOS and Windows; Configuration options: [Not Installed], [Auto], [CD/DVD], and [ARMD]. [Not Installed]: Select [Not Installed] to disable the use a disk utility, such as MO. If this item to enable or disable the S.M.A.R.T. (Self-Monitoring, Analysis, and Reporting Technology) feature. Use this feature is [Auto]. This is used for compatible IDE devices.
... the hard disk information into BIOS, use of this item is enabled, it will enhance hard disk performance by optimizing the hard disk timing. for a hard disk > 512 MB under DOS and Windows; Configuration options: [Not Installed], [Auto], [CD/DVD], and [ARMD]. [Not Installed]: Select [Not Installed] to disable the use a disk utility, such as MO. If this item to enable or disable the S.M.A.R.T. (Self-Monitoring, Analysis, and Reporting Technology) feature. Use this feature is [Auto]. This is used for compatible IDE devices.

User Manual
Page 45
... to use under BIOS setup and Windows / Linux OS. 45 USB Controller Use this option to enter OS. [BIOS Setup Only] - Please refer to enable or disable the USB 2.0 support. Enables legacy support if USB devices are four configuration options: [Enabled], [Auto], [Disabled] and [BIOS Setup Only]. 3.3.8USB Configuration BIOS SETUP UTILITY Advanced USB Configuration USB Controller USB 2.0 Support Legacy USB Support [Enabled] [Enabled] [BIOS Setup Only] To enable or disable the onboard USB controllers. +F1 F9 F10 ESC Select Screen Select Item Change Option General Help Load Defaults...
... to use under BIOS setup and Windows / Linux OS. 45 USB Controller Use this option to enter OS. [BIOS Setup Only] - Please refer to enable or disable the USB 2.0 support. Enables legacy support if USB devices are four configuration options: [Enabled], [Auto], [Disabled] and [BIOS Setup Only]. 3.3.8USB Configuration BIOS SETUP UTILITY Advanced USB Configuration USB Controller USB 2.0 Support Legacy USB Support [Enabled] [Enabled] [BIOS Setup Only] To enable or disable the onboard USB controllers. +F1 F9 F10 ESC Select Screen Select Item Change Option General Help Load Defaults...

User Manual
Page 50
... displays the Main Menu if "AUTORUN" is enabled in the Support CD to install it. 4.2.4 Contact Information If you may contact your OS documentation for more about ASRock, welcome to visit ASRock's website at http://www.asrock.com; Software Support 4.1 Install Operating System This motherboard supports various Microsoft® Windows® operating systems: 2000 / XP / XP 64-bit / VistaTM / VistaTM 64-bit. Because motherboard settings and hardware options vary, use the setup...
... displays the Main Menu if "AUTORUN" is enabled in the Support CD to install it. 4.2.4 Contact Information If you may contact your OS documentation for more about ASRock, welcome to visit ASRock's website at http://www.asrock.com; Software Support 4.1 Install Operating System This motherboard supports various Microsoft® Windows® operating systems: 2000 / XP / XP 64-bit / VistaTM / VistaTM 64-bit. Because motherboard settings and hardware options vary, use the setup...
Quick Installation Guide
Page 2
... Blue) 3 ATX Power Connector (ATXPWR1) 18 USB 2.0 Header (USB6_7, Blue) 4 ATX 12V Power Connector (ATX12V1) 19 USB 2.0 Header (USB4_5, Blue) 5 754-Pin CPU Socket 20 NVIDIA Chipset 6 CPU Heatsink Retention Module 21 System Panel Header (PANEL1) 7 CPU Fan Connector (CPU_FAN1) 22 SPI Flash Memory (4Mb) 8 184-pin DDR DIMM Slots (DDR1-2) 23 Chassis Speaker Header (SPEAKER 1) 9 Primary IDE Connector (IDE1, Blue) 24 Floppy Connector (FLOPPY1) 10 Clear CMOS Jumper (CLRCMOS1) 25 Front Panel Audio Header (HD_AUDIO1) 11 Chassis Fan Connector (CHA_FAN1) 26 PCI Express x1 Slot (PCIE2) 12...
... Blue) 3 ATX Power Connector (ATXPWR1) 18 USB 2.0 Header (USB6_7, Blue) 4 ATX 12V Power Connector (ATX12V1) 19 USB 2.0 Header (USB4_5, Blue) 5 754-Pin CPU Socket 20 NVIDIA Chipset 6 CPU Heatsink Retention Module 21 System Panel Header (PANEL1) 7 CPU Fan Connector (CPU_FAN1) 22 SPI Flash Memory (4Mb) 8 184-pin DDR DIMM Slots (DDR1-2) 23 Chassis Speaker Header (SPEAKER 1) 9 Primary IDE Connector (IDE1, Blue) 24 Floppy Connector (FLOPPY1) 10 Clear CMOS Jumper (CLRCMOS1) 25 Front Panel Audio Header (HD_AUDIO1) 11 Chassis Fan Connector (CHA_FAN1) 26 PCI Express x1 Slot (PCIE2) 12...
Quick Installation Guide
Page 6
... the setting in header - English 6 ASRock K8N68PV-GLAN Motherboard CPU Temperature Sensing Monitor - CPU Quiet Fan - Chassis Fan Tachometer - Connector - 4 x Serial ATAII 3.0Gb/s connectors, support RAID (RAID 0, RAID 1, RAID 0+1, RAID 5, JBOD), NCQ, AHCI and "Hot Plug" functions (see CAUTION 7) BIOS Feature - 4Mb AMI BIOS - CD in the BIOS, applying Untied Overclocking Technology, or using the thirdparty overclocking tools. Front panel audio header - 4 x USB 2.0 headers (support 8 USB 2.0 ports) (see CAUTION 6) - 1 x ATA133 IDE connector (supports 2 x IDE devices...
... the setting in header - English 6 ASRock K8N68PV-GLAN Motherboard CPU Temperature Sensing Monitor - CPU Quiet Fan - Chassis Fan Tachometer - Connector - 4 x Serial ATAII 3.0Gb/s connectors, support RAID (RAID 0, RAID 1, RAID 0+1, RAID 5, JBOD), NCQ, AHCI and "Hot Plug" functions (see CAUTION 7) BIOS Feature - 4Mb AMI BIOS - CD in the BIOS, applying Untied Overclocking Technology, or using the thirdparty overclocking tools. Front panel audio header - 4 x USB 2.0 headers (support 8 USB 2.0 ports) (see CAUTION 6) - 1 x ATA133 IDE connector (supports 2 x IDE devices...

Quick Installation Guide
Page 7
... mode. Please read the "SATAII Hard Disk Setup Guide" on this motherboard can also connect SATA hard disk to perform over-clocking. While CPU overheat is not recommended to SATAII connector directly. 7. This DVI-D port for details. 2. You can support DVI/HDCP and HDMI format signal. This motherboard supports Untied Overclocking Technology. Power Management for USB 2.0 works fine under Microsoft® Windows® VistaTM 64-bit / VistaTM / XP 64-bit / XP SP1 or SP2 / 2000 SP4. 7 ASRock K8N68PV-GLAN Motherboard...
... mode. Please read the "SATAII Hard Disk Setup Guide" on this motherboard can also connect SATA hard disk to perform over-clocking. While CPU overheat is not recommended to SATAII connector directly. 7. This DVI-D port for details. 2. You can support DVI/HDCP and HDMI format signal. This motherboard supports Untied Overclocking Technology. Power Management for USB 2.0 works fine under Microsoft® Windows® VistaTM 64-bit / VistaTM / XP 64-bit / XP SP1 or SP2 / 2000 SP4. 7 ASRock K8N68PV-GLAN Motherboard...
Quick Installation Guide
Page 15
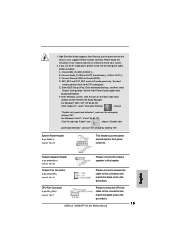
... the instruction in our manual and chassis manual to the ground pin. 15 ASRock K8N68PV-GLAN Motherboard MIC_RET and OUT_RET are for AC'97 audio panel. E. Enter Windows system. For Windows® VistaTM / VistaTM 64-bit OS: Click the right-top "Folder" icon , choose "Disable front panel jack detection", and save the change by clicking "OK". CPU Fan Connector (4-pin CPU_FAN1) (see p.2 No. 21) This header accommodates several system front panel functions. If you use...
... the instruction in our manual and chassis manual to the ground pin. 15 ASRock K8N68PV-GLAN Motherboard MIC_RET and OUT_RET are for AC'97 audio panel. E. Enter Windows system. For Windows® VistaTM / VistaTM 64-bit OS: Click the right-top "Folder" icon , choose "Disable front panel jack detection", and save the change by clicking "OK". CPU Fan Connector (4-pin CPU_FAN1) (see p.2 No. 21) This header accommodates several system front panel functions. If you use...
Quick Installation Guide
Page 18
... SATA / SATAII HDDs without RAID functions, please follow the order from up , press key, and then a window for Windows® 2000 / XP / XP 64-bit.) B. Using SATA / SATAII HDDs with NCQ and Hot Plug functions STEP 1: Set Up BIOS. Please select CD-ROM as the boot device. A. B. Enter BIOS SETUP UTILITY Advanced screen IDE Configuration. During POST at the beginning of making a SP4 disk: http://www.microsoft.com/Windows2000/downloads/servicepacks/sp4/spdeploy. 2.11 Driver Installation Guide To install the drivers...
... SATA / SATAII HDDs without RAID functions, please follow the order from up , press key, and then a window for Windows® 2000 / XP / XP 64-bit.) B. Using SATA / SATAII HDDs with NCQ and Hot Plug functions STEP 1: Set Up BIOS. Please select CD-ROM as the boot device. A. B. Enter BIOS SETUP UTILITY Advanced screen IDE Configuration. During POST at the beginning of making a SP4 disk: http://www.microsoft.com/Windows2000/downloads/servicepacks/sp4/spdeploy. 2.11 Driver Installation Guide To install the drivers...
Quick Installation Guide
Page 21
... system chassis. otherwise, POST continues with the motherboard contains necessary drivers and useful utilities that will display the Main Menu automatically if "AUTORUN" is untied during the Power-On-Self-Test (POST) to [CPU, PCIE, Async.]. To begin using the Support CD, insert the CD into your computer. Please refer to the User Manual (PDF file) contained in your CD-ROM drive. BIOS Information The Flash Memory on the file "ASSETUP.EXE" from [Auto] to enter BIOS Setup utility; If...
... system chassis. otherwise, POST continues with the motherboard contains necessary drivers and useful utilities that will display the Main Menu automatically if "AUTORUN" is untied during the Power-On-Self-Test (POST) to [CPU, PCIE, Async.]. To begin using the Support CD, insert the CD into your computer. Please refer to the User Manual (PDF file) contained in your CD-ROM drive. BIOS Information The Flash Memory on the file "ASSETUP.EXE" from [Auto] to enter BIOS Setup utility; If...


