

User Manual
Page 3
... network cables from the power outlets before cleaning the system. • If you encounter the following technical problems with ambient temperatures between 0o C and 40o C. • If you use an extension cord, make sure that the total ampere rating of the devices plugged into the system. • The system does not function properly even if you follow all instructions in...
... network cables from the power outlets before cleaning the system. • If you encounter the following technical problems with ambient temperatures between 0o C and 40o C. • If you use an extension cord, make sure that the total ampere rating of the devices plugged into the system. • The system does not function properly even if you follow all instructions in...

User Manual
Page 5
... 1.1 Package Contents 7 1.2 Specifications 8 1.3 Motherboard Layout 10 1.4 Rear Panel 12 1.5 System Chassis 13 1.6 Remote Controller 14 2 Quick Installation 15 3 Reinstalling the ODD/HDD 18 4 Installing the Second HDD 20 5 Dual Monitor 22 6 Driver Installation 23 7 Utility Menu 24 7.1 Instant Boot 24 7.1.1 Introduction 24 7.1.2 Installation 25 7.2 Symantec Norton AntiVirus Software free bundle (Trial version 28 7.3 ASRock APP Charger 29 7.4 CyberLink MediaEspresso 6.5 (Trial version)....... 30 7.5 ASRock XFast RAM 31 7.6 ASRock XFast USB 34 7.7 ASRock XFast LAN 37 7.8 Other...
... 1.1 Package Contents 7 1.2 Specifications 8 1.3 Motherboard Layout 10 1.4 Rear Panel 12 1.5 System Chassis 13 1.6 Remote Controller 14 2 Quick Installation 15 3 Reinstalling the ODD/HDD 18 4 Installing the Second HDD 20 5 Dual Monitor 22 6 Driver Installation 23 7 Utility Menu 24 7.1 Instant Boot 24 7.1.1 Introduction 24 7.1.2 Installation 25 7.2 Symantec Norton AntiVirus Software free bundle (Trial version 28 7.3 ASRock APP Charger 29 7.4 CyberLink MediaEspresso 6.5 (Trial version)....... 30 7.5 ASRock XFast RAM 31 7.6 ASRock XFast USB 34 7.7 ASRock XFast LAN 37 7.8 Other...

User Manual
Page 7
... control. It delivers excellent performance with robust design conforming to ASRock's commitment to change without further notice. www.asrock.com/support/index.asp 1.1 Package Contents ASRock Mini Series Support CD Quick Start Guide AC Power Cord One AC/DC Adapter Anti-Slip Pad Remote Controller SATA and Power Cables 7 You may find the latest VGA cards and CPU support lists on ASRock website without notice. http://www.asrock.com If you for specific information about the model...
... control. It delivers excellent performance with robust design conforming to ASRock's commitment to change without further notice. www.asrock.com/support/index.asp 1.1 Package Contents ASRock Mini Series Support CD Quick Start Guide AC Power Cord One AC/DC Adapter Anti-Slip Pad Remote Controller SATA and Power Cables 7 You may find the latest VGA cards and CPU support lists on ASRock website without notice. http://www.asrock.com If you for specific information about the model...

User Manual
Page 8
...) 3. 1.2 Specifications * For barebone systems, the HDD, ODD or Memory may not be included. Processor Chipset Memory Display Storage LAN Front I/O Rear I/O Audio ODD WiFi Bluetooth Controller Power Dimension Volume AMD E2-1800 APU AMD A68M Chipset Supports DDR3 1333/1066MHz, 2 x SO-DIMM slots, maximum up to 16GB Integrated AMD Radeon™ HD7340M Graphics Supports up to two 2.5" SATA HDDs and RAID 0/1 Gigabit LAN 2 x USB 3.0, 1 x MIC, 1 x Headphone 1 x HDMI, 1 x DVI-D, 1 x D-Sub VGA, 6 x USB 2.0, 1 x S/PDIF 7.1 Ch HD Audio DVD...
...) 3. 1.2 Specifications * For barebone systems, the HDD, ODD or Memory may not be included. Processor Chipset Memory Display Storage LAN Front I/O Rear I/O Audio ODD WiFi Bluetooth Controller Power Dimension Volume AMD E2-1800 APU AMD A68M Chipset Supports DDR3 1333/1066MHz, 2 x SO-DIMM slots, maximum up to 16GB Integrated AMD Radeon™ HD7340M Graphics Supports up to two 2.5" SATA HDDs and RAID 0/1 Gigabit LAN 2 x USB 3.0, 1 x MIC, 1 x Headphone 1 x HDMI, 1 x DVI-D, 1 x D-Sub VGA, 6 x USB 2.0, 1 x S/PDIF 7.1 Ch HD Audio DVD...

User Manual
Page 10
Fan connector 4. Clear CMOS jumper 10. SATA 3.0 connector: For the HDD's SATA data cable 10 Fan connector 5. Infrared module header 7. SATA 3.0 connector: For the ODD's SATA data cable 11. 1.3 Motherboard Layout 12 11 10 9 8 1 2 7 3 4 DDR3_A1 6 DDR3_A2 5 1. SATA 3.0 connector: For the HDD's SATA data cable 2. Mini-PCI Express expansion slot: For the WiFi module 9. Memory sockets 6. CPU Fan 8. Heatsink 3. ATX5V output power connector for slim ODD & 2.5" HDD 12.
Fan connector 4. Clear CMOS jumper 10. SATA 3.0 connector: For the HDD's SATA data cable 10 Fan connector 5. Infrared module header 7. SATA 3.0 connector: For the ODD's SATA data cable 11. 1.3 Motherboard Layout 12 11 10 9 8 1 2 7 3 4 DDR3_A1 6 DDR3_A2 5 1. SATA 3.0 connector: For the HDD's SATA data cable 2. Mini-PCI Express expansion slot: For the WiFi module 9. Memory sockets 6. CPU Fan 8. Heatsink 3. ATX5V output power connector for slim ODD & 2.5" HDD 12.

User Manual
Page 11
Fan Connection Connect to ODD Connect to HDD Connect to SATA Connector (4) Connect to ATX5V Power Connector (3) Connect to SATA Connector (1) 11 1. SATA and Power Connections SATA & Power Connections 2.
Fan Connection Connect to ODD Connect to HDD Connect to SATA Connector (4) Connect to ATX5V Power Connector (3) Connect to SATA Connector (1) 11 1. SATA and Power Connections SATA & Power Connections 2.

User Manual
Page 13
Drive activity indicator 28. Microphone port 30. 1.5 System Chassis 31 30 29 28 27 25. USB 3.0 ports: USB devices 31. Infrared receiver 25 26 13 Optical Disc Drive 26. Power ON/OFF button with status indicator 27. Headphone port 29.
Drive activity indicator 28. Microphone port 30. 1.5 System Chassis 31 30 29 28 27 25. USB 3.0 ports: USB devices 31. Infrared receiver 25 26 13 Optical Disc Drive 26. Power ON/OFF button with status indicator 27. Headphone port 29.
User Manual
Page 15
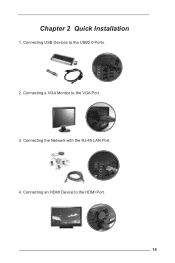
Connecting an HDMI Device to the USB2.0 Ports. 2. Connecting USB Devices to the HDMI Port. 15 Connecting the Network with the RJ-45 LAN Port. 4. Connecting a VGA Monitor to the VGA Port. 3. Chapter 2 Quick Installation 1.
Connecting an HDMI Device to the USB2.0 Ports. 2. Connecting USB Devices to the HDMI Port. 15 Connecting the Network with the RJ-45 LAN Port. 4. Connecting a VGA Monitor to the VGA Port. 3. Chapter 2 Quick Installation 1.

User Manual
Page 16
5. Connecting Center / Subwoofer Speakers. (Center/LEF Port) 16 Connecting Stereo Speakers or Headphones. (Front L/R Out Port) 8. Rear Port for 2/4/6 Channel; Connecting an External Audio Device. (Line In Port for 8 Channel) 7. Connecting a Microphone. (Mic In Port) 9. Connecting a DVI Device to the DVI Port. 6.
5. Connecting Center / Subwoofer Speakers. (Center/LEF Port) 16 Connecting Stereo Speakers or Headphones. (Front L/R Out Port) 8. Rear Port for 2/4/6 Channel; Connecting an External Audio Device. (Line In Port for 8 Channel) 7. Connecting a Microphone. (Mic In Port) 9. Connecting a DVI Device to the DVI Port. 6.

User Manual
Page 17
Connecting an Optical Device to the DC-In Jack. 13. Powering on the System. 14. Connecting Power to the Optical S/PDIF Out Port. 12. Connecting Headphones / Microphones / USB3.0 Devices 17 Connecting Side Speakers. (Side Port for 4/6/8 Channel) 11. 10.
Connecting an Optical Device to the DC-In Jack. 13. Powering on the System. 14. Connecting Power to the Optical S/PDIF Out Port. 12. Connecting Headphones / Microphones / USB3.0 Devices 17 Connecting Side Speakers. (Side Port for 4/6/8 Channel) 11. 10.

User Manual
Page 21
4. Replace the side cover and fasten the screws. 21 Connect the other SATA and power cables to SATA3_1 and J1 connectors on the motherboard. 6. Connect the SATA and power cables to the top HDD. 7. Connect the other end to the ODD and the bottom HDD. 5.
4. Replace the side cover and fasten the screws. 21 Connect the other SATA and power cables to SATA3_1 and J1 connectors on the motherboard. 6. Connect the SATA and power cables to the top HDD. 7. Connect the other end to the ODD and the bottom HDD. 5.

User Manual
Page 22
... enable dual monitor, please connect monitor cables to the respective ports on your ASRock Mini series HTPC. ASRock Mini series HTPC also provides independent display controllers for DVI-D, HDMI and D-Sub to your system, you can enjoy dual monitor after your computer. If you haven't installed the VGA driver yet, please install the VGA driver from our support CD to support dual VGA output so that DVI-D, HDMI and D-Sub can only choose two of them. 22 You can drive...
... enable dual monitor, please connect monitor cables to the respective ports on your ASRock Mini series HTPC. ASRock Mini series HTPC also provides independent display controllers for DVI-D, HDMI and D-Sub to your system, you can enjoy dual monitor after your computer. If you haven't installed the VGA driver yet, please install the VGA driver from our support CD to support dual VGA output so that DVI-D, HDMI and D-Sub can only choose two of them. 22 You can drive...

User Manual
Page 23
Therefore, the drivers you install will work properly. 23 Then, the drivers compatible to your optical drive first. Please follow the order from top to bottom to install those required drivers. Chapter 6 Driver Installation To install the drivers to your system, please insert the support CD to your system can be autodetected and listed on the support CD driver page.
Therefore, the drivers you install will work properly. 23 Then, the drivers compatible to your optical drive first. Please follow the order from top to bottom to install those required drivers. Chapter 6 Driver Installation To install the drivers to your system, please insert the support CD to your system can be autodetected and listed on the support CD driver page.

User Manual
Page 25
.../feature/InstantBoot/download.asp B. Install Instant Boot driver from ASRock's support CD, or you install Instant Boot. a. Click "Next" to . c. Please follow the instructions on Instant Boot's setup page. You may choose a different folder if you want to. You may choose a different folder if you want to continue. Execute the Instant Boot installation program under Windows®. b. Then click "Next". A. Select a location. Create a start menu folder. Then...
.../feature/InstantBoot/download.asp B. Install Instant Boot driver from ASRock's support CD, or you install Instant Boot. a. Click "Next" to . c. Please follow the instructions on Instant Boot's setup page. You may choose a different folder if you want to. You may choose a different folder if you want to continue. Execute the Instant Boot installation program under Windows®. b. Then click "Next". A. Select a location. Create a start menu folder. Then...

User Manual
Page 26
Double click ASRock Instant Boot's icon on the desktop, then Instant Boot's main menu will find an ASRock Instant Boot icon on Windows® desktop. d. Click "Finish" to begin installing Instant Boot driver. Click "Install" to complete and exit the setup. After the installation is completed, you will pop up. 26 C. e. D.
Double click ASRock Instant Boot's icon on the desktop, then Instant Boot's main menu will find an ASRock Instant Boot icon on Windows® desktop. d. Click "Finish" to begin installing Instant Boot driver. Click "Install" to complete and exit the setup. After the installation is completed, you will pop up. 26 C. e. D.

User Manual
Page 39
Make the keyboard LEDs display Traffic Shaping information. cFos Speed Test Quickly test the upload and download speed of current internet connections. nection. tion or solve problems with speed, ping time or connections. Current Connection Shows the details of your connec- bottom right and selecting Open windows. Window settings Users may configure the skin and effects of packets that meet certain criteria. prove latency, and/or increase usable bandwidth for XFast LAN in...
Make the keyboard LEDs display Traffic Shaping information. cFos Speed Test Quickly test the upload and download speed of current internet connections. nection. tion or solve problems with speed, ping time or connections. Current Connection Shows the details of your connec- bottom right and selecting Open windows. Window settings Users may configure the skin and effects of packets that meet certain criteria. prove latency, and/or increase usable bandwidth for XFast LAN in...

User Manual
Page 41
... be running on 41 ASRock Internet Flash ASRock Internet Flash searches for available UEFI firmware updates from bypassing OMG, guest accounts without entering operating systems first like MS-DOS or Windows®. ASRock Dehumidifier Function Users may schedule the starting and ending hours of internet access granted to your USB flash drive, floppy disk or hard drive, then you must use FAT32/16/12 file system. With this tool and save the new BIOS file to...
... be running on 41 ASRock Internet Flash ASRock Internet Flash searches for available UEFI firmware updates from bypassing OMG, guest accounts without entering operating systems first like MS-DOS or Windows®. ASRock Dehumidifier Function Users may schedule the starting and ending hours of internet access granted to your USB flash drive, floppy disk or hard drive, then you must use FAT32/16/12 file system. With this tool and save the new BIOS file to...

User Manual
Page 43
... start up the computer. Because the UEFI software is constantly being updated, the following selections: Main For setting system time/date information OC Tweaker For overclocking configurations Advanced For advanced system configurations Tool Useful tools H/W Monitor Displays current hardware status Boot For configuring boot settings and boot priority Security For security settings Exit Exit the current screen or the UEFI Setup Utility 43 If you wish to enter the UEFI SETUP UTILITY...
... start up the computer. Because the UEFI software is constantly being updated, the following selections: Main For setting system time/date information OC Tweaker For overclocking configurations Advanced For advanced system configurations Tool Useful tools H/W Monitor Displays current hardware status Boot For configuring boot settings and boot priority Security For security settings Exit Exit the current screen or the UEFI Setup Utility 43 If you wish to enter the UEFI SETUP UTILITY...

User Manual
Page 60
... able to configure the boot settings and the boot priority. If you to enter BIOS Setup by using an external graphics card, the VBIOS must support UEFI GOP in windows. 3. Boot From Onboard LAN Use this is set to [On], it is to clear CMOS or run the "Restart to enable or disable Boot From Onboard LAN. The only way to enter UEFI Setup is not allowed to boot from a USB storage device. [Ultra Fast]: There are using the keyboard. Setup Prompt...
... able to configure the boot settings and the boot priority. If you to enter BIOS Setup by using an external graphics card, the VBIOS must support UEFI GOP in windows. 3. Boot From Onboard LAN Use this is set to [On], it is to clear CMOS or run the "Restart to enable or disable Boot From Onboard LAN. The only way to enter UEFI Setup is not allowed to boot from a USB storage device. [Ultra Fast]: There are using the keyboard. Setup Prompt...

User Manual
Page 64
... necessary drivers and useful utilities that the system supports. or you need to contact ASRock or want to display the menu. 9.2.2 Drivers Menu The Drivers Menu shows the available devices drivers if the system detects installed devices. If the Main Menu does not appear automatically, locate and double click on a specific item then follow the installation wizard to activate the devices. 9.2.3 Utilities Menu The Utilities Menu shows the applications software that enhance the system features. 9.2.1 Running The Support...
... necessary drivers and useful utilities that the system supports. or you need to contact ASRock or want to display the menu. 9.2.2 Drivers Menu The Drivers Menu shows the available devices drivers if the system detects installed devices. If the Main Menu does not appear automatically, locate and double click on a specific item then follow the installation wizard to activate the devices. 9.2.3 Utilities Menu The Utilities Menu shows the applications software that enhance the system features. 9.2.1 Running The Support...

