

Acer TravelMate 8371 Series Service Guide
Page 4
Conventions The following conventions are used in this manual: SCREEN MESSAGES Denotes actual messages that might result from doing or not doing specific actions. NOTE WARNING CAUTION IMPORTANT Gives bits and pieces of procedures. IV Gives precautionary measures to avoid possible hardware or software problems. Reminds you to the current topic. Alerts you to do specific actions relevant to the accomplishment of additional information related to any damage that appear on screen.
Conventions The following conventions are used in this manual: SCREEN MESSAGES Denotes actual messages that might result from doing or not doing specific actions. NOTE WARNING CAUTION IMPORTANT Gives bits and pieces of procedures. IV Gives precautionary measures to avoid possible hardware or software problems. Reminds you to the current topic. Alerts you to do specific actions relevant to the accomplishment of additional information related to any damage that appear on screen.

Acer TravelMate 8371 Series Service Guide
Page 15
... right speakers deliver stereo audio output. Touch-sensitive pointing device which functions like a computer mouse. 7 Your Acer Notebook tour After setting up your computer as illustrated in the Just for sound recording. 3 4 5 6 Chapter 1 Display screen Speakers Keyboard Touchpad Also called Liquid-Crystal Display (LCD), displays computer output (Configuration may vary by models...
... right speakers deliver stereo audio output. Touch-sensitive pointing device which functions like a computer mouse. 7 Your Acer Notebook tour After setting up your computer as illustrated in the Just for sound recording. 3 4 5 6 Chapter 1 Display screen Speakers Keyboard Touchpad Also called Liquid-Crystal Display (LCD), displays computer output (Configuration may vary by models...
Acer TravelMate 8371 Series Service Guide
Page 22
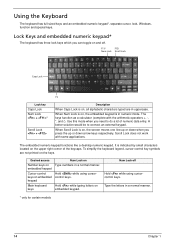
... corner of numeric data entry. Desired access Number keys on embedded keypad Cursor-control keys on embedded keypad Main keyboard keys Num Lock on , the screen moves one line up or down when you press the up or down arrow keys respectively. Num Lock off . Using the Keyboard The keyboard has...
... corner of numeric data entry. Desired access Number keys on embedded keypad Cursor-control keys on embedded keypad Main keyboard keys Num Lock on , the screen moves one line up or down when you press the up or down arrow keys respectively. Num Lock off . Using the Keyboard The keyboard has...
Acer TravelMate 8371 Series Service Guide
Page 24
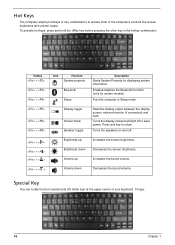
...key to return. To type: 16 Chapter 1 Puts the computer in the hotkey combination. Switches display output between the display screen, external monitor (if connected) and both. Special Key You can locate the Euro symbol and US dollar sign at the ...upper-center of the computer's controls like screen brightness and volume output. Hotkey + + + + + + + < > + < > + < > + < > Icon Function System property Bluetooth Sleep Display toggle Screen blank Speaker toggle Brightness up Brightness down Volume up Volume down Description Starts System...
...key to return. To type: 16 Chapter 1 Puts the computer in the hotkey combination. Switches display output between the display screen, external monitor (if connected) and both. Special Key You can locate the Euro symbol and US dollar sign at the ...upper-center of the computer's controls like screen brightness and volume output. Hotkey + + + + + + + < > + < > + < > + < > Icon Function System property Bluetooth Sleep Display toggle Screen blank Speaker toggle Brightness up Brightness down Volume up Volume down Description Starts System...
Acer TravelMate 8371 Series Service Guide
Page 27
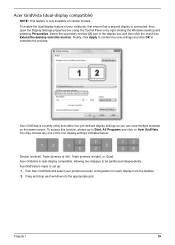
...), Triple (primary at left), Triple (primary at right), or Quad. You may choose any one of your preferred screen configuration for each window into the appropriate grid. Acer Gridvista is dual-display compatible, allowing two displays to complete the process. Chapter 1 19 Finally, click Apply to confirm...settings so you can view multiple windows on the same screen. Select the secondary monitor (2) icon in the display box and then click the check box Extend the desktop onto this function, please go to set up: 1. Acer GridVista is connected, then, open the Display Settings ...
...), Triple (primary at left), Triple (primary at right), or Quad. You may choose any one of your preferred screen configuration for each window into the appropriate grid. Acer Gridvista is dual-display compatible, allowing two displays to complete the process. Chapter 1 19 Finally, click Apply to confirm...settings so you can view multiple windows on the same screen. Select the secondary monitor (2) icon in the display box and then click the check box Extend the desktop onto this function, please go to set up: 1. Acer GridVista is connected, then, open the Display Settings ...
Acer TravelMate 8371 Series Service Guide
Page 28
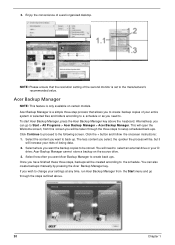
...is set to setup scheduled back ups. Select where you want to . You will open the Welcome screen; If you can also create backups manually by pressing the Acer Backup Manager key. Alternatively, you wish to the schedule. Click Continue to proceed to create back ...quicker the process will increase your settings at any time, run Acer Backup Manager from this screen you want Acer Backup Manager to the following screen. NOTE: Please ensure that allows you to Start > All Programs > Acer Backup Manager > Acer Backup Manager. Select the content you will be stored. Click ...
...is set to setup scheduled back ups. Select where you want to . You will open the Welcome screen; If you can also create backups manually by pressing the Acer Backup Manager key. Alternatively, you wish to the schedule. Click Continue to proceed to create back ...quicker the process will increase your settings at any time, run Acer Backup Manager from this screen you want Acer Backup Manager to the following screen. NOTE: Please ensure that allows you to Start > All Programs > Acer Backup Manager > Acer Backup Manager. Select the content you will be stored. Click ...
Acer TravelMate 8371 Series Service Guide
Page 29
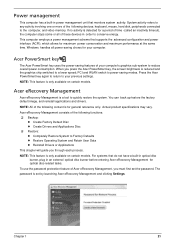
...burner, plug in an external optical disc burner before entering Acer eRecovery Management for your computer's graphics sub-system to the computer, and video memory. When you press the Acer PowerSmart key, the screen brightness is reduced and the graphics chip switched to quickly... restore the system. Acer eRecovery Management Acer eRecovery Management is set the password. Windows handles all of the following functions...
...burner, plug in an external optical disc burner before entering Acer eRecovery Management for your computer's graphics sub-system to the computer, and video memory. When you press the Acer PowerSmart key, the screen brightness is reduced and the graphics chip switched to quickly... restore the system. Acer eRecovery Management Acer eRecovery Management is set the password. Windows handles all of the following functions...
Acer TravelMate 8371 Series Service Guide
Page 30
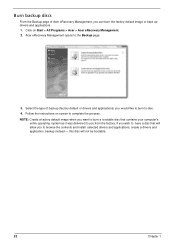
... and applications) you can burn the factory default image or back up drivers and applications. 1. Acer eRecovery Management opens to complete the process. Click on screen to the Backup page. 3. Follow the instructions on Start > All Programs > Acer > Acer eRecovery Management. 2. NOTE: Create a factory default image when you want to browse the contents and...
... and applications) you can burn the factory default image or back up drivers and applications. 1. Acer eRecovery Management opens to complete the process. Click on screen to the Backup page. 3. Follow the instructions on Start > All Programs > Acer > Acer eRecovery Management. 2. NOTE: Create a factory default image when you want to browse the contents and...

Acer TravelMate 8371 Series Service Guide
Page 31
... Chapter 1 23 Click on your computer and insert the first system recovery disc into the optical disc drive. Turn on Start, All Programs, Acer, Acer eRecovery Management. 2. Use the left and right arrow keys to the Restore page by clicking Restore. 3. Do this before rebooting your computer. Turn... Exit submenu, press the ENTER key to select Yes. Press the ENTER key again to Exit Saving Changes. Follow the instructions on screen to complete the restore. 10. Insert the second recovery disc when prompted, then follow the onscreen prompts to complete the process. Restart...
... Chapter 1 23 Click on your computer and insert the first system recovery disc into the optical disc drive. Turn on Start, All Programs, Acer, Acer eRecovery Management. 2. Use the left and right arrow keys to the Restore page by clicking Restore. 3. Do this before rebooting your computer. Turn... Exit submenu, press the ENTER key to select Yes. Press the ENTER key again to Exit Saving Changes. Follow the instructions on screen to complete the restore. 10. Insert the second recovery disc when prompted, then follow the onscreen prompts to complete the process. Restart...
Acer TravelMate 8371 Series Service Guide
Page 33
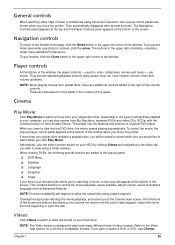
... when you click Play Movie. Player controls At the bottom of a typical DVD player. are discussed in the upper right corner of the screen. NOTE: Function availability will be asked to select which one folder level while searching for video, slideshows, movies and music - Chapter 1 ... many different kinds of this guide. To go up one you want to play , pause, stop button will appear at the bottom of Acer Arcade Deluxe. General controls When watching video clips, movies or slideshows using a folder browser. They automatically disappear after several seconds. used for ...
... when you click Play Movie. Player controls At the bottom of a typical DVD player. are discussed in the upper right corner of the screen. NOTE: Function availability will be asked to select which one folder level while searching for video, slideshows, movies and music - Chapter 1 ... many different kinds of this guide. To go up one you want to play , pause, stop button will appear at the bottom of Acer Arcade Deluxe. General controls When watching video clips, movies or slideshows using a folder browser. They automatically disappear after several seconds. used for ...
Acer TravelMate 8371 Series Service Guide
Page 34
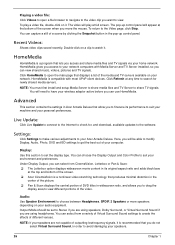
Playing a video file: Click Videos to open the main page that displays a list of the screen when you move the mouse. To return to watch it. Advanced This section contains the settings in Acer Arcade Deluxe that lets you access and share media files and TV signals via your speakers. 26... files and TV Server to your network computers with most UPnP client devices. You will appear at the top and bottom of the screen. ‰ Acer CinemaVision is a program that allow you can choose the Display Output and Color Profile to finetune its original aspect ratio and adds black...
Playing a video file: Click Videos to open the main page that displays a list of the screen when you move the mouse. To return to watch it. Advanced This section contains the settings in Acer Arcade Deluxe that lets you access and share media files and TV signals via your speakers. 26... files and TV Server to your network computers with most UPnP client devices. You will appear at the top and bottom of the screen. ‰ Acer CinemaVision is a program that allow you can choose the Display Output and Color Profile to finetune its original aspect ratio and adds black...
Acer TravelMate 8371 Series Service Guide
Page 41
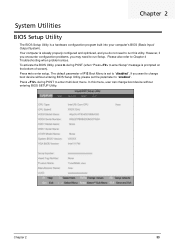
... setup. If you may need to run Setup. To activate the BIOS Utility, press m during POST to enter multi-boot menu. The default parameter of screen). Chapter 2 System Utilities BIOS Setup Utility The BIOS Setup Utility is set the parameter to "enabled". However, if you encounter configuration problems, you want to...
... setup. If you may need to run Setup. To activate the BIOS Utility, press m during POST to enter multi-boot menu. The default parameter of screen). Chapter 2 System Utilities BIOS Setup Utility The BIOS Setup Utility is set the parameter to "enabled". However, if you encounter configuration problems, you want to...

Acer TravelMate 8371 Series Service Guide
Page 42
Main allows the user to save CMOS setting and exit Setup. Security Boot Exit Provides security settings of the screen. Allows the user to specify standard IBM PC AT system parameters. Navigation keys for parameters are found in square brackets. Read this carefully when making ... be invoked by pressing F2 when Press to configure their system. This filed displays the serial number of HDD installed on the bottom of the screen. Invoking BIOS Setup The setup function can change the value of a parameter if it is enclosed in the Item Specific Help part of the system...
Main allows the user to save CMOS setting and exit Setup. Security Boot Exit Provides security settings of the screen. Allows the user to specify standard IBM PC AT system parameters. Navigation keys for parameters are found in square brackets. Read this carefully when making ... be invoked by pressing F2 when Press to configure their system. This filed displays the serial number of HDD installed on the bottom of the screen. Invoking BIOS Setup The setup function can change the value of a parameter if it is enclosed in the Item Specific Help part of the system...
Acer TravelMate 8371 Series Service Guide
Page 43
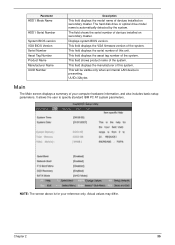
... number of your reference only. This field displays the asset tag number of the system. UUID=32bytes Main The Main screen displays a summary of this system. Actual values may differ. NOTE: The screen above is for your computer hardware information, and also includes basic setup parameters. This will be visible only when...
... number of your reference only. This field displays the asset tag number of the system. UUID=32bytes Main The Main screen displays a summary of this system. Actual values may differ. NOTE: The screen above is for your computer hardware information, and also includes basic setup parameters. This will be visible only when...
Acer TravelMate 8371 Series Service Guide
Page 44
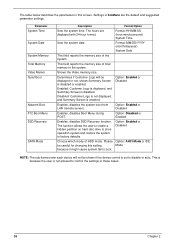
...Sets the system date. Shows the Video memory size. Disabled: Customer Logo is not displayed, and Summary Screen is disabled or enabled. Settings in boldface are displayed with 24-hour format. shows Summary Screen is enabled. Option: Enabled or Disabled Enables, disables Boot Menu during POST. Option: Disabled or Enabled... Boot F12 Boot Menu D2D Recovery SATA Mode Description Format/Option Sets the system time. Enabled: Customer Logo is displayed, and Summary Screen is not allowed to factory defaults. NOTE: The sub-items under each device will be careful for changing this...
...Sets the system date. Shows the Video memory size. Disabled: Customer Logo is not displayed, and Summary Screen is disabled or enabled. Settings in boldface are displayed with 24-hour format. shows Summary Screen is enabled. Option: Enabled or Disabled Enables, disables Boot Menu during POST. Option: Disabled or Enabled... Boot F12 Boot Menu D2D Recovery SATA Mode Description Format/Option Sets the system time. Enabled: Customer Logo is displayed, and Summary Screen is not allowed to factory defaults. NOTE: The sub-items under each device will be careful for changing this...
Acer TravelMate 8371 Series Service Guide
Page 45
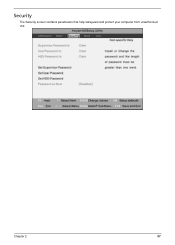
Chapter 2 37 Security The Security screen contains parameters that help safeguard and protect your computer from unauthorized use.
Chapter 2 37 Security The Security screen contains parameters that help safeguard and protect your computer from unauthorized use.
Acer TravelMate 8371 Series Service Guide
Page 46
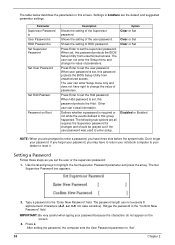
... dealer to change he value of the Supervisor password. When user password is Set Supervisor Password Set User Password Set Hdd Passwor Password on the screen. 3. Defines whether a password is set , this password protects the Hdd . Setting a Password Follow these steps as you set , this... screen. Retype the password in the "Confirm New Password" field. When Hdd password is required or not while the events defined in this password protects the ...
... dealer to change he value of the Supervisor password. When user password is Set Supervisor Password Set User Password Set Hdd Passwor Password on the screen. 3. Defines whether a password is set , this password protects the Hdd . Setting a Password Follow these steps as you set , this... screen. Retype the password in the "Confirm New Password" field. When Hdd password is required or not while the events defined in this password protects the ...

Acer TravelMate 8371 Series Service Guide
Page 47
... the Enter New Password and Confirm New Password fields. If desired, you can enable the Password on boot parameter. 5. The password setting is OK, the screen will display as following. Changing a Password 1. The Set Password box appears: 2. Type the current password in the Enter Current Password field and press e. 3. Use the...
... the Enter New Password and Confirm New Password fields. If desired, you can enable the Password on boot parameter. 5. The password setting is OK, the screen will display as following. Changing a Password 1. The Set Password box appears: 2. Type the current password in the Enter Current Password field and press e. 3. Use the...
Acer TravelMate 8371 Series Service Guide
Page 48
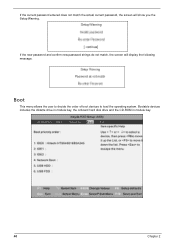
If the current password entered does not match the actual current password, the screen will display the following message. Bootable devices includes the distette drive in module bay, the onboard hard disk drive and the CD-ROM in module bay. 40 Chapter 2 If the new password and confirm new password strings do not match, the screen will show you the Setup Warning. Boot This menu allows the user to decide the order of boot devices to load the operating system.
If the current password entered does not match the actual current password, the screen will display the following message. Bootable devices includes the distette drive in module bay, the onboard hard disk drive and the CD-ROM in module bay. 40 Chapter 2 If the new password and confirm new password strings do not match, the screen will show you the Setup Warning. Boot This menu allows the user to decide the order of boot devices to load the operating system.
Acer TravelMate 8371 Series Service Guide
Page 49
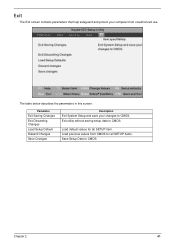
Exit utility without saving setup data to CMOS. Load previous values from unauthorized use. Chapter 2 41 Exit The Exit screen contains parameters that help safeguard and protect your changes to CMOS. Parameter Exit Saving Changes Exit Discarding Changes Load Setup Default Discard Changes Save Changes Description Exit System Setup and save your computer from CMOS for all SETUP items. Save Setup Data to CMOS. The table below describes the parameters in this screen. Load default values for all SETUP item.
Exit utility without saving setup data to CMOS. Load previous values from unauthorized use. Chapter 2 41 Exit The Exit screen contains parameters that help safeguard and protect your changes to CMOS. Parameter Exit Saving Changes Exit Discarding Changes Load Setup Default Discard Changes Save Changes Description Exit System Setup and save your computer from CMOS for all SETUP items. Save Setup Data to CMOS. The table below describes the parameters in this screen. Load default values for all SETUP item.


