
User Guide for Altos R910
Page 7
... 7 Front panel 8 Rear panel 13 Internal components 16 System boards 17 Mainboard 17 SCSI backplane board 19 Hot-plug memory board 20 System jumpers 22 2 System setup 23 Setting up the system 25 Pre-installation requirements 25 Connecting peripherals 26 Turning on the system 27 Power-on problems 28 Configuring the system OS 29 Turning off the system 30 3 System upgrade 31 Installation precautions 33 ESD precautions 33 Pre-installation instructions 33 Post-installation instructions 34 Opening the server 35 Removing the...
... 7 Front panel 8 Rear panel 13 Internal components 16 System boards 17 Mainboard 17 SCSI backplane board 19 Hot-plug memory board 20 System jumpers 22 2 System setup 23 Setting up the system 25 Pre-installation requirements 25 Connecting peripherals 26 Turning on the system 27 Power-on problems 28 Configuring the system OS 29 Turning off the system 30 3 System upgrade 31 Installation precautions 33 ESD precautions 33 Pre-installation instructions 33 Post-installation instructions 34 Opening the server 35 Removing the...
User Guide for Altos R910
Page 8
viii Removing a memory board air baffle 42 Installing a memory board air baffle 43 Configuring hot-pluggable components 44 Hard disk drives 45 Installing a HDD 46 System fan assembly 47 Power supply 49 Memory board 51 PCI card 55 Configuring cold-pluggable components 57 DVD drive 58 5.25-inch drive 60 Processor 62 Processor core VRMs 66 Memory board 69 DIMM modules 72 PCI card 76 ARMC/3 (optional) or BMC module 77 Configuring integrated SCSI hardware RAID components 79 RAID activation key 80 RAID cache 81 RAID BBU 83 4 BIOS setup 87 Introduction ...
viii Removing a memory board air baffle 42 Installing a memory board air baffle 43 Configuring hot-pluggable components 44 Hard disk drives 45 Installing a HDD 46 System fan assembly 47 Power supply 49 Memory board 51 PCI card 55 Configuring cold-pluggable components 57 DVD drive 58 5.25-inch drive 60 Processor 62 Processor core VRMs 66 Memory board 69 DIMM modules 72 PCI card 76 ARMC/3 (optional) or BMC module 77 Configuring integrated SCSI hardware RAID components 79 RAID activation key 80 RAID cache 81 RAID BBU 83 4 BIOS setup 87 Introduction ...

User Guide for Altos R910
Page 9
ix Verifying proper operation of key system lights 131 Specific problems and corrective actions 132 Appendix A: Acer Altos R910 rack installation guide Setting up the system rack System rack installation Vertical mounting hole pattern Installing the system into the rack 141 143 145 146 147 Appendix B: Memory configuration options Introduction Installation and population order Memory board installation order DIMM module installation order DIMM module population order Memory modes Maximum compatibility Maximum performance Memory sparing Memory RAID Memory mirroring 155 157 158 158 158 ...
ix Verifying proper operation of key system lights 131 Specific problems and corrective actions 132 Appendix A: Acer Altos R910 rack installation guide Setting up the system rack System rack installation Vertical mounting hole pattern Installing the system into the rack 141 143 145 146 147 Appendix B: Memory configuration options Introduction Installation and population order Memory board installation order DIMM module installation order DIMM module population order Memory modes Maximum compatibility Maximum performance Memory sparing Memory RAID Memory mirroring 155 157 158 158 158 ...

User Guide for Altos R910
Page 14
... controller • Dual independent Ultra320 SCSI interfaces (internal) Integrated hardware RAID (optional) • Supports RAID levels 0, 1, 5, and 10 • Requires RAID activation key (iButton) • Requires DDR2-400 registered ECC DIMM for RAID cache • Supports RAID BBU (Battery Backup Unit). 4 1 System tour • Memory reliability, availability, and serviceability (RAS) features • Memory mirroring • Memory RAID • Memory sparing • Memory hot-plug • x8 SDDC (Single Device Data Correction) for memory error detection and correction Media storage...
... controller • Dual independent Ultra320 SCSI interfaces (internal) Integrated hardware RAID (optional) • Supports RAID levels 0, 1, 5, and 10 • Requires RAID activation key (iButton) • Requires DDR2-400 registered ECC DIMM for RAID cache • Supports RAID BBU (Battery Backup Unit). 4 1 System tour • Memory reliability, availability, and serviceability (RAS) features • Memory mirroring • Memory RAID • Memory sparing • Memory hot-plug • x8 SDDC (Single Device Data Correction) for memory error detection and correction Media storage...
User Guide for Altos R910
Page 31
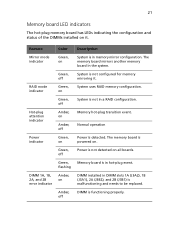
RAID mode indicator Green, on Power is detected. flashing DIMM 1A, 1B, 2A, and 2B error indicator Amber, on DIMM installed in hot-plug event. Green, off System is malfunctioning and needs to be replaced. Green, Memory board is in DIMM slots 1A (J3A2), 1B (J3A1), 2A (J3B2), and 2B (J3B1) is not configured for memory mirroring it . Normal operation Power indicator Green, on System uses RAID memory configuration. The memory board mirrors another memory board in memory mirror configuration. The memory board is...
RAID mode indicator Green, on Power is detected. flashing DIMM 1A, 1B, 2A, and 2B error indicator Amber, on DIMM installed in hot-plug event. Green, off System is malfunctioning and needs to be replaced. Green, Memory board is in DIMM slots 1A (J3A2), 1B (J3A1), 2A (J3B2), and 2B (J3B1) is not configured for memory mirroring it . Normal operation Power indicator Green, on System uses RAID memory configuration. The memory board mirrors another memory board in memory mirror configuration. The memory board is...

User Guide for Altos R910
Page 63
... the memory board is also off , your configuration may not support hot-plug memory board activity. Caution! Refer to flash. The power LED will begin to "Memory board LED indicators" on page 21 for the location of a memory board". 4 Once all the board LEDs are either replace it with a new memory board or install a memory board air baffle. 1 Observe the ESD precautions described on page 33. 2 Press the attention button on the memory board. For instructions on or blinking.
... the memory board is also off , your configuration may not support hot-plug memory board activity. Caution! Refer to flash. The power LED will begin to "Memory board LED indicators" on page 21 for the location of a memory board". 4 Once all the board LEDs are either replace it with a new memory board or install a memory board air baffle. 1 Observe the ESD precautions described on page 33. 2 Press the attention button on the memory board. For instructions on or blinking.

User Guide for Altos R910
Page 65
... a memory hot-removal or hot-add operation. Removing hot-plug PCI card To remove a hot-plug PCI card with OS hot-plug interface. PCI card Caution! You can be hot-plugged in the taskbar to open the Unplug or Eject Hardware menu. 3 Select the device to the card. 5 Rotate the slot retention latch on page 87 for more information. Refer to remove it (B). 7 Store the card in PCI slots 1 through 5. If you are hot-pluggable. If a DIMM fails the memory test, an LED will light on...
... a memory hot-removal or hot-add operation. Removing hot-plug PCI card To remove a hot-plug PCI card with OS hot-plug interface. PCI card Caution! You can be hot-plugged in the taskbar to open the Unplug or Eject Hardware menu. 3 Select the device to the card. 5 Rotate the slot retention latch on page 87 for more information. Refer to remove it (B). 7 Store the card in PCI slots 1 through 5. If you are hot-pluggable. If a DIMM fails the memory test, an LED will light on...

User Guide for Altos R910
Page 66
... expansion slot on the mainboard. 4 Rotate the slot retention latch on . Installing a hot-plug PCI card 1 If your server is properly seated. 9 Rotate the retention latch downward. 10 Connect any required cable to the card. 11 When using the hot-plug PCI card with OS hot-plug interface: • Wait for the software user interface to appear on your OS to turn on the rear of the card slot upward. 5 Pull up the slot cover. 6 Remove the PCI add-in board...
... expansion slot on the mainboard. 4 Rotate the slot retention latch on . Installing a hot-plug PCI card 1 If your server is properly seated. 9 Rotate the retention latch downward. 10 Connect any required cable to the card. 11 When using the hot-plug PCI card with OS hot-plug interface: • Wait for the software user interface to appear on your OS to turn on the rear of the card slot upward. 5 Pull up the slot cover. 6 Remove the PCI add-in board...

User Guide for Altos R910
Page 118
... memory board status. This submenu allows you select the View and Configure Memory Board # menu. When this parameter is set to view memory board status and configure the memory boards in the server. Enables or disables the retest of all DIMMs on the current memory board. The possible status include: Not Installed, Healthy, Failed, or Disabled. Option Healthy, Not Installed, Failed, or Disabled Disabled Enabled 108 4 BIOS setup View and Configure Memory Board # The screen below appears when you to Enabled, the DIMMs will be re-enabled after passing the test...
... memory board status. This submenu allows you select the View and Configure Memory Board # menu. When this parameter is set to view memory board status and configure the memory boards in the server. Enables or disables the retest of all DIMMs on the current memory board. The possible status include: Not Installed, Healthy, Failed, or Disabled. Option Healthy, Not Installed, Failed, or Disabled Disabled Enabled 108 4 BIOS setup View and Configure Memory Board # The screen below appears when you to Enabled, the DIMMs will be re-enabled after passing the test...

User Guide for Altos R910
Page 119
... DIMM and DIMM slot status. Refer to "To configure memory sparing" on a bad rank surpasses the sparing threshold, it is replaced by a spare rank. Press Enter to server as spare. 109 Parameter Description Option Reserve Rank for Spare Enables or disables the BIOS to set system parameters for more details. Not Installed, Installed, Installed/ Partial, or Failed Devices The Devices menu allows you to examine and set aside the largest memory...
... DIMM and DIMM slot status. Refer to "To configure memory sparing" on a bad rank surpasses the sparing threshold, it is replaced by a spare rank. Press Enter to server as spare. 109 Parameter Description Option Reserve Rank for Spare Enables or disables the BIOS to set system parameters for more details. Not Installed, Installed, Installed/ Partial, or Failed Devices The Devices menu allows you to examine and set aside the largest memory...

User Guide for Altos R910
Page 122
Enabled Disabled NIC 1 or 2 MAC Indicates the media access control of the local area network and lets you set the local area network parameters. 112 4 BIOS setup LAN The LAN submenu displays the status of the Address system's LAN controller. Enabled Disabled Enable On-board NIC ROM Enables or disables the ROM for the onboard LAN. Parameter Description Option Enable On-board NIC Enables or disables both channels of the embedded LAN. If Disabled, both channels of the embedded LAN are turned off and the device is inaccessible to the OS.
Enabled Disabled NIC 1 or 2 MAC Indicates the media access control of the local area network and lets you set the local area network parameters. 112 4 BIOS setup LAN The LAN submenu displays the status of the Address system's LAN controller. Enabled Disabled Enable On-board NIC ROM Enables or disables the ROM for the onboard LAN. Parameter Description Option Enable On-board NIC Enables or disables both channels of the embedded LAN. If Disabled, both channels of the embedded LAN are turned off and the device is inaccessible to the OS.

User Guide for Altos R910
Page 139
... software" on your own, contact your system, such as video drivers, network drivers and SCSI drivers. 129 Troubleshooting This chapter helps you identify and solve problems that you are using the latest firmware and files. Cold boot reset. Turn the system power off /on . For any drivers used for components you have installed in -depth troubleshooting, attempt first to perform reset the system using the system. This clears system memory, restarts POST, reloads the operating...
... software" on your own, contact your system, such as video drivers, network drivers and SCSI drivers. 129 Troubleshooting This chapter helps you identify and solve problems that you are using the latest firmware and files. Cold boot reset. Turn the system power off /on . For any drivers used for components you have installed in -depth troubleshooting, attempt first to perform reset the system using the system. This clears system memory, restarts POST, reloads the operating...

User Guide for Altos R910
Page 140
... power cord properly connected to turn the server on expansion boards and peripheral devices correct? Check the DC cable(s) on the back of the chassis and at the wall outlet? • Are the power supplies plugged in BIOS setup correct? • Is the operating system properly loaded? Check the tested memory, and chassis lists, as well as the supported hardware and operating system list. for 200-240 V? • Are all device drivers properly installed? • Are the configuration settings...
... power cord properly connected to turn the server on expansion boards and peripheral devices correct? Check the DC cable(s) on the back of the chassis and at the wall outlet? • Are the power supplies plugged in BIOS setup correct? • Is the operating system properly loaded? Check the tested memory, and chassis lists, as well as the supported hardware and operating system list. for 200-240 V? • Are all device drivers properly installed? • Are the configuration settings...

User Guide for Altos R910
Page 142
... system requirements. • Make sure the memory modules have contact to the system requirements. • Remove and reseat the CPU. • Make sure the chassis standoffs are installed only below mounting holes. Do the following: • Make sure the power button on the front panel is turned on but turns off often with fault light Do the following contains specific problems that the wall outlet has power. 132 5 Troubleshooting Specific problems and...
... system requirements. • Make sure the memory modules have contact to the system requirements. • Remove and reseat the CPU. • Make sure the chassis standoffs are installed only below mounting holes. Do the following: • Make sure the power button on the front panel is turned on but turns off often with fault light Do the following contains specific problems that the wall outlet has power. 132 5 Troubleshooting Specific problems and...
User Guide for Altos R910
Page 147
... drivers. • Run the diagnostics. Try accessing the server. Refer to make sure the Num Lock light is problem with the copy you are using . • Make sure all cables are loaded on ? Do the following: • Make sure the correct network drivers are properly connected. • If other software runs correctly on the screen. There is functioning. • Is the video monitor plugged in and turned...
... drivers. • Run the diagnostics. Try accessing the server. Refer to make sure the Num Lock light is problem with the copy you are using . • Make sure all cables are loaded on ? Do the following: • Make sure the correct network drivers are properly connected. • If other software runs correctly on the screen. There is functioning. • Is the video monitor plugged in and turned...
User Guide for Altos R910
Page 167
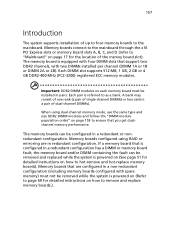
... nonredundant configuration. Memory boards configured using dual-channel memory mode, use the same type and size DDR2 DIMM modules and follow the "DIMM module population order" on page 159 to as a bank. The memory boards can be installed in redundant configuration. Each pair is powered on (See page 51 for detailed instructions on how to remove and replace memory boards.). Memory boards that you get dualchannel memory performance. 157 Introduction The system supports installation of up to four memory boards...
... nonredundant configuration. Memory boards configured using dual-channel memory mode, use the same type and size DDR2 DIMM modules and follow the "DIMM module population order" on page 159 to as a bank. The memory boards can be installed in redundant configuration. Each pair is powered on (See page 51 for detailed instructions on how to remove and replace memory boards.). Memory boards that you get dualchannel memory performance. 157 Introduction The system supports installation of up to four memory boards...

User Guide for Altos R910
Page 178
... during a memory hot-removal or hot-add operation. A bank may consist of memory and the system cannot continue to serve as a system memory. The DIMMs on the spare rank. To configure memory sparing: 1 Do either option below: • Run BIOS setup. Each pair is referred to configuring the memory in POST and when a memory board is set aside to replace memory under use when a DIMM's correctable error count has reached a specified threshold. The BIOS setup utility executes a memory test prior...
... during a memory hot-removal or hot-add operation. A bank may consist of memory and the system cannot continue to serve as a system memory. The DIMMs on the spare rank. To configure memory sparing: 1 Do either option below: • Run BIOS setup. Each pair is referred to configuring the memory in POST and when a memory board is set aside to replace memory under use when a DIMM's correctable error count has reached a specified threshold. The BIOS setup utility executes a memory test prior...

User Guide for Altos R910
Page 189
.../3 module installing 77 removing 77 B BIOS menus Devices 109 IDE Controller 110 LAN 112 Mass Storage 111 PCI 116 Serial 115 USB 114 Video 113 Main 98 Memory 103 Configure Memory RAS and Performance 104 View and Configure Memory Board # 108 Processor 100 Processor Information 102 Save, Restore & Exit 124 Security 122 changing password 123 removing password 123 Supervisor password 122 User password 122 Server Management 117 Console Redirection 118 FRB Information 121 FRU Information 119 SEL Logging 120 BIOS setup 89 entering 96 BMC module installing...
.../3 module installing 77 removing 77 B BIOS menus Devices 109 IDE Controller 110 LAN 112 Mass Storage 111 PCI 116 Serial 115 USB 114 Video 113 Main 98 Memory 103 Configure Memory RAS and Performance 104 View and Configure Memory Board # 108 Processor 100 Processor Information 102 Save, Restore & Exit 124 Security 122 changing password 123 removing password 123 Supervisor password 122 User password 122 Server Management 117 Console Redirection 118 FRB Information 121 FRU Information 119 SEL Logging 120 BIOS setup 89 entering 96 BMC module installing...

User Guide for Altos R910
Page 190
... 26 power cable 27 power supply installing 50 removing 50 processor upgrade guidelines 62 processor core VRM installing 68 R rack installing 147 rack installation 141 mounting pattern 146 precautions 143 RAID activation key installing 80 removing 80 RAID BBU installing 85 removing 83 RAID cache removing 81 RAID configuration 175 SCSI hardware RAID utility assign hot spare 178 create RAID Volume 177 using SCSI hardware RAID utility 177 rear panel 13 LED indicators 14 removing ARMC/3 module 77 BMC module 77 center brace 40 cold-plug memory board 70 CPU 62 CPU air baffle 38 DIMMs 75 DVD drive 58...
... 26 power cable 27 power supply installing 50 removing 50 processor upgrade guidelines 62 processor core VRM installing 68 R rack installing 147 rack installation 141 mounting pattern 146 precautions 143 RAID activation key installing 80 removing 80 RAID BBU installing 85 removing 83 RAID cache removing 81 RAID configuration 175 SCSI hardware RAID utility assign hot spare 178 create RAID Volume 177 using SCSI hardware RAID utility 177 rear panel 13 LED indicators 14 removing ARMC/3 module 77 BMC module 77 center brace 40 cold-plug memory board 70 CPU 62 CPU air baffle 38 DIMMs 75 DVD drive 58...

User Guide for Altos R910
Page 191
... specification BMC 5 chipset 3 graphic interface 5 I/O ports 5 Integrated Hardware RAID 4 media storage 4 memory subsystem 3 networking 5 OS 6 PCI I/O 5 power supply 6 processor 3 SCSI controller 4 serial ATA port 5 system fan 6 storage devices installing 5.25-inch drive 60 replacing DVD drive 58 system boards 17 hot-plug memory board 20 mainboard 17 SCSI backplane board 19 SCSI backplane layout 19 system fan assembly installing 48 removing 47 system features 3 system jumpers 22 system memory reconfiguring 76 system options menu 90 BIOS setup utility 94 boot maintenance manager 93 boot manager...
... specification BMC 5 chipset 3 graphic interface 5 I/O ports 5 Integrated Hardware RAID 4 media storage 4 memory subsystem 3 networking 5 OS 6 PCI I/O 5 power supply 6 processor 3 SCSI controller 4 serial ATA port 5 system fan 6 storage devices installing 5.25-inch drive 60 replacing DVD drive 58 system boards 17 hot-plug memory board 20 mainboard 17 SCSI backplane board 19 SCSI backplane layout 19 system fan assembly installing 48 removing 47 system features 3 system jumpers 22 system memory reconfiguring 76 system options menu 90 BIOS setup utility 94 boot maintenance manager 93 boot manager...


