
Service Guide
Page 9
... 173 Card Reader Board (Discrete only 173 Clearing Password Check and BIOS Recovery 174 Clearing Password Check 174 Clear CMOS Jumper 174 BIOS Recovery by Crisis Disk 175 FRU (Field Replaceable Unit) List 177 Aspire AS5552/AS5552G Exploded Diagrams 178 Main Assembly 178 Upper Assembly 179 LCD... Assembly 180 LED Assembly 181 Aspire AS5552/AS5552G FRU List 182 Screw List ...
... 173 Card Reader Board (Discrete only 173 Clearing Password Check and BIOS Recovery 174 Clearing Password Check 174 Clear CMOS Jumper 174 BIOS Recovery by Crisis Disk 175 FRU (Field Replaceable Unit) List 177 Aspire AS5552/AS5552G Exploded Diagrams 178 Main Assembly 178 Upper Assembly 179 LCD... Assembly 180 LED Assembly 181 Aspire AS5552/AS5552G FRU List 182 Screw List ...
Service Guide
Page 47
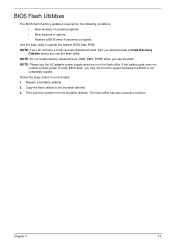
... system from the bootable diskette. NOTE: If you do not have a crisis recovery diskette at hand, then you should create a Crisis Recovery Diskette before you may not boot the system because the BIOS is required for the following conditions: • New versions of system programs •...; New features or options • Restore a BIOS when it becomes corrupted. BIOS Flash Utilities The BIOS flash memory update is...
... system from the bootable diskette. NOTE: If you do not have a crisis recovery diskette at hand, then you should create a Crisis Recovery Diskette before you may not boot the system because the BIOS is required for the following conditions: • New versions of system programs •...; New features or options • Restore a BIOS when it becomes corrupted. BIOS Flash Utilities The BIOS flash memory update is...
Service Guide
Page 166
...e. Select the appropriate operating system, and click Next. If an issue is virus free. 3. Run the Windows Memory Diagnostic Tool. Check the BIOS settings are correct and that CD/DVD drive is not fixed, repeat the preceding steps and select an earlier time and date. 11. Remove ...operate correctly, perform the following actions one at a time to enter the BIOS Utility. insert the Windows Vista Operating System DVD in the ODD and restart the computer. The Install Windows screen displays. The System Recovery Options screen displays. f. Select Startup Repair. For more information see Windows ...
...e. Select the appropriate operating system, and click Next. If an issue is virus free. 3. Run the Windows Memory Diagnostic Tool. Check the BIOS settings are correct and that CD/DVD drive is not fixed, repeat the preceding steps and select an earlier time and date. 11. Remove ...operate correctly, perform the following actions one at a time to enter the BIOS Utility. insert the Windows Vista Operating System DVD in the ODD and restart the computer. The Install Windows screen displays. The System Recovery Options screen displays. f. Select Startup Repair. For more information see Windows ...
Service Guide
Page 173
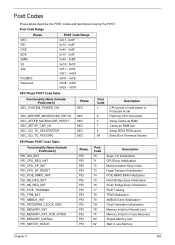
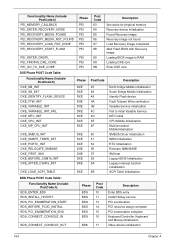
... Codes These tables describe the POST codes and descriptions during the POST. Memory Initial for Crisis Recovery Simple Memory test Start to Protected mode Patching CPU microcode Setup Cache as RAM Cache as RAM test Setup BIOS ROM cache Enter Boot Firmware Volume PEI Phase POST Code Table: Functionality Name (Include\ PostCode...
... Codes These tables describe the POST codes and descriptions during the POST. Memory Initial for Crisis Recovery Simple Memory test Start to Protected mode Patching CPU microcode Setup Cache as RAM Cache as RAM test Setup BIOS ROM cache Enter Boot Firmware Volume PEI Phase POST Code Table: Functionality Name (Include\ PostCode...
Service Guide
Page 174
...87 88 89 8A 8B Description Set cache for physical memory Recovery device Initialization Found Recovery image Recovery image not found Load Recovery Image completed Start Flash BIOS with Recovery image Loading BIOS image to RAM Loading DXE core Enter DXE core Functionality Name ...CPU Middle Initialization Multi-processor MiddleInitialization SMBUS Driver Initialization 8259 Initialization RTC Initialization Relocate SMM BASE SMI test Legacy BIOS Initialization Legacy interrupt function Initialization ACPI Table Initialization BDS Phase POST Code Table: Functionality Name (Include\ PostCode.h)...
...87 88 89 8A 8B Description Set cache for physical memory Recovery device Initialization Found Recovery image Recovery image not found Load Recovery Image completed Start Flash BIOS with Recovery image Loading BIOS image to RAM Loading DXE core Enter DXE core Functionality Name ...CPU Middle Initialization Multi-processor MiddleInitialization SMBUS Driver Initialization 8259 Initialization RTC Initialization Relocate SMM BASE SMI test Legacy BIOS Initialization Legacy interrupt function Initialization ACPI Table Initialization BDS Phase POST Code Table: Functionality Name (Include\ PostCode.h)...
Service Guide
Page 184
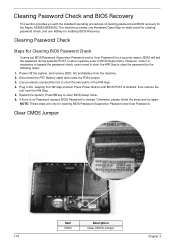
...when systems enter to clear the password by the following steps: 1. Clearing Password Check Steps for Clearing BIOS Password Check If users set BIOS Password (Supervisor Password and/or User Password) for enabling BIOS Recovery. Power Off the system, and remove HDD, AC and Battery from the HW Gap. 5. Disconnect... and try again. Clear CMOS Jumper Item R334 Description Clear CMOS Jumper 174 Chapter 3 NOTE: These steps are only for the Aspire AS5552/AS5552G. Clearing Password Check and BIOS Recovery This section provides you with the standard operating procedures of the HW Gap. 4.
...when systems enter to clear the password by the following steps: 1. Clearing Password Check Steps for Clearing BIOS Password Check If users set BIOS Password (Supervisor Password and/or User Password) for enabling BIOS Recovery. Power Off the system, and remove HDD, AC and Battery from the HW Gap. 5. Disconnect... and try again. Clear CMOS Jumper Item R334 Description Clear CMOS Jumper 174 Chapter 3 NOTE: These steps are only for the Aspire AS5552/AS5552G. Clearing Password Check and BIOS Recovery This section provides you with the standard operating procedures of the HW Gap. 4.
Service Guide
Page 185
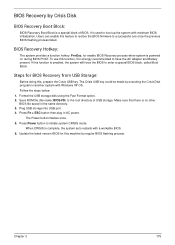
.... 2. Press Fn + ESC button then plug in the same directory. 3. When CRISIS is powered on during BIOS POST. Update the latest version BIOS for BIOS Recovery from USB Storage: Before doing this machine by executing the Crisis Disk program in another system with a workable... Steps for this , prepare the Crisis USB key. Save ROM file (file name: BIOS.FD) to a successful one once the previous BIOS flashing process failed. BIOS Recovery by Crisis Disk BIOS Recovery Boot Block: BIOS Recovery Boot Block is strongly recommended to have the AC adapter and Battery present. Users can enable...
.... 2. Press Fn + ESC button then plug in the same directory. 3. When CRISIS is powered on during BIOS POST. Update the latest version BIOS for BIOS Recovery from USB Storage: Before doing this machine by executing the Crisis Disk program in another system with a workable... Steps for this , prepare the Crisis USB key. Save ROM file (file name: BIOS.FD) to a successful one once the previous BIOS flashing process failed. BIOS Recovery by Crisis Disk BIOS Recovery Boot Block: BIOS Recovery Boot Block is strongly recommended to have the AC adapter and Battery present. Users can enable...


