Service Guide
Page 45
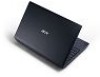
... diskette drives, the onboard hard disk drive and the DVD drive in the module bay. InsydeH20 Setup Utility Information Main Security Boot Exit Rev. 3.5 Boot priority order: Item Specific Help 1. USB CD/DVD ROM: Use < > or < > to select a device, then press to move it down the list, or to ...Menu Enter Select SubMenu F10 Save and Exit Chapter 2 35 IDE1 : PIONEER BD-ROM BDCTD03RS 3. Press to move it up the list. Boot This menu allows the user to decide the order of boot devices to support boot. Select Boot menu to select specific devices to load the operating system.
... diskette drives, the onboard hard disk drive and the DVD drive in the module bay. InsydeH20 Setup Utility Information Main Security Boot Exit Rev. 3.5 Boot priority order: Item Specific Help 1. USB CD/DVD ROM: Use < > or < > to select a device, then press to move it down the list, or to ...Menu Enter Select SubMenu F10 Save and Exit Chapter 2 35 IDE1 : PIONEER BD-ROM BDCTD03RS 3. Press to move it up the list. Boot This menu allows the user to decide the order of boot devices to support boot. Select Boot menu to select specific devices to load the operating system.
Service Guide
Page 48
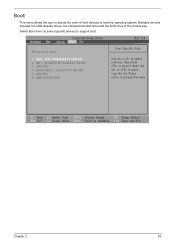
IDEO : WDC WD6400BEVT-22A0RT0 2. Press to update BIOS. Select Boot Menu to modify the boot priority order, for example, if using USB HDD to position 1. USB CD/DVD ROM: Use < > or < > to select a device, then press to move it down the list, or to move USB HDD to Update BIOS, ...move it up the list. InsydeH20 Setup Utility Information Main Security Boot Exit Boot priority order: Rev. 3.5 Item Specific Help 1....
IDEO : WDC WD6400BEVT-22A0RT0 2. Press to update BIOS. Select Boot Menu to modify the boot priority order, for example, if using USB HDD to position 1. USB CD/DVD ROM: Use < > or < > to select a device, then press to move it down the list, or to move USB HDD to Update BIOS, ...move it up the list. InsydeH20 Setup Utility Information Main Security Boot Exit Boot priority order: Rev. 3.5 Item Specific Help 1....
Service Guide
Page 53
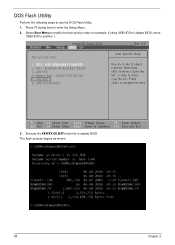
To use Boot Sequence Selector, perform the following steps: 1. Chapter 2 43 Select the desired boot sequence by entering the corresponding sequence. For example, enter BS 2 to change the boot sequence to display the usage screen. 3. Execute BS.exe to HDD | CD ROM | LAN | Floppy. Using Boot Sequence Selector The Boot Sequence Selector allows the boot order to be changed without accessing the BIOS. Enter into DOS. 2.
To use Boot Sequence Selector, perform the following steps: 1. Chapter 2 43 Select the desired boot sequence by entering the corresponding sequence. For example, enter BS 2 to change the boot sequence to display the usage screen. 3. Execute BS.exe to HDD | CD ROM | LAN | Floppy. Using Boot Sequence Selector The Boot Sequence Selector allows the boot order to be changed without accessing the BIOS. Enter into DOS. 2.
Service Guide
Page 161
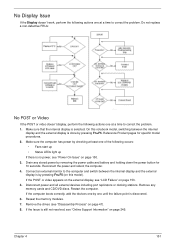
... computer. 4. Chapter 4 151 Reference Product pages for 10 seconds. If the Issue is discovered. 6. On this model). If the computer boots correctly, add the devices one by removing the power cable and battery and holding down the power button for specific model procedures. 2. Drain ...any memory cards and CD/DVD discs. Disconnect power and all external devices including port replicators or docking stations. Remove any stored power by one of the following...
... computer. 4. Chapter 4 151 Reference Product pages for 10 seconds. If the Issue is discovered. 6. On this model). If the computer boots correctly, add the devices one by removing the power cable and battery and holding down the power button for specific model procedures. 2. Drain ...any memory cards and CD/DVD discs. Disconnect power and all external devices including port replicators or docking stations. Remove any stored power by one of the following...
Service Guide
Page 166
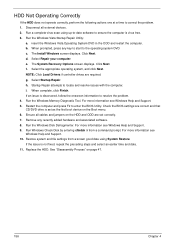
... correct the problem. 1. If the issue is virus free. 3. Replace the HDD. Check the BIOS settings are correct and that CD/DVD drive is discovered, follow the onscreen information to locate and resolve issues with the computer. Run the Windows Disk Defragmenter. Disconnect... all cables and jumpers on the Boot menu. 6. c. The System Recovery Options screen displays. i. NOTE: Click Load Drivers if controller drives are set correctly. 7. Restore system ...
... correct the problem. 1. If the issue is virus free. 3. Replace the HDD. Check the BIOS settings are correct and that CD/DVD drive is discovered, follow the onscreen information to locate and resolve issues with the computer. Run the Windows Disk Defragmenter. Disconnect... all cables and jumpers on the Boot menu. 6. c. The System Recovery Options screen displays. i. NOTE: Click Load Drivers if controller drives are set correctly. 7. Restore system ...


