User Manual
Page 2
... your unit should include the serial number, model number and purchase information. Record the model number, serial number, purchase date and place of purchase information in new editions of this publication without obligation to notify any means, electronically, mechanically, by any person of such revisions or changes. Acer LCD Monitor User's Guide Model number Serial number Date of purchase Place of Acer Incorporated. Such changes will be incorporated in the...
... your unit should include the serial number, model number and purchase information. Record the model number, serial number, purchase date and place of purchase information in new editions of this publication without obligation to notify any means, electronically, mechanically, by any person of such revisions or changes. Acer LCD Monitor User's Guide Model number Serial number Date of purchase Place of Acer Incorporated. Such changes will be incorporated in the...

User Manual
Page 3
... all power cords from the system by changing the image or turning off the power switch and then turn it on again to wipe the screen and cabinet front and sides. Cleaning your safety and comfort Safety instructions Read these guidelines when cleaning the monitor: • Always unplug the monitor before cleaning. • Use a soft cloth to make sure the flicker disappears. • You may find slightly uneven brightness...
... all power cords from the system by changing the image or turning off the power switch and then turn it on again to wipe the screen and cabinet front and sides. Cleaning your safety and comfort Safety instructions Read these guidelines when cleaning the monitor: • Always unplug the monitor before cleaning. • Use a soft cloth to make sure the flicker disappears. • You may find slightly uneven brightness...
User Manual
Page 4
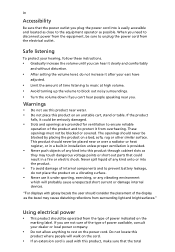
... and without distortion. • After setting the volume level, do not place the product on the cord. • If an extension cord is used with glossy bezels the user should never be blocked or covered. Safe listening To protect your ears have adjusted. • Limit the amount of the product and to unplug the power cord from surrounding light and bright surfaces."
... and without distortion. • After setting the volume level, do not place the product on the cord. • If an extension cord is used with glossy bezels the user should never be blocked or covered. Safe listening To protect your ears have adjusted. • Limit the amount of the product and to unplug the power cord from surrounding light and bright surfaces."
User Manual
Page 5
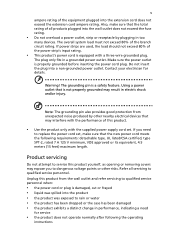
... grounded may result in performance, indicating a need to replace the power cord set . Using a power outlet that may expose you need for details. If you to qualified service personnel. The overall system load must not exceed 80% of the power strip's input rating. • This product's power cord is equipped with the performance of the equipment plugged into the wall outlet does not exceed the fuse...
... grounded may result in performance, indicating a need to replace the power cord set . Using a power outlet that may expose you need for details. If you to qualified service personnel. The overall system load must not exceed 80% of the power strip's input rating. • This product's power cord is equipped with the performance of the equipment plugged into the wall outlet does not exceed the fuse...

User Manual
Page 6
... normally be advised to turn off your vehicle engine. Switch off the device near gas pumps at Acer are very conscious of the environmental effects of our business and strive to identify and provide the best working procedures to environmental protection and views recycling, in the form of salvaging and disposal of used equipment, as one of...
... normally be advised to turn off your vehicle engine. Switch off the device near gas pumps at Acer are very conscious of the environmental effects of our business and strive to identify and provide the best working procedures to environmental protection and views recycling, in the form of salvaging and disposal of used equipment, as one of...
User Manual
Page 8
... sitting height to carpal tunnel syndrome, tendonitis, tenosynovitis or other factors greatly increase the risk of physical injury. Long work periods, bad posture, poor work habits, stress, inadequate working in front of a computer. The following tips: • refrain from Sleep mode by adjusting the viewing angle of the monitor, using a footrest, or raising your company's health and safety department. Users are...
... sitting height to carpal tunnel syndrome, tendonitis, tenosynovitis or other factors greatly increase the risk of physical injury. Long work periods, bad posture, poor work habits, stress, inadequate working in front of a computer. The following tips: • refrain from Sleep mode by adjusting the viewing angle of the monitor, using a footrest, or raising your company's health and safety department. Users are...
User Manual
Page 9
... window or any light source • minimizing room light by its base. Developing good work habits to make your display to a comfortable level for extended periods of time. Display • Keep your display clean. • Keep your head at a higher level than the top edge of the display so your eyes point downward when looking at the middle of the display. • Adjust the display brightness and/or contrast...
... window or any light source • minimizing room light by its base. Developing good work habits to make your display to a comfortable level for extended periods of time. Display • Keep your display clean. • Keep your head at a higher level than the top edge of the display so your eyes point downward when looking at the middle of the display. • Adjust the display brightness and/or contrast...
User Manual
Page 10
...Manager Regulation, Acer Inc. Year to establishing a framework for the setting of EMC Directive 2004/108/EC, Low Voltage Directive 2006/95/EC, and RoHS Directive 2011/65/EU and Directive 2009/125/EC with regard to begin affixing CE marking 2015 . Acer Incorporated 8F, ..., 40, 20020 Lainate (MI) Italy Tel: +39-02-939-921 ,Fax: +39-02 9399-2913 www.acer.it Declare under our own responsibility that the product: Product: LCD Monitor Trade Name: Acer Model Number: CB271HK SKU Number: CB271HK xxxxxx; ("x" = 0~9, a ~ z, A ~ Z, or blank) To which this declaration refers conforms to the...
...Manager Regulation, Acer Inc. Year to establishing a framework for the setting of EMC Directive 2004/108/EC, Low Voltage Directive 2006/95/EC, and RoHS Directive 2011/65/EU and Directive 2009/125/EC with regard to begin affixing CE marking 2015 . Acer Incorporated 8F, ..., 40, 20020 Lainate (MI) Italy Tel: +39-02-939-921 ,Fax: +39-02 9399-2913 www.acer.it Declare under our own responsibility that the product: Product: LCD Monitor Trade Name: Acer Model Number: CB271HK SKU Number: CB271HK xxxxxx; ("x" = 0~9, a ~ z, A ~ Z, or blank) To which this declaration refers conforms to the...
User Manual
Page 12
... Safe listening Warnings Using electrical power Product servicing Additional safety information IT equipment recycling information Disposal instructions LCD pixel statement Tips and information for comfortable use Federal Communications Commission Declaration of Conformity Unpacking Attaching/removing the base Screen position adjustment Connecting the power cord Power saving Display Data Channel (DDC) Connector pin assignment Standard timing table Installation User controls How to adjust a setting Acer eColor Management User Troubleshooting HDMI mode DVI mode DP mode 1 iii iii iii...
... Safe listening Warnings Using electrical power Product servicing Additional safety information IT equipment recycling information Disposal instructions LCD pixel statement Tips and information for comfortable use Federal Communications Commission Declaration of Conformity Unpacking Attaching/removing the base Screen position adjustment Connecting the power cord Power saving Display Data Channel (DDC) Connector pin assignment Standard timing table Installation User controls How to adjust a setting Acer eColor Management User Troubleshooting HDMI mode DVI mode DP mode 1 iii iii iii...
User Manual
Page 13
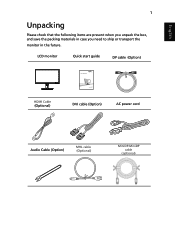
English 1 Unpacking Please check that the following items are present when you unpack the box, and save the packing materials in case you need to ship or transport the monitor in the future. LCD monitor Quick start guide DP cable (Option) HDMI Cable (Optional) DVI cable (Option) AC power cord Audio Cable (Option) MHL cable (Optional) MHL MiniDP-MiniDP cable (optional)
English 1 Unpacking Please check that the following items are present when you unpack the box, and save the packing materials in case you need to ship or transport the monitor in the future. LCD monitor Quick start guide DP cable (Option) HDMI Cable (Optional) DVI cable (Option) AC power cord Audio Cable (Option) MHL cable (Optional) MHL MiniDP-MiniDP cable (optional)

User Manual
Page 14
Remove: Reverse the steps to remove the base. English 2 ATTACHING/REMOVING THE BASE Install: Align the base with the stand and push the base towards the top of the monitor, and then rotate the base clockwise. Tighten the screw clockwise.
Remove: Reverse the steps to remove the base. English 2 ATTACHING/REMOVING THE BASE Install: Align the base with the stand and push the base towards the top of the monitor, and then rotate the base clockwise. Tighten the screw clockwise.
User Manual
Page 15
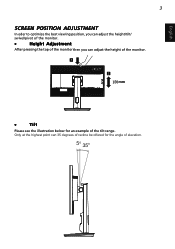
Only at the highest point can adjust the height of the monitor. 1 2 150mm • Tilt Please see the illustration below for the angle of the tilt range. English 3 SCREEN POSITION ADJUSTMENT In oder to optimize the best viewing position, you can adjust the height/tilt/ swivel/pivot of the monitor. • Height Adjustment After pressing the top of the monitor then you can 35 degrees of recline be offered for an example of elevation. 5o 35o
Only at the highest point can adjust the height of the monitor. 1 2 150mm • Tilt Please see the illustration below for the angle of the tilt range. English 3 SCREEN POSITION ADJUSTMENT In oder to optimize the best viewing position, you can adjust the height/tilt/ swivel/pivot of the monitor. • Height Adjustment After pressing the top of the monitor then you can 35 degrees of recline be offered for an example of elevation. 5o 35o
User Manual
Page 17
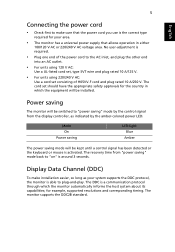
5 English Connecting the power cord • Check first to plug-and-play. Mode On Power saving LED light Blue Amber The power saving mode will be installed. Power saving The monitor will be kept until a control signal has been detected or the keyboard or mouse is the correct type required for your area. • The monitor has a universal power supply that allows operation in which the monitor automatically informs the host system about its capabilities; The...
5 English Connecting the power cord • Check first to plug-and-play. Mode On Power saving LED light Blue Amber The power saving mode will be installed. Power saving The monitor will be kept until a control signal has been detected or the keyboard or mouse is the correct type required for your area. • The monitor has a universal power supply that allows operation in which the monitor automatically informs the host system about its capabilities; The...
User Manual
Page 18
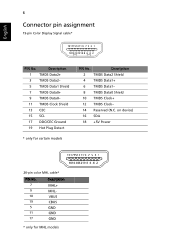
Description 2 TMDS Data2 Shield 4 TMDS Data1+ 6 TMDS Data1- 8 TMDS Data0 Shield 10 TMDS Clock+ 12 TMDS Clock- 14 Reserved (N.C. Description 1 TMDS Data2+ 3 TMDS Data2- 5 TMDS Data1 Shield 7 TMDS Data0+ 9 TMDS Data0- 11 TMDS Clock Shield 13 CEC 15 SCL 17 DDC/CEC Ground 19 Hot Plug Detect * only for certain models PIN No. English 6 Connector pin assignment 19-pin Color Display Signal cable* 1917151311 9 7 5 3 1 1816141210 8 6 4 2 PIN No. on device) 16 SDA 18 +5V Power
Description 2 TMDS Data2 Shield 4 TMDS Data1+ 6 TMDS Data1- 8 TMDS Data0 Shield 10 TMDS Clock+ 12 TMDS Clock- 14 Reserved (N.C. Description 1 TMDS Data2+ 3 TMDS Data2- 5 TMDS Data1 Shield 7 TMDS Data0+ 9 TMDS Data0- 11 TMDS Clock Shield 13 CEC 15 SCL 17 DDC/CEC Ground 19 Hot Plug Detect * only for certain models PIN No. English 6 Connector pin assignment 19-pin Color Display Signal cable* 1917151311 9 7 5 3 1 1816141210 8 6 4 2 PIN No. on device) 16 SDA 18 +5V Power
User Manual
Page 22
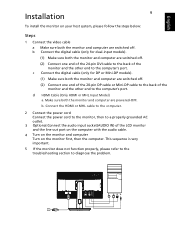
... the LCD monitor and the line-out port on the computer with the audio cable. 4 Turn on the monitor and computer Turn on your host system, please follow the steps below: Steps 1 Connect the video cable a Make sure both the monitor and computer are powered-OFF. b. c Connect the digital cable (only for dual-input models). (1) Make sure both the monitor and computer are switched off. (2) Connect one end of the 24-pin DVI cable to...
... the LCD monitor and the line-out port on the computer with the audio cable. 4 Turn on the monitor and computer Turn on your host system, please follow the steps below: Steps 1 Connect the video cable a Make sure both the monitor and computer are powered-OFF. b. c Connect the digital cable (only for dual-input models). (1) Make sure both the monitor and computer are switched off. (2) Connect one end of the 24-pin DVI cable to...
User Manual
Page 23
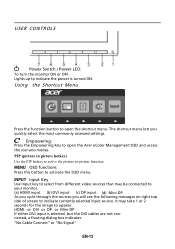
... indicate currently selected input source. Lights up to appear. MENU OSD functions Press this botton to open the shortcut menu. PIP (picture in picture hotkey) Use the PIP hotkey to open the Acer eColor Management OSD and access the scenario modes. HDMI or DVI or DP or Mini-DP If either DVI input is turned ON. USER CONTROLS Power Switch / Power LED: To turn the monitor ON or OFF. INPUT Input Key Use Input key to select from different video sources that may...
... indicate currently selected input source. Lights up to appear. MENU OSD functions Press this botton to open the shortcut menu. PIP (picture in picture hotkey) Use the PIP hotkey to open the Acer eColor Management OSD and access the scenario modes. HDMI or DVI or DP or Mini-DP If either DVI input is turned ON. USER CONTROLS Power Switch / Power LED: To turn the monitor ON or OFF. INPUT Input Key Use Input key to select from different video sources that may...
User Manual
Page 24
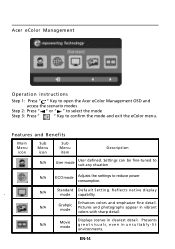
... Sub Menu icon Sub Menu item Description N/A User mode User defined. Presents great visuals, even in clearest detail. Pictures and photographs appear in vibrant colors with sharp detail. Settings can be fine-tuned to suit any situation N/A ECO mode Adjusts the settings to confirm the mode and exit the eColor menu. EN-14 Acer eColor Management Operation instructions Step 1: Press " " Key to open the Acer eColor Management OSD...
... Sub Menu icon Sub Menu item Description N/A User mode User defined. Presents great visuals, even in clearest detail. Pictures and photographs appear in vibrant colors with sharp detail. Settings can be fine-tuned to suit any situation N/A ECO mode Adjusts the settings to confirm the mode and exit the eColor menu. EN-14 Acer eColor Management Operation instructions Step 1: Press " " Key to open the Acer eColor Management OSD...

User Manual
Page 25
... for red, green, blue, yellow, magenta and cyan. 6 Super Sharpness technology can simulate high-resolution images by boosting the pixel density of the original source. Press the MENU key to open the OSD. For advanced settings, please refer to following content is DP1.2. It can use the OSD to adjust the picture quality, OSD position and general settings. The OSD can follow the setting message to confirm selection of your LCD Monitor...
... for red, green, blue, yellow, magenta and cyan. 6 Super Sharpness technology can simulate high-resolution images by boosting the pixel density of the original source. Press the MENU key to open the OSD. For advanced settings, please refer to following content is DP1.2. It can use the OSD to adjust the picture quality, OSD position and general settings. The OSD can follow the setting message to confirm selection of your LCD Monitor...
User Manual
Page 27
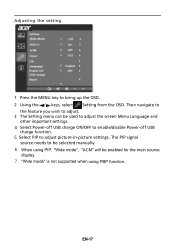
... main source display. 7 "Wide mode" is not supported when using PBP function. The PIP signal source needs to be selected manually. 6 When using PIP, "Wide mode", "ACM" will be used to adjust the screen Menu Language and other important settings. 4 Select Power-off USB charge ON/OFF to enable/disable Power-off USB charge function. 5 Select PIP to bring up the OSD. 2 Using the / keys, select Setting from the OSD. Adjusting the setting 1 Press the MENU key to adjust picture‐in‐picture settings.
... main source display. 7 "Wide mode" is not supported when using PBP function. The PIP signal source needs to be selected manually. 6 When using PIP, "Wide mode", "ACM" will be used to adjust the screen Menu Language and other important settings. 4 Select Power-off USB charge ON/OFF to enable/disable Power-off USB charge function. 5 Select PIP to bring up the OSD. 2 Using the / keys, select Setting from the OSD. Adjusting the setting 1 Press the MENU key to adjust picture‐in‐picture settings.
User Manual
Page 29
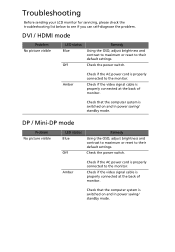
... the AC power cord is properly connected to the monitor. Problem No picture visible LED status Blue Off Remedy Using the OSD, adjust brightness and contrast to maximum or reset to see if you can self-diagnose the problem. Check if the video signal cable is switched on and in power saving/ standby mode. Check the power switch. Troubleshooting Before sending your LCD monitor for servicing, please check the troubleshooting list below to their default settings. DVI / HDMI mode Problem No picture visible LED status Blue Off Remedy Using the OSD, adjust brightness and contrast to...
... the AC power cord is properly connected to the monitor. Problem No picture visible LED status Blue Off Remedy Using the OSD, adjust brightness and contrast to maximum or reset to see if you can self-diagnose the problem. Check if the video signal cable is switched on and in power saving/ standby mode. Check the power switch. Troubleshooting Before sending your LCD monitor for servicing, please check the troubleshooting list below to their default settings. DVI / HDMI mode Problem No picture visible LED status Blue Off Remedy Using the OSD, adjust brightness and contrast to...

