Acer H236HL Monitor Service Guide
Page 2
Product Specification...2 2. Troubleshooting...31 6. OSD Menu ...15 3. Exploded Diagram ...20 4. Writing EDID Process...43 8. Schematics and Layouts...52 Safety Notice Any person attempting to service this chassis must familiarize with the chassis and be aware of Contents Important Safety Notice...1 1. FRU (Field Replaceable Unit) List...50 9. Contents Table of the necessary safety precautions to be used when serving electronic equipment containing high voltage. Assembly and Disassembly Procedures ...23 5. Firmware Upgrade Process...35 7.
Product Specification...2 2. Troubleshooting...31 6. OSD Menu ...15 3. Exploded Diagram ...20 4. Writing EDID Process...43 8. Schematics and Layouts...52 Safety Notice Any person attempting to service this chassis must familiarize with the chassis and be aware of Contents Important Safety Notice...1 1. FRU (Field Replaceable Unit) List...50 9. Contents Table of the necessary safety precautions to be used when serving electronic equipment containing high voltage. Assembly and Disassembly Procedures ...23 5. Firmware Upgrade Process...35 7.

Acer H236HL Monitor Service Guide
Page 3
... safe, reliable operation of Lead-Free solder requested in assembly and disassembly procedures to screw and unscrew screws. ! Using Lead-Free solder to well mounted the parts. ! Qualified Repairability: Proper service and repair is recommended that service engineers should be connect to an authorized power cord, and turn off the master power switch each time before performing the service procedures. Furthermore, the possible existed improper repairing method may damage equipment or products...
... safe, reliable operation of Lead-Free solder requested in assembly and disassembly procedures to screw and unscrew screws. ! Using Lead-Free solder to well mounted the parts. ! Qualified Repairability: Proper service and repair is recommended that service engineers should be connect to an authorized power cord, and turn off the master power switch each time before performing the service procedures. Furthermore, the possible existed improper repairing method may damage equipment or products...
Acer H236HL Monitor Service Guide
Page 4
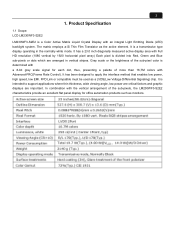
... thickness, wide viewing angle, low power are critical factors and graphic displays are arranged in the normally white mode. It is divided into Red, Green and Blue sub-pixels or dots which are important. FPD Link or compatible must be used as the active element. It has a 23.0 inch diagonally measured active display area with Advanced-FRC(Frame Rate Control). In combination with the vertical arrangement of...
... thickness, wide viewing angle, low power are critical factors and graphic displays are arranged in the normally white mode. It is divided into Red, Green and Blue sub-pixels or dots which are important. FPD Link or compatible must be used as the active element. It has a 23.0 inch diagonally measured active display area with Advanced-FRC(Frame Rate Control). In combination with the vertical arrangement of...

Acer H236HL Monitor Service Guide
Page 6
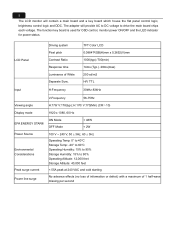
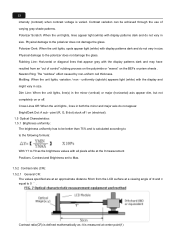
... shall be distinguished. 6500°K The value under the following conditions, unless otherwise specified. Led drive Flat Panel and LED backlight Main Board Speaker 19V Adapter Key Board AC-IN 100V-240V HOST Computer Video signal, DDC Warm up time AC supply voltage Ambient temperature Humidity Display mode e-color mode Contrast control Color temperature Brightness control Analog Input signal Picture position and size Viewing angle Viewing distance Ambient illumination > 30 min. 230V± 5%, 50± 3 Hz 20C ...
... shall be distinguished. 6500°K The value under the following conditions, unless otherwise specified. Led drive Flat Panel and LED backlight Main Board Speaker 19V Adapter Key Board AC-IN 100V-240V HOST Computer Video signal, DDC Warm up time AC supply voltage Ambient temperature Humidity Display mode e-color mode Contrast control Color temperature Brightness control Analog Input signal Picture position and size Viewing angle Viewing distance Ambient illumination > 30 min. 230V± 5%, 50± 3 Hz 20C ...
Acer H236HL Monitor Service Guide
Page 7
...: 15% to 90% Storage Humidity: 15% to drive the main board chips each voltage. The function key board is used for OSD control, monitor power ON/OFF and the LED indicator for power status. The adapter will contain a main board and a key board which house the flat panel control logic, brightness control logic and DDC. 5 The LCD monitor will provide AC to DC voltage to 90% Operating Altitude: 12...
...: 15% to 90% Storage Humidity: 15% to drive the main board chips each voltage. The function key board is used for OSD control, monitor power ON/OFF and the LED indicator for power status. The adapter will contain a main board and a key board which house the flat panel control logic, brightness control logic and DDC. 5 The LCD monitor will provide AC to DC voltage to 90% Operating Altitude: 12...
Acer H236HL Monitor Service Guide
Page 9
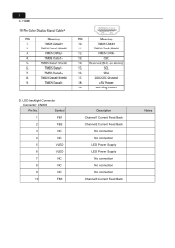
HDMI D. 7 C. LED backlight Connector Connector: CN803 Pin No. Symbol 1 FB1 2 FB2 3 NC 4 NC 5 VLED 6 VLED 7 NC 8 NC 9 NC 10 FB3 Description Channel1 Current Feed Back Channel2 Current Feed Back No connection No connection LED Power Supply LED Power Supply No connection No connection No connection Channel3 Current Feed Back Notes
HDMI D. 7 C. LED backlight Connector Connector: CN803 Pin No. Symbol 1 FB1 2 FB2 3 NC 4 NC 5 VLED 6 VLED 7 NC 8 NC 9 NC 10 FB3 Description Channel1 Current Feed Back Channel2 Current Feed Back No connection No connection LED Power Supply LED Power Supply No connection No connection No connection Channel3 Current Feed Back Notes
Acer H236HL Monitor Service Guide
Page 11
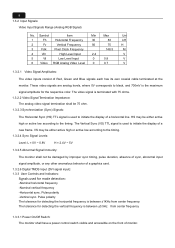
.... 1.3.2.4 Sync Signal Levels: Level: L = 0V ~ 0.8V H = 2.4V ~ 5V 1.3.2.5 Abnormal Signal Immunity: The monitor shall not be 75 ohm. 1.3.2.3 Synchronization (Sync) Signals: The Horizontal Sync (HS) TTL signal is used to black, and 700mV is between ±0.5Hz from center frequency 1.3.3.1 Power On/Off Switch: The monitor shall have a power control switch visible and accessible on the front of Red, Green and Blue signals each has its own coaxial cable terminated at the monitor. Pulse...
.... 1.3.2.4 Sync Signal Levels: Level: L = 0V ~ 0.8V H = 2.4V ~ 5V 1.3.2.5 Abnormal Signal Immunity: The monitor shall not be 75 ohm. 1.3.2.3 Synchronization (Sync) Signals: The Horizontal Sync (HS) TTL signal is used to black, and 700mV is between ±0.5Hz from center frequency 1.3.3.1 Power On/Off Switch: The monitor shall have a power control switch visible and accessible on the front of Red, Green and Blue signals each has its own coaxial cable terminated at the monitor. Pulse...

Acer H236HL Monitor Service Guide
Page 12
...-Screen Display: On Screen Display system shall be tuned off when the keys are controlled by OSD buttons on the front of the monitor. 10 1.3.3.2 Power Indicator LED: The monitor shall have LED indicators located on the front of bezel. 1.Power Switch/ Power LED 2.>/(Input) 3. . to select the desired function. 3) Press > to change source 1) Activate OSD First menu when OSD is on, press >(Input) key to control the monitor. Current setting will be saved and OSD will be used...
...-Screen Display: On Screen Display system shall be tuned off when the keys are controlled by OSD buttons on the front of the monitor. 10 1.3.3.2 Power Indicator LED: The monitor shall have LED indicators located on the front of bezel. 1.Power Switch/ Power LED 2.>/(Input) 3. . to select the desired function. 3) Press > to change source 1) Activate OSD First menu when OSD is on, press >(Input) key to control the monitor. Current setting will be saved and OSD will be used...
Acer H236HL Monitor Service Guide
Page 13
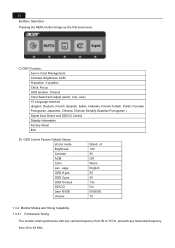
... level menu. C) OSD Function: Acer e-Color Management Contrast, Brightness, ACM H-position, V-position Clock, Focus OSD position, Timeout Color Select and adjust (warm, cool, user). 15 Language selected (English, Deutsch, French, Spanish, Italian, Hollands, Finnish,Turkish, Polish, P Portuguese, Japanese, Chinese, Chinese Simplify, Brazilian Portuguese ) Signal Input Select and DDC/CI Control Display Information Factory Reset Exit D) OSD Control Factory Default Values: eColor mode Brightness Contrast ACM Color Lan uage OSD H.pos OSD V.pos OSD Timeout DDC/CI User R/G/B Volume Stand rd...
... level menu. C) OSD Function: Acer e-Color Management Contrast, Brightness, ACM H-position, V-position Clock, Focus OSD position, Timeout Color Select and adjust (warm, cool, user). 15 Language selected (English, Deutsch, French, Spanish, Italian, Hollands, Finnish,Turkish, Polish, P Portuguese, Japanese, Chinese, Chinese Simplify, Brazilian Portuguese ) Signal Input Select and DDC/CI Control Display Information Factory Reset Exit D) OSD Control Factory Default Values: eColor mode Brightness Contrast ACM Color Lan uage OSD H.pos OSD V.pos OSD Timeout DDC/CI User R/G/B Volume Stand rd...
Acer H236HL Monitor Service Guide
Page 14
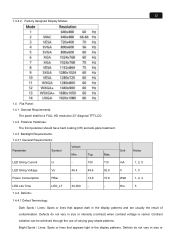
....4 49.6 52.8 V 1, 5 Power Consumption PBar - 14.9 15.8 Watt 1, 2, 4 LED Life Time 1.4.4 Defects: LED_LT 30,000 - - 12 1.3.4.2 Factory Assigned Display Modes: 1.4 Flat Panel: 1.4.1 General Requirements: The panel shall be achieved through the use of contamination. Typ. Contrast variation can be a FULL HD resolution 23" diagonal TFT-LCD. 1.4.2 Polarizer Hardness: The front polarizer should have hard coating (3H) and anti-glare treatment. 1.4.3 Backlight Requirements: 1.4.3.1 General Requirements...
....4 49.6 52.8 V 1, 5 Power Consumption PBar - 14.9 15.8 Watt 1, 2, 4 LED Life Time 1.4.4 Defects: LED_LT 30,000 - - 12 1.3.4.2 Factory Assigned Display Modes: 1.4 Flat Panel: 1.4.1 General Requirements: The panel shall be achieved through the use of contamination. Typ. Contrast variation can be a FULL HD resolution 23" diagonal TFT-LCD. 1.4.2 Polarizer Hardness: The front polarizer should have hard coating (3H) and anti-glare treatment. 1.4.3 Backlight Requirements: 1.4.3.1 General Requirements...
Acer H236HL Monitor Service Guide
Page 15
... (vertical) or major (horizontal) axis appear dim, but not completely on the BEFs or prism sheets . Polarizer Dent: When the unit lights, spots appear light (white) with the display patterns dark and may have resulted from the LCD surface at a viewing angle of varying gray shade patterns. Cross Lines Off: When the unit lights , lines in size. Contrast and Brightness set to Max. 1.5.2 Contrast...
... (vertical) or major (horizontal) axis appear dim, but not completely on the BEFs or prism sheets . Polarizer Dent: When the unit lights, spots appear light (white) with the display patterns dark and may have resulted from the LCD surface at a viewing angle of varying gray shade patterns. Cross Lines Off: When the unit lights , lines in size. Contrast and Brightness set to Max. 1.5.2 Contrast...

Acer H236HL Monitor Service Guide
Page 18
to select the desired function. 3) Press > to change the settings of the current function. 4) When First menu is on, press >(Input) key to change source 1) Activate OSD First menu when OSD is OFF 2) Press 16 2. OSD Menu 2.1 Key Definition: 1.Power Switch/ Power LED 2.>/(Input) 3. .
to select the desired function. 3) Press > to change the settings of the current function. 4) When First menu is on, press >(Input) key to change source 1) Activate OSD First menu when OSD is OFF 2) Press 16 2. OSD Menu 2.1 Key Definition: 1.Power Switch/ Power LED 2.>/(Input) 3. .

Acer H236HL Monitor Service Guide
Page 21
... 2.4 Acer eColor management: a. Input Not Supported When the Hsync Frequency, Vsync Frequency or Resolution is no active signal input, will show this message, and the monitor do the auto config Please Wait function. Cable Not Connected When the video cable is in OSD menu/picture page. b. This message will show this message, then enter power saving. Please Wait After user trigger the reset function, system will be flying with orange LED, and...
... 2.4 Acer eColor management: a. Input Not Supported When the Hsync Frequency, Vsync Frequency or Resolution is no active signal input, will show this message, and the monitor do the auto config Please Wait function. Cable Not Connected When the video cable is in OSD menu/picture page. b. This message will show this message, then enter power saving. Please Wait After user trigger the reset function, system will be flying with orange LED, and...
Acer H236HL Monitor Service Guide
Page 27
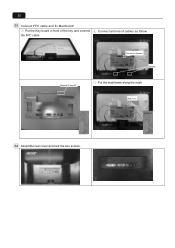
25 S3 Connect FFC cable and fix Mainboard: ① Put the Key board in front of the key and connect ② Connect all kind of cables as follow the FFC cable Marked 22 and 23 Connect to Speaker Speaker ③ Put the mainframe along the mark Align to 23 Align to 3 S4 Assemble rear cover and lock the two screws.
25 S3 Connect FFC cable and fix Mainboard: ① Put the Key board in front of the key and connect ② Connect all kind of cables as follow the FFC cable Marked 22 and 23 Connect to Speaker Speaker ③ Put the mainframe along the mark Align to 23 Align to 3 S4 Assemble rear cover and lock the two screws.
Acer H236HL Monitor Service Guide
Page 33
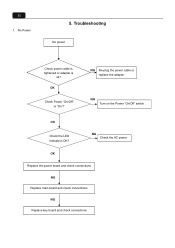
OK Check Power "On/Off" is ok? 31 1. NG Check the AC power OK Replace the power board and check connections NG Replace main board and check connections NG Replace key board and check connections No Power 5. Troubleshooting No power Check power cable is tightened or adapter is "On"? NG Re-plug the power cable or replace the adapter NG Turn on the Power "On/Off" switch OK Check the LED indicate is OK?
OK Check Power "On/Off" is ok? 31 1. NG Check the AC power OK Replace the power board and check connections NG Replace main board and check connections NG Replace key board and check connections No Power 5. Troubleshooting No power Check power cable is tightened or adapter is "On"? NG Re-plug the power cable or replace the adapter NG Turn on the Power "On/Off" switch OK Check the LED indicate is OK?

Acer H236HL Monitor Service Guide
Page 34
32 2. No Video (Power LED Blue) No Video (Power LED Blue) Press the power button is OK? OK Check the main board and connection OK Check the LVDS/FFC cable or panel NG Replace the key board NG Replace the main board NG Re-plug the cable OK Replace the LVDS/FFC cable or panel
32 2. No Video (Power LED Blue) No Video (Power LED Blue) Press the power button is OK? OK Check the main board and connection OK Check the LVDS/FFC cable or panel NG Replace the key board NG Replace the main board NG Re-plug the cable OK Replace the LVDS/FFC cable or panel
Acer H236HL Monitor Service Guide
Page 35
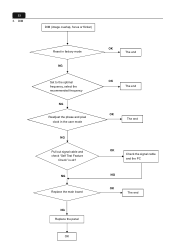
NG Replace the main board NG Replace the panel OK OK The end OK The end OK The end OK Check the signal cable and the PC NG OK The end 33 3. DIM DIM (image overlap, focus or flicker) Reset in factory mode NG Set to the optimal frequency, select the recommended frequency NG Readjust the phase and pixel clock in the user mode NG Pull out signal cable and check "Self Test Feature Check" is ok?
NG Replace the main board NG Replace the panel OK OK The end OK The end OK The end OK Check the signal cable and the PC NG OK The end 33 3. DIM DIM (image overlap, focus or flicker) Reset in factory mode NG Set to the optimal frequency, select the recommended frequency NG Readjust the phase and pixel clock in the user mode NG Pull out signal cable and check "Self Test Feature Check" is ok?
Acer H236HL Monitor Service Guide
Page 36
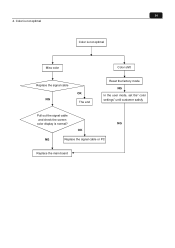
34 4. Color is not optimal Color is not optimal Miss color Color shift Replace the signal cable NG OK The end Reset the factory mode NG In the user mode, set the" color settings" until customer satisfy Pull out the signal cable and check the screen color display is normal? NG OK NG Replace the signal cable or PC Replace the main board
34 4. Color is not optimal Color is not optimal Miss color Color shift Replace the signal cable NG OK The end Reset the factory mode NG In the user mode, set the" color settings" until customer satisfy Pull out the signal cable and check the screen color display is normal? NG OK NG Replace the signal cable or PC Replace the main board
Acer H236HL Monitor Service Guide
Page 43
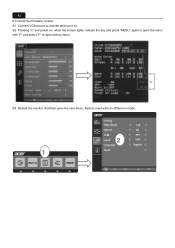
Connect VGA source to open the user menu. Factory reset will turn it on , when the screen lights, release the key and press "MENU" again to open the menu with "F" and select "F" to monitor and turn off Burn in mode. 2 1 Restart the monitor. Pressing "e" and power on . S2. Check this F/W version. 41 6.5 Check the firmware version. S1. S3. And then open factory menu.
Connect VGA source to open the user menu. Factory reset will turn it on , when the screen lights, release the key and press "MENU" again to open the menu with "F" and select "F" to monitor and turn off Burn in mode. 2 1 Restart the monitor. Pressing "e" and power on . S2. Check this F/W version. 41 6.5 Check the firmware version. S1. S3. And then open factory menu.

Acer H236HL Monitor Service Guide
Page 44
42 6 . 6 Troubleshooting. 6.6.1 Can't Entry ISP Mode!! (1) Check the cables and ISP JIG are connected fluently. (2) Click the usb driver installed correct. (3) AC off the monitor for a while and retry it. (4) Change ISP JIG or cable. (5) Change PC.
42 6 . 6 Troubleshooting. 6.6.1 Can't Entry ISP Mode!! (1) Check the cables and ISP JIG are connected fluently. (2) Click the usb driver installed correct. (3) AC off the monitor for a while and retry it. (4) Change ISP JIG or cable. (5) Change PC.


