
User Manual
Page 3
... use . Cleaning your safety and comfort Safety instructions Read these guidelines when cleaning the monitor: • Always unplug the monitor before connecting any cable or unplugging the power cord. • If the system has multiple sources of information obtained from the power supplies. Turn off the power switch for a few hours. • Acer monitor is displayed for video and visual display of power, disconnect power from the system by changing the image or turning off the power switch...
... use . Cleaning your safety and comfort Safety instructions Read these guidelines when cleaning the monitor: • Always unplug the monitor before connecting any cable or unplugging the power cord. • If the system has multiple sources of information obtained from the power supplies. Turn off the power switch for a few hours. • Acer monitor is displayed for video and visual display of power, disconnect power from the system by changing the image or turning off the power switch...

User Manual
Page 4
... not use it could result in installation unless proper ventilation is easily accessible and located as close to the equipment operator as they may touch dangerous voltage points or short-out parts that the power outlet you need to disconnect power from the equipment, be operated from the type of power indicated on an unstable cart, stand or table...
... not use it could result in installation unless proper ventilation is easily accessible and located as close to the equipment operator as they may touch dangerous voltage points or short-out parts that the power outlet you need to disconnect power from the equipment, be operated from the type of power indicated on an unstable cart, stand or table...
User Manual
Page 5
... service personnel. Using a power outlet that the total rating of all servicing to service this product yourself, as opening or removing covers may interfere with the performance of this product, make sure that is equipped with the supplied power supply cord set , make sure that the total ampere rating of the equipment plugged into a non-grounded power outlet. The overall system load must not exceed 80% of the power strip's input rating...
... service personnel. Using a power outlet that the total rating of all servicing to service this product yourself, as opening or removing covers may interfere with the performance of this product, make sure that is equipped with the supplied power supply cord set , make sure that the total ampere rating of the equipment plugged into a non-grounded power outlet. The overall system load must not exceed 80% of the power strip's input rating...

User Manual
Page 6
... instructions Note: Adjust only those controls that are often, but not always, marked. Potentially explosive environments Switch off your vehicle engine. or where blasting operations are very conscious of the environmental effects of our business and strive to identify and provide the best working procedures to turn off the device near gas pumps at Acer are in progress. Keep...
... instructions Note: Adjust only those controls that are often, but not always, marked. Potentially explosive environments Switch off your vehicle engine. or where blasting operations are very conscious of the environmental effects of our business and strive to identify and provide the best working procedures to turn off the device near gas pumps at Acer are in progress. Keep...
User Manual
Page 7
... disposal service or the shop where you can drop off your waste equipment for the recycling of user inactivity. • Wake the monitor when it is produced with your other household waste. Nevertheless, some pixels may occasionally misfire or appear as black or red dots. vii Disposal instructions This symbol on the product or on the recorded image...
... disposal service or the shop where you can drop off your waste equipment for the recycling of user inactivity. • Wake the monitor when it is produced with your other household waste. Nevertheless, some pixels may occasionally misfire or appear as black or red dots. vii Disposal instructions This symbol on the product or on the recorded image...
User Manual
Page 10
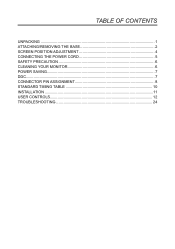
TABLE OF CONTENTS UNPACKING 1 ATTACHING/REMOVING THE BASE 2 SCREEN POSITION ADJUSTMENT 4 CONNECTING THE POWER CORD 5 SAFETY PRECAUTION 6 CLEANING YOUR MONITOR 6 POWER SAVING 7 DDC 7 CONNECTOR PIN ASSIGNMENT 8 STANDARD TIMING TABLE 10 INSTALLATION 11 USER CONTROLS 12 TROUBLESHOOTING 24
TABLE OF CONTENTS UNPACKING 1 ATTACHING/REMOVING THE BASE 2 SCREEN POSITION ADJUSTMENT 4 CONNECTING THE POWER CORD 5 SAFETY PRECAUTION 6 CLEANING YOUR MONITOR 6 POWER SAVING 7 DDC 7 CONNECTOR PIN ASSIGNMENT 8 STANDARD TIMING TABLE 10 INSTALLATION 11 USER CONTROLS 12 TROUBLESHOOTING 24

User Manual
Page 11
UNPACKING Please check the following items are present when you unpack the box, and save the packing materials in case you will need to ship or transport the monitor in future. *Below items shown here is indicative only. The actual product may be different. • LCD Monitor • Quick Start Guide • AC Power Cord (Optional) • Power adapter (Optional) XZ2 seriesX-Z342CU • D-Sub Cable (Optional) • HDMI Cable (Optional) • DP cable (Optional) • Audio Cable (Optional) • USB Cable (Optional) • USB Type C Cable (Optional) 1
UNPACKING Please check the following items are present when you unpack the box, and save the packing materials in case you will need to ship or transport the monitor in future. *Below items shown here is indicative only. The actual product may be different. • LCD Monitor • Quick Start Guide • AC Power Cord (Optional) • Power adapter (Optional) XZ2 seriesX-Z342CU • D-Sub Cable (Optional) • HDMI Cable (Optional) • DP cable (Optional) • Audio Cable (Optional) • USB Cable (Optional) • USB Type C Cable (Optional) 1
User Manual
Page 14
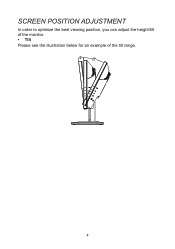
SCREEN POSITION ADJUSTMENT In order to optimize the best viewing position, you can adjust the height/tilt of the monitor. • Tilt Please see the illustration below for an example of the tilt range. 4
SCREEN POSITION ADJUSTMENT In order to optimize the best viewing position, you can adjust the height/tilt of the monitor. • Tilt Please see the illustration below for an example of the tilt range. 4

User Manual
Page 15
... safety approvals for your area. • This monitor has a universal power supply that the power cord you use is required. • Plug one end of H05VV-F cord and plug rated 10 A, 250 V. No user-adjustment is the correct type required for the country in either 100/120V AC or 220/240 V AC voltage area. CONNECTING THE POWER CORD • Check first to an AC inlet, and...
... safety approvals for your area. • This monitor has a universal power supply that the power cord you use is required. • Plug one end of H05VV-F cord and plug rated 10 A, 250 V. No user-adjustment is the correct type required for the country in either 100/120V AC or 220/240 V AC voltage area. CONNECTING THE POWER CORD • Check first to an AC inlet, and...

User Manual
Page 17
... monitor supports DDC2B standard. 7 The DDC (Display Data Channel) is activated. POWER SAVING The monitor will be driven into "Power Saving" mode by the control signal from Active OFF state back to ON state is able to Plug and Play with your system if your installation easier, the monitor is around 3 seconds. The recovery time from the display controller, as indicated by the LED flashes power LED. DDC To make your...
... monitor supports DDC2B standard. 7 The DDC (Display Data Channel) is activated. POWER SAVING The monitor will be driven into "Power Saving" mode by the control signal from Active OFF state back to ON state is able to Plug and Play with your system if your installation easier, the monitor is around 3 seconds. The recovery time from the display controller, as indicated by the LED flashes power LED. DDC To make your...
User Manual
Page 21
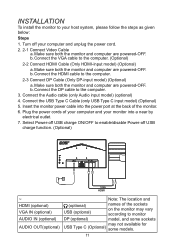
... unplug the power cord. 2. 2-1 Connect Video Cable a. Turn off USB charge function. (Optional) VGA HDMI ~ HDMI (optional) VGA IN (optional) AUDIO IN (optional) AUDIO OUT(optional) Note: The location and (optional) USB (optional) names of the sockets on the monitor may vary according to enable/disable Power-off your host system, please follow the steps as given below: Steps 1. INSTALLATION To install the monitor to the computer. (Optional) 2-2 Connect HDMI Cable (Only HDMI-input model) (Optional...
... unplug the power cord. 2. 2-1 Connect Video Cable a. Turn off USB charge function. (Optional) VGA HDMI ~ HDMI (optional) VGA IN (optional) AUDIO IN (optional) AUDIO OUT(optional) Note: The location and (optional) USB (optional) names of the sockets on the monitor may vary according to enable/disable Power-off your host system, please follow the steps as given below: Steps 1. INSTALLATION To install the monitor to the computer. (Optional) 2-2 Connect HDMI Cable (Only HDMI-input model) (Optional...
User Manual
Page 22
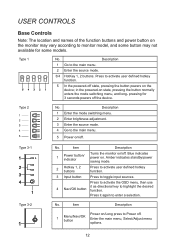
... 1 Enter the mode switching menu. 2 Enter brightness adjustment. 3 Enter the source mode. 4 Go to Power off . Enter the main menu, Select/Adjust menu options. 12 USER CONTROLS Base Controls Note: The location and names of the function buttons and power button on the monitor may not available for 3 seconds powers off . Type 1 No. Press to activate the OSD menu, then use 4 Navi/OK button it again to the main menu. 2 Enter the source mode. 3/4 HotKey 1, 2 buttons. Type 2 No...
... 1 Enter the mode switching menu. 2 Enter brightness adjustment. 3 Enter the source mode. 4 Go to Power off . Enter the main menu, Select/Adjust menu options. 12 USER CONTROLS Base Controls Note: The location and names of the function buttons and power button on the monitor may not available for 3 seconds powers off . Type 1 No. Press to activate the OSD menu, then use 4 Navi/OK button it again to the main menu. 2 Enter the source mode. 3/4 HotKey 1, 2 buttons. Type 2 No...

User Manual
Page 23
... LCD Monitor. Main Page Turn Modes on or off Note: Please select the button function operation according to open the OSD. You can not support. Press the MENU key to open the Modes control and select which user-defined profile to adjust the picture quality, OSD position and general settings. The button of Type 1 From any function page, press buttons 1 to open the Modes control and select which user-defined profile to use the OSD to use...
... LCD Monitor. Main Page Turn Modes on or off Note: Please select the button function operation according to open the OSD. You can not support. Press the MENU key to open the Modes control and select which user-defined profile to adjust the picture quality, OSD position and general settings. The button of Type 1 From any function page, press buttons 1 to open the Modes control and select which user-defined profile to use the OSD to use...
User Manual
Page 26
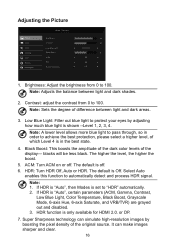
...-resolution images by adjusting how much blue light is shown --Level 1, 2, 3, 4. The default is set to automatically detect and process HDR signal. HDR: Turn HDR Off, Auto or HDR. The default is "Auto", certain parameters (ACM, Gamma, Contrast, Low Blue Light, Color Temperature, Black Boost, Grayscale Mode, 6-axis Hue, 6-axis Saturate, and VRB/TVR) are grayed out and disabled. 3. If HDR is "Auto", then Modes is off . Adjusting the Picture Picture Color Audio Gaming OSD System Mode - Note: Adjusts...
...-resolution images by adjusting how much blue light is shown --Level 1, 2, 3, 4. The default is set to automatically detect and process HDR signal. HDR: Turn HDR Off, Auto or HDR. The default is "Auto", certain parameters (ACM, Gamma, Contrast, Low Blue Light, Color Temperature, Black Boost, Grayscale Mode, 6-axis Hue, 6-axis Saturate, and VRB/TVR) are grayed out and disabled. 3. If HDR is "Auto", then Modes is off . Adjusting the Picture Picture Color Audio Gaming OSD System Mode - Note: Adjusts...

User Manual
Page 27
... 50 Picture Color Audio Gaming OSD System Mode - You can choose Cool, Warm, Normal, Low Blue Light or User. 3. Grayscale Mode: Turn grayscale mode On or Off. 6. 6-axis Hue: Adjust the red, green, blue, yellow, magenta and cyan hue. 7. 6-axis Saturate: Adjust the red, green, blue, yellow, magenta and cyan saturation. 17 Gamma mode allows you to "HDR" automatically. 2. Note: 1. If Color Space is not "HDR", then Modes is set to "Standard". 5. Color temperature: Default...
... 50 Picture Color Audio Gaming OSD System Mode - You can choose Cool, Warm, Normal, Low Blue Light or User. 3. Grayscale Mode: Turn grayscale mode On or Off. 6. 6-axis Hue: Adjust the red, green, blue, yellow, magenta and cyan hue. 7. 6-axis Saturate: Adjust the red, green, blue, yellow, magenta and cyan saturation. 17 Gamma mode allows you to "HDR" automatically. 2. Note: 1. If Color Space is not "HDR", then Modes is set to "Standard". 5. Color temperature: Default...

User Manual
Page 30
...: Display the panel's current refresh rate on detail model. 3. 2. Adaptive-Sync is dependent on the screen for AMD supported graphic cards only. FreeSync: Select On or Off. FreeSync is not supported in PBP mode. 20 the default is Off. • VRB does not support PIP/PBP Mode and HDR Mode. (Selective models) • When VRB is Extreme or Normal, Freesync/Freesync Premium/ Freesync Premium Pro/Adaptive-Sync is automatically turned...
...: Display the panel's current refresh rate on detail model. 3. 2. Adaptive-Sync is dependent on the screen for AMD supported graphic cards only. FreeSync: Select On or Off. FreeSync is not supported in PBP mode. 20 the default is Off. • VRB does not support PIP/PBP Mode and HDR Mode. (Selective models) • When VRB is Extreme or Normal, Freesync/Freesync Premium/ Freesync Premium Pro/Adaptive-Sync is automatically turned...
User Manual
Page 31
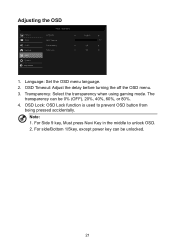
Note: 1. Adjusting the OSD Picture Color Audio Gaming OSD System Mode - Standard Language OSD Timeout Transparency OSD Lock English 10 1. OSD Lock: OSD Lock function is used to unlock OSD. 2. Language: Set the OSD menu language. 2. The transparency can be 0% (OFF), 20%, 40%, 60%, or 80%. 4. For side/Bottom 1/5key, except power key can be unlocked. 21 Transparency: Select the transparency when using gaming mode. For Side 9 key, Must press Navi Key in the middle to prevent OSD button from being...
Note: 1. Adjusting the OSD Picture Color Audio Gaming OSD System Mode - Standard Language OSD Timeout Transparency OSD Lock English 10 1. OSD Lock: OSD Lock function is used to unlock OSD. 2. Language: Set the OSD menu language. 2. The transparency can be 0% (OFF), 20%, 40%, 60%, or 80%. 4. For side/Bottom 1/5key, except power key can be unlocked. 21 Transparency: Select the transparency when using gaming mode. For Side 9 key, Must press Navi Key in the middle to prevent OSD button from being...

User Manual
Page 32
.... Quick Start Mode: Enable monitor rapidly. 10. Power-off USB change Normal Off 1. PIP/PBP: The options for available input sources. 4. You can select which allows monitor controls to be sent via software. 8. Wide Mode: You can also adjust the PIP Position, PBP Size, Sub Source, Source Swap, and Audio Source. 7. Adjusting the System Picture Color Audio Gaming OSD System Mode - Standard Input Ambient Light Auto Source Hot Key Assignment Wide Mode PIP/PBP DDC/CI HDMI2 On Full On Picture Color Audio Mode - Standard HDMI Black Level Quick Start Mode Power-off USB...
.... Quick Start Mode: Enable monitor rapidly. 10. Power-off USB change Normal Off 1. PIP/PBP: The options for available input sources. 4. You can select which allows monitor controls to be sent via software. 8. Wide Mode: You can also adjust the PIP Position, PBP Size, Sub Source, Source Swap, and Audio Source. 7. Adjusting the System Picture Color Audio Gaming OSD System Mode - Standard Input Ambient Light Auto Source Hot Key Assignment Wide Mode PIP/PBP DDC/CI HDMI2 On Full On Picture Color Audio Mode - Standard HDMI Black Level Quick Start Mode Power-off USB...
User Manual
Page 34
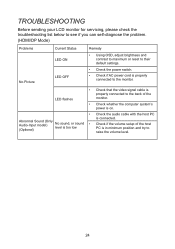
... problem. (HDMI/DP Mode) Problems No Picture Current Status LED ON LED OFF Remedy • Using OSD, adjust brightness and contrast to maximum or reset to their default settings. • Check the power switch. • Check if AC power cord is properly connected to the monitor. • LED flashes • • Abnormal Sound (Only Audio-Input model) (Optional) No sound, or sound level is too low • Check that the video signal cable is properly connected to the back of the host PC is in minimum position...
... problem. (HDMI/DP Mode) Problems No Picture Current Status LED ON LED OFF Remedy • Using OSD, adjust brightness and contrast to maximum or reset to their default settings. • Check the power switch. • Check if AC power cord is properly connected to the monitor. • LED flashes • • Abnormal Sound (Only Audio-Input model) (Optional) No sound, or sound level is too low • Check that the video signal cable is properly connected to the back of the host PC is in minimum position...
User Manual
Page 35
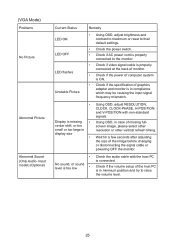
... V-POSITION with the host PC is properly connected to raise the volume level. 25 Input model) (Optional) Current Status LED ON LED OFF LED flashes Unstable Picture Remedy • Using OSD, adjust brightness and contrast to maximum or reset to their default settings. • Check the power switch. • Check if AC power cord is connected. (VGA Mode) Problems No Picture Abnormal Picture Abnormal Sound (Only Audio- Using OSD, in case of graphics adapter and monitor is in compliance which may be causing the input signal frequency mismatch. • Display...
... V-POSITION with the host PC is properly connected to raise the volume level. 25 Input model) (Optional) Current Status LED ON LED OFF LED flashes Unstable Picture Remedy • Using OSD, adjust brightness and contrast to maximum or reset to their default settings. • Check the power switch. • Check if AC power cord is connected. (VGA Mode) Problems No Picture Abnormal Picture Abnormal Sound (Only Audio- Using OSD, in case of graphics adapter and monitor is in compliance which may be causing the input signal frequency mismatch. • Display...

