

User Manual
Page 2
...serial number, model number and purchase information. Record the model number, serial number, purchase date and place of purchase information in new editions of Acer Incorporated. All Rights Reserved. The serial number and model number are registered trademarks of merchantability or fitness for identification purposes only and belong to notify.... Other companies' product names or trademarks are trademarks or registered trademarks of such revisions or changes. "HDMI™, the HDMI logo and High-Definition Multimedia Interface are used herein for a particular purpose.
...serial number, model number and purchase information. Record the model number, serial number, purchase date and place of purchase information in new editions of Acer Incorporated. All Rights Reserved. The serial number and model number are registered trademarks of merchantability or fitness for identification purposes only and belong to notify.... Other companies' product names or trademarks are trademarks or registered trademarks of such revisions or changes. "HDMI™, the HDMI logo and High-Definition Multimedia Interface are used herein for a particular purpose.

User Manual
Page 9
... things first viii Usage Notes viii Precautions viii Introduction 1 Product Features 1 Package Overview 2 Projector Overview 3 Projector Outlook 3 Control Panel 5 Remote Control Layout 6 MHL (Mobile High-Definition Link) Control 8 Getting Started 10 Connecting the Projector 10 Turning the Projector On/Off 12 Turning on the Projector 12 Turning the projector off 13...
... things first viii Usage Notes viii Precautions viii Introduction 1 Product Features 1 Package Overview 2 Projector Overview 3 Projector Outlook 3 Control Panel 5 Remote Control Layout 6 MHL (Mobile High-Definition Link) Control 8 Getting Started 10 Connecting the Projector 10 Turning the Projector On/Off 12 Turning on the Projector 12 Turning the projector off 13...

User Manual
Page 10
Troubleshooting 29 LED & Alarm Definition Listing 33 Cleaning and replacing the dust filters (Option) 34 Replacing the Lamp 35 Ceiling Mount Installation 36 Specifications 39 Compatibility modes 41 Regulations and safety notices 46
Troubleshooting 29 LED & Alarm Definition Listing 33 Cleaning and replacing the dust filters (Option) 34 Replacing the Lamp 35 Ceiling Mount Installation 36 Specifications 39 Compatibility modes 41 Regulations and safety notices 46

User Manual
Page 11
...a single-chip DLP® projector. Outstanding features include: • DLP® technology • P1186/M305/PE-S44/F14S/AS328 series: True 800x600 SVGA resolution P1286/M315/PE-X44/F14X/AX328 series... (480i/p, 576i/p, 720p, 1080i/p) supported • Lower power consumption and economy (ECO) mode extend lamp life • Acer EcoProjeciton Technology delivers Intelligent power management approach and physical efficiency improvement • Equipped with HDMI™ & MHL connection supporting HDCP... • Built-in One 3 Watts speaker Note: Functions vary depending on model definition.
...a single-chip DLP® projector. Outstanding features include: • DLP® technology • P1186/M305/PE-S44/F14S/AS328 series: True 800x600 SVGA resolution P1286/M315/PE-X44/F14X/AX328 series... (480i/p, 576i/p, 720p, 1080i/p) supported • Lower power consumption and economy (ECO) mode extend lamp life • Acer EcoProjeciton Technology delivers Intelligent power management approach and physical efficiency improvement • Equipped with HDMI™ & MHL connection supporting HDCP... • Built-in One 3 Watts speaker Note: Functions vary depending on model definition.
User Manual
Page 14
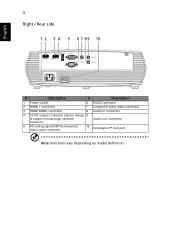
English 4 Right / Rear side 1 2 3 4 5 6 7 8 9 10 # Description # Description 1 Power socket 6 RS232 connector 2 HDMI 1 connector 7 Composite video input connector 3 HDMI 2/MHL connector 8 Audio in connector 4 5V DC output connector (device charge 9 & support mouse page up/down Audio out connector function) 5 PC analog signal/HDTV/component video input connector 10 Kensington™ lock port Note: Functions vary depending on model definition.
English 4 Right / Rear side 1 2 3 4 5 6 7 8 9 10 # Description # Description 1 Power socket 6 RS232 connector 2 HDMI 1 connector 7 Composite video input connector 3 HDMI 2/MHL connector 8 Audio in connector 4 5V DC output connector (device charge 9 & support mouse page up/down Audio out connector function) 5 PC analog signal/HDTV/component video input connector 10 Kensington™ lock port Note: Functions vary depending on model definition.
User Manual
Page 15
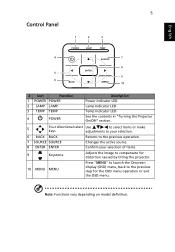
Note: Functions vary depending on model definition. 5 Control Panel 1 2 3 English 4 7 8 5 9 6 10 # Icon Function 1 POWER POWER 2 LAMP LAMP 3 TEMP TEMP 4 POWER Description Power Indicator LED Lamp Indicator LED Temp Indicator LED See the ...
Note: Functions vary depending on model definition. 5 Control Panel 1 2 3 English 4 7 8 5 9 6 10 # Icon Function 1 POWER POWER 2 LAMP LAMP 3 TEMP TEMP 4 POWER Description Power Indicator LED Lamp Indicator LED Temp Indicator LED See the ...

User Manual
Page 17
...the image. 22 ZOOM IN Zooms the projector display in. 23 VIDEO To change source to "WiFi." Note: Functions vary depending on model definition. Press "LAN/WiFi" to change source to activate the laser pointer. Use this button to select the 14 PgUp previous page. For ...available when USB Ctrl connector (mini type B) is connected to a computer via a USB cable. 15 COMPONENT No function. Only 25 LAN/WiFi available while Acer WirelessCAST (MWA3) is connected to a computer via a USB cable. 17 MEDIA No function. 18 KeyPad 0~9 Press "0~9" to input a password in source ...
...the image. 22 ZOOM IN Zooms the projector display in. 23 VIDEO To change source to "WiFi." Note: Functions vary depending on model definition. Press "LAN/WiFi" to change source to activate the laser pointer. Use this button to select the 14 PgUp previous page. For ...available when USB Ctrl connector (mini type B) is connected to a computer via a USB cable. 15 COMPONENT No function. Only 25 LAN/WiFi available while Acer WirelessCAST (MWA3) is connected to a computer via a USB cable. 17 MEDIA No function. 18 KeyPad 0~9 Press "0~9" to input a password in source ...
User Manual
Page 18
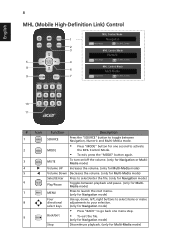
English 8 MHL (Mobile High-Definition Link) Control MHL Control Mode 1 Navigation Next Mode Exit MHL Control 2 3 MHL Control Mode Numeric Next Mode Exit MHL Control 5 4 8 MHL Control Mode 6 Multi-Media 9 7 ...
English 8 MHL (Mobile High-Definition Link) Control MHL Control Mode 1 Navigation Next Mode Exit MHL Control 2 3 MHL Control Mode Numeric Next Mode Exit MHL Control 5 4 8 MHL Control Mode 6 Multi-Media 9 7 ...

User Manual
Page 19
English 9 # Icon Function Description 10 PgUp/PgDn Use the button to select the next or previous page. (only for Navigation mode) 11 KeyPad 0~9 Number buttons. (only for Numeric mode) Note: Functions vary depending on model definition.
English 9 # Icon Function Description 10 PgUp/PgDn Use the button to select the next or previous page. (only for Navigation mode) 11 KeyPad 0~9 Number buttons. (only for Numeric mode) Note: Functions vary depending on model definition.

User Manual
Page 21
Note 5: USB DC 5V out connector support 5V/1.0A power output for power bank charging only when MHL source is compatible with your computer, please make sure the timing of the display mode is not detected. English 11 Note 1: To ensure the projector works well with the projector. Note 4: Some smartphones require a converter (supplied by smartphone maker) to enable the MHL function. Note 3: USB cable needs powered extender if the length is over 5 m. Note 2: Functions vary depending on model definition.
Note 5: USB DC 5V out connector support 5V/1.0A power output for power bank charging only when MHL source is compatible with your computer, please make sure the timing of the display mode is not detected. English 11 Note 1: To ensure the projector works well with the projector. Note 4: Some smartphones require a converter (supplied by smartphone maker) to enable the MHL function. Note 3: USB cable needs powered extender if the length is over 5 m. Note 2: Functions vary depending on model definition.

User Manual
Page 23
..., contact your local reseller or service center. Attention! This message appears: "Please press the power button again to turn the projector immediately back on model definition. Press the power button again. 2 The LED power indicator will turn RED and blink rapidly after the projector is now safe to ensure continued optimal...
..., contact your local reseller or service center. Attention! This message appears: "Please press the power button again to turn the projector immediately back on model definition. Press the power button again. 2 The LED power indicator will turn RED and blink rapidly after the projector is now safe to ensure continued optimal...

User Manual
Page 29
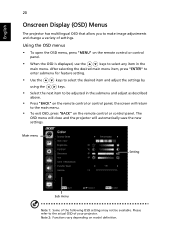
Note: Functions vary depending on the screen. Use the OSD only when the message "No signal input" is displayed on model definition. The menu options include settings and adjustments for screen size and distance, focus, keystone correction and more . 1 Turn on the projector by pressing "Power" button ... up and down arrow keys to select an option, the left and right arrow keys to adjust selected option settings, and the "ENTER" to the Acer welcome screen. The new settings will be saved automatically upon exiting the menu. 5 Push the "MENU" or "BACK" button anytime to exit the menu and...
Note: Functions vary depending on the screen. Use the OSD only when the message "No signal input" is displayed on model definition. The menu options include settings and adjustments for screen size and distance, focus, keystone correction and more . 1 Turn on the projector by pressing "Power" button ... up and down arrow keys to select an option, the left and right arrow keys to adjust selected option settings, and the "ENTER" to the Acer welcome screen. The new settings will be saved automatically upon exiting the menu. 5 Push the "MENU" or "BACK" button anytime to exit the menu and...
User Manual
Page 30
... the new settings. The OSD menu will close and the projector will return to the main menu. • To exit OSD, press "BACK" on model definition. Main menu Setting Sub menu Note 1: Some of the following OSD settings may not be adjusted in the main menu. After selecting the desired main...
... the new settings. The OSD menu will close and the projector will return to the main menu. • To exit OSD, press "BACK" on model definition. Main menu Setting Sub menu Note 1: Some of the following OSD settings may not be adjusted in the main menu. After selecting the desired main...

User Manual
Page 31
...: For playing video in a bright environment. • User: Memorize user's settings. With greater gamma value, dark scenery looks brighter. Note 2: Functions vary depending on model definition. There are not supported under computer or HDMI mode. R Gain Adjusts the red gain for color temperature optimization. It will compensate the color deviation due...
...: For playing video in a bright environment. • User: Memorize user's settings. With greater gamma value, dark scenery looks brighter. Note 2: Functions vary depending on model definition. There are not supported under computer or HDMI mode. R Gain Adjusts the red gain for color temperature optimization. It will compensate the color deviation due...

User Manual
Page 33
... on screen. • Auto: Automatically adjust by information from player. • Underscan: Always no overscan on HDMI image. • Overscan: Always keep overscan on model definition.
... on screen. • Auto: Automatically adjust by information from player. • Underscan: Always no overscan on HDMI image. • Overscan: Always keep overscan on model definition.

User Manual
Page 35
... enter the password every time when the projector is . • If losing this security card and number, please contact with an Acer service center. Note: Functions vary depending on model definition. This unique password is the number which will prompt the user to enter the password every time the power cord is...
... enter the password every time when the projector is . • If losing this security card and number, please contact with an Acer service center. Note: Functions vary depending on model definition. This unique password is the number which will prompt the user to enter the password every time the power cord is...

User Manual
Page 36
..." to turn on High Altitude mode. The projector will lower power consumption, extend the lamp life and reduce noise. Select "Manual" to power on model definition. Activate this function to display a reminder to allow for proper high altitude cooling of -life. Note: Functions vary depending on projector while AC power plug...
..." to turn on High Altitude mode. The projector will lower power consumption, extend the lamp life and reduce noise. Select "Manual" to power on model definition. Activate this function to display a reminder to allow for proper high altitude cooling of -life. Note: Functions vary depending on projector while AC power plug...

User Manual
Page 37
English 27 Audio Volume Mute • Press to decrease the volume. • Press to increase the volume. • Choose "On" to mute the volume. • Choose "Off" to restore the volume. Note: Functions vary depending on model definition.
English 27 Audio Volume Mute • Press to decrease the volume. • Press to increase the volume. • Choose "On" to mute the volume. • Choose "Off" to restore the volume. Note: Functions vary depending on model definition.
User Manual
Page 43
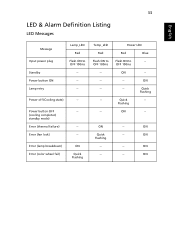
... completed; Error (fan lock) -- ON Quick Flashing --- ON -- ON -- ON -- standby mode) Error (thermal failure) -- OFF 100ms ON -- -- ON Flashing ON -- -- ON -- 33 LED & Alarm Definition Listing LED Messages English Message Input power plug Standby Power button ON Lamp retry Lamp_LED Red Flash ON to -- Quick Flashing Quick -- Power LED Red...
... completed; Error (fan lock) -- ON Quick Flashing --- ON -- ON -- ON -- standby mode) Error (thermal failure) -- OFF 100ms ON -- -- ON Flashing ON -- -- ON -- 33 LED & Alarm Definition Listing LED Messages English Message Input power plug Standby Power button ON Lamp retry Lamp_LED Red Flash ON to -- Quick Flashing Quick -- Power LED Red...
User Manual
Page 55
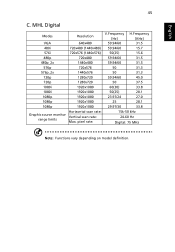
....1 23.97/24 27.0 25 28.1 29.97/30 33.8 15k-50 kHz 24-60 Hz Digital: 75 MHz Note: Functions vary depending on model definition. MHL Digital Modes VGA 480i 576i 480p 480p_2x 576p 576p_2x 720p 720p 1080i 1080i 1080p 1080p 1080p Graphic source monitor range limits Resolution 640x480 720x480...
....1 23.97/24 27.0 25 28.1 29.97/30 33.8 15k-50 kHz 24-60 Hz Digital: 75 MHz Note: Functions vary depending on model definition. MHL Digital Modes VGA 480i 576i 480p 480p_2x 576p 576p_2x 720p 720p 1080i 1080i 1080p 1080p 1080p Graphic source monitor range limits Resolution 640x480 720x480...