User Manual
Page 3
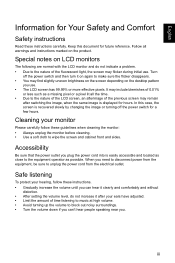
... the monitor before cleaning. • Use a soft cloth to unplug the power cord from the electrical outlet. Turn off the power switch for future reference. It may find slightly uneven brightness on the screen depending on the product. In this document for a few hours. Safe listening To protect your hearing, follow these instructions carefully. English Information for hours. Cleaning your ears have adjusted. •...
... the monitor before cleaning. • Use a soft cloth to unplug the power cord from the electrical outlet. Turn off the power switch for future reference. It may find slightly uneven brightness on the screen depending on the product. In this document for a few hours. Safe listening To protect your hearing, follow these instructions carefully. English Information for hours. Cleaning your ears have adjusted. •...
User Manual
Page 4
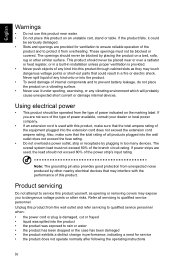
... may touch dangerous voltage points or short-out parts that the total rating of power available, consult your dealer or local power company. • If an extension cord is used , the load should be blocked or covered. The openings should never...need for ventilation to ensure reliable operation of the equipment plugged into the wall outlet does not exceed the fuse rating. • Do not overload a power outlet, strip or receptacle by plugging in a fire or electric shock. These openings must not exceed 80% of the power strip's input rating. English Warnings • Do not use...
... may touch dangerous voltage points or short-out parts that the total rating of power available, consult your dealer or local power company. • If an extension cord is used , the load should be blocked or covered. The openings should never...need for ventilation to ensure reliable operation of the equipment plugged into the wall outlet does not exceed the fuse rating. • Do not overload a power outlet, strip or receptacle by plugging in a fire or electric shock. These openings must not exceed 80% of the power strip's input rating. English Warnings • Do not use...

User Manual
Page 5
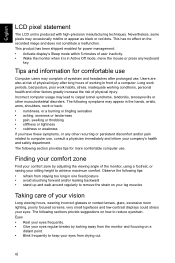
...the best working procedures to this electronic device into the trash when discarding. We at service stations. Disposal instructions Do not throw this website: https://www.acer-group.com/sustainability/en/our-products-environment.html Visit www.acer-group.com for video and visual display of...controls may contain small parts. They include below deck on the use of small children. To minimize pollution and ensure utmost protection of our products. For more information and help when recycling, please go to reduce the environmental impact of the global environment, please recycle. Switch...
...the best working procedures to this electronic device into the trash when discarding. We at service stations. Disposal instructions Do not throw this website: https://www.acer-group.com/sustainability/en/our-products-environment.html Visit www.acer-group.com for video and visual display of...controls may contain small parts. They include below deck on the use of small children. To minimize pollution and ensure utmost protection of our products. For more information and help when recycling, please go to reduce the environmental impact of the global environment, please recycle. Switch...
User Manual
Page 6
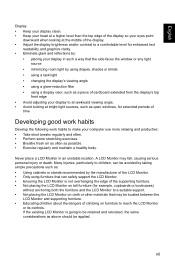
... room lighting, poorly focused screens, very small typefaces and low-contrast displays could stress your eyes. Incorrect computer usage may complain of eyestrain and headaches after long hours of a computer. Eyes • Rest your eyes frequently. • Give your eyes regular breaks by adjusting the viewing angle of the monitor, using a footrest, or raising your sitting height to remove the...
... room lighting, poorly focused screens, very small typefaces and low-contrast displays could stress your eyes. Incorrect computer usage may complain of eyestrain and headaches after long hours of a computer. Eyes • Rest your eyes frequently. • Give your eyes regular breaks by adjusting the viewing angle of the monitor, using a footrest, or raising your sitting height to remove the...
User Manual
Page 7
... following work habits to make your display to an awkward viewing angle. • Avoid looking at bright light sources, such as open windows, for example, cupboards or bookcases) without anchoring both the furniture and the LCD Monitor to reach the LCD Monitor or its controls. A LCD Monitor may be applied. Never place a LCD Monitor in such a way that the side faces the window or any light source • minimizing room light by...
... following work habits to make your display to an awkward viewing angle. • Avoid looking at bright light sources, such as open windows, for example, cupboards or bookcases) without anchoring both the furniture and the LCD Monitor to reach the LCD Monitor or its controls. A LCD Monitor may be applied. Never place a LCD Monitor in such a way that the side faces the window or any light source • minimizing room light by...

User Manual
Page 12
... v Disposal instructions v LCD pixel statement vi Tips and information for comfortable use vi Finding your comfort zone vi Taking care of your vision vi Developing good work habits vii PACKAGE CONTENTS 1 Attaching the monitor to the base 2 Attaching the monitor on the wall 3 SCREEN POSITION ADJUSTMENT 4 CONNECTING THE POWER CORD 5 Connecting the adapter and AC Power cord 5 POWER SAVING 5 Display Data Channel (DDC) 6 20-Pin Color Display Signal Cable 6 19-Pin Color Display Signal Cable 7 STANDARD TIMING TABLE 8 Connecting Your Monitor to...
... v Disposal instructions v LCD pixel statement vi Tips and information for comfortable use vi Finding your comfort zone vi Taking care of your vision vi Developing good work habits vii PACKAGE CONTENTS 1 Attaching the monitor to the base 2 Attaching the monitor on the wall 3 SCREEN POSITION ADJUSTMENT 4 CONNECTING THE POWER CORD 5 Connecting the adapter and AC Power cord 5 POWER SAVING 5 Display Data Channel (DDC) 6 20-Pin Color Display Signal Cable 6 19-Pin Color Display Signal Cable 7 STANDARD TIMING TABLE 8 Connecting Your Monitor to...
User Manual
Page 16
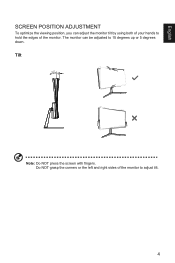
The monitor can adjust the monitor tilt by using both of your hands to hold the edges of the monitor to 15 degrees up or 5 degrees down. Do NOT grasp the corners or the left and right sides of the monitor. Note: Do NOT press the screen with fingers. Tilt 15!!!- ! English SCREEN POSITION ADJUSTMENT To optimize the viewing position, you can be adjusted to adjust tilt. 4
The monitor can adjust the monitor tilt by using both of your hands to hold the edges of the monitor to 15 degrees up or 5 degrees down. Do NOT grasp the corners or the left and right sides of the monitor. Note: Do NOT press the screen with fingers. Tilt 15!!!- ! English SCREEN POSITION ADJUSTMENT To optimize the viewing position, you can be adjusted to adjust tilt. 4
User Manual
Page 17
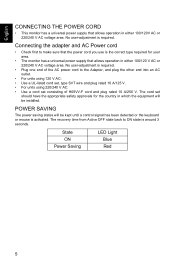
... which the equipment will be installed. POWER SAVING The power saving states will be kept until a control signal has been detected or the keyboard or mouse is the correct type required for the country in either 100/120 V AC or 220/240 V AC voltage area. State ON Power Saving LED Light Blue Red 5 English CONNECTING THE POWER CORD • This monitor has a universal power supply that allows operation in either...
... which the equipment will be installed. POWER SAVING The power saving states will be kept until a control signal has been detected or the keyboard or mouse is the correct type required for the country in either 100/120 V AC or 220/240 V AC voltage area. State ON Power Saving LED Light Blue Red 5 English CONNECTING THE POWER CORD • This monitor has a universal power supply that allows operation in either...
User Manual
Page 18
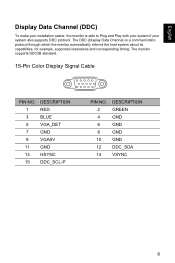
...-Pin Color Display Signal Cable PIN NO. 1 3 5 7 9 11 13 15 DESCRIPTION RED BLUE VGA_DET GND VGA5V GND HSYNC DDC_SCL-P PIN NO. 2 4 6 8 10 12 14 DESCRIPTION GREEN GND GND GND GND DDC_SDA VSYNC 6 English Display Data Channel (DDC) To make your system also supports DDC protocol. The DDC (Display Data Channel) is able to Plug and Play with your system if your installation easier, the monitor...
...-Pin Color Display Signal Cable PIN NO. 1 3 5 7 9 11 13 15 DESCRIPTION RED BLUE VGA_DET GND VGA5V GND HSYNC DDC_SCL-P PIN NO. 2 4 6 8 10 12 14 DESCRIPTION GREEN GND GND GND GND DDC_SDA VSYNC 6 English Display Data Channel (DDC) To make your system also supports DDC protocol. The DDC (Display Data Channel) is able to Plug and Play with your system if your installation easier, the monitor...
User Manual
Page 21
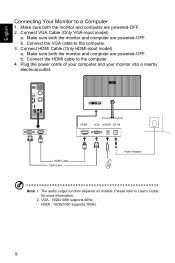
Connect VGA Cable (Only VGA-input model) a. Connect the VGA cable to the computer. 4. Connect HDMI Cable (Only HDMI-input model) a. Plug the power cords of your computer and your monitor into a nearby electrical outlet. b. b. HDMI : 1920x1080 supports 100Hz. 9 Make sure both the monitor and computer are powered-OFF. Make sure both the monitor and computer are powered-OFF. 2. Make sure both the monitor and computer are powered-OFF. HDMI VGA AUDIO DC HDMI VGA AUDIO DC IN HDMI HDMI HDMI Cable VGA Cable Power Adaptor Note: 1. The audio output function depends...
Connect VGA Cable (Only VGA-input model) a. Connect the VGA cable to the computer. 4. Connect HDMI Cable (Only HDMI-input model) a. Plug the power cords of your computer and your monitor into a nearby electrical outlet. b. b. HDMI : 1920x1080 supports 100Hz. 9 Make sure both the monitor and computer are powered-OFF. Make sure both the monitor and computer are powered-OFF. 2. Make sure both the monitor and computer are powered-OFF. HDMI VGA AUDIO DC HDMI VGA AUDIO DC IN HDMI HDMI HDMI Cable VGA Cable Power Adaptor Note: 1. The audio output function depends...
User Manual
Page 22
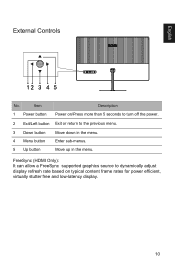
English External Controls HDMI VGA AUDIO DC No. Item 1 Power button Description Power on/Press more than 5 seconds to turn off the power. 2 Exit/Left button Exit or return to dynamically adjust display refresh rate based on typical content frame rates for power efficient, virtually stutter free and low-latency display. 10 Move up in the menu. FreeSync (HDMI Only): It can allow a FreeSync supported graphics source to the previous menu. 3 Down button 4 Menu button 5 Up button Move down in the menu. Enter sub-menus.
English External Controls HDMI VGA AUDIO DC No. Item 1 Power button Description Power on/Press more than 5 seconds to turn off the power. 2 Exit/Left button Exit or return to dynamically adjust display refresh rate based on typical content frame rates for power efficient, virtually stutter free and low-latency display. 10 Move up in the menu. FreeSync (HDMI Only): It can allow a FreeSync supported graphics source to the previous menu. 3 Down button 4 Menu button 5 Up button Move down in the menu. Enter sub-menus.
User Manual
Page 23
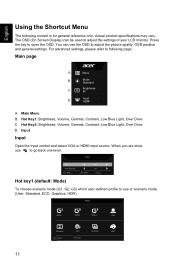
... Menu B. The OSD (On Screen Display) can use the OSD to adjust the picture quality, OSD position and general settings. Hot Key1: Brightness, Volume, Gamma, Contrast, Low Blue Light, Over Drive C. HDMI Exit Hot key1 (default: Mode) To choose scenario mode (G1, G2, G3) which user-defined profile to use to adjust the settings of your LCD monitor. Actual product specifications may vary. Press the key to following content is for general reference only. You can be used...
... Menu B. The OSD (On Screen Display) can use the OSD to adjust the picture quality, OSD position and general settings. Hot Key1: Brightness, Volume, Gamma, Contrast, Low Blue Light, Over Drive C. HDMI Exit Hot key1 (default: Mode) To choose scenario mode (G1, G2, G3) which user-defined profile to use to adjust the settings of your LCD monitor. Actual product specifications may vary. Press the key to following content is for general reference only. You can be used...
User Manual
Page 25
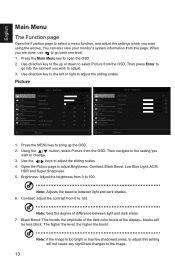
... adjust Brightness, Contrast, Black Boost, Low Blue Light, ACM, HDR and Super Sharpness. 5. blacks will not cause any significant changes to adjust. 3. Standard Picture Brightness 75 Picture Auto Config Color Contrast 50 Color H.Position 50 Audio Black Boost 5 Audio V.Position 50 Gaming Low Blue Light Off Gaming Focus 50 ACM Off Clock 50 OSD OSD System HDR Super Sharpness Off Information Max Brightness Off System Information Move Enter Move Enter 1. English Ř Ř Main Menu The Function page Open...
... adjust Brightness, Contrast, Black Boost, Low Blue Light, ACM, HDR and Super Sharpness. 5. blacks will not cause any significant changes to adjust. 3. Standard Picture Brightness 75 Picture Auto Config Color Contrast 50 Color H.Position 50 Audio Black Boost 5 Audio V.Position 50 Gaming Low Blue Light Off Gaming Focus 50 ACM Off Clock 50 OSD OSD System HDR Super Sharpness Off Information Max Brightness Off System Information Move Enter Move Enter 1. English Ř Ř Main Menu The Function page Open...
User Manual
Page 26
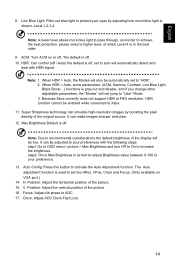
... connected to achieve the best protection, please select a higher level, of the picture. 16. HDR: Can control (off / Auto) the default is off . 10. Max Brightness:Default is off . Focus: Adjust clk phase to activate the Auto Adjustment function. English 8. Super Sharpness technology can make images sharper and clear. 12. H. step2: Once Max Brightness is shown--Level 1,2,3,4. Position: Adjust the horizontal position of the orignal source. Low Blue Light: Filter out blue light to "User" Mode...
... connected to achieve the best protection, please select a higher level, of the picture. 16. HDR: Can control (off / Auto) the default is off . 10. Max Brightness:Default is off . Focus: Adjust clk phase to activate the Auto Adjustment function. English 8. Super Sharpness technology can make images sharper and clear. 12. H. step2: Once Max Brightness is shown--Level 1,2,3,4. Position: Adjust the horizontal position of the orignal source. Low Blue Light: Filter out blue light to "User" Mode...
User Manual
Page 27
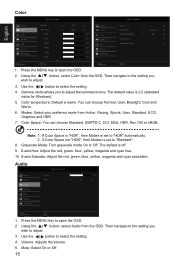
... Off. 15 Note: 1. Grayscale Mode: Turn grayscale mode On or Off. The default is warm. Using the !Ř 0 Ř button, select Audio from the OSD. Volume: Adjusts the volume. 5. Using the !Ř 0 Ř button, select Color from the OSD. The default value is set to open the OSD. 2. Modes: Select your preferred mode from Action, Racing, Sports, User, Standard, ECO, Graphics and HDR. 7. Audio Mode - Color Color English Adjust OK Adjust OK 1. Press the MENU key to "HDR" automatically. 2. Then...
... Off. 15 Note: 1. Grayscale Mode: Turn grayscale mode On or Off. The default is warm. Using the !Ř 0 Ř button, select Audio from the OSD. Volume: Adjusts the volume. 5. Using the !Ř 0 Ř button, select Color from the OSD. The default value is set to open the OSD. 2. Modes: Select your preferred mode from Action, Racing, Sports, User, Standard, ECO, Graphics and HDR. 7. Audio Mode - Color Color English Adjust OK Adjust OK 1. Press the MENU key to "HDR" automatically. 2. Then...
User Manual
Page 28
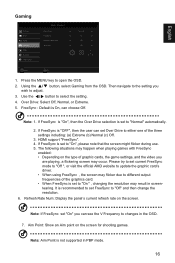
.... 3. HDMI support "FreeSync". 4. The following situations may happen when playing games with FreeSync enabled: • Depending on the screen. Refresh Rate Num: Display the panel's current refresh rate on the type of the graphics card. • When FreeSync is set FreeSync to "On " , changing the resolution may occur. English Gaming Picture Color Audio Gaming OSD System Information Mode - Use the / button to open the OSD. 2. Press the MENU key to select the setting. 4. FreeSync : Default is set...
.... 3. HDMI support "FreeSync". 4. The following situations may happen when playing games with FreeSync enabled: • Depending on the screen. Refresh Rate Num: Display the panel's current refresh rate on the type of the graphics card. • When FreeSync is set FreeSync to "On " , changing the resolution may occur. English Gaming Picture Color Audio Gaming OSD System Information Mode - Use the / button to open the OSD. 2. Press the MENU key to select the setting. 4. FreeSync : Default is set...
User Manual
Page 29
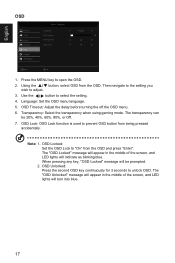
... transparency when using gaming mode. OSD Unlocked: Press the second OSD key continuously for 3 seconds to adjust. 3. Use the / button to open the OSD. 2. Press the MENU key to select the setting. 4. OSD Locked: Set the OSD Lock to prevent OSD button from the OSD. The "OSD Locked" message will appear in the middle of the screen, and LED lights will indicate as blinking blue. Standard Language OSD Timeout Transparency OSD Lock English 10 Off Off Adjust OK 1. English Ř Ř OSD Picture Color Audio Gaming OSD System Information...
... transparency when using gaming mode. OSD Unlocked: Press the second OSD key continuously for 3 seconds to adjust. 3. Use the / button to open the OSD. 2. Press the MENU key to select the setting. 4. OSD Locked: Set the OSD Lock to prevent OSD button from the OSD. The "OSD Locked" message will appear in the middle of the screen, and LED lights will indicate as blinking blue. Standard Language OSD Timeout Transparency OSD Lock English 10 Off Off Adjust OK 1. English Ř Ř OSD Picture Color Audio Gaming OSD System Information...
User Manual
Page 30
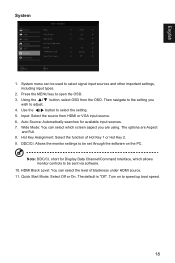
... be used to adjust. 4. English System HDMI Adjust HDMI Black Level Quick Start Mode OK Normal Off Ř Ř 1. HDMI Black Level: You can be sent via software. 10. Turn on the PC. Wide Mode: You can select which allows monitor controls to speed up boot speed. 18 The options are using. Hot Key Assignment: Select the function of blackness under HDMI source. 11. Use the / button to open the OSD. 3. The default is "Off". System menu can...
... be used to adjust. 4. English System HDMI Adjust HDMI Black Level Quick Start Mode OK Normal Off Ř Ř 1. HDMI Black Level: You can be sent via software. 10. Turn on the PC. Wide Mode: You can select which allows monitor controls to speed up boot speed. 18 The options are using. Hot Key Assignment: Select the function of blackness under HDMI source. 11. Use the / button to open the OSD. 3. The default is "Off". System menu can...

User Manual
Page 31
Press the MENU key to open the OSD. 2. Save Setting to the factory defaults. Save your monitor and current input. 3. Reset All Settings: Reset all settings to Game mode: There are three user-defined profiles available (Action, Racing and Sports). Save Setting to...(User mode only) Picture Color Gaming OSD System Information Save Settings to ..." User Game Mode: Action Game Mode: Racing Game Mode: Sports Adjust OK 1. Press the MENU key to implement those settings automatically when you select it afterwards. 19 Using the...
Press the MENU key to open the OSD. 2. Save Setting to the factory defaults. Save your monitor and current input. 3. Reset All Settings: Reset all settings to Game mode: There are three user-defined profiles available (Action, Racing and Sports). Save Setting to...(User mode only) Picture Color Gaming OSD System Information Save Settings to ..." User Game Mode: Action Game Mode: Racing Game Mode: Sports Adjust OK 1. Press the MENU key to implement those settings automatically when you select it afterwards. 19 Using the...
User Manual
Page 32
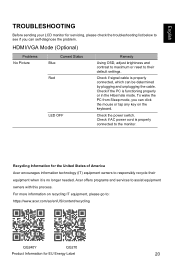
... default settings. Check if signal cable is no longer needed. Acer offers programs and services to see if you can be determined by plugging and unplugging the cable. Recycling Information for the United States of America Acer encourages information technology (IT) equipment owners to the monitor. Check the power switch. Check if AC power cord is functioning properly or in the Hibernate mode. HDMI/VGA Mode (Optional) Problems No Picture Current Status Blue Red LED OFF Remedy Using OSD, adjust brightness and contrast...
... default settings. Check if signal cable is no longer needed. Acer offers programs and services to see if you can be determined by plugging and unplugging the cable. Recycling Information for the United States of America Acer encourages information technology (IT) equipment owners to the monitor. Check the power switch. Check if AC power cord is functioning properly or in the Hibernate mode. HDMI/VGA Mode (Optional) Problems No Picture Current Status Blue Red LED OFF Remedy Using OSD, adjust brightness and contrast...

