TravelMate C110 Service Guide
Page 7
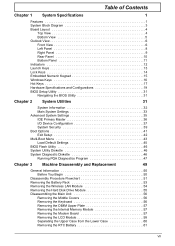
... Removing the Wireless LAN Module 54 Removing the Hard Disk Drive Module 55 Disassembling the Main Unit 56 Removing the Middle Covers 56 Removing the Keyboard 56 Removing the DIMM Upper Plate 57 Removing the Internal Memory Module 57 Removing the Modem Board 57 Removing the LCD Module 58 Separating the...
... Removing the Wireless LAN Module 54 Removing the Hard Disk Drive Module 55 Disassembling the Main Unit 56 Removing the Middle Covers 56 Removing the Keyboard 56 Removing the DIMM Upper Plate 57 Removing the Internal Memory Module 57 Removing the Modem Board 57 Removing the LCD Module 58 Separating the...
TravelMate C110 Service Guide
Page 8
... Board 69 Bluetooth Antenna Disassembling SOP 69 Chapter 4 Troubleshooting 71 System Check Procedures 72 External Diskette Drive Check 72 External CD-ROM Drive Check 72 Keyboard or Auxiliary Input Device Check 73 Memory Check 73 Power System Check 73 Touchpad Check 75 Power-On Self-Test (POST) Error Message 76 Index...
... Board 69 Bluetooth Antenna Disassembling SOP 69 Chapter 4 Troubleshooting 71 System Check Procedures 72 External Diskette Drive Check 72 External CD-ROM Drive Check 72 Keyboard or Auxiliary Input Device Check 73 Memory Check 73 Power System Check 73 Touchpad Check 75 Power-On Self-Test (POST) Error Message 76 Index...
TravelMate C110 Service Guide
Page 10
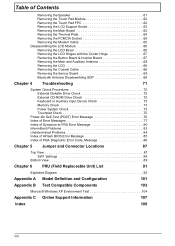
Expansion T T T One type II CardBus PC Card slot Upgradeable memory DockMate V Keyboard and Pointing Device T 84-/85-/88-key international language keyboards T Ergonomically-centered touchpad pointing device with scroll function I/O Ports T T T T T T T T T T T One type II CardBus PC Card slot Acer 100 pins standard docking connector One RJ-45 jack for 10/100BaseT LAN One RJ-11 data/fax modem jack One DC-in jack (AC adapter) One external monitor port One audio line-in/microphone-in jack One line-out/headphone-out jack One FIR port Two USB ports One IEEE 1394 port 2 TravelMate C110
Expansion T T T One type II CardBus PC Card slot Upgradeable memory DockMate V Keyboard and Pointing Device T 84-/85-/88-key international language keyboards T Ergonomically-centered touchpad pointing device with scroll function I/O Ports T T T T T T T T T T T One type II CardBus PC Card slot Acer 100 pins standard docking connector One RJ-45 jack for 10/100BaseT LAN One RJ-11 data/fax modem jack One DC-in jack (AC adapter) One external monitor port One audio line-in/microphone-in jack One line-out/headphone-out jack One FIR port Two USB ports One IEEE 1394 port 2 TravelMate C110
TravelMate C110 Service Guide
Page 12
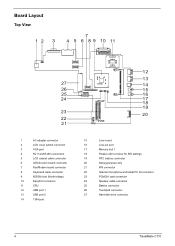
... 1 AC adapter connector 2 LCD cover switch connector 3 VGA port 4 RJ11 and RJ45 connectors 5 LCD coaxial cable connector 6 LED/Inverter board connector 7 Fax/Modem board connector 8 Keyboard cable connector 9 855GM chip (North bridge) 10 EasyPort connector 11 CPU 12 USB port 1 13 USB port 2 14 1394 port 12 13 14 15 16... microphone and tablet PC lid connector 23 PCMCIA card connector 24 Speaker cable connector 25 Battery connector 26 Touchpad connector 27 Hard disk drive connector 4 TravelMate C110
... 1 AC adapter connector 2 LCD cover switch connector 3 VGA port 4 RJ11 and RJ45 connectors 5 LCD coaxial cable connector 6 LED/Inverter board connector 7 Fax/Modem board connector 8 Keyboard cable connector 9 855GM chip (North bridge) 10 EasyPort connector 11 CPU 12 USB port 1 13 USB port 2 14 1394 port 12 13 14 15 16... microphone and tablet PC lid connector 23 PCMCIA card connector 24 Speaker cable connector 25 Battery connector 26 Touchpad connector 27 Hard disk drive connector 4 TravelMate C110
TravelMate C110 Service Guide
Page 14
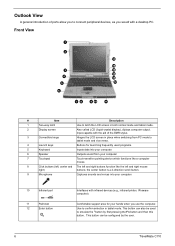
... devices, as you use the computer. Comfortable support area for launching frequently used to emulate the ^button by the user. 6 TravelMate C110 This button can also be configured by first pressing the Fn button and then this button. the center button is a 4-direction ...output. Front View # Item Description 1 Two-way latch Use to confirm selection in tablet mode. This button can be used programs. 5 Keyboard Inputs data into your computer. 7 Touchpad Touch-sensitive pointing device which functions like a computer mouse. 8 Click buttons (left, center and...
... devices, as you use the computer. Comfortable support area for launching frequently used to emulate the ^button by the user. 6 TravelMate C110 This button can also be configured by first pressing the Fn button and then this button. the center button is a 4-direction ...output. Front View # Item Description 1 Two-way latch Use to confirm selection in tablet mode. This button can be used programs. 5 Keyboard Inputs data into your computer. 7 Touchpad Touch-sensitive pointing device which functions like a computer mouse. 8 Click buttons (left, center and...
TravelMate C110 Service Guide
Page 21
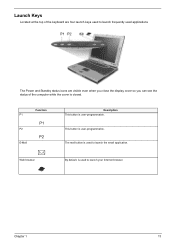
Launch Keys Located at the top of the keyboard are visible even when you close the display cover so you can see the status of the computer while the cover is user-programmable. Web browser By default, is used applications The Power and Standby status icons are four launch keys used to launch frequently used to launch the email application. The mail button is user-programmable. Function P1 P2 E-Mail Description This button is used to launch your Internet browser. This button is closed. Chapter 1 13
Launch Keys Located at the top of the keyboard are visible even when you close the display cover so you can see the status of the computer while the cover is user-programmable. Web browser By default, is used applications The Power and Standby status icons are four launch keys used to launch frequently used to launch the email application. The mail button is user-programmable. Function P1 P2 E-Mail Description This button is used to launch your Internet browser. This button is closed. Chapter 1 13
TravelMate C110 Service Guide
Page 22
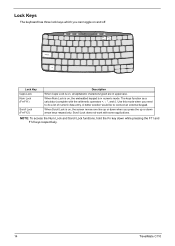
... , the screen moves one line up or down while pressing the F11 and F12 keys respectively. 14 TravelMate C110 When Scroll Lock is on , all alphabetic characters typed are in numeric mode. Lock Keys The keyboard has three lock keys which you can toggle on , the embedded keypad is in uppercase. When Num...
... , the screen moves one line up or down while pressing the F11 and F12 keys respectively. 14 TravelMate C110 When Scroll Lock is on , all alphabetic characters typed are in numeric mode. Lock Keys The keyboard has three lock keys which you can toggle on , the embedded keypad is in uppercase. When Num...
TravelMate C110 Service Guide
Page 23
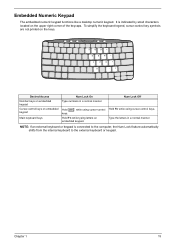
...manner. Chapter 1 15 Num Lock Off Hold Fn while using cursor-control keys. NOTE: If an external keyboard or keypad is indicated by small characters located on embedded keypad Main keyboard keys Num Lock On Type numbers in a normal manner. Hold j while using cursor-control keys. It... is connected to the computer, the Num Lock feature automatically shifts from the internal keyboard to the external keyboard or keypad. Embedded Numeric Keypad...
...manner. Chapter 1 15 Num Lock Off Hold Fn while using cursor-control keys. NOTE: If an external keyboard or keypad is indicated by small characters located on embedded keypad Main keyboard keys Num Lock On Type numbers in a normal manner. Hold j while using cursor-control keys. It... is connected to the computer, the Num Lock feature automatically shifts from the internal keyboard to the external keyboard or keypad. Embedded Numeric Keypad...

TravelMate C110 Service Guide
Page 24
Key Windows logo key Application key Description Start button. Below are a few examples: + Tab (Activates next taskbar button) + E (Explores My Computer) + F (Finds Document) + M (Minimizes All) j+ + M (Undoes Minimize All) + R (Displays the Run...dialog box) Opens a context menu (same as a right-click). 16 TravelMate C110 Combinations with this key perform shortcut functions. Windows Keys The keyboard has two keys that perform Windows-specific functions.
Key Windows logo key Application key Description Start button. Below are a few examples: + Tab (Activates next taskbar button) + E (Explores My Computer) + F (Finds Document) + M (Minimizes All) j+ + M (Undoes Minimize All) + R (Displays the Run...dialog box) Opens a context menu (same as a right-click). 16 TravelMate C110 Combinations with this key perform shortcut functions. Windows Keys The keyboard has two keys that perform Windows-specific functions.
TravelMate C110 Service Guide
Page 31
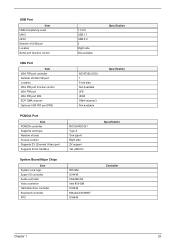
... (Zoomed Video) port Supports 32 bit CardBus System Board Major Chips Item System core logic Super I/O controller Audio controller Video controller Hard disk drive controller Keyboard controller RTC 1.1/2.0 USB 1.1 USB 2.0 2 Right side Not available Specification NS 87392 (SIO) 1 Front side Not Available 2F8 IRQ3 DMA channel 3 Not available Specification RICOH R5C551...
... (Zoomed Video) port Supports 32 bit CardBus System Board Major Chips Item System core logic Super I/O controller Audio controller Video controller Hard disk drive controller Keyboard controller RTC 1.1/2.0 USB 1.1 USB 2.0 2 Right side Not available Specification NS 87392 (SIO) 1 Front side Not Available 2F8 IRQ3 DMA channel 3 Not available Specification RICOH R5C551...
TravelMate C110 Service Guide
Page 32
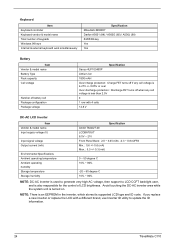
...utility to update the ID information. 24 TravelMate C110 Avoid touching the DC-AC inverter area while the system unit is an EEPROM in the inverter, which stores its supported LCD type and ID code. Keyboard Item Keyboard controller Keyboard vendor & model name Total number of ...keypads Windows 98 keys Internal & external keyboard work simultaneously Specification Mitsubishi M38857 Darfon A5001 (84) / A500G (85) / A500J (88...
...utility to update the ID information. 24 TravelMate C110 Avoid touching the DC-AC inverter area while the system unit is an EEPROM in the inverter, which stores its supported LCD type and ID code. Keyboard Item Keyboard controller Keyboard vendor & model name Total number of ...keypads Windows 98 keys Internal & external keyboard work simultaneously Specification Mitsubishi M38857 Darfon A5001 (84) / A500G (85) / A500J (88...
TravelMate C110 Service Guide
Page 33
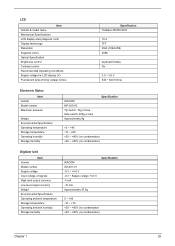
... Brightness control Contrast control Recommended Operating Conditions Supply voltage for LCD display (V) Fluorescent lamp driving voltage (Vrms) Specification Toshiba LTM10C321K 10.4 TFT XGA (1024x768) 256K keyboard hotkey No 3.0 ~ 3.6 V 540 ~ 640 V(rms) Electronic Stylus Item Vendor Model number Maximum pressure Weight Environmental Specification Operating temperature Storage temperature Operating humidity Storage humidity WACOM...
... Brightness control Contrast control Recommended Operating Conditions Supply voltage for LCD display (V) Fluorescent lamp driving voltage (Vrms) Specification Toshiba LTM10C321K 10.4 TFT XGA (1024x768) 256K keyboard hotkey No 3.0 ~ 3.6 V 540 ~ 640 V(rms) Electronic Stylus Item Vendor Model number Maximum pressure Weight Environmental Specification Operating temperature Storage temperature Operating humidity Storage humidity WACOM...

TravelMate C110 Service Guide
Page 35
Display Standby Mode Keyboard, built-in standby mode. (spindle turned-off T Hard disk drive is invalid or not present. Power Management Power Saving Mode Standby Mode Waiting time specified ...
Display Standby Mode Keyboard, built-in standby mode. (spindle turned-off T Hard disk drive is invalid or not present. Power Management Power Saving Mode Standby Mode Waiting time specified ...

TravelMate C110 Service Guide
Page 36
... Motherboard resources Programmable interrupt controller Programmable interrupt controller Programmable interrupt controller Programmable interrupt controller System timer System timer Acer Tablet PC Keyboard Buttons Motherboard resources Microsoft ACPI-compliant embedded controller Motherboard resources Acer Tablet PC Keyboard Buttons Motherboard resources Microsoft ACPI-compliant embedded controller Motherboard resources System CMOS/real time clock Motherboard resources 28 TravelMate C110
... Motherboard resources Programmable interrupt controller Programmable interrupt controller Programmable interrupt controller Programmable interrupt controller System timer System timer Acer Tablet PC Keyboard Buttons Motherboard resources Microsoft ACPI-compliant embedded controller Motherboard resources Acer Tablet PC Keyboard Buttons Motherboard resources Microsoft ACPI-compliant embedded controller Motherboard resources System CMOS/real time clock Motherboard resources 28 TravelMate C110

TravelMate C110 Service Guide
Page 43
... Support [Enabled] Boot From Hard disk Recovery [Disabled] Default Wireless Device [Disabled] Item Specific Help IDE Primary Master Drive. Help: Enable support for Legacy USB Keyboards and Mice. Auto User can enter submenu to set some detail functions Enter submenu to prevent unnecessary RF signals. Help: Select default wireless device when...
... Support [Enabled] Boot From Hard disk Recovery [Disabled] Default Wireless Device [Disabled] Item Specific Help IDE Primary Master Drive. Help: Enable support for Legacy USB Keyboards and Mice. Auto User can enter submenu to set some detail functions Enter submenu to prevent unnecessary RF signals. Help: Select default wireless device when...
TravelMate C110 Service Guide
Page 56
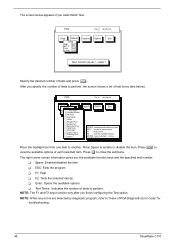
... list of tests to "Index of tests and press e. The screen below ). PQA Vx_x xx-xx-xx Diag Result Diag MANUALTTeEstSITtems AUTO[ ] SyTstEeSmTBoard [ ] Memory [ ] Keyboard [ ] Video [ ] Parallel Port [ ] Serial Port [ ] Diskette Drive [ ] Hard Disk [ ] CD-ROM [ ] Coprocessor [ ] Pointing Dev. [ ]...iiaaTTTggEETETSESSETSTTSTT QUICK TEST TEST COUNT VALUE (1...9999) 1 Specify the desired number of PQA Diagnostic Error Code" for troubleshooting. 48 TravelMate C110 Press | to view the available options of each selected item. NOTE: When any errors are detected by diagnostic program,...
... list of tests to "Index of tests and press e. The screen below ). PQA Vx_x xx-xx-xx Diag Result Diag MANUALTTeEstSITtems AUTO[ ] SyTstEeSmTBoard [ ] Memory [ ] Keyboard [ ] Video [ ] Parallel Port [ ] Serial Port [ ] Diskette Drive [ ] Hard Disk [ ] CD-ROM [ ] Coprocessor [ ] Pointing Dev. [ ]...iiaaTTTggEETETSESSETSTTSTT QUICK TEST TEST COUNT VALUE (1...9999) 1 Specify the desired number of PQA Diagnostic Error Code" for troubleshooting. 48 TravelMate C110 Press | to view the available options of each selected item. NOTE: When any errors are detected by diagnostic program,...

TravelMate C110 Service Guide
Page 59
... the system board, you want to be removed during servicing. Start Battery Pack Ax1 HDD Cover HDD Module Bx1 HDD HDD Case 2 Middle Covers Ax3 Keyboard Video Capture Kit Covers Wireless LAN Module Cx2 DIMM Upper Plate Ax2 Coaxial Cable Cx2 DIMM Cover Black & White RF Cable HDD Connector Ax2 Modem... Plate Gx4 PCMCIA Socket LCD Panel Ax4 LCD W/ Protection Cover Ex2 Sensor Board Coaxial Cable Chapter 3 51 For example, if you must first remove the keyboard, then disassemble the inside assembly frame in that order.
... the system board, you want to be removed during servicing. Start Battery Pack Ax1 HDD Cover HDD Module Bx1 HDD HDD Case 2 Middle Covers Ax3 Keyboard Video Capture Kit Covers Wireless LAN Module Cx2 DIMM Upper Plate Ax2 Coaxial Cable Cx2 DIMM Cover Black & White RF Cable HDD Connector Ax2 Modem... Plate Gx4 PCMCIA Socket LCD Panel Ax4 LCD W/ Protection Cover Ex2 Sensor Board Coaxial Cable Chapter 3 51 For example, if you must first remove the keyboard, then disassemble the inside assembly frame in that order.

TravelMate C110 Service Guide
Page 64
See "Removing the Battery Pack" on the rear of the unit. First, push outward the middle cover as shown here. 4. See "Removing the Battery Pack" on page 56. 3. See "Removing the Middle Covers" on page 53. 2. Disconnect the keyboard cable from the main board by using a plastic flat screwdriver and remove the keyboard. 56 TravelMate C110 Remove the three screws, lift the keyboard upward, and then put it on the upper case as shown here, and then detach the other middle cover on page 53. 2. Removing the Keyboard 1. Disassembling the Main Unit Removing the Middle Covers 1.
See "Removing the Battery Pack" on the rear of the unit. First, push outward the middle cover as shown here. 4. See "Removing the Battery Pack" on page 56. 3. See "Removing the Middle Covers" on page 53. 2. Disconnect the keyboard cable from the main board by using a plastic flat screwdriver and remove the keyboard. 56 TravelMate C110 Remove the three screws, lift the keyboard upward, and then put it on the upper case as shown here, and then detach the other middle cover on page 53. 2. Removing the Keyboard 1. Disassembling the Main Unit Removing the Middle Covers 1.
TravelMate C110 Service Guide
Page 65
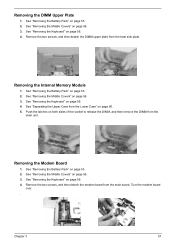
See "Separating the Upper Case from the main unit. See "Removing the Middle Covers" on page 60. 5. Removing the Internal Memory Module 1. See "Removing the Keyboard" on page 53. 2. Removing the Modem Board 1. See "Removing the Battery Pack" on page 56. 4. See "Removing the Middle Covers" on both sides of the ... the two screws, and then detach the modem board from the heat sink plate. See "Removing the Battery Pack" on page 56. 4. See "Removing the Keyboard" on page 53. 2. See "Removing the Keyboard" on page 56. 4. Turn the modem board over. .
See "Separating the Upper Case from the main unit. See "Removing the Middle Covers" on page 60. 5. Removing the Internal Memory Module 1. See "Removing the Keyboard" on page 53. 2. Removing the Modem Board 1. See "Removing the Battery Pack" on page 56. 4. See "Removing the Middle Covers" on both sides of the ... the two screws, and then detach the modem board from the heat sink plate. See "Removing the Battery Pack" on page 56. 4. See "Removing the Keyboard" on page 53. 2. See "Removing the Keyboard" on page 56. 4. Turn the modem board over. .
TravelMate C110 Service Guide
Page 66
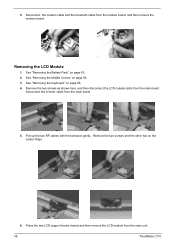
... bluetooth cable from the main board 5. Remove the two screws as shown here, and then disconnect the LCD coaxial cable from the main unit. 58 TravelMate C110 Remove the two screws and the other two on page 56. 3. See "Removing the Battery Pack" on page 56. 4. Pull up the two RF cables... with the tweezers gently. 5. Removing the LCD Module 1. See "Removing the Keyboard" on page 53. 2. Press the two LCD support knobs inward and then remove the LCD module from the main board.
... bluetooth cable from the main board 5. Remove the two screws as shown here, and then disconnect the LCD coaxial cable from the main unit. 58 TravelMate C110 Remove the two screws and the other two on page 56. 3. See "Removing the Battery Pack" on page 56. 4. Pull up the two RF cables... with the tweezers gently. 5. Removing the LCD Module 1. See "Removing the Keyboard" on page 53. 2. Press the two LCD support knobs inward and then remove the LCD module from the main board.


