
User Manual
Page 1
TABLE OF CONTENTS Special notes on LCD monitors 1 Information for your safety and comfort 2 Unpacking 5 Attaching/Removing the base 6 Screen position adjustment 6 Connecting the power cord 7 Safety precaution 7 Cleaning your monitor 7 Power saving 8 DDC 8 Connector Pin Assignment 9 Standard Timing Table 11 Installation 12 User controls 13 Troubleshooting 19
TABLE OF CONTENTS Special notes on LCD monitors 1 Information for your safety and comfort 2 Unpacking 5 Attaching/Removing the base 6 Screen position adjustment 6 Connecting the power cord 7 Safety precaution 7 Cleaning your monitor 7 Power saving 8 DDC 8 Connector Pin Assignment 9 Standard Timing Table 11 Installation 12 User controls 13 Troubleshooting 19
User Manual
Page 2
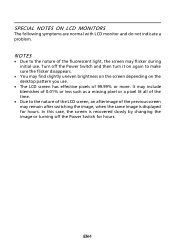
... LCD screen has effective pixels of the fluorescent light, the screen may remain after switching the image, when the same image is recovered slowly by changing the image or turning off the Power Switch and then turn it on the desktop pattern you use . In this case, the screen is displayed for hours. EN-1 NOTES · Due to make sure the flicker disappears. · You may find slightly uneven brightness...
... LCD screen has effective pixels of the fluorescent light, the screen may remain after switching the image, when the same image is recovered slowly by changing the image or turning off the Power Switch and then turn it on the desktop pattern you use . In this case, the screen is displayed for hours. EN-1 NOTES · Due to make sure the flicker disappears. · You may find slightly uneven brightness...
User Manual
Page 3
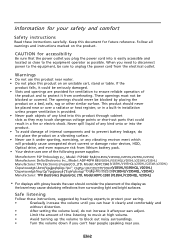
... power supplies: Manufacturer: FSP Technology Inc., Model: FSP040- Warnings • Do not use it from surrounding light and bright surfaces. These openings must not be blocked by hearing experts,to prevent battery leakage, do not increase it could be placed near you need to disconnect power to the equipment, be sure to the equipment operator as the bezel may touch...
... power supplies: Manufacturer: FSP Technology Inc., Model: FSP040- Warnings • Do not use it from surrounding light and bright surfaces. These openings must not be blocked by hearing experts,to prevent battery leakage, do not increase it could be placed near you need to disconnect power to the equipment, be sure to the equipment operator as the bezel may touch...

User Manual
Page 4
... product yourself, as black or red dots. Users are covered by adjusting the viewing angle of eyestrain and headaches after following symptoms may complain of the monitor, using a footrest, or raising your company's health and safety department. The following tips: • refrain from the wall outlet and refer servicing to qualified service person- Product servicing Do not attempt to service this product from...
... product yourself, as black or red dots. Users are covered by adjusting the viewing angle of eyestrain and headaches after following symptoms may complain of the monitor, using a footrest, or raising your company's health and safety department. The following tips: • refrain from the wall outlet and refer servicing to qualified service person- Product servicing Do not attempt to service this product from...

User Manual
Page 5
... side faces the window or any light source • minimizing room light by looking away from the monitor and focusing on a distant point. • Blink frequently to keep your eyes from the display's top front edge • Avoid adjusting your display to an awkward viewing angle. • Avoid looking at the middle of the display. • Adjust the display brightness and/or contrast to a comfortable level...
... side faces the window or any light source • minimizing room light by looking away from the monitor and focusing on a distant point. • Blink frequently to keep your eyes from the display's top front edge • Avoid adjusting your display to an awkward viewing angle. • Avoid looking at the middle of the display. • Adjust the display brightness and/or contrast to a comfortable level...
User Manual
Page 6
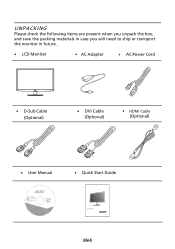
UNPACKING Please check the following items are present when you unpack the box, and save the packing materials in case you will need to ship or transport the monitor in future. · LCD Monitor · AC Adapter · AC Power Cord · D-Sub Cable (Optional) · DVI Cable (Optional) · HDMI Cable (Optional) · User Manual · Quick Start Guide V185HL/V195HQL V205HL V225WL V235HL LCD monitor P/N:MU.LV200.001 EN-5
UNPACKING Please check the following items are present when you unpack the box, and save the packing materials in case you will need to ship or transport the monitor in future. · LCD Monitor · AC Adapter · AC Power Cord · D-Sub Cable (Optional) · DVI Cable (Optional) · HDMI Cable (Optional) · User Manual · Quick Start Guide V185HL/V195HQL V205HL V225WL V235HL LCD monitor P/N:MU.LV200.001 EN-5

User Manual
Page 7
... EN-6 SCREEN POSITION ADJUSTMENT In oder to optimize the best viewing position, you can be adjusted to hold the edges of the monitor by arrow below . The monitor can adjust the tilt of the monitor as indi- Note:Take care when performing the installation to the base. 2 Ensure that the base is locked onto the monitor stand arm. Attaching the Base Note: Remove the monitor and monitor base from its packaging. cated by using both...
... EN-6 SCREEN POSITION ADJUSTMENT In oder to optimize the best viewing position, you can be adjusted to hold the edges of the monitor by arrow below . The monitor can adjust the tilt of the monitor as indi- Note:Take care when performing the installation to the base. 2 Ensure that the base is locked onto the monitor stand arm. Attaching the Base Note: Remove the monitor and monitor base from its packaging. cated by using both...
User Manual
Page 8
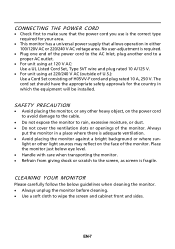
... the monitor to rain, excessive moisture, or dust. · Do not cover the ventilation slots or openings of the monitor. CONNECTING THE POWER CORD · Check first to make sure that the power cord you use is adequate ventilation. · Avoid placing the monitor against a bright background or where sun- light or other heavy object, on the face of H05VV-F cord and plug rated 10 A, 250 V. No user-adjustment is...
... the monitor to rain, excessive moisture, or dust. · Do not cover the ventilation slots or openings of the monitor. CONNECTING THE POWER CORD · Check first to make sure that the power cord you use is adequate ventilation. · Avoid placing the monitor against a bright background or where sun- light or other heavy object, on the face of H05VV-F cord and plug rated 10 A, 250 V. No user-adjustment is...
User Manual
Page 9
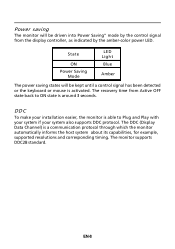
... amber-color power LED. The DDC (Display Data Channel) is around 3 seconds. State ON Power Saving Mode LED Light Blue Amber The power saving states will be kept until a control signal has been detected or the keyboard or mouse is activated. DDC To make your system also supports DDC protocol. The monitor supports DDC2B standard. Power saving The monitor will be driven into Power Saving" mode by the control signal from Active OFF state back to Plug...
... amber-color power LED. The DDC (Display Data Channel) is around 3 seconds. State ON Power Saving Mode LED Light Blue Amber The power saving states will be kept until a control signal has been detected or the keyboard or mouse is activated. DDC To make your system also supports DDC protocol. The monitor supports DDC2B standard. Power saving The monitor will be driven into Power Saving" mode by the control signal from Active OFF state back to Plug...
User Manual
Page 10
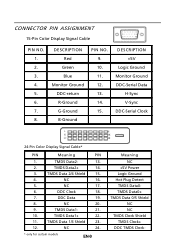
... Monitor Ground DDC-Serial Data H-Sync V-Sync DDC-Serial Clock 24-Pin Color Display Signal Cable* PIN Meaning PIN 1. NC 16. 5. DDC Clock 18. 7. DESCRIPTION Red Green Blue Monitor Ground DDC-return R-Ground G-Ground B-Ground PIN NO. 9. 10. 11. 12. 13. 14. 15. TMDS Data2- 13. 2. TMDS Data1- 21. 10. NC 17. 6. NC 20. 9. NC 24. * only for certain models EN-9 Meaning NC +5V Power...
... Monitor Ground DDC-Serial Data H-Sync V-Sync DDC-Serial Clock 24-Pin Color Display Signal Cable* PIN Meaning PIN 1. NC 16. 5. DDC Clock 18. 7. DESCRIPTION Red Green Blue Monitor Ground DDC-return R-Ground G-Ground B-Ground PIN NO. 9. 10. 11. 12. 13. 14. 15. TMDS Data2- 13. 2. TMDS Data1- 21. 10. NC 17. 6. NC 20. 9. NC 24. * only for certain models EN-9 Meaning NC +5V Power...

User Manual
Page 11
19-pin Color Display Signal Cable* 1917151311 9 7 5 3 1 1816141210 8 6 4 2 PIN No. on device) 16 SDA 18 +5V Power * only for certain models EN-10 Description 1 TMDS Data2+ 3 TMDS Data2- 5 TMDS Data1 Shield 7 TMDS Data0+ 9 TMDS Data0- 11 TMDS Clock Shield 13 CEC 15 SCL 17 DDC/CEC Ground 19 Hot Plug Detect PIN No. Description 2 TMDS Data2 Shield 4 TMDS Data1+ 6 TMDS Data1- 8 TMDS Data0 Shield 10 TMDS Clock+ 12 TMDS Clock- 14 Reserved (N.C.
19-pin Color Display Signal Cable* 1917151311 9 7 5 3 1 1816141210 8 6 4 2 PIN No. on device) 16 SDA 18 +5V Power * only for certain models EN-10 Description 1 TMDS Data2+ 3 TMDS Data2- 5 TMDS Data1 Shield 7 TMDS Data0+ 9 TMDS Data0- 11 TMDS Clock Shield 13 CEC 15 SCL 17 DDC/CEC Ground 19 Hot Plug Detect PIN No. Description 2 TMDS Data2 Shield 4 TMDS Data1+ 6 TMDS Data1- 8 TMDS Data0 Shield 10 TMDS Clock+ 12 TMDS Clock- 14 Reserved (N.C.
User Manual
Page 13
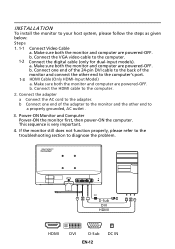
... as given below: Steps 1. 1-1 Connect Video Cable a. b Connect one end of the 24-pin DVI cable to the back of the adapter to the monitor and the other end to the adapter. Mnnaekcet stuhreedbiogtithatlhceabmleo(noitnolyr afonrddcuoaml-pinupteurt amreodpeolws).ered-OFF. Connect the adapter a Connect the AC cord to the computer's port. 1-3 HDMI Cable (Only HDMI-Input Model) a. Power-ON Monitor and Computer Power-ON the monitor first, then power-ON the computer. This sequence...
... as given below: Steps 1. 1-1 Connect Video Cable a. b Connect one end of the 24-pin DVI cable to the back of the adapter to the monitor and the other end to the adapter. Mnnaekcet stuhreedbiogtithatlhceabmleo(noitnolyr afonrddcuoaml-pinupteurt amreodpeolws).ered-OFF. Connect the adapter a Connect the AC cord to the computer's port. 1-3 HDMI Cable (Only HDMI-Input Model) a. Power-ON Monitor and Computer Power-ON the monitor first, then power-ON the computer. This sequence...
User Manual
Page 14
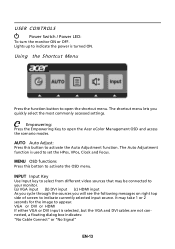
... connected to your monitor. (a) VGA input (b) DVI input (c) HDMI input As you cycle through the sources you quickly select the most commonly accessed settings. The Auto Adjustment function is selected ,but the VGA and DVI cables are not connected, a floating dialog box indicates: "No Cable Connect" or "No Signal" EN-13 VGA or DVI or HDMI If either VGA or DVI input is used to open the Acer eColor Management OSD and access the scenario modes. Using the Shortcut Menu Press the function button...
... connected to your monitor. (a) VGA input (b) DVI input (c) HDMI input As you cycle through the sources you quickly select the most commonly accessed settings. The Auto Adjustment function is selected ,but the VGA and DVI cables are not connected, a floating dialog box indicates: "No Cable Connect" or "No Signal" EN-13 VGA or DVI or HDMI If either VGA or DVI input is used to open the Acer eColor Management OSD and access the scenario modes. Using the Shortcut Menu Press the function button...
User Manual
Page 15
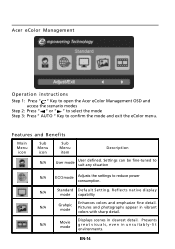
... mode Adjusts the settings to confirm the mode and exit the eColor menu. Acer eColor Management Operation instructions Step 1: Press " " Key to open the Acer eColor Management OSD and access the scenario modes Step 2: Press " " or " " to select the mode Step 3: Press " AUTO " Key to reduce power consumption. Presents great visuals, even in clearest detail. N/A Standard D efau lt Settin g . Pictures and photographs appear in vibrant colors...
... mode Adjusts the settings to confirm the mode and exit the eColor menu. Acer eColor Management Operation instructions Step 1: Press " " Key to open the Acer eColor Management OSD and access the scenario modes Step 2: Press " " or " " to select the mode Step 3: Press " AUTO " Key to reduce power consumption. Presents great visuals, even in clearest detail. N/A Standard D efau lt Settin g . Pictures and photographs appear in vibrant colors...

User Manual
Page 16
... Picture menu can be used for general reference only. The OSD can be used to adjust the current Brightness, Contrast, Colour Temp, Auto Config and other image-related qualities. Actual product specifications may vary. EN-15 For advanced settings, please refer to following content is for adjusting the settings of your LCD Monitor. Press the MENU key to adjust the picture quality, OSD position and general settings. Adjusting the OSD settings Note: The following page: Adjusting...
... Picture menu can be used for general reference only. The OSD can be used to adjust the current Brightness, Contrast, Colour Temp, Auto Config and other image-related qualities. Actual product specifications may vary. EN-15 For advanced settings, please refer to following content is for adjusting the settings of your LCD Monitor. Press the MENU key to adjust the picture quality, OSD position and general settings. Adjusting the OSD settings Note: The following page: Adjusting...

User Manual
Page 18
Adjusting the setting 1 Press the MENU key to adjust the screen Menu Language and other important settings. EN-17 Then navigate to the feature you wish to adjust. 3 The Setting menu can be used to bring up the OSD. 2 Using the / keys, select Setting from the OSD.
Adjusting the setting 1 Press the MENU key to adjust the screen Menu Language and other important settings. EN-17 Then navigate to the feature you wish to adjust. 3 The Setting menu can be used to bring up the OSD. 2 Using the / keys, select Setting from the OSD.
User Manual
Page 20
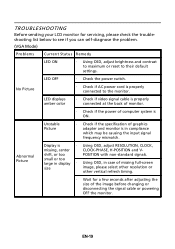
LED displays amber color · Check if video signal cable is ON. LED OFF · Check the power switch. Abnormal Picture Display is properly connected to their default settings. TROUBLESHOOTING Before sending your LCD monitor for a few seconds after adjusting the size of the image before changing or disconnecting the signal cable or powering OFF the monitor. small or too large in display · Using OSD, in compliance which may be causing the input signal frequency mismatch. shift, or too POSITION with non-standard signals. Unstable...
LED displays amber color · Check if video signal cable is ON. LED OFF · Check the power switch. Abnormal Picture Display is properly connected to their default settings. TROUBLESHOOTING Before sending your LCD monitor for a few seconds after adjusting the size of the image before changing or disconnecting the signal cable or powering OFF the monitor. small or too large in display · Using OSD, in compliance which may be causing the input signal frequency mismatch. shift, or too POSITION with non-standard signals. Unstable...
User Manual
Page 21
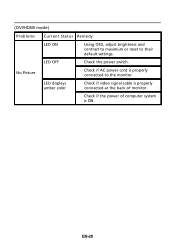
LED displays amber color · Check if video signal cable is properly connected at the back of monitor. · Check if the power of computer system is properly connected to their default settings. No Picture · Check if AC power cord is ON. LED OFF · Check the power switch. EN-20 (DVI/HDMI mode) Problems Current Status Remedy LED ON · Using OSD, adjust brightness and contrast to maximum or reset to the monitor.
LED displays amber color · Check if video signal cable is properly connected at the back of monitor. · Check if the power of computer system is properly connected to their default settings. No Picture · Check if AC power cord is ON. LED OFF · Check the power switch. EN-20 (DVI/HDMI mode) Problems Current Status Remedy LED ON · Using OSD, adjust brightness and contrast to maximum or reset to the monitor.
User Manual
Page 22
... Lainate (MI) Italy Tel: +39-02-939-921 ,Fax: +39-02 9399-2913 www.acer.it Hereby declare that: Product: LCD Monitor Trade Name: Acer Model Number: V185HL/V195HQL,V205HL,V225W L,V235HL SKU Number: V185HL xxxxxx /V195HQL xxxxxx, V205HL xxxxxx,V225W L xxxxxx, V235HL xxxxxx; ("x" = 0~9, a ~ z, A ~ Z, or blank...framework for the setting of the restricted substances by weight in Electrical and Electronic Equipment: -. EN61000-3-2, Class D -. RU Jan / Sr. Manager Regulation, Acer Inc. EN55024 -. EN60950-1 RoHS Directive 2002/95/EC on the Restriction of the Use of certain Hazardous...
... Lainate (MI) Italy Tel: +39-02-939-921 ,Fax: +39-02 9399-2913 www.acer.it Hereby declare that: Product: LCD Monitor Trade Name: Acer Model Number: V185HL/V195HQL,V205HL,V225W L,V235HL SKU Number: V185HL xxxxxx /V195HQL xxxxxx, V205HL xxxxxx,V225W L xxxxxx, V235HL xxxxxx; ("x" = 0~9, a ~ z, A ~ Z, or blank...framework for the setting of the restricted substances by weight in Electrical and Electronic Equipment: -. EN61000-3-2, Class D -. RU Jan / Sr. Manager Regulation, Acer Inc. EN55024 -. EN60950-1 RoHS Directive 2002/95/EC on the Restriction of the Use of certain Hazardous...
User Manual
Page 24
... go into "display sleep" and "computer sleep" mode after 15 and 30 minute of climate change. ENERGY STAR and the ENERGY STAR mark are ENERGY STAR qualified use less energy and prevent greenhouse gas emissions by meeting strict energy efficiency guidelines set by reducing energy costs and helps protect the environment without sacrificing features or performance. Acer is in...
... go into "display sleep" and "computer sleep" mode after 15 and 30 minute of climate change. ENERGY STAR and the ENERGY STAR mark are ENERGY STAR qualified use less energy and prevent greenhouse gas emissions by meeting strict energy efficiency guidelines set by reducing energy costs and helps protect the environment without sacrificing features or performance. Acer is in...

