
User Manual
Page 3
... all power cords from electronic devices. Turn off the power switch for a few hours. • Acer monitor is displayed for your monitor Please carefully follow these instructions carefully. In this document for video and visual display of information obtained from the power supplies. iii Special notes on LCD monitors The following guidelines when connecting and disconnecting power from the LCD monitor: • Make sure the monitor is attached to its base before connecting the power cord...
... all power cords from electronic devices. Turn off the power switch for a few hours. • Acer monitor is displayed for your monitor Please carefully follow these instructions carefully. In this document for video and visual display of information obtained from the power supplies. iii Special notes on LCD monitors The following guidelines when connecting and disconnecting power from the LCD monitor: • Make sure the monitor is attached to its base before connecting the power cord...
User Manual
Page 4
... power cord from the electrical outlet. Safe listening To protect your hearing, follow these instructions. • Gradually increase the volume until you . When you can hear it clearly and comfortably and without distortion. • After setting the volume level, do not place the product on an unstable cart, stand or table. This product should be blocked or covered...
... power cord from the electrical outlet. Safe listening To protect your hearing, follow these instructions. • Gradually increase the volume until you . When you can hear it clearly and comfortably and without distortion. • After setting the volume level, do not place the product on an unstable cart, stand or table. This product should be blocked or covered...
User Manual
Page 5
... receptacle by other risks. If power strips are used with this product, make sure that may interfere with the performance of the power strip's input rating. • This product's power cord is used , the load should not exceed 80% of this product yourself, as opening or removing covers may result in a grounded power outlet. Do not insert the plug into the product • the...
... receptacle by other risks. If power strips are used with this product, make sure that may interfere with the performance of the power strip's input rating. • This product's power cord is used , the load should not exceed 80% of this product yourself, as opening or removing covers may result in a grounded power outlet. Do not insert the plug into the product • the...

User Manual
Page 6
... business and strive to identify and provide the best working procedures to this website: https://www.acer-group.com/sustainability/en/our-products-environment.html Visit www.acer-group.com for service • the product does not operate normally after following the operating instructions Note: Adjust only those controls that are covered by a qualified technician to restore the product...
... business and strive to identify and provide the best working procedures to this website: https://www.acer-group.com/sustainability/en/our-products-environment.html Visit www.acer-group.com for service • the product does not operate normally after following the operating instructions Note: Adjust only those controls that are covered by a qualified technician to restore the product...
User Manual
Page 7
...LCD unit is in a manner that this product must not be disposed of user inactivity. • Wake the monitor when it over to conserve natural resources and ensure that it is recycled in Active Off mode, move the mouse or press any keyboard key. This product has been shipped enabled for power management: • Activate display's Sleep mode...misfire or appear as black or red dots. Instead, it is your responsibility to dispose of your household waste disposal service or the shop where you can drop off your waste equipment for the recycling of disposal will help to a designated ...
...LCD unit is in a manner that this product must not be disposed of user inactivity. • Wake the monitor when it over to conserve natural resources and ensure that it is recycled in Active Off mode, move the mouse or press any keyboard key. This product has been shipped enabled for power management: • Activate display's Sleep mode...misfire or appear as black or red dots. Instead, it is your responsibility to dispose of your household waste disposal service or the shop where you can drop off your waste equipment for the recycling of disposal will help to a designated ...

User Manual
Page 9
... at bright light sources, such as open windows, for enhanced text readability and graphics clarity. • Eliminate glare and reflections by using drapes, shades or blinds • using a task light • changing the display's viewing angle • using a glare-reduction filter • using a display visor, such as possible. • Exercise regularly and maintain a healthy body. The following work habits to make your eyes. Display • Keep your display clean. • Keep...
... at bright light sources, such as open windows, for enhanced text readability and graphics clarity. • Eliminate glare and reflections by using drapes, shades or blinds • using a task light • changing the display's viewing angle • using a glare-reduction filter • using a display visor, such as possible. • Exercise regularly and maintain a healthy body. The following work habits to make your eyes. Display • Keep your display clean. • Keep...

User Manual
Page 10
TABLE OF CONTENTS UNPACKING 1 ATTACHING/REMOVING THE BASE 2 SCREEN POSITION ADJUSTMENT 4 CONNECTING THE POWER CORD 5 POWER SAVING 7 DDC...7 CONNECTOR PIN ASSIGNMENT 8 STANDARD TIMING TABLE 10 INSTALLATION 11 USER CONTROLS 12 TROUBLESHOOTING 24
TABLE OF CONTENTS UNPACKING 1 ATTACHING/REMOVING THE BASE 2 SCREEN POSITION ADJUSTMENT 4 CONNECTING THE POWER CORD 5 POWER SAVING 7 DDC...7 CONNECTOR PIN ASSIGNMENT 8 STANDARD TIMING TABLE 10 INSTALLATION 11 USER CONTROLS 12 TROUBLESHOOTING 24

User Manual
Page 11
UNPACKING Please check the following items are present when you unpack the box, and save the packing materials in case you will need to ship or transport the monitor in future. * Below items shown here is indicative only. The actual product may be different. • LCD Monitor • Quick Start Guide • AC Power Cord (Optional) • Power adapter (Optional) • D-Sub Cable (Optional) • HDMI Cable (Optional) • DP cable (Optional) • Audio Cable (Optional) • USB Cable (Optional) • USB Type C Cable (Optional) 1
UNPACKING Please check the following items are present when you unpack the box, and save the packing materials in case you will need to ship or transport the monitor in future. * Below items shown here is indicative only. The actual product may be different. • LCD Monitor • Quick Start Guide • AC Power Cord (Optional) • Power adapter (Optional) • D-Sub Cable (Optional) • HDMI Cable (Optional) • DP cable (Optional) • Audio Cable (Optional) • USB Cable (Optional) • USB Type C Cable (Optional) 1

User Manual
Page 14
SCREEN POSITION ADJUSTMENT In order to optimize the best viewing position, you can adjust the height/tilt of the monitor. • Tilt Please see the illustration below for an example of the tilt range. -5° +20° 4
SCREEN POSITION ADJUSTMENT In order to optimize the best viewing position, you can adjust the height/tilt of the monitor. • Tilt Please see the illustration below for an example of the tilt range. -5° +20° 4

User Manual
Page 15
... V AC (outside of U.S.): Use a Cord Set consisting of H05VV-F cord and plug rated 10 A, 250 V. No user-adjustment is required. • Plug one end of the AC power cord to make sure that allows operation in which the equipment will be installed. 5 The cord set should have the appropriate safety approvals for your area. • This monitor has a universal power supply that the power cord you use is the correct type...
... V AC (outside of U.S.): Use a Cord Set consisting of H05VV-F cord and plug rated 10 A, 250 V. No user-adjustment is required. • Plug one end of the AC power cord to make sure that allows operation in which the equipment will be installed. 5 The cord set should have the appropriate safety approvals for your area. • This monitor has a universal power supply that the power cord you use is the correct type...

User Manual
Page 17
... "Power Saving" mode by the LED flashes power LED. DDC To make your installation easier, the monitor is able to ON state is a communication protocol through which the monitor automatically informs the host system about its capabilities, for example, supported resolutions and corresponding timing. The DDC (Display Data Channel) is around 3 seconds. State ON Power Saving Mode LED Light Blue Type 1: Amber Type 2: LED flashes The power saving states will be kept until a control signal has...
... "Power Saving" mode by the LED flashes power LED. DDC To make your installation easier, the monitor is able to ON state is a communication protocol through which the monitor automatically informs the host system about its capabilities, for example, supported resolutions and corresponding timing. The DDC (Display Data Channel) is around 3 seconds. State ON Power Saving Mode LED Light Blue Type 1: Amber Type 2: LED flashes The power saving states will be kept until a control signal has...

User Manual
Page 19
... A9 VBUS A10 SSTXn2 A11 SSTXp2 A12 GND * only for certain models 24-pin USB Type C cable PIN No. Explanations +5 V Logic ground Monitor ground DDC-continuous data Line sync signal Field sync signal DDC-continuous clock * only for certain models PIN No. 15-pin color display signal cable Threading 1. 2. 3. 4. 5. 6. 7. 8. Explanations Red Green Blue Monitor ground DDC return Red-ground Green-ground Blue-ground Threading 9. 10. 11. 12. 13. 14. 15.
... A9 VBUS A10 SSTXn2 A11 SSTXp2 A12 GND * only for certain models 24-pin USB Type C cable PIN No. Explanations +5 V Logic ground Monitor ground DDC-continuous data Line sync signal Field sync signal DDC-continuous clock * only for certain models PIN No. 15-pin color display signal cable Threading 1. 2. 3. 4. 5. 6. 7. 8. Explanations Red Green Blue Monitor ground DDC return Red-ground Green-ground Blue-ground Threading 9. 10. 11. 12. 13. 14. 15.

User Manual
Page 21
... are powered-OFF. Make sure both the monitor and computer are powered-OFF. Turn off USB charge function. (Optional) VGA HDMI ~ Note: The location and HDMI (optional) (optional) names of the monitor. 6. b. Connect the DP cable to the computer. 2-3 Connect DP Cable (Only DP-input model) (Optional) a. Connect the Audio cable (only Audio input model) (optional) 4. Connect the HDMI cable to the computer. 3. INSTALLATION To install the monitor to your computer and unplug the power cord. 2. 2-1 Connect Video Cable a. Connect the VGA cable to enable/disable Power-off...
... are powered-OFF. Make sure both the monitor and computer are powered-OFF. Turn off USB charge function. (Optional) VGA HDMI ~ Note: The location and HDMI (optional) (optional) names of the monitor. 6. b. Connect the DP cable to the computer. 2-3 Connect DP Cable (Only DP-input model) (Optional) a. Connect the Audio cable (only Audio input model) (optional) 4. Connect the HDMI cable to the computer. 3. INSTALLATION To install the monitor to your computer and unplug the power cord. 2. 2-1 Connect Video Cable a. Connect the VGA cable to enable/disable Power-off...

User Manual
Page 22
.... Item Description 1 Power button/ indicator Turns the monitor on state, pressing the button normally enters the mode switching menu, and long- Press to activate the OSD menu, 4 Navi/OK button then use it again to activate user defined hotkey function. 5 In the powered-off the device. Description 1 Enter the mode switching menu. 2 Enter brightness adjustment. 3 Enter the source mode. 4 Go to highlight the desired function. pressing for some button may not available...
.... Item Description 1 Power button/ indicator Turns the monitor on state, pressing the button normally enters the mode switching menu, and long- Press to activate the OSD menu, 4 Navi/OK button then use it again to activate user defined hotkey function. 5 In the powered-off the device. Description 1 Enter the mode switching menu. 2 Enter brightness adjustment. 3 Enter the source mode. 4 Go to highlight the desired function. pressing for some button may not available...

User Manual
Page 23
... page, press buttons 5 to open the OSD. Some functions might be grayed if the model can be used for more information). Actual product specifications may vary. For advanced settings, please refer to open the Modes control and select which user-defined profile to use the OSD to use (please see the OSD section for adjusting the settings of your LCD Monitor. The OSD (on-screen display) can not support. You can use (please see...
... page, press buttons 5 to open the OSD. Some functions might be grayed if the model can be used for more information). Actual product specifications may vary. For advanced settings, please refer to open the Modes control and select which user-defined profile to use the OSD to use (please see the OSD section for adjusting the settings of your LCD Monitor. The OSD (on-screen display) can not support. You can use (please see...

User Manual
Page 27
...-resolution images by boosting the pixel density of the original source. ACM: Turn ACM on or off . 6. Position (only Analog input model): Adjust the horizontal position from 0 to 100. 8. The default value is warm. Super Sharpness technology can choose Cool, Warm, Normal, Low Blue Light or User. 17 Focus (only Analog input model): Adjust the focus from 0 to 100. 10. It can make images sharper and clear. 7. H. V. Color temperature: Default is 2.2 (standard value for Windows...
...-resolution images by boosting the pixel density of the original source. ACM: Turn ACM on or off . 6. Position (only Analog input model): Adjust the horizontal position from 0 to 100. 8. The default value is warm. Super Sharpness technology can choose Cool, Warm, Normal, Low Blue Light or User. 17 Focus (only Analog input model): Adjust the focus from 0 to 100. 10. It can make images sharper and clear. 7. H. V. Color temperature: Default is 2.2 (standard value for Windows...
User Manual
Page 30
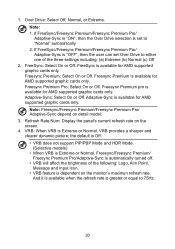
...", then the user can set to 75Hz. 20 And it is available when the refresh rate is available for AMD supported graphic cards only. Note: 1. Freesync Premium is greater or equal to "Normal" automatically 2. Adaptive-Sync: Select On or Off. Refresh Rate Num: Display the panel's current refresh rate on detail model. 3. If FreeSync/Freesync Premium/Freesync Premium Pro/ Adaptive-Sync is dependent on the monitor's maximun refresh rate. Freesync...
...", then the user can set to 75Hz. 20 And it is available when the refresh rate is available for AMD supported graphic cards only. Note: 1. Freesync Premium is greater or equal to "Normal" automatically 2. Adaptive-Sync: Select On or Off. Refresh Rate Num: Display the panel's current refresh rate on detail model. 3. If FreeSync/Freesync Premium/Freesync Premium Pro/ Adaptive-Sync is dependent on the monitor's maximun refresh rate. Freesync...

User Manual
Page 32
... the function of blackness under HDMI source. The options are using. 5. Power-off USB charge (Optional): Turn On or Off. (*only for available input sources. 3. Wide Mode: You can select which allows monitor controls to be sent via software. 7. HDMI Black Level: You can also adjust the PIP Position, PBP Size, Sub Source, Source Swap, and Audio Source. 6. Adjusting the System DP Format Information PIP/PBP DP1.2 Information 1. Auto Source: Automatically searches for USB function) 22 You...
... the function of blackness under HDMI source. The options are using. 5. Power-off USB charge (Optional): Turn On or Off. (*only for available input sources. 3. Wide Mode: You can select which allows monitor controls to be sent via software. 7. HDMI Black Level: You can also adjust the PIP Position, PBP Size, Sub Source, Source Swap, and Audio Source. 6. Adjusting the System DP Format Information PIP/PBP DP1.2 Information 1. Auto Source: Automatically searches for USB function) 22 You...
User Manual
Page 34
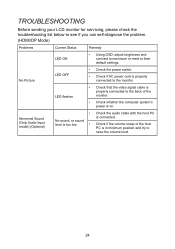
... minimum position and try to raise the volume level. 24 TROUBLESHOOTING Before sending your LCD monitor for servicing, please check the troubleshooting list below to see if you can self-diagnose the problem. (HDMI/DP Mode) Problems Current Status Remedy LED ON • Using OSD, adjust brightness and contrast to maximum or reset to the monitor. No Picture LED OFF • Check the power switch. • Check if AC power cord is on. LED flashes • Check that the video signal cable is properly connected...
... minimum position and try to raise the volume level. 24 TROUBLESHOOTING Before sending your LCD monitor for servicing, please check the troubleshooting list below to see if you can self-diagnose the problem. (HDMI/DP Mode) Problems Current Status Remedy LED ON • Using OSD, adjust brightness and contrast to maximum or reset to the monitor. No Picture LED OFF • Check the power switch. • Check if AC power cord is on. LED flashes • Check that the video signal cable is properly connected...
User Manual
Page 35
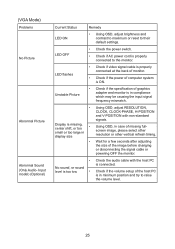
... the signal cable or powering OFF the monitor. • No sound, or sound level is connected. Wait for a few seconds after adjusting the size of computer system is properly connected to the monitor. Unstable Picture • Check if the specification of missing fullscreen image, please select other resolution or other vertical refresh timing. LED OFF • Check the power switch. • Check if AC power cord is ON. Input model) (Optional) Current Status Remedy LED ON • Using OSD, adjust brightness and contrast...
... the signal cable or powering OFF the monitor. • No sound, or sound level is connected. Wait for a few seconds after adjusting the size of computer system is properly connected to the monitor. Unstable Picture • Check if the specification of missing fullscreen image, please select other resolution or other vertical refresh timing. LED OFF • Check the power switch. • Check if AC power cord is ON. Input model) (Optional) Current Status Remedy LED ON • Using OSD, adjust brightness and contrast...

