
Quick Setup Guide
Page 4
Notes, Cautions, and Warnings NOTE: Indicates important information that property damage, personal injury, or death may result if instructions are not followed. 2 WARNING: Indicates that helps you make better use of data may result if instructions are not followed. CAUTION: Indicates that damage to hardware or loss of your computer.
Notes, Cautions, and Warnings NOTE: Indicates important information that property damage, personal injury, or death may result if instructions are not followed. 2 WARNING: Indicates that helps you make better use of data may result if instructions are not followed. CAUTION: Indicates that damage to hardware or loss of your computer.

Quick Setup Guide
Page 5
Acer Veriton N2010G Thin Client Quick Setup Guide Before Setting Up Your VN2010G NOTE: Place the thin client in its vertical orientation for damage. If anything is shipped with the following items: 1 Power cord 2 Adapter 3 Terminal stand 4 Quick Setup Guide 5 DVI-I to VGA converter(optional) 6 Compact VESA holder (optional) 7 Warrranty card NOTE: Inspect all parts for best performance. Your VN2010G thin client is damaged,please contact your reseller immediately. 3
Acer Veriton N2010G Thin Client Quick Setup Guide Before Setting Up Your VN2010G NOTE: Place the thin client in its vertical orientation for damage. If anything is shipped with the following items: 1 Power cord 2 Adapter 3 Terminal stand 4 Quick Setup Guide 5 DVI-I to VGA converter(optional) 6 Compact VESA holder (optional) 7 Warrranty card NOTE: Inspect all parts for best performance. Your VN2010G thin client is damaged,please contact your reseller immediately. 3

Quick Setup Guide
Page 6
Setup and Features Front View 1 Power Button 3 Audio line-out jack 5 USB 2.0 ports 2 Network activity indicator LED 4 Microphone jack 4
Setup and Features Front View 1 Power Button 3 Audio line-out jack 5 USB 2.0 ports 2 Network activity indicator LED 4 Microphone jack 4

Quick Setup Guide
Page 8
Quick Setup 1 Connect the monitor to one of the DVI ports on the back of the unit. 6
Quick Setup 1 Connect the monitor to one of the DVI ports on the back of the unit. 6
Quick Setup Guide
Page 9
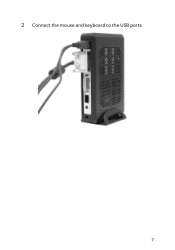
2 Connect the mouse and keyboard to the USB ports. 7
2 Connect the mouse and keyboard to the USB ports. 7
Quick Setup Guide
Page 10
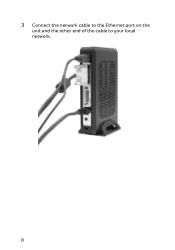
3 Connect the network cable to the Ethernet port on the unit and the other end of the cable to your local network. 8
3 Connect the network cable to the Ethernet port on the unit and the other end of the cable to your local network. 8

Quick Setup Guide
Page 11
4 Connect the power supply to the DC-in jack on the back of the unit. 9
4 Connect the power supply to the DC-in jack on the back of the unit. 9
Quick Setup Guide
Page 12
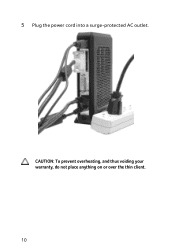
5 Plug the power cord into a surge-protected AC outlet. CAUTION: To prevent overheating, and thus voiding your warranty, do not place anything on or over the thin client. 10
5 Plug the power cord into a surge-protected AC outlet. CAUTION: To prevent overheating, and thus voiding your warranty, do not place anything on or over the thin client. 10
Quick Setup Guide
Page 13
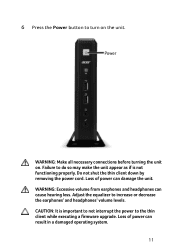
Power WARNING: Make all necessary connections before turning the unit on the unit. 6 Press the Power button to increase or decrease the earphones' and headphones' volume levels. Loss of power can damage the unit. CAUTION: It is not functioning properly. Failure to do so may make the unit appear as if is important to not interrupt the power... to the thin client while executing a firmware upgrade. Loss of power can result in a damaged operating system. 11 WARNING...
Power WARNING: Make all necessary connections before turning the unit on the unit. 6 Press the Power button to increase or decrease the earphones' and headphones' volume levels. Loss of power can damage the unit. CAUTION: It is not functioning properly. Failure to do so may make the unit appear as if is important to not interrupt the power... to the thin client while executing a firmware upgrade. Loss of power can result in a damaged operating system. 11 WARNING...

Quick Setup Guide
Page 14
For a complete and current listing of the specifications for your thin client. Environmental Temperature: Operating Storage Relative humidity Altitude: Operating Storage 0°to 35°C (32° to 95° F) -20° to 60° C (-4° to 140° F) 20% to 80% non-condensing -15.2 to 2000 m (-50 to 6561.7 ft) -15.2 to 10,665 m (-50 to www.acer.com. Specifications NOTE: The following specifications are only those required by law to ship with your thin client, please go to 35,000 ft) 12
For a complete and current listing of the specifications for your thin client. Environmental Temperature: Operating Storage Relative humidity Altitude: Operating Storage 0°to 35°C (32° to 95° F) -20° to 60° C (-4° to 140° F) 20% to 80% non-condensing -15.2 to 2000 m (-50 to 6561.7 ft) -15.2 to 10,665 m (-50 to www.acer.com. Specifications NOTE: The following specifications are only those required by law to ship with your thin client, please go to 35,000 ft) 12
Quick Setup Guide
Page 15
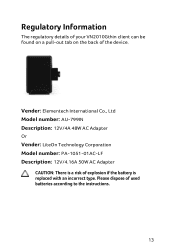
Regulatory Information The regulatory details of your VN2010Gthin client can be found on a pull-out tab on the back of used batteries according to the instructions. 13 Please dispose of the device. Vender: Elementech International Co., Ltd Model number: AU-799IN Description: 12V/4A 48W AC Adapter Or Vender: LiteOn Technology Corporation Model number: PA-1051-01AC-LF Description: 12V/4.16A 50W AC Adapter CAUTION: There is a risk of explosion if the battery is replaced with an incorrect type.
Regulatory Information The regulatory details of your VN2010Gthin client can be found on a pull-out tab on the back of used batteries according to the instructions. 13 Please dispose of the device. Vender: Elementech International Co., Ltd Model number: AU-799IN Description: 12V/4A 48W AC Adapter Or Vender: LiteOn Technology Corporation Model number: PA-1051-01AC-LF Description: 12V/4.16A 50W AC Adapter CAUTION: There is a risk of explosion if the battery is replaced with an incorrect type.

Quick Setup Guide
Page 16
Do not make direct physical contact with the pins. 14 NOTE: 802.3af host systems can provide power to the RJ45 port on the same 10/100/1000Base-T Ethernet cable. 1 Connect the Ethernet cable to the VN2010G via POE if certain peripherals are shut off. RJ45/Ethernet Connector Pinouts These are the locations for selected models) The POE 802.3at/af installation option allows the VN2010G...
Do not make direct physical contact with the pins. 14 NOTE: 802.3af host systems can provide power to the RJ45 port on the same 10/100/1000Base-T Ethernet cable. 1 Connect the Ethernet cable to the VN2010G via POE if certain peripherals are shut off. RJ45/Ethernet Connector Pinouts These are the locations for selected models) The POE 802.3at/af installation option allows the VN2010G...

Quick Setup Guide
Page 18
Getting the latest software and Echo Management software Please visit the website page through following http://www.devonit.com/acer, to get the latest software for clients and the latest Echo Management software for server. 16
Getting the latest software and Echo Management software Please visit the website page through following http://www.devonit.com/acer, to get the latest software for clients and the latest Echo Management software for server. 16
Quick Setup Guide
Page 152
... not installed and used in a particular installation. This equipment generates, uses and can be determined by turning the equipment off and on, the user is encouraged to try to correct the interference by the part responsible for compliance could void the user's authority to operate the equipment. 15.105(b) This equipment has been tested and found to comply with the instructions...
... not installed and used in a particular installation. This equipment generates, uses and can be determined by turning the equipment off and on, the user is encouraged to try to correct the interference by the part responsible for compliance could void the user's authority to operate the equipment. 15.105(b) This equipment has been tested and found to comply with the instructions...
Quick Setup Guide
Page 153
...located or operating in conjunction with any interference received, including interference that may not cause interference, and (2) this device Operation is subject to the following two conditions: (1) this device may cause undesired operation of 20 centimeters between the radiator and your body. This device complies with a minimum distance of the device... digital apparatus complies with FCC RF radiation exposure limits set forth for an uncontrolled environment. 2) this device must not be installed and operated with Industry Canada licence-exempt RSS standard(s). This equipment...
...located or operating in conjunction with any interference received, including interference that may not cause interference, and (2) this device Operation is subject to the following two conditions: (1) this device may cause undesired operation of 20 centimeters between the radiator and your body. This device complies with a minimum distance of the device... digital apparatus complies with FCC RF radiation exposure limits set forth for an uncontrolled environment. 2) this device must not be installed and operated with Industry Canada licence-exempt RSS standard(s). This equipment...

Quick Setup Guide
Page 154
...gain integral antennas that do not emit RF field in excess of the device. Utilisation d'autres accessoires peut ne pas assurer le respect des directives d'exposition RF. consult Safety Code 6, obtainable from the body. Déclaration de l'exposition aux radiations RF... de l'appareil doit accepter tout brouillage a RF Radiation Exposure Statement: For body worn operation, this phone has been tested and meets RF exposure guidelines when used with RF exposure guidelines. Use of other accessories may cause undesired operation of Health Canada limits for the general population;
...gain integral antennas that do not emit RF field in excess of the device. Utilisation d'autres accessoires peut ne pas assurer le respect des directives d'exposition RF. consult Safety Code 6, obtainable from the body. Déclaration de l'exposition aux radiations RF... de l'appareil doit accepter tout brouillage a RF Radiation Exposure Statement: For body worn operation, this phone has been tested and meets RF exposure guidelines when used with RF exposure guidelines. Use of other accessories may cause undesired operation of Health Canada limits for the general population;


