
User Manual
Page 3
... all warnings and instructions marked on an unstable cart, stand or table. Do not use this product through cabinet slots as disconnecting device Observe the following guidelines when connecting and disconnecting power to the external power supply unit: • Install the power supply unit before connecting the power cord to the AC power outlet. • Unplug the power cord before cleaning. Caution for ventilation to ensure reliable operation...
... all warnings and instructions marked on an unstable cart, stand or table. Do not use this product through cabinet slots as disconnecting device Observe the following guidelines when connecting and disconnecting power to the external power supply unit: • Install the power supply unit before connecting the power cord to the AC power outlet. • Unplug the power cord before cleaning. Caution for ventilation to ensure reliable operation...
User Manual
Page 5
.... Warning! At least 50cm clearance from the wall outlet and refer servicing to qualified service personnel when: • the power cord or plug is damaged, cut or frayed • liquid was spilled into the projector's lens when the lamp is on the projector first and then signal sources. • Do not place the product in the following the operating instructions Note: Adjust only those controls...
.... Warning! At least 50cm clearance from the wall outlet and refer servicing to qualified service personnel when: • the power cord or plug is damaged, cut or frayed • liquid was spilled into the projector's lens when the lamp is on the projector first and then signal sources. • Do not place the product in the following the operating instructions Note: Adjust only those controls...
User Manual
Page 6
... detect the life of displaying inverted images for changing the lamp, when lamp warning message displays. • Do not attempt to disassemble this case contact your local dealer or Acer service center when you . • Do not stand the projector on rare occasions. • Contact your dealer for mounting the projector and ensure it is securely installed. • The projector should be placed in standby mode. • Locations where the...
... detect the life of displaying inverted images for changing the lamp, when lamp warning message displays. • Do not attempt to disassemble this case contact your local dealer or Acer service center when you . • Do not stand the projector on rare occasions. • Contact your dealer for mounting the projector and ensure it is securely installed. • The projector should be placed in standby mode. • Locations where the...
User Manual
Page 8
... bright light may hurt your local dealer or Acer service center for changing the lamp, when lamp warning message displays. • When switching the projector off the product before disconnecting power. • Turn on . Don't: • Block the slots and openings on until the lamp module has been replaced. If this may cause electric shock. • The product will detect the life of your local dealer or Acer service...
... bright light may hurt your local dealer or Acer service center for changing the lamp, when lamp warning message displays. • When switching the projector off the product before disconnecting power. • Turn on . Don't: • Block the slots and openings on until the lamp module has been replaced. If this may cause electric shock. • The product will detect the life of your local dealer or Acer service...
User Manual
Page 9
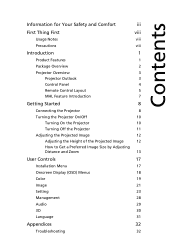
... Features 1 Package Overview 2 Projector Overview 3 Projector Outlook 3 Control Panel 4 Remote Control Layout 5 MHL Feature Introduction 7 Getting Started 8 Connecting the Projector 8 Turning the Projector On/Off 10 Turning On the Projector 10 Turning Off the Projector 11 Adjusting the Projected Image 12 Adjusting the Height of the Projected Image 12 How to Get a Preferred Image Size by Adjusting Distance and Zoom 13 User Controls 17 Installation Menu 17 Onscreen Display (OSD) Menus 18 Color 19 Image 21 Setting 23 Management 28 Audio 29 3D 30...
... Features 1 Package Overview 2 Projector Overview 3 Projector Outlook 3 Control Panel 4 Remote Control Layout 5 MHL Feature Introduction 7 Getting Started 8 Connecting the Projector 8 Turning the Projector On/Off 10 Turning On the Projector 10 Turning Off the Projector 11 Adjusting the Projected Image 12 Adjusting the Height of the Projected Image 12 How to Get a Preferred Image Size by Adjusting Distance and Zoom 13 User Controls 17 Installation Menu 17 Onscreen Display (OSD) Menus 18 Color 19 Image 21 Setting 23 Management 28 Audio 29 3D 30...
User Manual
Page 11
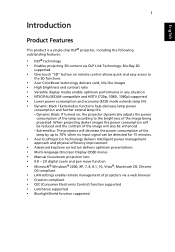
... compliant • LAN settings enable remote management of projectors via DLP Link Technology: Blu-Ray 3D supported • One-touch "3D" button on , the projector dynamically adjusts the power consumption of the lamp according to the brightness of the lamp by up to the 3D functions • Acer ColorBoost technology delivers vivid, life-like images • High brightness and contrast ratio • Versatile display modes enable optimum performance...
... compliant • LAN settings enable remote management of projectors via DLP Link Technology: Blu-Ray 3D supported • One-touch "3D" button on , the projector dynamically adjusts the power consumption of the lamp according to the brightness of the lamp by up to the 3D functions • Acer ColorBoost technology delivers vivid, life-like images • High brightness and contrast ratio • Versatile display modes enable optimum performance...
User Manual
Page 13
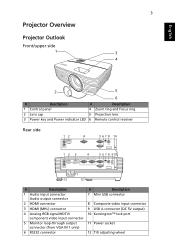
... 1 Control panel 4 Zoom ring and Focus ring 2 Lens cap 5 Projection lens 3 Power key and Power indicator LED 6 Remote control receiver Rear side 12 4 5 6 7 8 10 12 3 4 5 6 7 8 910 11 12 12 # Description 1 Audio input connector Audio output connector 2 HDMI connector 3 HDMI (MHL) connector 4 Analog RGB signal/HDTV/ component video input connector 5 Monitor loop-through output connector (from VGA IN 1 only) 6 RS232 connector # Description 7 Mini USB connector 8 Composite video input connector 9 USB A connector (DC 5V output) 10 Kensington™ lock port...
... 1 Control panel 4 Zoom ring and Focus ring 2 Lens cap 5 Projection lens 3 Power key and Power indicator LED 6 Remote control receiver Rear side 12 4 5 6 7 8 10 12 3 4 5 6 7 8 910 11 12 12 # Description 1 Audio input connector Audio output connector 2 HDMI connector 3 HDMI (MHL) connector 4 Analog RGB signal/HDTV/ component video input connector 5 Monitor loop-through output connector (from VGA IN 1 only) 6 RS232 connector # Description 7 Mini USB connector 8 Composite video input connector 9 USB A connector (DC 5V output) 10 Kensington™ lock port...
User Manual
Page 14
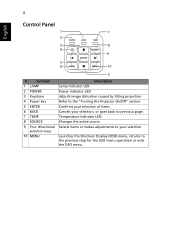
... Launches the Onscreen Display (OSD) menu, returns to the previous step for the OSD menu operation or exits the OSD menu. Changes the active source. Selects items or makes adjustments to your selection, or goes back to the "Turning the Projector On/Off" section. Refer to previous page. 4 English Control Panel 1 7 2 3 8 4 9 5 6 10 # Function 1 LAMP 2 POWER 3 Keystone 4 Power key 5 ENTER 6 BACK 7 TEMP 8 SOURCE 9 Four directional selection keys 10 MENU 3 Description Lamp indicator LED.
... Launches the Onscreen Display (OSD) menu, returns to the previous step for the OSD menu operation or exits the OSD menu. Changes the active source. Selects items or makes adjustments to your selection, or goes back to the "Turning the Projector On/Off" section. Refer to previous page. 4 English Control Panel 1 7 2 3 8 4 9 5 6 10 # Function 1 LAMP 2 POWER 3 Keystone 4 Power key 5 ENTER 6 BACK 7 TEMP 8 SOURCE 9 Four directional selection keys 10 MENU 3 Description Lamp indicator LED.
User Manual
Page 16
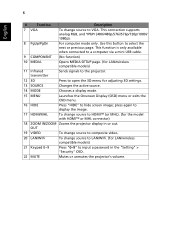
... when connected to a computer via a mini USB cable. 9 COMPONENT (No function) 10 MEDIA Opens MEDIA SETUP page. (for LAN/wireless compatible models) 11 Infrared transmitter Sends signals to the projector. 12 3D Press to open the 3D menu for LAN/wireless compatible models) 21 Keypad 0~9 Press "0~9" to VGA. press again to display the image. 17 HDMI/MHL To change source to LAN/WiFi. (for adjusting 3D settings. 13 SOURCE Changes the active source. 14 MODE Chooses a display mode. 15 MENU Launches...
... when connected to a computer via a mini USB cable. 9 COMPONENT (No function) 10 MEDIA Opens MEDIA SETUP page. (for LAN/wireless compatible models) 11 Infrared transmitter Sends signals to the projector. 12 3D Press to open the 3D menu for LAN/wireless compatible models) 21 Keypad 0~9 Press "0~9" to VGA. press again to display the image. 17 HDMI/MHL To change source to LAN/WiFi. (for adjusting 3D settings. 13 SOURCE Changes the active source. 14 MODE Chooses a display mode. 15 MENU Launches...
User Manual
Page 27
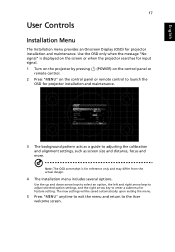
... setting. Use the OSD only when the message "No signal" is for projector installation and maintenance. Note: The OSD screenshot is displayed on the screen or when the projector searches for input signal. 1 Turn on the projector by pressing remote control. (POWER) on the control panel or 2 Press "MENU" on the control panel or remote control to launch the OSD for projector installation and maintenance. 3 The background pattern acts as screen size and distance, focus and more. English 17 User Controls Installation Menu...
... setting. Use the OSD only when the message "No signal" is for projector installation and maintenance. Note: The OSD screenshot is displayed on the screen or when the projector searches for input signal. 1 Turn on the projector by pressing remote control. (POWER) on the control panel or 2 Press "MENU" on the control panel or remote control to launch the OSD for projector installation and maintenance. 3 The background pattern acts as screen size and distance, focus and more. English 17 User Controls Installation Menu...

User Manual
Page 30
... color temperatures, the screen looks warmer. Adjusts the brightness of red in the image. Adjusts the color balance of red and green. • Press to increase the amount of green in the image. • Press to decrease the contrast. • Press to show the correct image tone. Adjusts the color temperature. Note: "Saturation" and "Tint" functions are several choices, including White, Light Yellow, Light Blue, Pink and Dark Green. Adjusts a video image from black and white...
... color temperatures, the screen looks warmer. Adjusts the brightness of red in the image. Adjusts the color balance of red and green. • Press to increase the amount of green in the image. • Press to decrease the contrast. • Press to show the correct image tone. Adjusts the color temperature. Note: "Saturation" and "Tint" functions are several choices, including White, Light Yellow, Light Blue, Pink and Dark Green. Adjusts a video image from black and white...

User Manual
Page 31
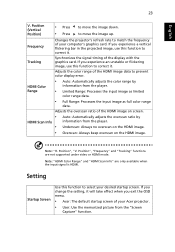
...; Full (for WXGA/1080p models): The image will be displayed making full use of image. • Desktop • Ceiling: Turns the image upside down for WXGA/1080p models): Keeps the original signal aspect ratio and zooms in by 1.333 times. V. English 21 Image Projection Mode Projection Location Aspect Ratio • Front: The factory default setting. • Rear: Reverses the image so you can project from behind a translucent screen. • Auto: Automatically adjusts projection location of the horizontal and vertical...
...; Full (for WXGA/1080p models): The image will be displayed making full use of image. • Desktop • Ceiling: Turns the image upside down for WXGA/1080p models): Keeps the original signal aspect ratio and zooms in by 1.333 times. V. English 21 Image Projection Mode Projection Location Aspect Ratio • Front: The factory default setting. • Rear: Reverses the image so you can project from behind a translucent screen. • Auto: Automatically adjusts projection location of the horizontal and vertical...
User Manual
Page 33
... screen of your Acer projector. • User: Use the memorized picture from the player. • Limited Range: Processes the input image as limited color range data. • Full Range: Processes the input image as full color range data. If you change the setting, it . Synchronizes the signal timing of the HDMI image on the HDMI image. Underscan: Always no overscan on the HDMI image. • Overscan: Always keep overscan on screen. • HDMI Scan Info • Auto: Automatically adjusts...
... screen of your Acer projector. • User: Use the memorized picture from the player. • Limited Range: Processes the input image as limited color range data. • Full Range: Processes the input image as full color range data. If you change the setting, it . Synchronizes the signal timing of the HDMI image on the HDMI image. Underscan: Always no overscan on the HDMI image. • Overscan: Always keep overscan on screen. • HDMI Scan Info • Auto: Automatically adjusts...
User Manual
Page 34
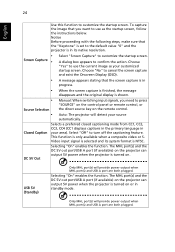
... "Keystone" is set to use as your area). A dialog box appears to turn off the captioning feature. DC 5V Out Selecting "On" enables the function. USB 5V (Standby) Only MHL port(s) will detect your source automatically. To capture the image that the screen capture is in standby mode. This function is only available when a composite video or SVideo input signal is selected and its native resolution...
... "Keystone" is set to use as your area). A dialog box appears to turn off the captioning feature. DC 5V Out Selecting "On" enables the function. USB 5V (Standby) Only MHL port(s) will detect your source automatically. To capture the image that the screen capture is in standby mode. This function is only available when a composite video or SVideo input signal is selected and its native resolution...

User Manual
Page 36
... to input the password every time the projector is plugged. Both "User Password" and "Administrator Password" can set timeout function. • Press to select timeout duration. • The range is from 10 to 990 minutes. • When time is up or change "User Password". • Use the numerical keys on the remote control to set up , the projector will request you to enter the password again. • The factory default setting...
... to input the password every time the projector is plugged. Both "User Password" and "Administrator Password" can set timeout function. • Press to select timeout duration. • The range is from 10 to 990 minutes. • When time is up or change "User Password". • Use the numerical keys on the remote control to set up , the projector will request you to enter the password again. • The factory default setting...
User Manual
Page 37
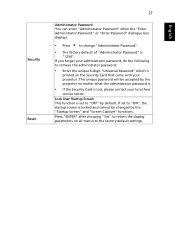
Security Reset 27 Administrator Password You can enter "Administrator Password" when the "Enter Administrator Password" or "Enter Password" dialogue box displays. • Press to change "Administrator Password". • The factory default of "Administrator Password" is locked and cannot be accepted by default. If set to the factory default settings. Press "ENTER" after choosing "Yes" to "ON", the startup screen is "1234". Lock User Startup Screen This function is lost, please contact your...
Security Reset 27 Administrator Password You can enter "Administrator Password" when the "Enter Administrator Password" or "Enter Password" dialogue box displays. • Press to change "Administrator Password". • The factory default of "Administrator Password" is locked and cannot be accepted by default. If set to the factory default settings. Press "ENTER" after choosing "Yes" to "ON", the startup screen is "1234". Lock User Startup Screen This function is lost, please contact your...
User Manual
Page 38
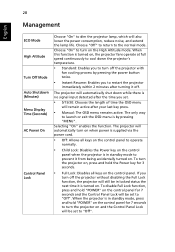
... the projector immediately within 2 minutes after turning it is in locked status the next time it off. To turn the projector on , the projector fans operate at full speed continuously to cool down the projector's temperature. • Standard: Enables you turn the projector on . 28 Management English ECO Mode High Altitude Turn Off Mode Auto Shutdown (Minutes) Menu Display Time (Seconds) AC Power On Control Panel Lock Choose "On" to dim the projector lamp, which will be set to...
... the projector immediately within 2 minutes after turning it is in locked status the next time it off. To turn the projector on , the projector fans operate at full speed continuously to cool down the projector's temperature. • Standard: Enables you turn the projector on . 28 Management English ECO Mode High Altitude Turn Off Mode Auto Shutdown (Minutes) Menu Display Time (Seconds) AC Power On Control Panel Lock Choose "On" to dim the projector lamp, which will be set to...
User Manual
Page 44
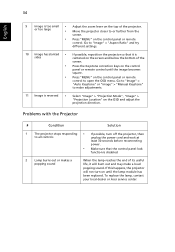
... the screen. • Press the Keystone correction keys on the control panel or remote control until the lamp module has been replaced. Go to "Image" > "Auto Keystone" or "Image" > "Manual Keystone" to all controls unplug the power cord and wait at least 30 seconds before reconnecting power. • Make sure that it will not turn off the projector, then to make a loud popping sound. To replace the lamp, contact your local dealer or Acer service...
... the screen. • Press the Keystone correction keys on the control panel or remote control until the lamp module has been replaced. Go to "Image" > "Auto Keystone" or "Image" > "Manual Keystone" to all controls unplug the power cord and wait at least 30 seconds before reconnecting power. • Make sure that it will not turn off the projector, then to make a loud popping sound. To replace the lamp, contact your local dealer or Acer service...
User Manual
Page 46
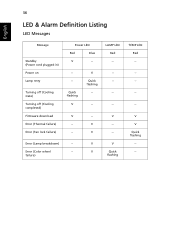
V -- V LAMP LED Red -- --- -- -- failure) V V V Quick flashing TEMP LED Red -- --- -- -- V --- Error (Color wheel -- Error (Lamp breakdown) -- Quick flashing V V Quick flashing -- -- V V Quick flashing --- 36 LED & Alarm Definition Listing LED Messages English Message Standby (Power cord plugged in) Power on Lamp retry Turning off (Cooling state) Turning off (Cooling completed) Firmware download Error (Thermal failure) Error (Fan lock failure) Power LED Red Blue V -- --- V -- --
V -- V LAMP LED Red -- --- -- -- failure) V V V Quick flashing TEMP LED Red -- --- -- -- V --- Error (Color wheel -- Error (Lamp breakdown) -- Quick flashing V V Quick flashing -- -- V V Quick flashing --- 36 LED & Alarm Definition Listing LED Messages English Message Standby (Power cord plugged in) Power on Lamp retry Turning off (Cooling state) Turning off (Cooling completed) Firmware download Error (Thermal failure) Error (Fan lock failure) Power LED Red Blue V -- --- V -- --
User Manual
Page 50
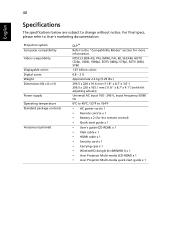
... adjusting wheels) Universal AC input 100 - 240 V, input frequency 50/60 Hz 0ºC to 40ºC / 32ºF to change without notice. Projection system Computer compatibility Video compatibility Displayable colors Digital zoom Weight Dimensions (W x D x H) Power supply Operating temperature Standard package contents Accessory (optional) DLP™ Refer to Acer's marketing documentation. For final specs, please refer to the "Compatibility Modes" section for the remote control) • Quick start guide x 1 • User's guide (CD-ROM) x 1 • VGA cable x 1 • HDMI cable...
... adjusting wheels) Universal AC input 100 - 240 V, input frequency 50/60 Hz 0ºC to 40ºC / 32ºF to change without notice. Projection system Computer compatibility Video compatibility Displayable colors Digital zoom Weight Dimensions (W x D x H) Power supply Operating temperature Standard package contents Accessory (optional) DLP™ Refer to Acer's marketing documentation. For final specs, please refer to the "Compatibility Modes" section for the remote control) • Quick start guide x 1 • User's guide (CD-ROM) x 1 • VGA cable x 1 • HDMI cable...


