
User Manual
Page 3
... product. It may remain after switching the image, when the same image is displayed for future reference. Acer monitor is recovered slowly by changing the image or turning off the power switch and then turn it on the desktop pattern you use . Turn off the power switch for video and visual display of the fluorescent light, the screen may find slightly uneven brightness on the screen depending on again to the nature...
... product. It may remain after switching the image, when the same image is displayed for future reference. Acer monitor is recovered slowly by changing the image or turning off the power switch and then turn it on the desktop pattern you use . Turn off the power switch for video and visual display of the fluorescent light, the screen may find slightly uneven brightness on the screen depending on again to the nature...
User Manual
Page 4
... this product on the cord. When you plug the power cord into the product. • To avoid dmage of time listening to music at high volume. • Avoid turning up the volume to block out noisy surroundings. • Turn the volume down if you can hear it clearly and comfortably and without distortion. • After setting the volume level, do not...
... this product on the cord. When you plug the power cord into the product. • To avoid dmage of time listening to music at high volume. • Avoid turning up the volume to block out noisy surroundings. • Turn the volume down if you can hear it clearly and comfortably and without distortion. • After setting the volume level, do not...

User Manual
Page 5
...the product exhibits a distinct change in electric shock and/or injury. If you to service this product, make sure that the total rating of all servicing to replace the power cord set . Warning! Contact your electrician for service • the product ...power strip's input rating. • This product's power cord is used with this product yourself, as opening or removing covers may result in performance, indicating a need to qualified service personnel. If power strips are used, the load should not exceed 80% of the branch circuit rating. Do not insert the plug into the wall...
...the product exhibits a distinct change in electric shock and/or injury. If you to service this product, make sure that the total rating of all servicing to replace the power cord set . Warning! Contact your electrician for service • the product ...power strip's input rating. • This product's power cord is used with this product yourself, as opening or removing covers may result in performance, indicating a need to qualified service personnel. If power strips are used, the load should not exceed 80% of the branch circuit rating. Do not insert the plug into the wall...

User Manual
Page 6
...best working procedures to reduce the environmental impact of other products. We at Acer are in damage and will often require extensive work by the operating instructions, since improper adjustment of our products. To minimize pollution and ensure utmost protection of small children. Keep them out of the reach of the global environment, please recycle. Switch... covered by a qualified technician to restore the product to turn off your device in minimizing the burden placed on the Waste from Electrical and Electronics Equipment (WEEE) regulations, visit https://www.acer-...
...best working procedures to reduce the environmental impact of other products. We at Acer are in damage and will often require extensive work by the operating instructions, since improper adjustment of our products. To minimize pollution and ensure utmost protection of small children. Keep them out of the reach of the global environment, please recycle. Switch... covered by a qualified technician to restore the product to turn off your device in minimizing the burden placed on the Waste from Electrical and Electronics Equipment (WEEE) regulations, visit https://www.acer-...

User Manual
Page 7
This product has been shipped enabled for power management: • Activate display's Sleep mode within 5 minutes of user inactivity. • Wake the monitor when it is produced with high-precision manufacturing techniques. Incorrect computer usage may occasionally misfire or appear as black or red dots. Observe the following section provides tips for comfortable use Computer users may appear in the hands...
This product has been shipped enabled for power management: • Activate display's Sleep mode within 5 minutes of user inactivity. • Wake the monitor when it is produced with high-precision manufacturing techniques. Incorrect computer usage may occasionally misfire or appear as black or red dots. Observe the following section provides tips for comfortable use Computer users may appear in the hands...
User Manual
Page 11
... vision 8 Developing good work habits 8 Federal Communications Commission 10 Supplier's Declaration of Conformity 10 Unpacking 12 SCREEN POSITION ADJUSTMENT 13 Connecting the adapter and AC Power cord 15 Power saving 15 Display Data Channel (DDC) 16 19-pin color display signal cable* 16 20-pin color display signal cable 16 Standard timing table 17 Installation 18 User Controls 19 External controls 19 Using the Shortcut Menu 20 The Function page 21 Troubleshooting 30 HDMI /DP Mode (Optional) 30
... vision 8 Developing good work habits 8 Federal Communications Commission 10 Supplier's Declaration of Conformity 10 Unpacking 12 SCREEN POSITION ADJUSTMENT 13 Connecting the adapter and AC Power cord 15 Power saving 15 Display Data Channel (DDC) 16 19-pin color display signal cable* 16 20-pin color display signal cable 16 Standard timing table 17 Installation 18 User Controls 19 External controls 19 Using the Shortcut Menu 20 The Function page 21 Troubleshooting 30 HDMI /DP Mode (Optional) 30
User Manual
Page 12
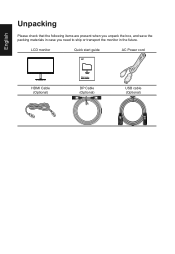
English Unpacking Please check that the following items are present when you unpack the box, and save the packing materials in case you need to ship or transport the monitor in the future. LCD monitor Quick start guide AC Power cord HDMI Cable (Optional) LCD Monitor NITRO XV2 series-XV272 DP Cable (Optional) USB cable (Optional)
English Unpacking Please check that the following items are present when you unpack the box, and save the packing materials in case you need to ship or transport the monitor in the future. LCD monitor Quick start guide AC Power cord HDMI Cable (Optional) LCD Monitor NITRO XV2 series-XV272 DP Cable (Optional) USB cable (Optional)

User Manual
Page 13
English SCREEN POSITION ADJUSTMENT In oder to avoid scratching the screen. • Height Adjustment After pressing the top of the monitor then you can adjust the tilt of the tilt range. use a cloth to optimize the best viewing position, you can 25 degrees of recline be offered for an example of the monitor. • Attaching the Base Note: Remove the monitor and monitor base from its packaging.Carefully place the monitor face-down on a stable...
English SCREEN POSITION ADJUSTMENT In oder to avoid scratching the screen. • Height Adjustment After pressing the top of the monitor then you can adjust the tilt of the tilt range. use a cloth to optimize the best viewing position, you can 25 degrees of recline be offered for an example of the monitor. • Attaching the Base Note: Remove the monitor and monitor base from its packaging.Carefully place the monitor face-down on a stable...

User Manual
Page 15
... user-adjustment is the correct type required for the country in either 100/120 V AC or 220/240 V AC voltage area. English Connecting the adapter and AC Power cord • Check first to make sure that allows operation in which the equipment will be installed. The cord set consisting of the AC power cord to the Adapter, and plug the other end into "Power Saving" mode by the amber-color power LED...
... user-adjustment is the correct type required for the country in either 100/120 V AC or 220/240 V AC voltage area. English Connecting the adapter and AC Power cord • Check first to make sure that allows operation in which the equipment will be installed. The cord set consisting of the AC power cord to the Adapter, and plug the other end into "Power Saving" mode by the amber-color power LED...
User Manual
Page 16
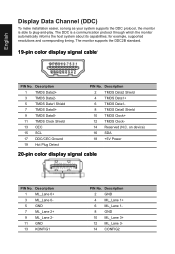
... 2+ 9 ML_Lane 211 GND 13 KONFIG1 PIN No. on device) 16 SDA 18 +5V Power 20-pin color display signal cable PIN No. Description 2 TMDS Data2 Shield 4 TMDS Data1+ 6 TMDS Data18 TMDS Data0 Shield 10 TMDS Clock+ 12 TMDS Clock14 Reserved (N.C. The DDC is able to plug-and-play. The monitor supports the DDC2B standard. 19-pin color display signal cable* PIN No.
... 2+ 9 ML_Lane 211 GND 13 KONFIG1 PIN No. on device) 16 SDA 18 +5V Power 20-pin color display signal cable PIN No. Description 2 TMDS Data2 Shield 4 TMDS Data1+ 6 TMDS Data18 TMDS Data0 Shield 10 TMDS Clock+ 12 TMDS Clock14 Reserved (N.C. The DDC is able to plug-and-play. The monitor supports the DDC2B standard. 19-pin color display signal cable* PIN No.
User Manual
Page 18
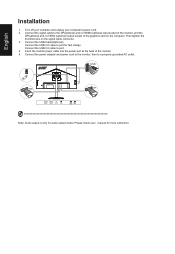
Insert the monitor power cable into the power port at the back of the graphics card on the signal cable connector. 3. Connect the power adapter and power cord to the monitor, then to port. 4. English Installation 1. Connect the USB Cable(Optional) Connect the USB 3.0 cable to the DP(optional) and /or HDMI (optional) input socket of the monitor, and the DP(optional) and /or HDMI (optional) output socket of the monitor. 5. Connect the signal cable to port for audio output model. USB HDMI 1(2.0) HDMI 2(2.0) DP Note: Audio output is only...
Insert the monitor power cable into the power port at the back of the graphics card on the signal cable connector. 3. Connect the power adapter and power cord to the monitor, then to port. 4. English Installation 1. Connect the USB Cable(Optional) Connect the USB 3.0 cable to the DP(optional) and /or HDMI (optional) input socket of the monitor, and the DP(optional) and /or HDMI (optional) output socket of the monitor. 5. Connect the signal cable to port for audio output model. USB HDMI 1(2.0) HDMI 2(2.0) DP Note: Audio output is only...
User Manual
Page 19
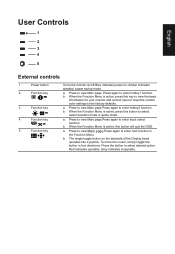
... information for your monitor and current input or reset the custom color settings to enter hotkey1 function. a. Grey indicates inoperable. English User Controls 1 2 3 4 5 External controls 1 Power button 2 Function key / 3 Function key / 4 Function key /X 5 Function key / Turns the monitor on/off.Blue indicates power on the backside of the Display bezel operates like a joystick. Press again to the factory defaults. When the Function Menu is active, this button to select desired...
... information for your monitor and current input or reset the custom color settings to enter hotkey1 function. a. Grey indicates inoperable. English User Controls 1 2 3 4 5 External controls 1 Power button 2 Function key / 3 Function key / 4 Function key /X 5 Function key / Turns the monitor on/off.Blue indicates power on the backside of the Display bezel operates like a joystick. Press again to the factory defaults. When the Function Menu is active, this button to select desired...
User Manual
Page 20
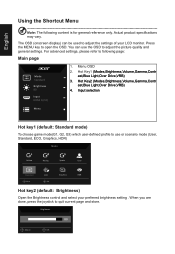
... Menu Note: The following page: Main page Mode Standard Brightness 80 Input HDMI 1(2.0) 1. Hot Key2 (Modes,Brightness,Volume,Gamma,Contr ast,Blue Light,Over Drive,VRB) 4. You can be used to adjust the picture quality and general settings. The OSD (onscreen display) can use or scenario mode (User, Standard, ECO, Graphics, HDR) Modes Action Racing Sports User Standard ECO Graphics HDR Move OK Hot key2 (default: Brightness) Open the Brightness control and select your LCD monitor. Actual product specifications...
... Menu Note: The following page: Main page Mode Standard Brightness 80 Input HDMI 1(2.0) 1. Hot Key2 (Modes,Brightness,Volume,Gamma,Contr ast,Blue Light,Over Drive,VRB) 4. You can be used to adjust the picture quality and general settings. The OSD (onscreen display) can use or scenario mode (User, Standard, ECO, Graphics, HDR) Modes Action Racing Sports User Standard ECO Graphics HDR Move OK Hot key2 (default: Brightness) Open the Brightness control and select your LCD monitor. Actual product specifications...
User Manual
Page 21
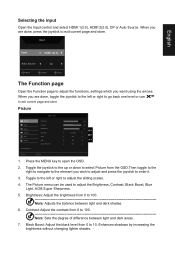
Picture Picture Color Audio Gaming OSD System Save Settings to open the OSD. 2. Contrast: Adjust the contrast from 0 to 100 Note: Adjusts the balance between light and dark areas. 7. Black Boost: Adjust the black level from the OSD.Then toggle to the right to navigate to enter it. 3. Press the MENU key to ... The Picture menu can be used to adjust the sliding scales. 4. Selecting the input Open the Input control and select HDMI 1(2.0), HDMI 2(2.0), DP or Auto Source. Enhances shadows by...
Picture Picture Color Audio Gaming OSD System Save Settings to open the OSD. 2. Contrast: Adjust the contrast from 0 to 100 Note: Adjusts the balance between light and dark areas. 7. Black Boost: Adjust the black level from the OSD.Then toggle to the right to navigate to enter it. 3. Press the MENU key to ... The Picture menu can be used to adjust the sliding scales. 4. Selecting the input Open the Input control and select HDMI 1(2.0), HDMI 2(2.0), DP or Auto Source. Enhances shadows by...

User Manual
Page 22
... be based on the current screen to ... HDR function • Hot Key of Mode: Mode Standard Brightness 80 Input HDMI 1(2.0) Modes Action Racing Sports User Menu Standard ECO Graphics HDR Move OK • Main Menu of the original source to protect your eyes by boosting the pixel density of HDR: Mode - Blue Light: Filters out blue light to make images sharper and clearer. User Picture Color Audio Gaming OSD System Save Settings to dynamic contrast adjustment. 10. Super Sharpness: Turn...
... be based on the current screen to ... HDR function • Hot Key of Mode: Mode Standard Brightness 80 Input HDMI 1(2.0) Modes Action Racing Sports User Menu Standard ECO Graphics HDR Move OK • Main Menu of the original source to protect your eyes by boosting the pixel density of HDR: Mode - Blue Light: Filters out blue light to make images sharper and clearer. User Picture Color Audio Gaming OSD System Save Settings to dynamic contrast adjustment. 10. Super Sharpness: Turn...

User Manual
Page 23
... and Color Temp are hidden). HDR Brightness Contrast Black Boost Blue Light ACM HDR Super Sharpness Standard Off Auto Off 80 50 9 X Main Source DP Resolution 1920x1080 H/V Frequency H:66KHz V:60Hz Mode HDR Information S/N: MN53035032682018TPV888 Reset ALL Settings Exit Move Enter HDR = (Auto or HDR-400) • HDR function and Effect: Move Exit Information Page Optional Auto HDR-400 Off (Default) Behavior Auto checked input source status Auto checked input source status No support HDR effect...
... and Color Temp are hidden). HDR Brightness Contrast Black Boost Blue Light ACM HDR Super Sharpness Standard Off Auto Off 80 50 9 X Main Source DP Resolution 1920x1080 H/V Frequency H:66KHz V:60Hz Mode HDR Information S/N: MN53035032682018TPV888 Reset ALL Settings Exit Move Enter HDR = (Auto or HDR-400) • HDR function and Effect: Move Exit Information Page Optional Auto HDR-400 Off (Default) Behavior Auto checked input source status Auto checked input source status No support HDR effect...

User Manual
Page 27
VRB function does not affect the (Logo, Aim Point, Message and Input Icon) brightness. 5. VRB set "On", when to turn on AMD FreeSync Premium, will auto set VRB is "Off". 4. VRB: To choose whether to adjustment (Brightness, Blue Light, ACM), will auto set VRB is "Off". 3. VRB set "On", when to support dynamic picture more clean control, default is not support VRB. 2. VRB setting "On", when detection of Input Timing HDR setting: "Auto" is Off. English 6. Note: 1.
VRB function does not affect the (Logo, Aim Point, Message and Input Icon) brightness. 5. VRB set "On", when to turn on AMD FreeSync Premium, will auto set VRB is "Off". 4. VRB: To choose whether to adjustment (Brightness, Blue Light, ACM), will auto set VRB is "Off". 3. VRB set "On", when to support dynamic picture more clean control, default is not support VRB. 2. VRB setting "On", when detection of Input Timing HDR setting: "Auto" is Off. English 6. Note: 1.

User Manual
Page 28
... to trigger "OSD Unlock". • The "OSD Unlock" message will be displayed in the middle of shortcut key 1(Modes, Brightness, Volume, Hot Key Assigment: Select the function of the screen. • LED lights will be 0% (OFF), 20%, 40%, 60%, or 80%. 7. OSD Lock:To choose OSD lock on/off the OSD menu. 6. System Mode - Standard Picture Color Audio Gaming OSD System Move Input Auto Source Wide Mode Hot Key Assignment DDC/CI HDMI Black Level Quick Start Mode Power-off USB Charge Enter HDMI 1(2.0) On...
... to trigger "OSD Unlock". • The "OSD Unlock" message will be displayed in the middle of shortcut key 1(Modes, Brightness, Volume, Hot Key Assigment: Select the function of the screen. • LED lights will be 0% (OFF), 20%, 40%, 60%, or 80%. 7. OSD Lock:To choose OSD lock on/off the OSD menu. 6. System Mode - Standard Picture Color Audio Gaming OSD System Move Input Auto Source Wide Mode Hot Key Assignment DDC/CI HDMI Black Level Quick Start Mode Power-off USB Charge Enter HDMI 1(2.0) On...
User Manual
Page 29
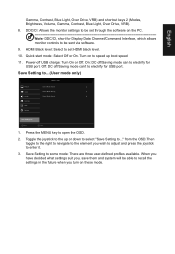
... will be sent via software. 9. HDMI Black level: Select to set through the software on these mode. On: DC off/Saving mode can 't to be set HDMI black level. 10. English Gamma, Contrast, Blue Light, Over Drive, VRB) and shortcut keys 2 (Modes, Brightness, Volume, Gamma, Contrast, Blue Light, Over Drive, VRB). 8. DDC/CI: Allows the monitor settings to electrify for USB port. Toggle the joystick to enter it. 3. Off: DC off USB charge: Turn On or Off...
... will be sent via software. 9. HDMI Black level: Select to set through the software on these mode. On: DC off/Saving mode can 't to be set HDMI black level. 10. English Gamma, Contrast, Blue Light, Over Drive, VRB) and shortcut keys 2 (Modes, Brightness, Volume, Gamma, Contrast, Blue Light, Over Drive, VRB). 8. DDC/CI: Allows the monitor settings to electrify for USB port. Toggle the joystick to enter it. 3. Off: DC off USB charge: Turn On or Off...

User Manual
Page 30
Amber Check if the AC power cord is properly connected at the back of monitor. Regulatory Compliance 217186 I.T.E. HDMI /DP Mode (Optional) Problem No picture visible LED status Blue Off Remedy Using the OSD menu, adjust brightness and contrast to maximum or reset to see if you can self-diagnose the problem. Check if the video signal cable is properly connected to the monitor. English Troubleshooting Before sending your LCD monitor for servicing, please check the troubleshooting list below to their default setting. Check if the...
Amber Check if the AC power cord is properly connected at the back of monitor. Regulatory Compliance 217186 I.T.E. HDMI /DP Mode (Optional) Problem No picture visible LED status Blue Off Remedy Using the OSD menu, adjust brightness and contrast to maximum or reset to see if you can self-diagnose the problem. Check if the video signal cable is properly connected to the monitor. English Troubleshooting Before sending your LCD monitor for servicing, please check the troubleshooting list below to their default setting. Check if the...


