
User Manual
Page 10
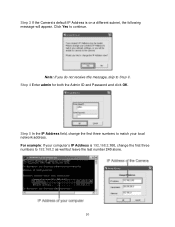
Step 4 Enter admin for both the Admin ID and Password and click OK. For example: If your local network address. Step 3 If the Camera's default IP Address is 192.168.2.100, change the first three numbers to Step 9. Click Yes to 192.168.2 as well but leave the last number 240 alone. 10 Step 5 In the IP Address field, change the first three numbers to continue. Note: If you do not receive this message, skip to match your computer's IP Address is on a different subnet, the following message will appear.
Step 4 Enter admin for both the Admin ID and Password and click OK. For example: If your local network address. Step 3 If the Camera's default IP Address is 192.168.2.100, change the first three numbers to Step 9. Click Yes to 192.168.2 as well but leave the last number 240 alone. 10 Step 5 In the IP Address field, change the first three numbers to continue. Note: If you do not receive this message, skip to match your computer's IP Address is on a different subnet, the following message will appear.
User Manual
Page 12
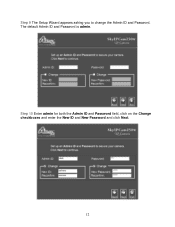
Step 10 Enter admin for both the Admin ID and Password field, click on the Change checkboxes and enter the New ID and New Password and click Next. 12 Step 9 The Setup Wizard appears asking you to change the Admin ID and Password. The default Admin ID and Password is admin.
Step 10 Enter admin for both the Admin ID and Password field, click on the Change checkboxes and enter the New ID and New Password and click Next. 12 Step 9 The Setup Wizard appears asking you to change the Admin ID and Password. The default Admin ID and Password is admin.
User Manual
Page 14
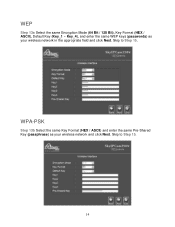
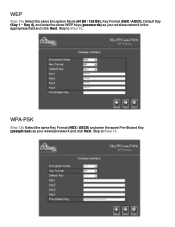
Skip to Step 15. WEP Step 13a Select the same Encryption Mode (64 Bit / 128 Bit), Key Format (HEX / ASCII), Default Key (Key_1 ~ Key_4), and enter the same WEP keys (passwords) as your wireless network in the appropriate field and click Next. WPA-PSK Step 13b Select the same Key Format (HEX / ASCII) and enter the same Pre-Shared Key (passphrase) as your wireless network and click Next. Skip to Step 15. 14
Skip to Step 15. WEP Step 13a Select the same Encryption Mode (64 Bit / 128 Bit), Key Format (HEX / ASCII), Default Key (Key_1 ~ Key_4), and enter the same WEP keys (passwords) as your wireless network in the appropriate field and click Next. WPA-PSK Step 13b Select the same Key Format (HEX / ASCII) and enter the same Pre-Shared Key (passphrase) as your wireless network and click Next. Skip to Step 15. 14

User Manual
Page 19
Step 3 Enter admin for both the User name and Password and click OK. Step 4 Click on Configuration and then Wireless. 19
Step 3 Enter admin for both the User name and Password and click OK. Step 4 Click on Configuration and then Wireless. 19

User Manual
Page 24
... or Netscape). Note: If you have previously specified and click OK. 24 Step 3 Enter admin for both the User name and Password or enter the new User name and Password that you to enter the Web Configuration Utility. Web Configuration Utility The built-in Web Configuration Utility allows you have changed the...
... or Netscape). Note: If you have previously specified and click OK. 24 Step 3 Enter admin for both the User name and Password or enter the new User name and Password that you to enter the Web Configuration Utility. Web Configuration Utility The built-in Web Configuration Utility allows you have changed the...

User Manual
Page 28
Admin Password: Specify a password for the camera. Dummy: Both Pwr and Lnk LEDs are OFF. OFF: Both Pwr and Lnk LEDs are ON with Lnk flashing randomly. Camera Name: ...
Admin Password: Specify a password for the camera. Dummy: Both Pwr and Lnk LEDs are OFF. OFF: Both Pwr and Lnk LEDs are ON with Lnk flashing randomly. Camera Name: ...
User Manual
Page 33
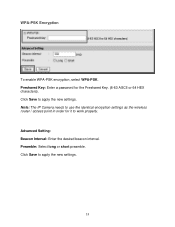
Preamble: Select long or short preamble. Click Save to apply the new settings. Click Save to apply the new settings. 33 Note: The IP Camera needs to use the identical encryption settings as the wireless router / access point in order for the Preshared Key. (8-63 ASCII or 64 HEX characters). Advanced Setting: Beacon Interval: Enter the desired beacon interval. Preshared Key: Enter a password for it to work properly. WPA-PSK Encryption To enable WPA-PSK encryption, select WPA-PSK.
Preamble: Select long or short preamble. Click Save to apply the new settings. Click Save to apply the new settings. 33 Note: The IP Camera needs to use the identical encryption settings as the wireless router / access point in order for the Preshared Key. (8-63 ASCII or 64 HEX characters). Advanced Setting: Beacon Interval: Enter the desired beacon interval. Preshared Key: Enter a password for it to work properly. WPA-PSK Encryption To enable WPA-PSK encryption, select WPA-PSK.
User Manual
Page 34
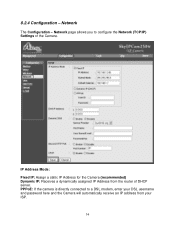
IP Address Mode: Fixed IP: Assign a static IP Address for the Camera (recommended) Dynamic IP: Receives a dynamically assigned IP Address from your DSL username and password here and the Camera will automatically receive an IP address from the router of the Camera. Network The Configuration - PPPoE: If the camera is directly connected to configure the Network (TCP/IP) Settings of DHCP server. Network page allows you to a DSL modem, enter your ISP. 34 8.2.4 Configuration -
IP Address Mode: Fixed IP: Assign a static IP Address for the Camera (recommended) Dynamic IP: Receives a dynamically assigned IP Address from your DSL username and password here and the Camera will automatically receive an IP address from the router of the Camera. Network The Configuration - PPPoE: If the camera is directly connected to configure the Network (TCP/IP) Settings of DHCP server. Network page allows you to a DSL modem, enter your ISP. 34 8.2.4 Configuration -

User Manual
Page 35
... a port number that's not in the applicable fields. Select to apply the new settings. 8.2.5 Configuration - To add a new user, enter the new User Name and Password.
... a port number that's not in the applicable fields. Select to apply the new settings. 8.2.5 Configuration - To add a new user, enter the new User Name and Password.

User Manual
Page 44
Step 4 Click on Configuration then Network. 44 Step 3 Enter admin for both the User name and Password or enter the new User name and Password that you have previously specified and click OK.
Step 4 Click on Configuration then Network. 44 Step 3 Enter admin for both the User name and Password or enter the new User name and Password that you have previously specified and click OK.
User Manual
Page 51
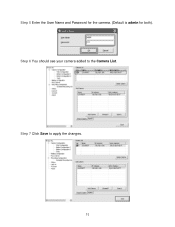
Step 5 Enter the User Name and Password for the camera. (Default is admin for both). Step 7 Click Save to the Camera List. Step 6 You should see your camera added to apply the changes. 51
Step 5 Enter the User Name and Password for the camera. (Default is admin for both). Step 7 Click Save to the Camera List. Step 6 You should see your camera added to apply the changes. 51

User Manual
Page 54
Step 6 Click on the System Configuration button to the Camera List. Step 4 You should see your camera added to close the System Configuration Window. 54 Step 3 Enter the User Name and Password for the camera. (Default is admin for both). Step 5 Click Save to apply the changes. Step 2b For remote camera, enter the Internet IP Address (WAN IP) of the remote router and the port number of the Second HTTP Port of the remote camera and click Add Camera.
Step 6 Click on the System Configuration button to the Camera List. Step 4 You should see your camera added to close the System Configuration Window. 54 Step 3 Enter the User Name and Password for the camera. (Default is admin for both). Step 5 Click Save to apply the changes. Step 2b For remote camera, enter the Internet IP Address (WAN IP) of the remote router and the port number of the Second HTTP Port of the remote camera and click Add Camera.

User Manual
Page 59
Record: Click on the IPView Pro for IPView Pro, you'll need to input the same password to the corresponding settings in System Configuration. To stop recording, click on the Power button and select to your hard drive. Key Lock: The Key ... Record button and select Manual Record again. 59 10.3.3 Control Panel The Control Panel contains essential buttons for operating IPView Pro. If you have enabled a password login for security purposes.
Record: Click on the IPView Pro for IPView Pro, you'll need to input the same password to the corresponding settings in System Configuration. To stop recording, click on the Power button and select to your hard drive. Key Lock: The Key ... Record button and select Manual Record again. 59 10.3.3 Control Panel The Control Panel contains essential buttons for operating IPView Pro. If you have enabled a password login for security purposes.

User Manual
Page 66
... allows you to specify the recipient of the E-mail alert when motion is detected and the Send e-Mail option is used to send your e-mail. Password: Enter the password for logging into the Mail Server.
... allows you to specify the recipient of the E-mail alert when motion is detected and the Send e-Mail option is used to send your e-mail. Password: Enter the password for logging into the Mail Server.

User Manual
Page 73
Enter the desired Admin ID and Password. Login password check: Check this box to IPView Pro. 10.4.12 Account The Account page allows you to setup a user name and password to log in to enable the login prompt when you start IPView Pro and when you unlock the Key Lock button. 73
Enter the desired Admin ID and Password. Login password check: Check this box to IPView Pro. 10.4.12 Account The Account page allows you to setup a user name and password to log in to enable the login prompt when you start IPView Pro and when you unlock the Key Lock button. 73
User Manual
Page 79
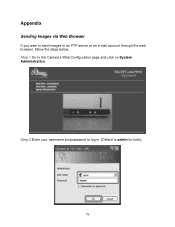
Step 1 Go to an FTP server or an e-mail account through the web browser, follow the steps below. Appendix Sending Images via Web Browser If you want to send images to the Camera's Web Configuration page and click on System Administration. Step 2 Enter your username and password to log in. (Default is admin for both). 79
Step 1 Go to an FTP server or an e-mail account through the web browser, follow the steps below. Appendix Sending Images via Web Browser If you want to send images to the Camera's Web Configuration page and click on System Administration. Step 2 Enter your username and password to log in. (Default is admin for both). 79
Quick Installation Guide
Page 7
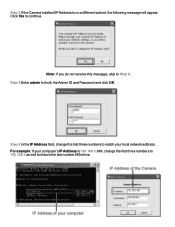
Note: If you do not receive this message, skip to continue. Step 3 If the Camera's default IP Address is 192.168.2.100, change the first three numbers to match your computer's IP Address is on a different subnet, the following message will appear. Step 4 Enter admin for both the Admin ID and Password and click OK. Step 5 In the IP Address field, change the first three numbers to 192.168.2 as well but leave the last number 240 alone. Click Yes to Step 9. For example: If your local network address.
Note: If you do not receive this message, skip to continue. Step 3 If the Camera's default IP Address is 192.168.2.100, change the first three numbers to match your computer's IP Address is on a different subnet, the following message will appear. Step 4 Enter admin for both the Admin ID and Password and click OK. Step 5 In the IP Address field, change the first three numbers to 192.168.2 as well but leave the last number 240 alone. Click Yes to Step 9. For example: If your local network address.

Quick Installation Guide
Page 9
The default Admin ID and Password is admin. Step 10 Enter admin for both the Admin ID and Password field, click on the Change checkboxes and enter the New ID and New Password and click Next. Step 9 The Setup Wizard appears asking you to change the Admin ID and Password.
The default Admin ID and Password is admin. Step 10 Enter admin for both the Admin ID and Password field, click on the Change checkboxes and enter the New ID and New Password and click Next. Step 9 The Setup Wizard appears asking you to change the Admin ID and Password.
Quick Installation Guide
Page 11
WPA-PSK Step 13b Select the same Key Format (HEX / ASCII) and enter the same Pre-Shared Key (passphrase) as your wireless network and click Next. Skip to Step 15. Skip to Step 15. WEP Step 13a Select the same Encryption Mode (64 Bit / 128 Bit), Key Format (HEX / ASCII), Default Key (Key 1 ~ Key 4), and enter the same WEP keys (passwords) as your wireless network in the appropriate field and click Next.
WPA-PSK Step 13b Select the same Key Format (HEX / ASCII) and enter the same Pre-Shared Key (passphrase) as your wireless network and click Next. Skip to Step 15. Skip to Step 15. WEP Step 13a Select the same Encryption Mode (64 Bit / 128 Bit), Key Format (HEX / ASCII), Default Key (Key 1 ~ Key 4), and enter the same WEP keys (passwords) as your wireless network in the appropriate field and click Next.

Quick Installation Guide
Page 16
Verify that the SSID matches the SSID of your wireless router. Step 4 Click on the Refresh button until it displays Yes. Step 3 Enter admin for both the User name and Password and click OK. Also verify that the Connection Mode is Infrastructure and the Link is Yes. Note: If the Link does not say Yes, click on Wireless.
Verify that the SSID matches the SSID of your wireless router. Step 4 Click on the Refresh button until it displays Yes. Step 3 Enter admin for both the User name and Password and click OK. Also verify that the Connection Mode is Infrastructure and the Link is Yes. Note: If the Link does not say Yes, click on Wireless.
