
User Manual
Page 2
... The IP Camera is ready for use now 17 7. System 28 8.2.2 Configuration - Date & Time 36 8.2.7 Configuration - Introduction...4 2. Installing the Setup Wizard...6 4. User ...27 8.2.1 Configuration - Wireless 26 8.1.4 Management - User...35 8.2.6 Configuration - Using the Setup Wizard ...9 6. Configuring Wireless Settings 18 7.1 Infrastructure Mode ...18 7.2 Ad-Hoc Mode ...22 8. Factory Reset ...40 8.3.5 Tools - IPView Pro...46...
... The IP Camera is ready for use now 17 7. System 28 8.2.2 Configuration - Date & Time 36 8.2.7 Configuration - Introduction...4 2. Installing the Setup Wizard...6 4. User ...27 8.2.1 Configuration - Wireless 26 8.1.4 Management - User...35 8.2.6 Configuration - Using the Setup Wizard ...9 6. Configuring Wireless Settings 18 7.1 Infrastructure Mode ...18 7.2 Ad-Hoc Mode ...22 8. Factory Reset ...40 8.3.5 Tools - IPView Pro...46...

User Manual
Page 4
... you to remotely manage the IP Camera. The IP Camera allows you install and use this product, please read this manual. Combined with the bundled Setup Wizard and IPView Pro software, managing and viewing multiple IP Cameras is a standalone network device that 's connected to the network to view images and live...
... you to remotely manage the IP Camera. The IP Camera allows you install and use this product, please read this manual. Combined with the bundled Setup Wizard and IPView Pro software, managing and viewing multiple IP Cameras is a standalone network device that 's connected to the network to view images and live...

User Manual
Page 5
...lit. Caution: The IP Camera is recommended to the CMOS sensor. When operating in this Manual carefully to perform the following tasks: 1. Install the Setup Wizard. 3. Please follow the steps in extremely bright environment, an iris lens or sun visor is designed for indoor use only. Step 3 Verify that... the IP Camera. Gather information about your network. 2. 2. Configure the IP Camera using the IP Camera, you'll need to ensure proper setup of the Camera and connecting the other end to your local network address and wireless settings. 4. Getting Started Note: Before using the...
...lit. Caution: The IP Camera is recommended to the CMOS sensor. When operating in this Manual carefully to perform the following tasks: 1. Install the Setup Wizard. 3. Please follow the steps in extremely bright environment, an iris lens or sun visor is designed for indoor use only. Step 3 Verify that... the IP Camera. Gather information about your network. 2. 2. Configure the IP Camera using the IP Camera, you'll need to ensure proper setup of the Camera and connecting the other end to your local network address and wireless settings. 4. Getting Started Note: Before using the...

User Manual
Page 6
Step 2 Click on Install Wizard. Step 3 Click Next. 6 3. Note: If the autorun screen does not appear automatically, go to appear. Installing the Setup Wizard Step 1 Insert the provided CD and wait for the autorun screen to Start, Run, type D:\autorun.exe (where D is the letter of your CD drive) and click OK.
Step 2 Click on Install Wizard. Step 3 Click Next. 6 3. Note: If the autorun screen does not appear automatically, go to appear. Installing the Setup Wizard Step 1 Insert the provided CD and wait for the autorun screen to Start, Run, type D:\autorun.exe (where D is the letter of your CD drive) and click OK.
User Manual
Page 8
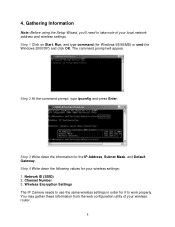
.... Step 4 Write down the information for your wireless router. 8 Step 2 At the command prompt, type ipconfig and press Enter. Gathering Information Note: Before using the Setup Wizard, you'll need to work properly. Step 3 Write down the following values for the IP Address, Subnet Mask, and Default Gateway. Network ID (SSID...
.... Step 4 Write down the information for your wireless router. 8 Step 2 At the command prompt, type ipconfig and press Enter. Gathering Information Note: Before using the Setup Wizard, you'll need to work properly. Step 3 Write down the following values for the IP Address, Subnet Mask, and Default Gateway. Network ID (SSID...

User Manual
Page 9
5. Using the Setup Wizard Step 1 Go to configure from the list and click on the Wizard button. 9 Step 2 Select the IP Camera you want to Start > (All) Programs > AirLink101 IP Camera Setup Wizard.
5. Using the Setup Wizard Step 1 Go to configure from the list and click on the Wizard button. 9 Step 2 Select the IP Camera you want to Start > (All) Programs > AirLink101 IP Camera Setup Wizard.

User Manual
Page 11
Select the Camera and click on the Wizard button. 11 Step 7 After the Camera has restarted, click the Exit button to continue. Step 8 Start the Setup Wizard again and make sure the Current IP Address field displays the new IP Address. Step 6 Enter the Subnet Mask and Gateway fields with exactly the same values as you got from running ipconfig. Click OK to close the Setup Wizard.
Select the Camera and click on the Wizard button. 11 Step 7 After the Camera has restarted, click the Exit button to continue. Step 8 Start the Setup Wizard again and make sure the Current IP Address field displays the new IP Address. Step 6 Enter the Subnet Mask and Gateway fields with exactly the same values as you got from running ipconfig. Click OK to close the Setup Wizard.
User Manual
Page 12
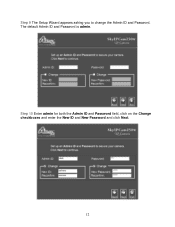
Step 9 The Setup Wizard appears asking you to change the Admin ID and Password. Step 10 Enter admin for both the Admin ID and Password field, click on the Change checkboxes and enter the New ID and New Password and click Next. 12 The default Admin ID and Password is admin.
Step 9 The Setup Wizard appears asking you to change the Admin ID and Password. Step 10 Enter admin for both the Admin ID and Password field, click on the Change checkboxes and enter the New ID and New Password and click Next. 12 The default Admin ID and Password is admin.
User Manual
Page 16
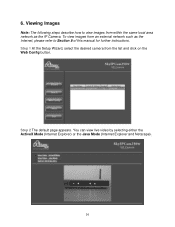
Step 2 The default page appears. Step 1 At the Setup Wizard, select the desired camera from an external network such as the Internet, please refer to view images from within the same local area network as the IP Camera. To view images from the list and click on the Web Config button. You can view live video by selecting either the ActiveX Mode (Internet Explorer) or the Java Mode (Internet Explorer and Netscape). 16 6. Viewing Images Note: The following steps describe how to Section 9 of this manual for further instructions.
Step 2 The default page appears. Step 1 At the Setup Wizard, select the desired camera from an external network such as the Internet, please refer to view images from within the same local area network as the IP Camera. To view images from the list and click on the Web Config button. You can view live video by selecting either the ActiveX Mode (Internet Explorer) or the Java Mode (Internet Explorer and Netscape). 16 6. Viewing Images Note: The following steps describe how to Section 9 of this manual for further instructions.
User Manual
Page 18
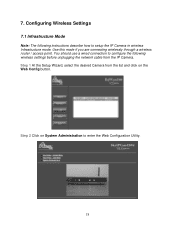
Step 2 Click on the Web Config button. 7. Use this mode if you are connecting wirelessly through a wireless router / access point. Step 1 At the Setup Wizard, select the desired Camera from the IP Camera. You should use a wired connection to enter the Web Configuration Utility. 18 Configuring Wireless Settings 7.1 Infrastructure Mode Note: The following wireless settings before unplugging the network cable from the list and click on System Administration to configure the following instructions describe how to setup the IP Camera in wireless Infrastructure mode.
Step 2 Click on the Web Config button. 7. Use this mode if you are connecting wirelessly through a wireless router / access point. Step 1 At the Setup Wizard, select the desired Camera from the IP Camera. You should use a wired connection to enter the Web Configuration Utility. 18 Configuring Wireless Settings 7.1 Infrastructure Mode Note: The following wireless settings before unplugging the network cable from the list and click on System Administration to configure the following instructions describe how to setup the IP Camera in wireless Infrastructure mode.

User Manual
Page 37
Click Save to the designated FTP server. 8.2.7 Configuration - Time Schedule: You can setup a time schedule to always upload or periodically upload images to apply the new settings. 37 Upload The Configuration - Upload page allows you to . FTP Server: Enter the information for the FTP server that you click on the Upload Video ON button in the view image screen, it will start to upload the image and save the image with the file name specified in the Base File Name field. Manual Operation: When you want to upload the images to configure the Upload Settings of the Camera.
Click Save to the designated FTP server. 8.2.7 Configuration - Time Schedule: You can setup a time schedule to always upload or periodically upload images to apply the new settings. 37 Upload The Configuration - Upload page allows you to . FTP Server: Enter the information for the FTP server that you click on the Upload Video ON button in the view image screen, it will start to upload the image and save the image with the file name specified in the Base File Name field. Manual Operation: When you want to upload the images to configure the Upload Settings of the Camera.

User Manual
Page 38
E-mail Account: Enter the information for your SMTP E-mail account that you click on the E-mail Video ON button in the view image screen, it will start to e-mail the images at the designated interval to the specified e-mail account. Manual Operation: When you want to e-mail the images to configure the E-mail Settings of the Camera. Click Save to the designated e-mail account. 8.2.8 Configuration - Time Schedule: You can setup a time schedule to always e-mail or periodically e-mail images to apply the new settings. 38 E-mail page allows you to . E-mail The Configuration -
E-mail Account: Enter the information for your SMTP E-mail account that you click on the E-mail Video ON button in the view image screen, it will start to e-mail the images at the designated interval to the specified e-mail account. Manual Operation: When you want to e-mail the images to configure the E-mail Settings of the Camera. Click Save to the designated e-mail account. 8.2.8 Configuration - Time Schedule: You can setup a time schedule to always e-mail or periodically e-mail images to apply the new settings. 38 E-mail page allows you to . E-mail The Configuration -

User Manual
Page 69
At the Record Button, select Schedule Record. 10.4.9 Schedule-Recording Configuration The Schedule-Recording Configuration page allows you to apply the changes. Date Mode Select the desired camera from the drop-down menu. Specify the Start Date/Time and the Stop Date/Time and click Add. Recording will begin at the scheduled time. Click Save to setup automated recording at the scheduled time. 69
At the Record Button, select Schedule Record. 10.4.9 Schedule-Recording Configuration The Schedule-Recording Configuration page allows you to apply the changes. Date Mode Select the desired camera from the drop-down menu. Specify the Start Date/Time and the Stop Date/Time and click Add. Recording will begin at the scheduled time. Click Save to setup automated recording at the scheduled time. 69

User Manual
Page 73
Login password check: Check this box to enable the login prompt when you start IPView Pro and when you to setup a user name and password to log in to IPView Pro. 10.4.12 Account The Account page allows you unlock the Key Lock button. 73 Enter the desired Admin ID and Password.
Login password check: Check this box to enable the login prompt when you start IPView Pro and when you to setup a user name and password to log in to IPView Pro. 10.4.12 Account The Account page allows you unlock the Key Lock button. 73 Enter the desired Admin ID and Password.
Quick Installation Guide
Page 2
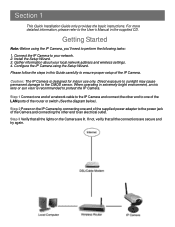
Getting Started Note: Before using the Setup Wizard. Configure the IP Camera using the IP Camera, you'll need to perform the following tasks: 1. Caution: The IP Camera is recommended to an ... the lights on the IP Camera by connecting one of the LAN ports of the IP Camera. Install the Setup Wizard. 3. Direct exposure to sunlight may cause permanent damage to ensure proper setup of the router or switch (See the diagram below). When operating in this Guide carefully to the CMOS sensor...
Getting Started Note: Before using the Setup Wizard. Configure the IP Camera using the IP Camera, you'll need to perform the following tasks: 1. Caution: The IP Camera is recommended to an ... the lights on the IP Camera by connecting one of the LAN ports of the IP Camera. Install the Setup Wizard. 3. Direct exposure to sunlight may cause permanent damage to ensure proper setup of the router or switch (See the diagram below). When operating in this Guide carefully to the CMOS sensor...

Quick Installation Guide
Page 3
Step 2 Click on Install Wizard. Step 3 Click Next. Note: If the autorun screen does not appear automatically, go to appear. Section 2 Installing the Setup Wizard Step 1 Insert the provided CD and wait for the autorun screen to Start, Run, type D:\autorun.exe (where D is the letter of your CD drive) and click OK.
Step 2 Click on Install Wizard. Step 3 Click Next. Note: If the autorun screen does not appear automatically, go to appear. Section 2 Installing the Setup Wizard Step 1 Insert the provided CD and wait for the autorun screen to Start, Run, type D:\autorun.exe (where D is the letter of your CD drive) and click OK.
Quick Installation Guide
Page 5
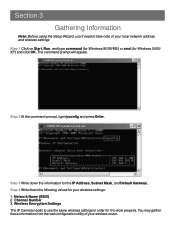
... settings. Step 3 Write down the following values for the IP Address, Subnet Mask, and Default Gateway. Channel Number 3. Section 3 Gathering Information Note: Before using the Setup Wizard, you'll need to work properly. Wireless Encryption Settings The IP Camera needs to use the same wireless settings in order for Windows 2000...
... settings. Step 3 Write down the following values for the IP Address, Subnet Mask, and Default Gateway. Channel Number 3. Section 3 Gathering Information Note: Before using the Setup Wizard, you'll need to work properly. Wireless Encryption Settings The IP Camera needs to use the same wireless settings in order for Windows 2000...

Quick Installation Guide
Page 6
Section 4 Using the Setup Wizard Step 1 Go to configure from the list and click on the Wizard button. Step 2 Select the IP Camera you want to Start > (All) Programs > AirLink101 IP Camera Setup Wizard.
Section 4 Using the Setup Wizard Step 1 Go to configure from the list and click on the Wizard button. Step 2 Select the IP Camera you want to Start > (All) Programs > AirLink101 IP Camera Setup Wizard.

Quick Installation Guide
Page 8
Click OK to close the Setup Wizard. Step 7 After the Camera has restarted, click the Exit button to continue. Select the Camera and click on the Wizard button. Step 8 Start the Setup Wizard again and make sure the Current IP Address field displays the new IP Address. Step 6 Enter the Subnet Mask and Gateway fields with exactly the same values as you got from running ipconfig.
Click OK to close the Setup Wizard. Step 7 After the Camera has restarted, click the Exit button to continue. Select the Camera and click on the Wizard button. Step 8 Start the Setup Wizard again and make sure the Current IP Address field displays the new IP Address. Step 6 Enter the Subnet Mask and Gateway fields with exactly the same values as you got from running ipconfig.

Quick Installation Guide
Page 9
The default Admin ID and Password is admin. Step 9 The Setup Wizard appears asking you to change the Admin ID and Password. Step 10 Enter admin for both the Admin ID and Password field, click on the Change checkboxes and enter the New ID and New Password and click Next.
The default Admin ID and Password is admin. Step 9 The Setup Wizard appears asking you to change the Admin ID and Password. Step 10 Enter admin for both the Admin ID and Password field, click on the Change checkboxes and enter the New ID and New Password and click Next.