
User Manual
Page 2
......35 8.2.6 Configuration - Viewing Videos from External Networks 43 10. Network 27 8.1.5 Management - E-mail ...38 8.3.1 Tools - Backup ...42 8.4.1 Help - Configuring Wireless Settings 18 7.1 Infrastructure Mode ...18 7.2 Ad-Hoc Mode ...22 8. Getting Started ...5 3. IPView Pro...46 10.1 Installing IPView Pro...46 10.2 Starting IPView Pro ...48 10.2.1 Adding Camera using the Search Method 49 10...
......35 8.2.6 Configuration - Viewing Videos from External Networks 43 10. Network 27 8.1.5 Management - E-mail ...38 8.3.1 Tools - Backup ...42 8.4.1 Help - Configuring Wireless Settings 18 7.1 Infrastructure Mode ...18 7.2 Ad-Hoc Mode ...22 8. Getting Started ...5 3. IPView Pro...46 10.1 Installing IPView Pro...46 10.2 Starting IPView Pro ...48 10.2.1 Adding Camera using the Search Method 49 10...

User Manual
Page 4
... you need to ship the unit in CPU and Web Configuration Utility, the IP Camera is a standalone network device that 's connected to the network to view images and live videos from internal and external networks. Also, keep the box and packaging materials in case you begin the installation, ...please check the items of your package: • SkyIPCam 250W • Camera Stand • AC Power Adapter • Quick Installation Guide • Utility...
... you need to ship the unit in CPU and Web Configuration Utility, the IP Camera is a standalone network device that 's connected to the network to view images and live videos from internal and external networks. Also, keep the box and packaging materials in case you begin the installation, ...please check the items of your package: • SkyIPCam 250W • Camera Stand • AC Power Adapter • Quick Installation Guide • Utility...

User Manual
Page 5
...the lights on the IP Camera by connecting one end of the supplied power adapter to the power jack of a network cable to the IP Camera and connect the other end to protect the IP Camera. Connect the IP Camera to the CMOS sensor. Configure the IP Camera using the IP Camera, you'll need to ...one end of the Camera and connecting the other end to perform the...
...the lights on the IP Camera by connecting one end of the supplied power adapter to the power jack of a network cable to the IP Camera and connect the other end to protect the IP Camera. Connect the IP Camera to the CMOS sensor. Configure the IP Camera using the IP Camera, you'll need to ...one end of the Camera and connecting the other end to perform the...
User Manual
Page 8
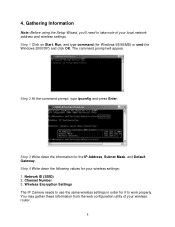
Network ID (SSID) 2. Step 2 At the command prompt, type ipconfig and press Enter. Step 3 Write down the following values for Windows 2000/XP) and click OK. Channel Number 3. The command prompt will appear. Wireless Encryption Settings The IP Camera needs to take note of your wireless router. 8... Step 1 Click on Start, Run, and type command (for Windows 95/98/ME) or cmd (for your local network address and wireless settings. Step 4 Write down the ...
Network ID (SSID) 2. Step 2 At the command prompt, type ipconfig and press Enter. Step 3 Write down the following values for Windows 2000/XP) and click OK. Channel Number 3. The command prompt will appear. Wireless Encryption Settings The IP Camera needs to take note of your wireless router. 8... Step 1 Click on Start, Run, and type command (for Windows 95/98/ME) or cmd (for your local network address and wireless settings. Step 4 Write down the ...
User Manual
Page 10
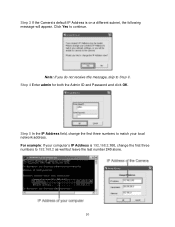
Note: If you do not receive this message, skip to 192.168.2 as well but leave the last number 240 alone. 10 For example: If your local network address. Step 3 If the Camera's default IP Address is 192.168.2.100, change the first three numbers to continue. Step 5 In the IP Address field, change the first three numbers to Step 9. Step 4 Enter admin for both the Admin ID and Password and click OK. Click Yes to match your computer's IP Address is on a different subnet, the following message will appear.
Note: If you do not receive this message, skip to 192.168.2 as well but leave the last number 240 alone. 10 For example: If your local network address. Step 3 If the Camera's default IP Address is 192.168.2.100, change the first three numbers to continue. Step 5 In the IP Address field, change the first three numbers to Step 9. Step 4 Enter admin for both the Admin ID and Password and click OK. Click Yes to match your computer's IP Address is on a different subnet, the following message will appear.
User Manual
Page 13
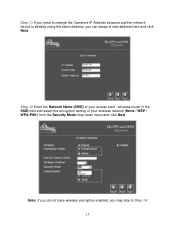
Step 11 If you can assign a new address here and click Next. Note: If you do not have wireless encryption enabled, you may skip to change the Camera's IP Address because another network device is already using the same address, you need to Step 14. 13 Step 12 Enter the Network Name (SSID) of your access point / wireless router in the SSID field and select the encryption setting of your wireless network (None / WEP / WPA-PSK) from the Security Mode drop-down menu and click Next.
Step 11 If you can assign a new address here and click Next. Note: If you do not have wireless encryption enabled, you may skip to change the Camera's IP Address because another network device is already using the same address, you need to Step 14. 13 Step 12 Enter the Network Name (SSID) of your access point / wireless router in the SSID field and select the encryption setting of your wireless network (None / WEP / WPA-PSK) from the Security Mode drop-down menu and click Next.
User Manual
Page 16
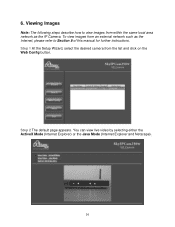
6. You can view live video by selecting either the ActiveX Mode (Internet Explorer) or the Java Mode (Internet Explorer and Netscape). 16 Step 1 At the Setup Wizard, select the desired camera from within the same local area network as the Internet, please refer to view images from the list and click on the Web Config button. To view images from an external network such as the IP Camera. Step 2 The default page appears. Viewing Images Note: The following steps describe how to Section 9 of this manual for further instructions.
6. You can view live video by selecting either the ActiveX Mode (Internet Explorer) or the Java Mode (Internet Explorer and Netscape). 16 Step 1 At the Setup Wizard, select the desired camera from within the same local area network as the Internet, please refer to view images from the list and click on the Web Config button. To view images from an external network such as the IP Camera. Step 2 The default page appears. Viewing Images Note: The following steps describe how to Section 9 of this manual for further instructions.
User Manual
Page 18
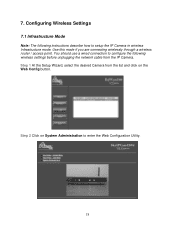
7. Use this mode if you are connecting wirelessly through a wireless router / access point. You should use a wired connection to setup the IP Camera in wireless Infrastructure mode. Step 1 At the Setup Wizard, select the desired Camera from the IP Camera. Configuring Wireless Settings 7.1 Infrastructure Mode Note: The following instructions describe how to configure the following wireless settings before unplugging the network cable from the list and click on System Administration to enter the Web Configuration Utility. 18 Step 2 Click on the Web Config button.
7. Use this mode if you are connecting wirelessly through a wireless router / access point. You should use a wired connection to setup the IP Camera in wireless Infrastructure mode. Step 1 At the Setup Wizard, select the desired Camera from the IP Camera. Configuring Wireless Settings 7.1 Infrastructure Mode Note: The following instructions describe how to configure the following wireless settings before unplugging the network cable from the list and click on System Administration to enter the Web Configuration Utility. 18 Step 2 Click on the Web Config button.
User Manual
Page 20
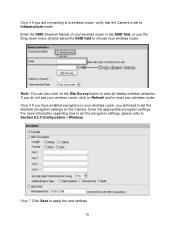
...see your wireless router, click on Refresh and/or reset your wireless router, you will need to Section 8.2.3 Configuration - Enter the SSID (Network Name) of your wireless router. Step 6 If you have enabled encryption on your wireless router. For more information regarding how to set ... settings, please refer to set to view all nearby wireless networks. Enter the appropriate encryption settings. Step 5 If you are connecting to a wireless router, verify that the Camera is set the identical encryption settings on the Camera. Note: You can also click on the Site Survey button...
...see your wireless router, click on Refresh and/or reset your wireless router, you will need to Section 8.2.3 Configuration - Enter the SSID (Network Name) of your wireless router. Step 6 If you have enabled encryption on your wireless router. For more information regarding how to set ... settings, please refer to set to view all nearby wireless networks. Enter the appropriate encryption settings. Step 5 If you are connecting to a wireless router, verify that the Camera is set the identical encryption settings on the Camera. Note: You can also click on the Site Survey button...
User Manual
Page 21
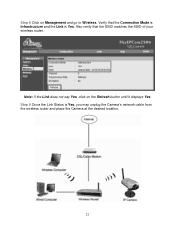
Step 8 Click on the Refresh button until it displays Yes. Note: If the Link does not say Yes, click on Management and go to Wireless. Step 9 Once the Link Status is Yes. Verify that the SSID matches the SSID of your wireless router. Also verify that the Connection Mode is Infrastructure and the Link is Yes, you may unplug the Camera's network cable from the wireless router and place the Camera at the desired location. 21
Step 8 Click on the Refresh button until it displays Yes. Note: If the Link does not say Yes, click on Management and go to Wireless. Step 9 Once the Link Status is Yes. Verify that the SSID matches the SSID of your wireless router. Also verify that the Connection Mode is Infrastructure and the Link is Yes, you may unplug the Camera's network cable from the wireless router and place the Camera at the desired location. 21

User Manual
Page 22
You should use a wired connection to configure the following wireless settings before unplugging the network cable from the Camera Caution: Your wireless computer may lose Internet connection if you want to bypass your wireless router / access point and connect directly to Ad-Hoc mode. 7.2 Ad-Hoc Mode If you set the Connection Mode to Ad-Hoc. 22 Step 1 Go to Configuration, Wireless, and set it to the Wireless Camera, follow the steps below.
You should use a wired connection to configure the following wireless settings before unplugging the network cable from the Camera Caution: Your wireless computer may lose Internet connection if you want to bypass your wireless router / access point and connect directly to Ad-Hoc mode. 7.2 Ad-Hoc Mode If you set the Connection Mode to Ad-Hoc. 22 Step 1 Go to Configuration, Wireless, and set it to the Wireless Camera, follow the steps below.

User Manual
Page 23
For more information regarding how to Section 8.2.3 Configuration - Wireless. Also verify that the SSID matches the SSID you have enabled encryption on the Camera. Note: If the Link does not say Yes, click on Management and go to Ad-Hoc mode, using the same SSID and Channel ...recommended that the Connection Mode is Ad-Hoc and the Link is Yes. Step 8 Configure your network. Enter the appropriate encryption settings. If you do not connect directly to do not know how to the Camera, but connect through the wireless router instead. Step 7 Manually change the TCP/IP setting of...
For more information regarding how to Section 8.2.3 Configuration - Wireless. Also verify that the SSID matches the SSID you have enabled encryption on the Camera. Note: If the Link does not say Yes, click on Management and go to Ad-Hoc mode, using the same SSID and Channel ...recommended that the Connection Mode is Ad-Hoc and the Link is Yes. Step 8 Configure your network. Enter the appropriate encryption settings. If you do not connect directly to do not know how to the Camera, but connect through the wireless router instead. Step 7 Manually change the TCP/IP setting of...
User Manual
Page 27
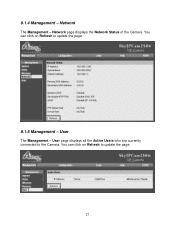
User page displays all the Active Users who are currently connected to update the page. 27 You can click on Refresh to the Camera. Network page displays the Network Status of the Camera. You can click on Refresh to update the page. 8.1.5 Management - User The Management - Network The Management - 8.1.4 Management -
User page displays all the Active Users who are currently connected to update the page. 27 You can click on Refresh to the Camera. Network page displays the Network Status of the Camera. You can click on Refresh to update the page. 8.1.5 Management - User The Management - Network The Management - 8.1.4 Management -
User Manual
Page 31
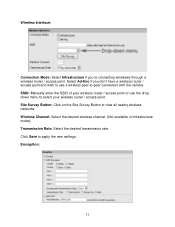
... / access point and wish to use the dropdown menu to select your wireless router / access point or use a wireless peer-to-peer connection with the camera. Select Ad-Hoc if you 're connecting wirelessly through a wireless router / access point. SSID: Manually enter the SSID of your wireless router / access point. Site...
... / access point and wish to use the dropdown menu to select your wireless router / access point or use a wireless peer-to-peer connection with the camera. Select Ad-Hoc if you 're connecting wirelessly through a wireless router / access point. SSID: Manually enter the SSID of your wireless router / access point. Site...
User Manual
Page 34
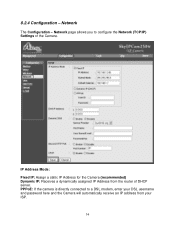
Network The Configuration - Network page allows you to a DSL modem, enter your ISP. 34 PPPoE: If the camera is directly connected to configure the Network (TCP/IP) Settings of DHCP server. 8.2.4 Configuration - IP Address Mode: Fixed IP: Assign a static IP Address for the Camera (recommended) Dynamic IP: Receives a dynamically assigned IP Address from your DSL username and password here and the Camera will automatically receive an IP address from the router of the Camera.
Network The Configuration - Network page allows you to a DSL modem, enter your ISP. 34 PPPoE: If the camera is directly connected to configure the Network (TCP/IP) Settings of DHCP server. 8.2.4 Configuration - IP Address Mode: Fixed IP: Assign a static IP Address for the Camera (recommended) Dynamic IP: Receives a dynamically assigned IP Address from your DSL username and password here and the Camera will automatically receive an IP address from the router of the Camera.
User Manual
Page 43
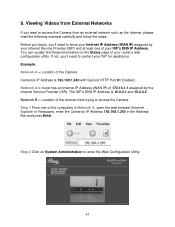
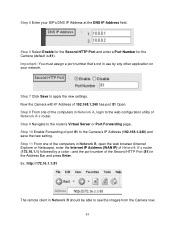
...Internet Service Provider (ISP). The ISP's DNS IP Address is 10.0.0.1 and 10.0.0.2 Network B = Location of the Camera Camera's IP Address is 192.168.1.240 with Second HTTP Port 81 Enabled. Viewing Videos from an external network such as the Internet, please read the following example carefully and follow the steps.... you 'll need to enter the Web Configuration Utility. 43 Before you begin, you'll need to access the Camera. Example: Network A = Location of the remote client trying to contact your ISP for assistance. 9. Step 1 From one of 172.16.1.1 assigned by your Internet ...
...Internet Service Provider (ISP). The ISP's DNS IP Address is 10.0.0.1 and 10.0.0.2 Network B = Location of the Camera Camera's IP Address is 192.168.1.240 with Second HTTP Port 81 Enabled. Viewing Videos from an external network such as the Internet, please read the following example carefully and follow the steps.... you 'll need to enter the Web Configuration Utility. 43 Before you begin, you'll need to access the Camera. Example: Network A = Location of the remote client trying to contact your ISP for assistance. 9. Step 1 From one of 172.16.1.1 assigned by your Internet ...
User Manual
Page 45
... and press Enter. Important: You must assign a port number that's not in Network B should be able to the Camera's IP Address (192.168.1.240) and save the new setting. Step 11 From one of the computers in Network B, open the web browser (Internet Explorer or Netscape), enter the Internet IP Address...Port Forwarding page. Step 9 Navigate to apply the new settings. Step 8 From one of the computers in Network A, login to the web configuration utility of port 81 to see the images from the Camera now. 45 Step 6 Select Enable for the Second HTTP Port and enter a Port Number for the...
... and press Enter. Important: You must assign a port number that's not in Network B should be able to the Camera's IP Address (192.168.1.240) and save the new setting. Step 11 From one of the computers in Network B, open the web browser (Internet Explorer or Netscape), enter the Internet IP Address...Port Forwarding page. Step 9 Navigate to apply the new settings. Step 8 From one of the computers in Network A, login to the web configuration utility of port 81 to see the images from the Camera now. 45 Step 6 Select Enable for the Second HTTP Port and enter a Port Number for the...
User Manual
Page 46
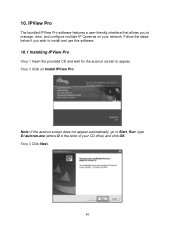
Step 2 Click on your CD drive) and click OK. 10. IPView Pro The bundled IPView Pro software features a user-friendly interface that allows you wish to install and use this software. 10.1 Installing IPView Pro Step 1 Insert the provided CD and wait for the autorun screen to manage, view, and configure multiple IP Cameras on Install IPView Pro. Follow the steps below if you to appear. Step 3 Click Next. 46 Note: If the autorun screen does not appear automatically, go to Start, Run, type D:\autorun.exe (where D is the letter of your network.
Step 2 Click on your CD drive) and click OK. 10. IPView Pro The bundled IPView Pro software features a user-friendly interface that allows you wish to install and use this software. 10.1 Installing IPView Pro Step 1 Insert the provided CD and wait for the autorun screen to manage, view, and configure multiple IP Cameras on Install IPView Pro. Follow the steps below if you to appear. Step 3 Click Next. 46 Note: If the autorun screen does not appear automatically, go to Start, Run, type D:\autorun.exe (where D is the letter of your network.
User Manual
Page 50
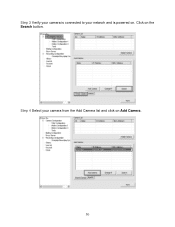
Step 4 Select your network and is connected to your camera from the Add Camera list and click on . Step 3 Verify your camera is powered on Add Camera. 50 Click on the Search button.
Step 4 Select your network and is connected to your camera from the Add Camera list and click on . Step 3 Verify your camera is powered on Add Camera. 50 Click on the Search button.
User Manual
Page 52
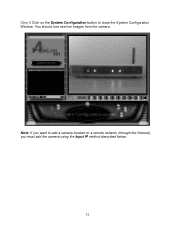
Note: If you must add the camera using the Input IP method described below. 52 You should now see live images from the camera. Step 8 Click on a remote network (through the Internet), you want to add a camera located on the System Configuration button to close the System Configuration Window.
Note: If you must add the camera using the Input IP method described below. 52 You should now see live images from the camera. Step 8 Click on a remote network (through the Internet), you want to add a camera located on the System Configuration button to close the System Configuration Window.