

User Manual
Page 4
... immediately. The IP Camera allows you need to view images and live videos from internal and external networks. The built-in this manual. Combined with the bundled Setup Wizard and IPView Pro software, managing and viewing multiple IP Cameras is damaged or missing, please contact... your purchase of this manual carefully for proper operation of ownership. Instructions for installing and configuring this product can be found in Web Configuration Utility allows any ...
... immediately. The IP Camera allows you need to view images and live videos from internal and external networks. The built-in this manual. Combined with the bundled Setup Wizard and IPView Pro software, managing and viewing multiple IP Cameras is damaged or missing, please contact... your purchase of this manual carefully for proper operation of ownership. Instructions for installing and configuring this product can be found in Web Configuration Utility allows any ...

User Manual
Page 5
... that all the connections are lit. Configure the IP Camera using the IP Camera, you'll need to the CMOS sensor. When operating in this Manual carefully to protect the IP Camera. 2.
... that all the connections are lit. Configure the IP Camera using the IP Camera, you'll need to the CMOS sensor. When operating in this Manual carefully to protect the IP Camera. 2.
User Manual
Page 16
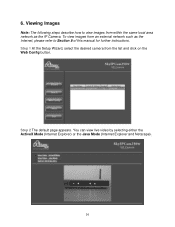
Step 2 The default page appears. 6. Viewing Images Note: The following steps describe how to Section 9 of this manual for further instructions. Step 1 At the Setup Wizard, select the desired camera from within the same local area network as the Internet, please refer to view images from the list and click on the Web Config button. You can view live video by selecting either the ActiveX Mode (Internet Explorer) or the Java Mode (Internet Explorer and Netscape). 16 To view images from an external network such as the IP Camera.
Step 2 The default page appears. 6. Viewing Images Note: The following steps describe how to Section 9 of this manual for further instructions. Step 1 At the Setup Wizard, select the desired camera from within the same local area network as the Internet, please refer to view images from the list and click on the Web Config button. You can view live video by selecting either the ActiveX Mode (Internet Explorer) or the Java Mode (Internet Explorer and Netscape). 16 To view images from an external network such as the IP Camera.

User Manual
Page 17
Rather, go to http://www.java.com/en/download/manual.jsp and follow the on that web site to download and install the required Java software. The IP Camera is ready for use now. 17 Note: ActiveX and/or Java Applet must be installed and enabled on your Web Browser (Internet Explorer or Netscape) before you need to focus. Step 4 If you can view the live videos. Step 3 Turn the Camera's lens clockwise or counter-clockwise to install Java Virtual Machine on your computer, do not follow the instructions on -screen XP instructions.
Rather, go to http://www.java.com/en/download/manual.jsp and follow the on that web site to download and install the required Java software. The IP Camera is ready for use now. 17 Note: ActiveX and/or Java Applet must be installed and enabled on your Web Browser (Internet Explorer or Netscape) before you need to focus. Step 4 If you can view the live videos. Step 3 Turn the Camera's lens clockwise or counter-clockwise to install Java Virtual Machine on your computer, do not follow the instructions on -screen XP instructions.

User Manual
Page 23
...-Hoc mode, using the same SSID and Channel number as default. Step 8 Configure your wireless computer, you do this, it as the Camera. 23 Step 7 Manually change the TCP/IP setting of the Camera or keep it is recommended that the Connection Mode is Ad-Hoc and the Link is Yes...
...-Hoc mode, using the same SSID and Channel number as default. Step 8 Configure your wireless computer, you do this, it as the Camera. 23 Step 7 Manually change the TCP/IP setting of the Camera or keep it is recommended that the Connection Mode is Ad-Hoc and the Link is Yes...
User Manual
Page 31
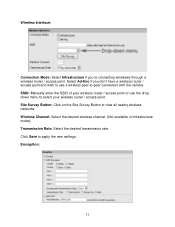
Site Survey Button: Click on the Site Survey Button to select your wireless router / access point. Encryption: 31 SSID: Manually enter the SSID of your wireless router / access point or use a wireless peer-to apply the new settings. Click Save to -peer connection with the ...
Site Survey Button: Click on the Site Survey Button to select your wireless router / access point. Encryption: 31 SSID: Manually enter the SSID of your wireless router / access point or use a wireless peer-to apply the new settings. Click Save to -peer connection with the ...

User Manual
Page 32
... WEP Encryption. Authentication Type: Choose from Open System, Shared Key, or Both. For each key select either ASCII (all letters and numbers) or HEX (0-9, A-F) Key 1 - 4: Manually assign a passphrase for each key. Note: The IP Camera needs to work properly. 32 Encrypt Data Transmissions Using: Select one of the keys to apply...
... WEP Encryption. Authentication Type: Choose from Open System, Shared Key, or Both. For each key select either ASCII (all letters and numbers) or HEX (0-9, A-F) Key 1 - 4: Manually assign a passphrase for each key. Note: The IP Camera needs to work properly. 32 Encrypt Data Transmissions Using: Select one of the keys to apply...

User Manual
Page 36
... date. Synchronized with Computer Time: Check this box to synchronize the Camera's time with the Time Server you to apply the new settings. 36 Set Manually: Manually set the Date and Time for the Camera. 8.2.6 Configuration -
... date. Synchronized with Computer Time: Check this box to synchronize the Camera's time with the Time Server you to apply the new settings. 36 Set Manually: Manually set the Date and Time for the Camera. 8.2.6 Configuration -

User Manual
Page 37
FTP Server: Enter the information for the FTP server that you want to upload the images to upload the image and save the image with the file name specified in the view image screen, it will start to . Manual Operation: When you to configure the Upload Settings of the Camera. Time Schedule: You can setup a time schedule to always upload or periodically upload images to apply the new settings. 37 8.2.7 Configuration - Click Save to the designated FTP server. Upload page allows you click on the Upload Video ON button in the Base File Name field. Upload The Configuration -
FTP Server: Enter the information for the FTP server that you want to upload the images to upload the image and save the image with the file name specified in the view image screen, it will start to . Manual Operation: When you to configure the Upload Settings of the Camera. Time Schedule: You can setup a time schedule to always upload or periodically upload images to apply the new settings. 37 8.2.7 Configuration - Click Save to the designated FTP server. Upload page allows you click on the Upload Video ON button in the Base File Name field. Upload The Configuration -

User Manual
Page 38
E-mail page allows you click on the E-mail Video ON button in the view image screen, it will start to e-mail the images at the designated interval to the specified e-mail account. Time Schedule: You can setup a time schedule to always e-mail or periodically e-mail images to . Manual Operation: When you to apply the new settings. 38 E-mail Account: Enter the information for your SMTP E-mail account that you want to e-mail the images to the designated e-mail account. E-mail The Configuration - 8.2.8 Configuration - Click Save to configure the E-mail Settings of the Camera.
E-mail page allows you click on the E-mail Video ON button in the view image screen, it will start to e-mail the images at the designated interval to the specified e-mail account. Time Schedule: You can setup a time schedule to always e-mail or periodically e-mail images to . Manual Operation: When you to apply the new settings. 38 E-mail Account: Enter the information for your SMTP E-mail account that you want to e-mail the images to the designated e-mail account. E-mail The Configuration - 8.2.8 Configuration - Click Save to configure the E-mail Settings of the Camera.

User Manual
Page 59
Power: Click on the Record button and select Manual Record again. 59 To stop recording, click on the Power button and select to the corresponding settings in System Configuration. If you have enabled a password ... The Control Panel contains essential buttons for security purposes. Key Lock: The Key Lock button locks all the buttons on the Record button and select Manual Record to record the video immediately to unlock the key lock. If you 'll need to input the same password to your hard drive. Record...
Power: Click on the Record button and select Manual Record again. 59 To stop recording, click on the Power button and select to the corresponding settings in System Configuration. If you have enabled a password ... The Control Panel contains essential buttons for security purposes. Key Lock: The Key Lock button locks all the buttons on the Record button and select Manual Record to record the video immediately to unlock the key lock. If you 'll need to input the same password to your hard drive. Record...
Quick Installation Guide
Page 2
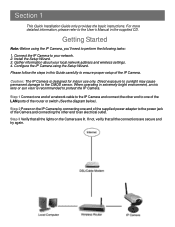
For more detailed information, please refer to the User's Manual in this Guide carefully to an electrical outlet. Getting Started Note: Before using the Setup Wizard. Caution: The IP Camera is recommended to your local ...
For more detailed information, please refer to the User's Manual in this Guide carefully to an electrical outlet. Getting Started Note: Before using the Setup Wizard. Caution: The IP Camera is recommended to your local ...

Quick Installation Guide
Page 13
Step 1 At the Setup Wizard, select the desired Camera from the list and click on the provided CD for further instructions. Step 2 The default page appears. To view images from an external network such as the IP Camera. You can view live video by selecting either the ActiveX Mode (Internet Explorer) or the Java Mode (Internet Explorer and Netscape). Section 5 Viewing Images Note: The following steps describe how to view images from within the same local area network as the Internet, please refer to the User's Manual on the Web Config button.
Step 1 At the Setup Wizard, select the desired Camera from the list and click on the provided CD for further instructions. Step 2 The default page appears. To view images from an external network such as the IP Camera. You can view live video by selecting either the ActiveX Mode (Internet Explorer) or the Java Mode (Internet Explorer and Netscape). Section 5 Viewing Images Note: The following steps describe how to view images from within the same local area network as the Internet, please refer to the User's Manual on the Web Config button.

Quick Installation Guide
Page 14
Step 3 Turn the Camera's lens clockwise or counter-clockwise to the User's Manual on the provided CD. Step 4 If you need to install Java Virtual Machine on -screen XP instructions. Rather, go to download and install the required ... Java Applet must be installed and enabled on your computer, do not follow the instructions on that web site to www.java.com/en/download/manual.jsp and follow the on your Web Browser (Internet Explorer or Netscape) before you can view the live videos. The IP Camera is ready for...
Step 3 Turn the Camera's lens clockwise or counter-clockwise to the User's Manual on the provided CD. Step 4 If you need to install Java Virtual Machine on -screen XP instructions. Rather, go to download and install the required ... Java Applet must be installed and enabled on your computer, do not follow the instructions on that web site to www.java.com/en/download/manual.jsp and follow the on your Web Browser (Internet Explorer or Netscape) before you can view the live videos. The IP Camera is ready for...

Instruction Manual
Page 4
... Before you need to remotely manage the IP Camera. 1. Introduction Congratulations on your local dealer immediately. Instructions for installing and configuring this manual carefully for proper operation of this manual. The IP Camera allows you install and use this product, please read this product can be found in the future. 4 The built...
... Before you need to remotely manage the IP Camera. 1. Introduction Congratulations on your local dealer immediately. Instructions for installing and configuring this manual carefully for proper operation of this manual. The IP Camera allows you install and use this product, please read this product can be found in the future. 4 The built...

Instruction Manual
Page 5
Install the Setup Wizard. 3. When operating in this Manual carefully to an electrical outlet. If not, verify that all the connections are lit. Step 2 Power on the Camera are secure and try again. 5 Gather ...
Install the Setup Wizard. 3. When operating in this Manual carefully to an electrical outlet. If not, verify that all the connections are lit. Step 2 Power on the Camera are secure and try again. 5 Gather ...

Instruction Manual
Page 14
Step 1 At the Setup Wizard, select the desired camera from within the same local area network as the Internet, please refer to Section 8 of this manual for further instructions. You can view live video by selecting either the ActiveX Mode (Internet Explorer) or the Java Mode (Internet Explorer and Netscape). 14 6. To view images from an external network such as the IP Camera. Step 2 The default page appears. Viewing Images Note: The following steps describe how to view images from the list and click on the Web Config button.
Step 1 At the Setup Wizard, select the desired camera from within the same local area network as the Internet, please refer to Section 8 of this manual for further instructions. You can view live video by selecting either the ActiveX Mode (Internet Explorer) or the Java Mode (Internet Explorer and Netscape). 14 6. To view images from an external network such as the IP Camera. Step 2 The default page appears. Viewing Images Note: The following steps describe how to view images from the list and click on the Web Config button.

Instruction Manual
Page 15
The IP Camera is ready for use now. 15 Step 4 If you can view the live videos. Rather, go to http://www.java.com/en/download/manual.jsp and follow the on that web site to focus. Step 3 Turn the Camera's lens clockwise or counter-clockwise to download and install the required Java software. Note: ActiveX and/or Java Applet must be installed and enabled on your Web Browser (Internet Explorer or Netscape) before you need to install Java Virtual Machine on your computer, do not follow the instructions on -screen XP instructions.
The IP Camera is ready for use now. 15 Step 4 If you can view the live videos. Rather, go to http://www.java.com/en/download/manual.jsp and follow the on that web site to focus. Step 3 Turn the Camera's lens clockwise or counter-clockwise to download and install the required Java software. Note: ActiveX and/or Java Applet must be installed and enabled on your Web Browser (Internet Explorer or Netscape) before you need to install Java Virtual Machine on your computer, do not follow the instructions on -screen XP instructions.

Instruction Manual
Page 23
...'s time with the Time Server you to apply the new settings. 23 Date Time page allows you 've specified. Time: Enter the current time. Set Manually: Manually set the Date and Time for the Camera. 7.2.5 Configuration - Date: Enter the current date.
...'s time with the Time Server you to apply the new settings. 23 Date Time page allows you 've specified. Time: Enter the current time. Set Manually: Manually set the Date and Time for the Camera. 7.2.5 Configuration - Date: Enter the current date.

Instruction Manual
Page 24
Upload page allows you click on the Upload Video ON button in the view image screen, it will start to upload the image and save the image with the file name specified in the Base File Name field. Manual Operation: When you to apply the new settings. 24 FTP Server: Enter the information for the FTP server that you want to upload the images to the designated FTP server. Upload The Configuration - Time Schedule: You can setup a time schedule to always upload or periodically upload images to . Click Save to configure the Upload Settings of the Camera. 7.2.6 Configuration -
Upload page allows you click on the Upload Video ON button in the view image screen, it will start to upload the image and save the image with the file name specified in the Base File Name field. Manual Operation: When you to apply the new settings. 24 FTP Server: Enter the information for the FTP server that you want to upload the images to the designated FTP server. Upload The Configuration - Time Schedule: You can setup a time schedule to always upload or periodically upload images to . Click Save to configure the Upload Settings of the Camera. 7.2.6 Configuration -