
User Manual
Page 2
... ...3 1.1 Package Contents 3 1.2 System Requirements 3 2 Multi-Functional Printer Server Installation 4 2.1 Connecting the Printer Server 4 2.2 Installing the PS Software 5 2.3 Configuring the Printer Server 8 2.4 Configuring the Computer 14 3 Web Configuration Utility 16 3.1 Connecting ...22 3.3.3 Configuration J Network 25 3.3.4 Configuration J User 26 3.3.5 Configuration J E-mail 27 3.3.6 Configuration J SNMP 30 3.4 Tools...31 3.4.1 Tool J Print Test 31 3.4.2 Tool J E-mail 31 3.4.3 Tool J Reset 32 3.4.4 Tool J Factory Reset 32 3.4.5 Tool J Firmware Upgrade 32 3.4.6 Tool ...
... ...3 1.1 Package Contents 3 1.2 System Requirements 3 2 Multi-Functional Printer Server Installation 4 2.1 Connecting the Printer Server 4 2.2 Installing the PS Software 5 2.3 Configuring the Printer Server 8 2.4 Configuring the Computer 14 3 Web Configuration Utility 16 3.1 Connecting ...22 3.3.3 Configuration J Network 25 3.3.4 Configuration J User 26 3.3.5 Configuration J E-mail 27 3.3.6 Configuration J SNMP 30 3.4 Tools...31 3.4.1 Tool J Print Test 31 3.4.2 Tool J E-mail 31 3.4.3 Tool J Reset 32 3.4.4 Tool J Factory Reset 32 3.4.5 Tool J Firmware Upgrade 32 3.4.6 Tool ...

User Manual
Page 3
.... Also, keep the box and packaging materials in case you to set up the Print Server through the web browser easily and quickly. It manages the flow of your network. The Wireless MFP print server complies to IEEE 802.11g/b that you to share your All-in the future. ... CD • RJ-45 Ethernet Cable • Antenna If any of print files from computers to the connected printer, delivering print jobs to highperformance printer much faster than a file server or a PC acting as a print server can do printing, faxing, and scanning on any item contained is the easiest and fastest ...
.... Also, keep the box and packaging materials in case you to set up the Print Server through the web browser easily and quickly. It manages the flow of your network. The Wireless MFP print server complies to IEEE 802.11g/b that you to share your All-in the future. ... CD • RJ-45 Ethernet Cable • Antenna If any of print files from computers to the connected printer, delivering print jobs to highperformance printer much faster than a file server or a PC acting as a print server can do printing, faxing, and scanning on any item contained is the easiest and fastest ...
User Manual
Page 4
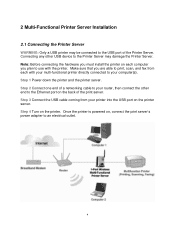
... 4 Once the printer is powered on the printer server. Make sure that you are able to your printer into the USB port on , connect the print server's power adapter to the Printer Server may be connected to the USB port of the print server. Step 4 Turn on each with the printer. Step... 1 Power down the printer and the printer server. Step 3 Connect the USB cable coming from ...
... 4 Once the printer is powered on the printer server. Make sure that you are able to your printer into the USB port on , connect the print server's power adapter to the Printer Server may be connected to the USB port of the print server. Step 4 Turn on each with the printer. Step... 1 Power down the printer and the printer server. Step 3 Connect the USB cable coming from ...
User Manual
Page 5
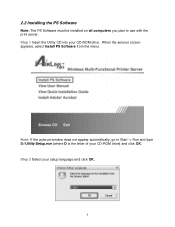
When the autorun screen appears, select Install PS Software from the menu. Note: If the autorun window does not appear automatically, go to use with the print server. Step 1 Insert the Utility CD into your setup language and click OK. 5 Step 2 Select your CD-ROM drive. 2.2 Installing the PS Software Note: The PS Software must be installed on all computers you plan to Start -> Run and type D:\Utility\Setup.exe (where D is the letter of your CD-ROM drive) and click OK.
When the autorun screen appears, select Install PS Software from the menu. Note: If the autorun window does not appear automatically, go to use with the print server. Step 1 Insert the Utility CD into your setup language and click OK. 5 Step 2 Select your CD-ROM drive. 2.2 Installing the PS Software Note: The PS Software must be installed on all computers you plan to Start -> Run and type D:\Utility\Setup.exe (where D is the letter of your CD-ROM drive) and click OK.

User Manual
Page 8
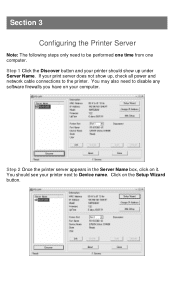
Step 2 Once the printer server appears in the Server Name box, click on the Setup Wizard button. 8 Click on it. You may also need to the printer. You should show up under Server Name. If your printer should see your computer. Step 1 Click the Discover button and your print server does not show up , check all power and network cable connections to be performed one time from one computer. 2.3 Configuring the Printer Server Note: The following steps only need to disable any software firewalls you have on your printer next to Device name.
Step 2 Once the printer server appears in the Server Name box, click on the Setup Wizard button. 8 Click on it. You may also need to the printer. You should show up under Server Name. If your printer should see your computer. Step 1 Click the Discover button and your print server does not show up , check all power and network cable connections to be performed one time from one computer. 2.3 Configuring the Printer Server Note: The following steps only need to disable any software firewalls you have on your printer next to Device name.
User Manual
Page 11
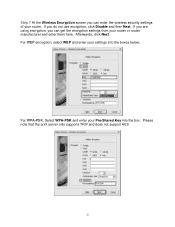
For WEP encryption, select WEP and enter your Pre-Shared Key into the boxes below. Please note that the print server only supports TKIP and does not support AES 11 For WPA-PSK, Select WPA-PSK and enter your settings into the box. Step 7 At the Wireless Encryption screen you can get the encryption settings from your router. If you are using encryption, you do not use encryption, click Disable and then Next. Afterwards, click Next. If you can enter the wireless security settings of your router or router manufacturer and enter them here.
For WEP encryption, select WEP and enter your Pre-Shared Key into the boxes below. Please note that the print server only supports TKIP and does not support AES 11 For WPA-PSK, Select WPA-PSK and enter your settings into the box. Step 7 At the Wireless Encryption screen you can get the encryption settings from your router. If you are using encryption, you do not use encryption, click Disable and then Next. Afterwards, click Next. If you can enter the wireless security settings of your router or router manufacturer and enter them here.
User Manual
Page 12
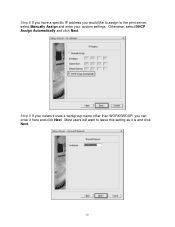
Step 8 If you have a specific IP address you would like to assign to leave this setting as it here and click Next. Most users will want to the print server, select Manually Assign and enter your network uses a workgroup name other than WORKGROUP, you can enter it is and click Next. 12 Step 9 If your custom settings. Otherwise, select DHCP Assign Automatically and click Next.
Step 8 If you have a specific IP address you would like to assign to leave this setting as it here and click Next. Most users will want to the print server, select Manually Assign and enter your network uses a workgroup name other than WORKGROUP, you can enter it is and click Next. 12 Step 9 If your custom settings. Otherwise, select DHCP Assign Automatically and click Next.

User Manual
Page 13
Step 10 If you have specific AppleTalk settings, you can enter them here. Step 11 Click Save to save the changes to leave this setting as it is and click Next. If you plan to use the print server wirelessly, you can now disconnect the Ethernet cable between the print server and the router. 13 Most users will want to your print server.
Step 10 If you have specific AppleTalk settings, you can enter them here. Step 11 Click Save to save the changes to leave this setting as it is and click Next. If you plan to use the print server wirelessly, you can now disconnect the Ethernet cable between the print server and the router. 13 Most users will want to your print server.
User Manual
Page 14
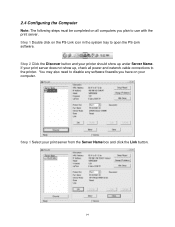
Step 2 Click the Discover button and your printer should show up under Server Name. Step 1 Select your print server does not show up , check all computers you have on all power and network cable connections to the printer. You may also need to open the PS-Link software. 2.4 Configuring the Computer Note: The following steps must be completed on your computer. Step 1 Double click on the PS-Link icon in the system tray to disable any software firewalls you plan to use with the print server. If your print server from the Server Name box and click the Link button. 14
Step 2 Click the Discover button and your printer should show up under Server Name. Step 1 Select your print server does not show up , check all computers you have on all power and network cable connections to the printer. You may also need to open the PS-Link software. 2.4 Configuring the Computer Note: The following steps must be completed on your computer. Step 1 Double click on the PS-Link icon in the system tray to disable any software firewalls you plan to use with the print server. If your print server from the Server Name box and click the Link button. 14

User Manual
Page 15
... see a copy of Printers and Faxes). Step 2 Click OK at the Link Successfully screen. Congratulations, the configuration is installed and ready to use with the print server. 15
... see a copy of Printers and Faxes). Step 2 Click OK at the Link Successfully screen. Congratulations, the configuration is installed and ready to use with the print server. 15
User Manual
Page 23
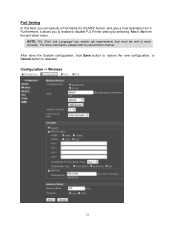
NOTE: PJL (Print Job Language) has certain job requirements that must be met to abandon. Configuration J Wireless 23 After done the System configuration, click Save button to restore the new configuration, or Cancel button to work correctly. Furthermore, it . For more information, please refer to enable or disable PJL Printer setting by selecting Yes or No from the pull-down menu. Port Setting In this field, you can specify a Port Name for the MFP Server, and give a brief description for it allows you to your printer's manual.
NOTE: PJL (Print Job Language) has certain job requirements that must be met to abandon. Configuration J Wireless 23 After done the System configuration, click Save button to restore the new configuration, or Cancel button to work correctly. Furthermore, it . For more information, please refer to enable or disable PJL Printer setting by selecting Yes or No from the pull-down menu. Port Setting In this field, you can specify a Port Name for the MFP Server, and give a brief description for it allows you to your printer's manual.
User Manual
Page 26
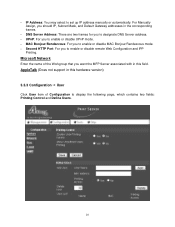
...: There are two frames for you to designate DNS Server address. - MAC Bonjour/Rendezvous: For you to enable or disable MAC Bonjour/Rendezvous mode. - For Manually Assign, you to display the following page, which contains two fields: Printing Control and Define Users. 26 Second HTTP Port: For you should IP... IP address manually or automatically. - IP Address: You may select to enable or disable UPnP mode. - UPnP: For you want the MFP Server associated with in this field. Microsoft Network Enter the name of Configuration to enable or disable remote Web Configuration and IPP...
...: There are two frames for you to designate DNS Server address. - MAC Bonjour/Rendezvous: For you to enable or disable MAC Bonjour/Rendezvous mode. - For Manually Assign, you to display the following page, which contains two fields: Printing Control and Define Users. 26 Second HTTP Port: For you should IP... IP address manually or automatically. - IP Address: You may select to enable or disable UPnP mode. - UPnP: For you want the MFP Server associated with in this field. Microsoft Network Enter the name of Configuration to enable or disable remote Web Configuration and IPP...

Quick Installation Guide
Page 2
... the other end to the Ethernet port on the printer. Once the printer is powered on the printer server. Step 1 Insert the Utility CD into the USB port on , connect the print server's power adapter to use with the print server. Step 2 Connect one end of the print server. Step 1 Power down the printer and the printer...
... the other end to the Ethernet port on the printer. Once the printer is powered on the printer server. Step 1 Insert the Utility CD into the USB port on , connect the print server's power adapter to use with the print server. Step 2 Connect one end of the print server. Step 1 Power down the printer and the printer...
Quick Installation Guide
Page 6
Section 3 Configuring the Printer Server Note: The following steps only need to disable any software firewalls you have on your computer. Step 1 Click the Discover button and your printer should see your print server does not show up , check all power and network cable connections to the printer. If your printer next to be performed one time from one computer. Click on it. Step 2 Once the printer server appears in the Server Name box, click on the Setup Wizard button. You should show up under Server Name. You may also need to Device name.
Section 3 Configuring the Printer Server Note: The following steps only need to disable any software firewalls you have on your computer. Step 1 Click the Discover button and your printer should see your print server does not show up , check all power and network cable connections to the printer. If your printer next to be performed one time from one computer. Click on it. Step 2 Once the printer server appears in the Server Name box, click on the Setup Wizard button. You should show up under Server Name. You may also need to Device name.

Quick Installation Guide
Page 9
For WPA-PSK, Select WPA-PSK and enter your settings into the box. For WEP encryption, select WEP and enter your Pre-Shared Key into the boxes below. Please note that the print server only supports TKIP and does not support AES. If you are using encryption, you can enter the wireless security settings of your router or router manufacturer and enter them here. If you do not use encryption, click Disable and then Next. Step 7 At the Wireless Encryption screen you can get the encryption settings from your router. Afterwards, click Next.
For WPA-PSK, Select WPA-PSK and enter your settings into the box. For WEP encryption, select WEP and enter your Pre-Shared Key into the boxes below. Please note that the print server only supports TKIP and does not support AES. If you are using encryption, you can enter the wireless security settings of your router or router manufacturer and enter them here. If you do not use encryption, click Disable and then Next. Step 7 At the Wireless Encryption screen you can get the encryption settings from your router. Afterwards, click Next.

Quick Installation Guide
Page 10
Step 9 If your custom settings. Otherwise, select DHCP Assign Automatically and click Next. Step 8 If you have a specific IP address you would like to assign to the print server, select Manually Assign and enter your network uses a workgroup name other than WORKGROUP, you can enter it here, or accept the default settings, and click Next.
Step 9 If your custom settings. Otherwise, select DHCP Assign Automatically and click Next. Step 8 If you have a specific IP address you would like to assign to the print server, select Manually Assign and enter your network uses a workgroup name other than WORKGROUP, you can enter it here, or accept the default settings, and click Next.
Quick Installation Guide
Page 11
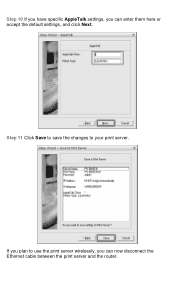
Step 10 If you have specific AppleTalk settings, you plan to your print server. Step 11 Click Save to save the changes to use the print server wirelessly, you can enter them here or accept the default settings, and click Next. If you can now disconnect the Ethernet cable between the print server and the router.
Step 10 If you have specific AppleTalk settings, you plan to your print server. Step 11 Click Save to save the changes to use the print server wirelessly, you can enter them here or accept the default settings, and click Next. If you can now disconnect the Ethernet cable between the print server and the router.

Quick Installation Guide
Page 12
... connections to the printer. You may also need to open the PS-Link software. If your print server does not show up , check all computers you are using the print server wirelessly, please refer to Section 5 for wireless troubleshooting steps. Step 3 Select your printer should ...show up under Server Name. If you plan to use with the print server. Step 2 Click the Discover button and your print server from the Server Name box and click the Link button. Section 4 Configuring the Computer Note: The...
... connections to the printer. You may also need to open the PS-Link software. If your print server does not show up , check all computers you are using the print server wirelessly, please refer to Section 5 for wireless troubleshooting steps. Step 3 Select your printer should ...show up under Server Name. If you plan to use with the print server. Step 2 Click the Discover button and your print server from the Server Name box and click the Link button. Section 4 Configuring the Computer Note: The...
Quick Installation Guide
Page 14
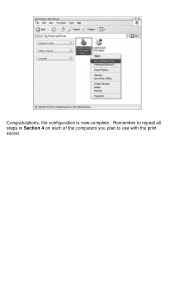
Remember to repeat all steps in Section 4 on each of the computers you plan to use with the print server. Congratulations, the configuration is now complete.
Remember to repeat all steps in Section 4 on each of the computers you plan to use with the print server. Congratulations, the configuration is now complete.

Quick Installation Guide
Page 15
.... For instructions on changing channels, refer to the documentation that came with channel 1 and work /finish, only able to communicate with the print server intermittently) you will automatically pick up the new channel after you unplug the power and plug it back in . Start with your way up...work your router. Keep going through the channels until you find one that gives you unplug the power from the print server and plug it will want to tune your print server shows up, the wireless connection is connected wirelessly, disconnect the networking cable from . Your router has 11 different...
.... For instructions on changing channels, refer to the documentation that came with channel 1 and work /finish, only able to communicate with the print server intermittently) you will automatically pick up the new channel after you unplug the power and plug it back in . Start with your way up...work your router. Keep going through the channels until you find one that gives you unplug the power from the print server and plug it will want to tune your print server shows up, the wireless connection is connected wirelessly, disconnect the networking cable from . Your router has 11 different...