
User Manual
Page 3
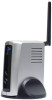
... is the easiest and fastest way to deploy printers on your local area network (LAN). 1 Introduction Congratulations on purchasing your computers that allows you to set up the Print Server through the web browser easily and quickly. It also features a Web-based Configuration Utility, which allows you to the network. It...
... is the easiest and fastest way to deploy printers on your local area network (LAN). 1 Introduction Congratulations on purchasing your computers that allows you to set up the Print Server through the web browser easily and quickly. It also features a Web-based Configuration Utility, which allows you to the network. It...

User Manual
Page 9
The default password is admin. If you do not have a specific Server Name, Port Name, or Password that you can change the Server Name, Port Name, and Password. Enter it and click OK. Step 4 Click Next at the welcome screen. Step 5 At the System screen you would like to use, click Next to accept the default settings. 9 Click Next after making the desired changes. Step 3 A password box will appear.
The default password is admin. If you do not have a specific Server Name, Port Name, or Password that you can change the Server Name, Port Name, and Password. Enter it and click OK. Step 4 Click Next at the welcome screen. Step 5 At the System screen you would like to use, click Next to accept the default settings. 9 Click Next after making the desired changes. Step 3 A password box will appear.

User Manual
Page 10
If you are unsure of your SSID, contact your router manufacturer for your network. If you have a router, you will want to choose Infrastructure mode. Step 6 At the Wireless screen you can input the wireless settings for assistance. 10
If you are unsure of your SSID, contact your router manufacturer for your network. If you have a router, you will want to choose Infrastructure mode. Step 6 At the Wireless screen you can input the wireless settings for assistance. 10
User Manual
Page 11
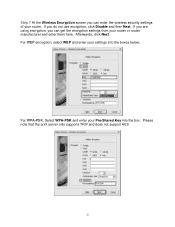
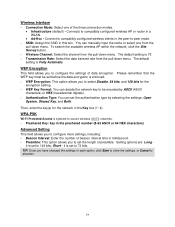
For WPA-PSK, Select WPA-PSK and enter your settings into the box. For WEP encryption, select WEP and enter your Pre-Shared Key into the boxes below. If you are using encryption, you can enter the wireless security settings of your router or router manufacturer and enter them here. Step 7 At the Wireless Encryption screen you can get the encryption settings from your router. Afterwards, click Next. Please note that the print server only supports TKIP and does not support AES 11 If you do not use encryption, click Disable and then Next.
For WPA-PSK, Select WPA-PSK and enter your settings into the box. For WEP encryption, select WEP and enter your Pre-Shared Key into the boxes below. If you are using encryption, you can enter the wireless security settings of your router or router manufacturer and enter them here. Step 7 At the Wireless Encryption screen you can get the encryption settings from your router. Afterwards, click Next. Please note that the print server only supports TKIP and does not support AES 11 If you do not use encryption, click Disable and then Next.
User Manual
Page 12
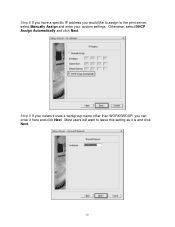
Otherwise, select DHCP Assign Automatically and click Next. Step 8 If you have a specific IP address you would like to assign to leave this setting as it here and click Next. Most users will want to the print server, select Manually Assign and enter your network uses a workgroup name other than WORKGROUP, you can enter it is and click Next. 12 Step 9 If your custom settings.
Otherwise, select DHCP Assign Automatically and click Next. Step 8 If you have a specific IP address you would like to assign to leave this setting as it here and click Next. Most users will want to the print server, select Manually Assign and enter your network uses a workgroup name other than WORKGROUP, you can enter it is and click Next. 12 Step 9 If your custom settings.

User Manual
Page 13
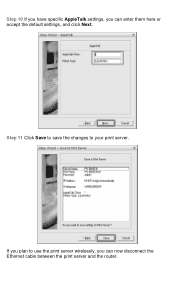
Step 11 Click Save to save the changes to leave this setting as it is and click Next. Most users will want to your print server. Step 10 If you have specific AppleTalk settings, you can enter them here. If you plan to use the print server wirelessly, you can now disconnect the Ethernet cable between the print server and the router. 13
Step 11 Click Save to save the changes to leave this setting as it is and click Next. Most users will want to your print server. Step 10 If you have specific AppleTalk settings, you can enter them here. If you plan to use the print server wirelessly, you can now disconnect the Ethernet cable between the print server and the router. 13

User Manual
Page 15
... of Printers and Faxes). Step 2 Click OK at the Link Successfully screen. Step 3 Once you see notices appearing in Section 4 on the copy and click Set as Windows configures the printer. You will see a copy of your printer.
... of Printers and Faxes). Step 2 Click OK at the Link Successfully screen. Step 3 Once you see notices appearing in Section 4 on the copy and click Set as Windows configures the printer. You will see a copy of your printer.

User Manual
Page 20
The current configuration contains DHCP/BOOTP, UPnP, and MAC Bonjour/Rendezvous. 20 3.2.3 Management J Network Click the Network option of Management to display the LAN information: Auto IP This field displays the current settings of TCP/IP, pre-configured in TCP/IP field that is located on Network of Configuration category, for your verification.
The current configuration contains DHCP/BOOTP, UPnP, and MAC Bonjour/Rendezvous. 20 3.2.3 Management J Network Click the Network option of Management to display the LAN information: Auto IP This field displays the current settings of TCP/IP, pre-configured in TCP/IP field that is located on Network of Configuration category, for your verification.

User Manual
Page 22
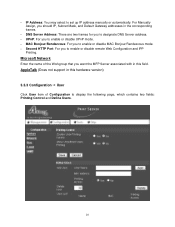
... J System Click System item of Configuration to display the following page, which contains two fields: System Device and Port Settings. Password: Specify an administrator password with 3 to do the basic set up for the MFP Server. - Admin Contact (optional): Assign an administrator name for the MFP Server. - 3.3 ...Configuration The Configuration category allows you to set up the password, please enter the password in the New Password, and then enter the same one again in the Confirm Again. 22...
... J System Click System item of Configuration to display the following page, which contains two fields: System Device and Port Settings. Password: Specify an administrator password with 3 to do the basic set up for the MFP Server. - Admin Contact (optional): Assign an administrator name for the MFP Server. - 3.3 ...Configuration The Configuration category allows you to set up the password, please enter the password in the New Password, and then enter the same one again in the Confirm Again. 22...
User Manual
Page 23
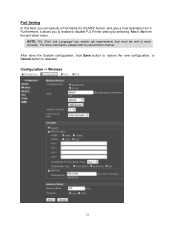
Port Setting In this field, you can specify a Port Name for the MFP Server, and give a brief description for it allows you to enable or disable PJL Printer setting by selecting Yes or No from the pull-down menu. Furthermore, it . After done the System configuration, click Save button to restore the new configuration, or Cancel button to your printer's manual. Configuration J Wireless 23 For more information, please refer to abandon. NOTE: PJL (Print Job Language) has certain job requirements that must be met to work correctly.
Port Setting In this field, you can specify a Port Name for the MFP Server, and give a brief description for it allows you to enable or disable PJL Printer setting by selecting Yes or No from the pull-down menu. Furthermore, it . After done the System configuration, click Save button to restore the new configuration, or Cancel button to your printer's manual. Configuration J Wireless 23 For more information, please refer to abandon. NOTE: PJL (Print Job Language) has certain job requirements that must be met to work correctly.
User Manual
Page 24
...24 Short - Wireless Channel: Select the channel from the pull-down menu. Please remember that the WEP key must be encoded by selecting the settings: Open System, Shared Key, and Both. Authentication Type: You can manually input the name or select one of beacon interval time in each ...to select Disable, 64 bits, and 128 bits for the network in the preshared number (8-63 ASCII or 64 HEX characters) Advanced Setting This field allows you to configure more settings, including: - SSID: Assign the SSID in a WLAN. • Ad-Hoc - Transmission Rate: Select the data transmit rate ...
...24 Short - Wireless Channel: Select the channel from the pull-down menu. Please remember that the WEP key must be encoded by selecting the settings: Open System, Shared Key, and Both. Authentication Type: You can manually input the name or select one of beacon interval time in each ...to select Disable, 64 bits, and 128 bits for the network in the preshared number (8-63 ASCII or 64 HEX characters) Advanced Setting This field allows you to configure more settings, including: - SSID: Assign the SSID in a WLAN. • Ad-Hoc - Transmission Rate: Select the data transmit rate ...

User Manual
Page 25
TCP/IP This field allows you to display the following page, which contains two fields: TCP/IP, Microsoft Network, and Apple Talk. 3.3.2 Configuration J Network Click Network item of Configuration to configure the TCP/IP setting, including: 25
TCP/IP This field allows you to display the following page, which contains two fields: TCP/IP, Microsoft Network, and Apple Talk. 3.3.2 Configuration J Network Click Network item of Configuration to configure the TCP/IP setting, including: 25
User Manual
Page 26
AppleTalk (Does not support in this hardware version) 3.3.3 Configuration J User Click User item of the Workgroup that you to set up IP address manually or automatically. DNS Server Address: There are two frames for you to display the following page, which contains two fields: Printing ...
AppleTalk (Does not support in this hardware version) 3.3.3 Configuration J User Click User item of the Workgroup that you to set up IP address manually or automatically. DNS Server Address: There are two frames for you to display the following page, which contains two fields: Printing ...

User Manual
Page 28
... printed out directly through the printer (ASCII text only). After done the configuration, click Save button to restore the new configuration, or Cancel button to set up a time interval in minute in ASCII text format only. - To enable this function, enter the Email account in the Admin Email Address frame...
... printed out directly through the printer (ASCII text only). After done the configuration, click Save button to restore the new configuration, or Cancel button to set up a time interval in minute in ASCII text format only. - To enable this function, enter the Email account in the Admin Email Address frame...
User Manual
Page 32
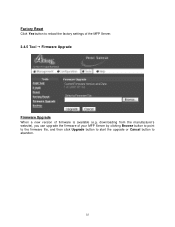
downloading from the manufacturer's website), you can upgrade the firmware of firmware is available (e.g. Factory Reset Click Yes button to reload the factory settings of the MFP Server. 3.4.5 Tool J Firmware Upgrade Firmware Upgrade When a new version of your MFP Server by clicking Browse button to point to the firmware file, and then click Upgrade button to start the upgrade or Cancel button to abandon. 32
downloading from the manufacturer's website), you can upgrade the firmware of firmware is available (e.g. Factory Reset Click Yes button to reload the factory settings of the MFP Server. 3.4.5 Tool J Firmware Upgrade Firmware Upgrade When a new version of your MFP Server by clicking Browse button to point to the firmware file, and then click Upgrade button to start the upgrade or Cancel button to abandon. 32

Quick Installation Guide
Page 8
If you have a specific Server Name, Port Name, or Password that you are unsure of your SSID, contact your router manufacturer for your network. Step 5 At the System screen you can input the wireless settings for assistance. Step 6 At the Wireless screen you can change the Server Name, Port Name, and Password. Click Next after making the desired changes. If you do not have a router, you will want to accept the default settings. If you would like to use, click Next to choose Infrastructure mode.
If you have a specific Server Name, Port Name, or Password that you are unsure of your SSID, contact your router manufacturer for your network. Step 5 At the System screen you can input the wireless settings for assistance. Step 6 At the Wireless screen you can change the Server Name, Port Name, and Password. Click Next after making the desired changes. If you do not have a router, you will want to accept the default settings. If you would like to use, click Next to choose Infrastructure mode.

Quick Installation Guide
Page 9
For WEP encryption, select WEP and enter your settings into the box. If you are using encryption, you can get the encryption settings from your router or router manufacturer and enter them here. Afterwards, click Next. Step 7 At the Wireless Encryption screen you can enter the wireless security settings of your router. For WPA-PSK, Select WPA-PSK and enter your Pre-Shared Key into the boxes below. Please note that the print server only supports TKIP and does not support AES. If you do not use encryption, click Disable and then Next.
For WEP encryption, select WEP and enter your settings into the box. If you are using encryption, you can get the encryption settings from your router or router manufacturer and enter them here. Afterwards, click Next. Step 7 At the Wireless Encryption screen you can enter the wireless security settings of your router. For WPA-PSK, Select WPA-PSK and enter your Pre-Shared Key into the boxes below. Please note that the print server only supports TKIP and does not support AES. If you do not use encryption, click Disable and then Next.

Quick Installation Guide
Page 10
Step 9 If your custom settings. Otherwise, select DHCP Assign Automatically and click Next. Step 8 If you have a specific IP address you would like to assign to the print server, select Manually Assign and enter your network uses a workgroup name other than WORKGROUP, you can enter it here, or accept the default settings, and click Next.
Step 9 If your custom settings. Otherwise, select DHCP Assign Automatically and click Next. Step 8 If you have a specific IP address you would like to assign to the print server, select Manually Assign and enter your network uses a workgroup name other than WORKGROUP, you can enter it here, or accept the default settings, and click Next.
Quick Installation Guide
Page 11
Step 10 If you have specific AppleTalk settings, you can enter them here or accept the default settings, and click Next. If you plan to your print server. Step 11 Click Save to save the changes to use the print server wirelessly, you can now disconnect the Ethernet cable between the print server and the router.
Step 10 If you have specific AppleTalk settings, you can enter them here or accept the default settings, and click Next. If you plan to your print server. Step 11 Click Save to save the changes to use the print server wirelessly, you can now disconnect the Ethernet cable between the print server and the router.

Quick Installation Guide
Page 13
Right click on Printers instead of Printers and Faxes) Step 6 In Printers and Faxes (or Printers) you see a notice that says Your new hardware is installed and ready to use, go to Start -> Control Panel and double click on Printers and Faxes (Vista users: Click on the copy and click Set as Default Printer. You will see notices appearing in the bottom right-hand corner of your screen while Windows configures the printer. Step 4 Click OK at the Link Successfully screen. Step 5 Once you will see a copy of your printer.
Right click on Printers instead of Printers and Faxes) Step 6 In Printers and Faxes (or Printers) you see a notice that says Your new hardware is installed and ready to use, go to Start -> Control Panel and double click on Printers and Faxes (Vista users: Click on the copy and click Set as Default Printer. You will see notices appearing in the bottom right-hand corner of your screen while Windows configures the printer. Step 4 Click OK at the Link Successfully screen. Step 5 Once you will see a copy of your printer.
