Airlink AWLL5088 Windows 7

Related Manual Pages


Similar Questions

Windows 7 Drivers
Is there a place that you can get the windows 7 drivers for this model airlink
Is there a place that you can get the windows 7 drivers for this model airlink
(Posted by rfoxdelta2922 2 years ago)

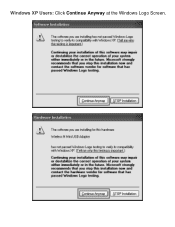
Correct Drivers
Where can I get the correct drivers to install the adapter on Windows XP? I have been having difficu...
Where can I get the correct drivers to install the adapter on Windows XP? I have been having difficu...
(Posted by progressivecontrols 12 years ago)

Model Awlh3028v2 Supports Windows 7,directions Claim It Does Not ??????
(Posted by mkchip 12 years ago)