

User Guide
Page 3
... the hi-hat controller pedal: • Open hi-hat: With your foot off of force to select Kit 6, 7, 8, 9, or 10 (respectively). Once you have selected a Kit, you hit the pads. Try hitting the pads with different amounts of the pedal, hit the hi-hat pad. • Closed hi-hat: With your electronic drum kit has velocity-sensitive pads, this manual. 3 For additional product support, visit alesis.com/support. and + Buttons. Quick Start Connecting the Drum Module Connect the cable snake here (using the...
... the hi-hat controller pedal: • Open hi-hat: With your foot off of force to select Kit 6, 7, 8, 9, or 10 (respectively). Once you have selected a Kit, you hit the pads. Try hitting the pads with different amounts of the pedal, hit the hi-hat pad. • Closed hi-hat: With your electronic drum kit has velocity-sensitive pads, this manual. 3 For additional product support, visit alesis.com/support. and + Buttons. Quick Start Connecting the Drum Module Connect the cable snake here (using the...

User Guide
Page 4
.... PHONES AUX IN OUTPUT R L/MONO USB 453 36 1 3. Pattern Button: Press this input. 6. Aux In: Use a 1/8" stereo cable (not included) to connect an external audio device (smartphone, CD player, etc.) to the drum module's functions and operation. 3. Display: This area shows values and text relevant to this button to adjust the tempo. Cable Snake Connector: Connect your cable snake (included) here, and connect the cable snake's cables to and from your kit's triggers (drum pads, cymbal pads, and pedals).
.... PHONES AUX IN OUTPUT R L/MONO USB 453 36 1 3. Pattern Button: Press this input. 6. Aux In: Use a 1/8" stereo cable (not included) to connect an external audio device (smartphone, CD player, etc.) to the drum module's functions and operation. 3. Display: This area shows values and text relevant to this button to adjust the tempo. Cable Snake Connector: Connect your cable snake (included) here, and connect the cable snake's cables to and from your kit's triggers (drum pads, cymbal pads, and pedals).
User Guide
Page 5
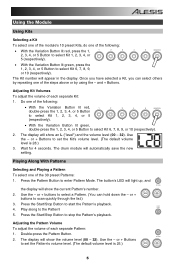
... + buttons to select a Pattern. (You can select others by using the - Adjusting the Pattern Volume To adjust the volume of each separate Kit: 1. and + Buttons. The display will show the current Pattern's number. 2. Use the - or + buttons to enter Pattern Mode. START /STOP 4. Adjusting Kit Volumes To adjust the volume of each separate Pattern: 1. Use the - Press the Pattern Button to scan quickly through the list.) 3. or + Buttons to set the Kit's volume level. (The default volume level...
... + buttons to select a Pattern. (You can select others by using the - Adjusting the Pattern Volume To adjust the volume of each separate Kit: 1. and + Buttons. The display will show the current Pattern's number. 2. Use the - or + buttons to enter Pattern Mode. START /STOP 4. Adjusting Kit Volumes To adjust the volume of each separate Pattern: 1. Use the - Press the Pattern Button to scan quickly through the list.) 3. or + Buttons to set the Kit's volume level. (The default volume level...
User Guide
Page 6
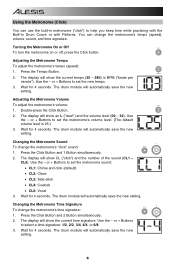
...the Built-In Drum Coach or with Patterns. Use the - Adjusting the Metronome Volume To adjust the metronome's volume: CLICK 1. Changing the Metronome Sound To change the metronome's time signature: 2 CLICK 1. or + Buttons to select a time signature: 1/2, 2/2, 3/4, 4/4, or 6/8. 3. Using the Metronome (Click) You can change the metronome's tempo (speed), volume, sound, and time signature. Changing the Metronome Time Signature To change the metronome's "click" sound: 1 CLICK 1. Wait for 4 seconds. The drum module will show CL ("click") and the number of the sound (CL1 -
...the Built-In Drum Coach or with Patterns. Use the - Adjusting the Metronome Volume To adjust the metronome's volume: CLICK 1. Changing the Metronome Sound To change the metronome's time signature: 2 CLICK 1. or + Buttons to select a time signature: 1/2, 2/2, 3/4, 4/4, or 6/8. 3. Using the Metronome (Click) You can change the metronome's tempo (speed), volume, sound, and time signature. Changing the Metronome Time Signature To change the metronome's "click" sound: 1 CLICK 1. Wait for 4 seconds. The drum module will show CL ("click") and the number of the sound (CL1 -

User Guide
Page 7
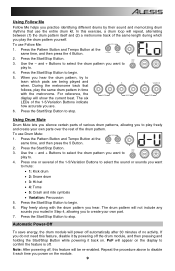
... you want to help you have selected. 1. Changing the Metronome Interval To change the metronome's note division (the note value it measures with the metronome. The drum module will show which exercise you develop and improve a sense of time and how accurately you can play along with the metronome. Drum Mute (d-U) Using Beat Check This exercise evaluates your sense of tempo, accuracy, or stamina: Beat Check...
... you want to help you have selected. 1. Changing the Metronome Interval To change the metronome's note division (the note value it measures with the metronome. The drum module will show which exercise you develop and improve a sense of time and how accurately you can play along with the metronome. Drum Mute (d-U) Using Beat Check This exercise evaluates your sense of tempo, accuracy, or stamina: Beat Check...

User Guide
Page 8
...; Press the 1 Button to select G-1 Mode. Press the Pattern Button and Tempo Button at the same time, and then press the 3 Button. Hit the pads in the rhythm you practice changing rhythms while still maintaining accurate time. PATTERN TEMPO 2. Press the 1, 2, or 3 Button, or use Rhythm Change Up: 3 COACH 1. Hit the pads in time with the metronome. Press the Start/Stop Button to select G-2 Mode. In this mode, the 2 tempo automatically decreases or...
...; Press the 1 Button to select G-1 Mode. Press the Pattern Button and Tempo Button at the same time, and then press the 3 Button. Hit the pads in the rhythm you practice changing rhythms while still maintaining accurate time. PATTERN TEMPO 2. Press the 1, 2, or 3 Button, or use Rhythm Change Up: 3 COACH 1. Hit the pads in time with the metronome. Press the Start/Stop Button to select G-2 Mode. In this mode, the 2 tempo automatically decreases or...
User Guide
Page 9
... play to select the sound or sounds you do not need this feature, disable it by their sound and memorizing drum rhythms that follows, play the drum pattern yourself. Note: After powering off . Repeat the procedure above to mute: • 1: Kick drum • 2: Snare drum • 3: Hi-hat • 4: Toms • 5: Crash and ride cymbals • Variation: Percussion 5. Use the - During the metronome track that use the entire drum kit...
... play to select the sound or sounds you do not need this feature, disable it by their sound and memorizing drum rhythms that follows, play the drum pattern yourself. Note: After powering off . Repeat the procedure above to mute: • 1: Kick drum • 2: Snare drum • 3: Hi-hat • 4: Toms • 5: Crash and ride cymbals • Variation: Percussion 5. Use the - During the metronome track that use the entire drum kit...
User Guide
Page 10
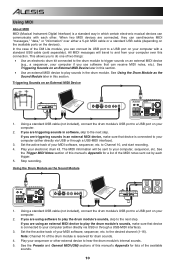
... connection. Note: Channel 10 of the DM Lite module, you can connect its USB port to a USB port on your computer with each trigger. 5. If you use software that can receive MIDI notes, etc.). If you are triggering sounds in an external MIDI device, make sure that device is connected to hear the drum module's internal sounds. 5. If you are using software to play the drum module's sounds, make sure that device is connected to a USB port on your computer. 2. Stop recording. Using a standard USB cable...
... connection. Note: Channel 10 of the DM Lite module, you can connect its USB port to a USB port on your computer with each trigger. 5. If you use software that can receive MIDI notes, etc.). If you are triggering sounds in an external MIDI device, make sure that device is connected to hear the drum module's internal sounds. 5. If you are using software to play the drum module's sounds, make sure that device is connected to a USB port on your computer. 2. Stop recording. Using a standard USB cable...

User Guide
Page 43
Appendix (English) Trigger MIDI Notes Trigger Kick Snare Tom 1 Tom 2 MIDI Note 36 38 48 45 Trigger Tom 3 Crash Ride Hi-Hat (open) MIDI Note 43 49 51 46 Trigger Hi-Hat (closed) Splash MIDI Note 44 21 Presets Kits Number 1 2 3 4 Preset Kit Acoustic Funk Jazz Brushes Rock Number 5 6 7 8 Preset Kit 808 909 FX Mix Marimba Number 9 10 Preset Kit Indian Percussion2 Patterns Number 1 2 3 4 5 6 7 8 9 10 Preset Kit Fusion1 Dance Funk Modern Pop Hip Hop Dance Classic Rock 68 Ballad CountryPop...
Appendix (English) Trigger MIDI Notes Trigger Kick Snare Tom 1 Tom 2 MIDI Note 36 38 48 45 Trigger Tom 3 Crash Ride Hi-Hat (open) MIDI Note 43 49 51 46 Trigger Hi-Hat (closed) Splash MIDI Note 44 21 Presets Kits Number 1 2 3 4 Preset Kit Acoustic Funk Jazz Brushes Rock Number 5 6 7 8 Preset Kit 808 909 FX Mix Marimba Number 9 10 Preset Kit Indian Percussion2 Patterns Number 1 2 3 4 5 6 7 8 9 10 Preset Kit Fusion1 Dance Funk Modern Pop Hip Hop Dance Classic Rock 68 Ballad CountryPop...
User Guide
Page 44
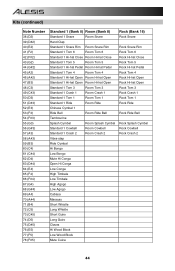
Kits (continued) Note Number 38 (D2) 39 (D#2) 40 (E2) 41 (F2) 42 (F#2) 43 (G2) 44 (G#2) 45 (A2) 46 (A#2) 47 (B3) 48 (C3) 49 (C#3) 50 (D3) 51 (D#3) 52 (E3) 53 (... Short Whistle Long Whistle Short Guiro Long Guiro Claves Hi Wood Block Low Wood Block Mute Cuica Rock (Bank 16) Rock Snare Rock Snare Rim Rock Tom 6 Rock Hi-hat Close Rock Tom 5 Rock Hi-hat Pedal Rock Tom 4 Rock Hi-hat Open Rock Hi-hat Open Rock Tom 3 Rock Crash 1 Rock Tom 1 Rock Ride Rock Ride Bell Rock...
Kits (continued) Note Number 38 (D2) 39 (D#2) 40 (E2) 41 (F2) 42 (F#2) 43 (G2) 44 (G#2) 45 (A2) 46 (A#2) 47 (B3) 48 (C3) 49 (C#3) 50 (D3) 51 (D#3) 52 (E3) 53 (... Short Whistle Long Whistle Short Guiro Long Guiro Claves Hi Wood Block Low Wood Block Mute Cuica Rock (Bank 16) Rock Snare Rock Snare Rim Rock Tom 6 Rock Hi-hat Close Rock Tom 5 Rock Hi-hat Pedal Rock Tom 4 Rock Hi-hat Open Rock Hi-hat Open Rock Tom 3 Rock Crash 1 Rock Tom 1 Rock Ride Rock Ride Bell Rock...
User Guide
Page 45
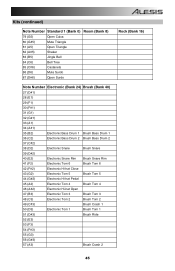
Kits (continued) Note Number Standard 1 (Bank 0) Room (Bank 8) 79 (G5) Open Cuica 80 (G#5) Mute Triangle 81 (A5) Open Triangle 82 (A#5) Shaker 83 (B5) Jingle Bell 84 (C6) Bell Tree 85 (C#6) Castanets 86 (D6) Mute Surdo 87 (D#6) Open Surdo Note Number Electronic (Bank 24) Brush (Bank 40) 27 (D#1) 28 (E1) 29 (F1) 30 (F#1) 31 (G1) 32 (G#1) 33 (A1) 34 (A#1) 35 (B2) Electronic Bass Drum 1 Brush Bass Drum 1 36 (C2) Electronic Bass Drum 2 Brush...
Kits (continued) Note Number Standard 1 (Bank 0) Room (Bank 8) 79 (G5) Open Cuica 80 (G#5) Mute Triangle 81 (A5) Open Triangle 82 (A#5) Shaker 83 (B5) Jingle Bell 84 (C6) Bell Tree 85 (C#6) Castanets 86 (D6) Mute Surdo 87 (D#6) Open Surdo Note Number Electronic (Bank 24) Brush (Bank 40) 27 (D#1) 28 (E1) 29 (F1) 30 (F#1) 31 (G1) 32 (G#1) 33 (A1) 34 (A#1) 35 (B2) Electronic Bass Drum 1 Brush Bass Drum 1 36 (C2) Electronic Bass Drum 2 Brush...
User Guide
Page 46
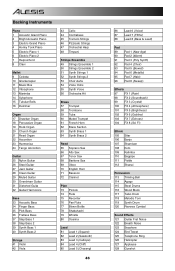
Backing Instruments Piano 1 Acoustic Grand Piano 2 Bright Acoustic Piano 3 Electric Grand Piano 4 Honky Tonk Piano 5 Electric Piano 1 6 Electric Piano 2 7 Harpsichord 8 Clavi Mallet 9 Celesta 10 Glockenspiel 11 Music Box 12 Vibraphone 13 Marimba 14 Xylophone 15 Tubular Bells 16 Dulcimer Organ 17 Drawbar Organ 18 Percussive Organ 19 Rock Organ 20 Church Organ 21 Reed Organ 22 Accordion 23 Harmonica 24 Tango Accordion Guitar 25 Nylon Guitar 26 Steel Guitar 27 Jazz Guitar 28...
Backing Instruments Piano 1 Acoustic Grand Piano 2 Bright Acoustic Piano 3 Electric Grand Piano 4 Honky Tonk Piano 5 Electric Piano 1 6 Electric Piano 2 7 Harpsichord 8 Clavi Mallet 9 Celesta 10 Glockenspiel 11 Music Box 12 Vibraphone 13 Marimba 14 Xylophone 15 Tubular Bells 16 Dulcimer Organ 17 Drawbar Organ 18 Percussive Organ 19 Rock Organ 20 Church Organ 21 Reed Organ 22 Accordion 23 Harmonica 24 Tango Accordion Guitar 25 Nylon Guitar 26 Steel Guitar 27 Jazz Guitar 28...
User Guide
Page 47
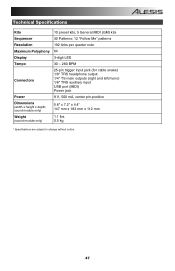
Technical Specifications Kits Sequencer Resolution Maximum Polyphony Display Tempo Connectors Power Dimensions (width x height x depth; sound module only) Weight (sound module only) 10 preset kits; 5 General MIDI (GM) kits 30 Patterns; 12 "Follow Me" patterns 192 ticks per quarter note 64 3-digit LED 30 - 280 BPM 25-pin trigger input jack (for cable snake) 1/8" TRS headphone output 1/4" TS main outputs (right and left/mono) 1/8" TRS auxiliary input USB port (MIDI) Power jack 9 V, 500 mA, center pin-positive 5.8" x 7.2" x 4.4" 147 mm...
Technical Specifications Kits Sequencer Resolution Maximum Polyphony Display Tempo Connectors Power Dimensions (width x height x depth; sound module only) Weight (sound module only) 10 preset kits; 5 General MIDI (GM) kits 30 Patterns; 12 "Follow Me" patterns 192 ticks per quarter note 64 3-digit LED 30 - 280 BPM 25-pin trigger input jack (for cable snake) 1/8" TRS headphone output 1/4" TS main outputs (right and left/mono) 1/8" TRS auxiliary input USB port (MIDI) Power jack 9 V, 500 mA, center pin-positive 5.8" x 7.2" x 4.4" 147 mm...


