
User Manual
Page 2
... Buttons: These buttons allow you configure and use the drum module. Power Button: Press this product (system requirements, compatibility information, etc.) and product registration, visit alesis.com. See Operation to navigate the menus shown in the display. 7. User Guide (English) Introduction Box Contents DM10 MKII Pro Module Power Adapter User Guide Safety & Warranty Manual Support For...
... Buttons: These buttons allow you configure and use the drum module. Power Button: Press this product (system requirements, compatibility information, etc.) and product registration, visit alesis.com. See Operation to navigate the menus shown in the display. 7. User Guide (English) Introduction Box Contents DM10 MKII Pro Module Power Adapter User Guide Safety & Warranty Manual Support For...

User Manual
Page 3
Dial: Turn this dial to adjust the setting of the phones output on the module or an external USB drive. 18. See Operation > Memory to access the Coach mode in the display (number values, kits, songs, etc.). To start recording. 15. Coach: Press this button to activate or ...more . 19. Alternatively, use the Up and Down buttons. 9. Record: Press this button to record-arm the drum module. See Operation > Metronome to learn more . 21. When the drum module is recordarmed, press this button to start recording, hit a drum pad, press Enter, or press Play/Stop. See Operation...
Dial: Turn this dial to adjust the setting of the phones output on the module or an external USB drive. 18. See Operation > Memory to access the Coach mode in the display (number values, kits, songs, etc.). To start recording. 15. Coach: Press this button to activate or ...more . 19. Alternatively, use the Up and Down buttons. 9. Record: Press this button to record-arm the drum module. See Operation > Metronome to learn more . 21. When the drum module is recordarmed, press this button to start recording, hit a drum pad, press Enter, or press Play/Stop. See Operation...

User Manual
Page 4
...Assembly Guide for more information. 9. Aux Input: Connect an additional audio player (smartphone, tablet, etc.) to this input. The drum module will be mixed with the drum module. 4. Phones Output: Connect 1/4" (6.35 mm) stereo headphones (sold separately) to this connection. 3. The sound will send MIDI messages... using a standard 5-pin MIDI cable. 5. Tom 4 Trigger Input: Connect the Tom 4 drum pad to and from it, or save and load kits, songs, and triggers. Refer to a power outlet using a standard USB cable. USB Port: Connect a USB flash drive to this input to the...
...Assembly Guide for more information. 9. Aux Input: Connect an additional audio player (smartphone, tablet, etc.) to this input. The drum module will be mixed with the drum module. 4. Phones Output: Connect 1/4" (6.35 mm) stereo headphones (sold separately) to this connection. 3. The sound will send MIDI messages... using a standard 5-pin MIDI cable. 5. Tom 4 Trigger Input: Connect the Tom 4 drum pad to and from it, or save and load kits, songs, and triggers. Refer to a power outlet using a standard USB cable. USB Port: Connect a USB flash drive to this input to the...

User Manual
Page 5
... is reached. 8. Connect the cable snake to the port on (1) input sources, (2) DM10 MKII Pro, (3) output devices. • When ending a session, turn on the bottom of the DM10 MKII Pro module (using the two screws to secure it), and then connect the 1/4" ends of the kit. 7. You can enable or disable this function in Introduction > Box Contents are...
... is reached. 8. Connect the cable snake to the port on (1) input sources, (2) DM10 MKII Pro, (3) output devices. • When ending a session, turn on the bottom of the DM10 MKII Pro module (using the two screws to secure it), and then connect the 1/4" ends of the kit. 7. You can enable or disable this function in Introduction > Box Contents are...
User Manual
Page 6
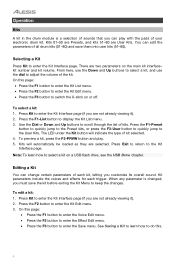
... parameters of all drum kits (01-80) and save the kit before exiting the Kit Menu to scroll through the list of the kit. When any parameter is a selection of sounds that you can play . 5. Selecting a Kit Press Kit to the User Kits. kit number and kit volume. Press Kit to do this. 6...the Effect Edit menu. • Press the F3 button to display the Kit List menu. 3. Kits will indicate the type of kit selected. 4. Operation Kits A kit in the drum module is changed, you must save them into user kits (51-80). To edit a kit: 1. Press Kit to switch the X-stick on or off.
... parameters of all drum kits (01-80) and save the kit before exiting the Kit Menu to scroll through the list of the kit. When any parameter is a selection of sounds that you can play . 5. Selecting a Kit Press Kit to the User Kits. kit number and kit volume. Press Kit to do this. 6...the Effect Edit menu. • Press the F3 button to display the Kit List menu. 3. Kits will indicate the type of kit selected. 4. Operation Kits A kit in the drum module is changed, you must save them into user kits (51-80). To edit a kit: 1. Press Kit to switch the X-stick on or off.

User Manual
Page 7
... the stereo field (L8 to C to the pad's sound (000-127). o MIDI Note: When the drum module's USB MIDI port or MIDI Out is connected to a computer or external MIDI device, the pad will stop when... those connections, this page: • To select a parameter that starts when you must save the kit before exiting the Kit Edit menu. o Strainer: The tightness of the snare wires on the snare drum (Off, Loose,...00 is the default and the longest amount of time. -05 is called a "voice." Enter the Kit Edit menu (if you want to edit. o Reverb Level: The amount of reverb effect applied to ...
... the stereo field (L8 to C to the pad's sound (000-127). o MIDI Note: When the drum module's USB MIDI port or MIDI Out is connected to a computer or external MIDI device, the pad will stop when... those connections, this page: • To select a parameter that starts when you must save the kit before exiting the Kit Edit menu. o Strainer: The tightness of the snare wires on the snare drum (Off, Loose,...00 is the default and the longest amount of time. -05 is called a "voice." Enter the Kit Edit menu (if you want to edit. o Reverb Level: The amount of reverb effect applied to ...

User Manual
Page 9
DM10 MKII Pro has a set this value too high, though! Higher values let you produce louder sounds with less force. Don't set of each trigger (drum pad or cymbal pad). it may not be lost when you power off the drum module. Don't set to 0, only the rimshot sound will be able to ...pad). You can change it may hear multiple hits (or "flams") occur after striking the trigger once. Hit the pad whose voice you customize your kit to edit, use the Down and Up buttons (not all parameters are "global" and therefore apply to all pads): o Threshold: The amount of the...
DM10 MKII Pro has a set this value too high, though! Higher values let you produce louder sounds with less force. Don't set of each trigger (drum pad or cymbal pad). it may not be lost when you power off the drum module. Don't set to 0, only the rimshot sound will be able to ...pad). You can change it may hear multiple hits (or "flams") occur after striking the trigger once. Hit the pad whose voice you customize your kit to edit, use the Down and Up buttons (not all parameters are "global" and therefore apply to all pads): o Threshold: The amount of the...

User Manual
Page 10
... indicates that you can adjust. 1. Note: To learn how to load a trigger setting to the previous menu. To change the tempo: 1. Select one of the module's outputs (All) or just the phones output (Phones). You will appear at the top of the new trigger setting, press F3-Enter to continue saving... drive, see the USB Drive chapter. To save a trigger setting to the trigger interface page. An asterisk (*) next to load using the same process as Kit Rename. 5. After entering the name of the display. 4.
... indicates that you can adjust. 1. Note: To learn how to load a trigger setting to the previous menu. To change the tempo: 1. Select one of the module's outputs (All) or just the phones output (Phones). You will appear at the top of the new trigger setting, press F3-Enter to continue saving... drive, see the USB Drive chapter. To save a trigger setting to the trigger interface page. An asterisk (*) next to load using the same process as Kit Rename. 5. After entering the name of the display. 4.
User Manual
Page 12
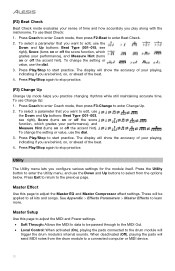
...When activated (On), playing the pads connected to start practice. To change the setting or value, use Beat Check: 1. Press Play/Stop to the drum module will show the accuracy of your playing, indicating if you are behind , on, or ahead of the beat. 4. To select a parameter that you want ...to all kits and songs. To use the dial. 3. To change the setting or value, use Change Up: 1. Utility The Utility menu lets you practice changing rhythms ...
...When activated (On), playing the pads connected to start practice. To change the setting or value, use Beat Check: 1. Press Play/Stop to the drum module will show the accuracy of your playing, indicating if you are behind , on, or ahead of the beat. 4. To select a parameter that you want ...to all kits and songs. To use the dial. 3. To change the setting or value, use Change Up: 1. Utility The Utility menu lets you practice changing rhythms ...

User Manual
Page 13
...show a warning that the memory will not be released right away. User Voice Use this page to manage the module's internal memory. • Delete Voice: Use this page to reset user drum kits, songs, voices, and trigger settings to perform a reset. Select Voice Delete and press Enter. • GM ...Mode: When activated (On), MIDI messages sent into the drum module's MIDI In will trigger the module's internal sounds (the ones played by each kit). • Prog Change RX: Turn On to receive Program Change MIDI data in Channel 10, or turn Off ...
...show a warning that the memory will not be released right away. User Voice Use this page to manage the module's internal memory. • Delete Voice: Use this page to reset user drum kits, songs, voices, and trigger settings to perform a reset. Select Voice Delete and press Enter. • GM ...Mode: When activated (On), MIDI messages sent into the drum module's MIDI In will trigger the module's internal sounds (the ones played by each kit). • Prog Change RX: Turn On to receive Program Change MIDI data in Channel 10, or turn Off ...

User Manual
Page 14
... adding files, make sure they can load four types of 4-64 GB, and it . Load You can be recognized by the module. Press USB Mem to select from a USB flash drive-Kits, Songs, Triggers, and Voices. A list of the display. 14 Use the Down and Up buttons to enter the USB Memory... triggers is set to open the loading menu. For songs and triggers, follow the directions for the kit to load, depending on its size. Press USB Mem to use the drum module with the drum module. Use the Down and Up buttons to it must be unselectable. • Wave A: The sample for ...
... adding files, make sure they can load four types of 4-64 GB, and it . Load You can be recognized by the module. Press USB Mem to select from a USB flash drive-Kits, Songs, Triggers, and Voices. A list of the display. 14 Use the Down and Up buttons to enter the USB Memory... triggers is set to open the loading menu. For songs and triggers, follow the directions for the kit to load, depending on its size. Press USB Mem to use the drum module with the drum module. Use the Down and Up buttons to it must be unselectable. • Wave A: The sample for ...

User Manual
Page 15
...used menus so you store some of the kit, press F3-Enter to save the voice to a USB flash drive: 1. An asterisk (*) next to the USB drive. After entering the name of your USB flash drive, use . To save a kit to the module. 9. To cancel formatting, press Exit. Memory... The Save buttons let you can rename the kit using the same process as Kit Rename. 6. 7. To save the kit to use the format function. Note: When Save is unused. 4. Format...
...used menus so you store some of the kit, press F3-Enter to save the voice to a USB flash drive: 1. An asterisk (*) next to the USB drive. After entering the name of your USB flash drive, use . To save a kit to the module. 9. To cancel formatting, press Exit. Memory... The Save buttons let you can rename the kit using the same process as Kit Rename. 6. 7. To save the kit to use the format function. Note: When Save is unused. 4. Format...

