Operation Manual
Page 3
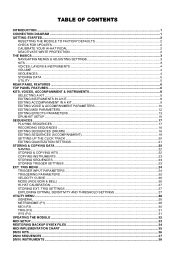
... SYSEX FILES ...34 MIDI IMPLEMENTATION CHART ...35 DM10 KITS...36 DM10 SEQUENCES ...37 DM10 INSTRUMENTS ...38 TABLE OF CONTENTS INTRODUCTION ...1 CONNECTION DIAGRAM ...1 GETTING STARTED...2 RESETTING THE MODULE TO FACTORY DEFAULTS 2 CHECK FOR UPDATES ...2 CALIBRATE YOUR HI-HAT PEDAL...2 DEACTIVATE WRITE PROTECTION ...2 THE BASICS...3 NAVIGATING MENUS & ADJUSTING SETTINGS 3 KITS ...3 VOICES: LAYERS & INSTRUMENTS...4 VOLUME ...4 SEQUENCES ...4 STORING DATA ...5 UTILITY ...5 REAR PANEL FEATURES ...6 TOP PANEL FEATURES...6 KITS, VOICES, ACCOMPANIMENT & INSTRUMENTS 8 SELECTING A KIT ...8 EDITING...
... SYSEX FILES ...34 MIDI IMPLEMENTATION CHART ...35 DM10 KITS...36 DM10 SEQUENCES ...37 DM10 INSTRUMENTS ...38 TABLE OF CONTENTS INTRODUCTION ...1 CONNECTION DIAGRAM ...1 GETTING STARTED...2 RESETTING THE MODULE TO FACTORY DEFAULTS 2 CHECK FOR UPDATES ...2 CALIBRATE YOUR HI-HAT PEDAL...2 DEACTIVATE WRITE PROTECTION ...2 THE BASICS...3 NAVIGATING MENUS & ADJUSTING SETTINGS 3 KITS ...3 VOICES: LAYERS & INSTRUMENTS...4 VOLUME ...4 SEQUENCES ...4 STORING DATA ...5 UTILITY ...5 REAR PANEL FEATURES ...6 TOP PANEL FEATURES...6 KITS, VOICES, ACCOMPANIMENT & INSTRUMENTS 8 SELECTING A KIT ...8 EDITING...

Operation Manual
Page 5
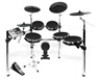
... r s hyth m s p attern analog modeling synth HOUSE AMP POWER COMPUTER CD PLAYER MONITORS • Connect your electronic drum set of the DM10. If this manual so you can connect only one output.) • You can connect a set 's triggers to trigger both zones. • Plug 1/4" TS cables from your electronic drum kit's assembly manual for a brief overview of the module's features, see the BASICS chapter. DRUM KIT EXTERNAL MIDI MODULE volume MIDI KEYBOARD m1 m2 pitch - Dual-zone pads or cymbals (e.g., a drum with the convenience and...
... r s hyth m s p attern analog modeling synth HOUSE AMP POWER COMPUTER CD PLAYER MONITORS • Connect your electronic drum set of the DM10. If this manual so you can connect only one output.) • You can connect a set 's triggers to trigger both zones. • Plug 1/4" TS cables from your electronic drum kit's assembly manual for a brief overview of the module's features, see the BASICS chapter. DRUM KIT EXTERNAL MIDI MODULE volume MIDI KEYBOARD m1 m2 pitch - Dual-zone pads or cymbals (e.g., a drum with the convenience and...
Operation Manual
Page 6
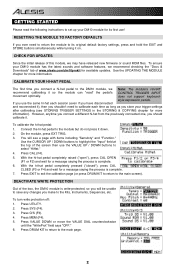
...). 3. RESETTING THE MODULE TO FACTORY DEFAULTS If you have released new firmware or sound ROM files. You will be unable to save any changes you make to calibrate each session (even if you ever need to the Kits, Instruments, Sequences, etc. GETTING STARTED Please read " the pedal's movement optimally. However, anytime you connect a different hi-hat from the previously connected one, you connect a hi-hat pedal to select "HiHat." 4. Press DRUM KIT...
...). 3. RESETTING THE MODULE TO FACTORY DEFAULTS If you have released new firmware or sound ROM files. You will be unable to save any changes you make to calibrate each session (even if you ever need to the Kits, Instruments, Sequences, etc. GETTING STARTED Please read " the pedal's movement optimally. However, anytime you connect a different hi-hat from the previously connected one, you connect a hi-hat pedal to select "HiHat." 4. Press DRUM KIT...

Operation Manual
Page 7
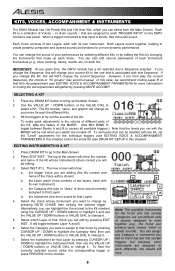
... with the following controls: • F-BUTTONS - You can adjust the overall Kit volume level, MIDI Program Change settings, or restore the current Kit's factory settings.) • SEQ - Press either of the current Kit.) • VALUE DIAL - the faster you turn the wheel, the faster it on the module's LCD with that will be triggered by pressing MUTE ACCOMP. 3 Press this to return to edit the sound of this...
... with the following controls: • F-BUTTONS - You can adjust the overall Kit volume level, MIDI Program Change settings, or restore the current Kit's factory settings.) • SEQ - Press either of the current Kit.) • VALUE DIAL - the faster you turn the wheel, the faster it on the module's LCD with that will be triggered by pressing MUTE ACCOMP. 3 Press this to return to edit the sound of this...

Operation Manual
Page 8
... then EDIT INST. VOLUME You may sound unusual. You can be selected or edited. TRIG MENU chapter for more information on selecting and editing Voices, see the KITS, VOICES, ACCOMPANIMENT & INSTRUMENTS chapter. You can adjust certain parameters of two Layers, and each Layer has its own Instrument (a drum sound such as a tom, snare, hi-hat, etc.) which you can set (e.g., a cymbal, a drum pad, etc.), it will trigger a Voice in the module. For...
... then EDIT INST. VOLUME You may sound unusual. You can be selected or edited. TRIG MENU chapter for more information on selecting and editing Voices, see the KITS, VOICES, ACCOMPANIMENT & INSTRUMENTS chapter. You can adjust certain parameters of two Layers, and each Layer has its own Instrument (a drum sound such as a tom, snare, hi-hat, etc.) which you can set (e.g., a cymbal, a drum pad, etc.), it will trigger a Voice in the module. For...
Operation Manual
Page 9
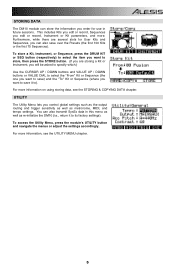
... menus or adjust the settings accordingly. STORING DATA The DM10 module can store the information you want to save it to its factory settings). To store a Kit, Instrument, or Sequence, press the DRUM KIT or SEQ button (respectively) to select the item you want to store, then press the STORE button. (If you are several slots for use in this menu as well as metronome, MIDI, and tempo settings. For...
... menus or adjust the settings accordingly. STORING DATA The DM10 module can store the information you want to save it to its factory settings). To store a Kit, Instrument, or Sequence, press the DRUM KIT or SEQ button (respectively) to select the item you want to store, then press the STORE button. (If you are several slots for use in this menu as well as metronome, MIDI, and tempo settings. For...
Operation Manual
Page 10
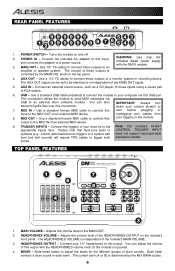
... Use a standard five-pin MIDI cable to connect this connection. Please note that dual-zone pads or CONTROL TRIGGER INPUT cymbals (e.g., a drum with head and rim triggers or a cymbal with the DM10 module. 4. HEADPHONES VOLUME - Use 1/4" TS cables to connect these inputs using a stereo pair of your computer via USB to a monitor system or recording device. output to an amplifier or speaker system. MAIN VOLUME - POWER SWITCH - AUX IN - REAR PANEL FEATURES 999999 543 129 9 9 9 9 99 8 7 65 4 3 1. WARNING: Use only the included Alesis power supply...
... Use a standard five-pin MIDI cable to connect this connection. Please note that dual-zone pads or CONTROL TRIGGER INPUT cymbals (e.g., a drum with head and rim triggers or a cymbal with the DM10 module. 4. HEADPHONES VOLUME - Use 1/4" TS cables to connect these inputs using a stereo pair of your computer via USB to a monitor system or recording device. output to an amplifier or speaker system. MAIN VOLUME - POWER SWITCH - AUX IN - REAR PANEL FEATURES 999999 543 129 9 9 9 9 99 8 7 65 4 3 1. WARNING: Use only the included Alesis power supply...

Operation Manual
Page 11
... to adjust parameters related to triggering. EXIT - EXT TRIG - NOTE CHASE - Press this button to strike the pads, etc. 20. Press this button to adjust the settings for your drum kit, if it is not convenient to mute the drum track of the Kit. STORE - When saving a Kit, its Instruments and all its corresponding Kit and Accompaniment. 21. Press this button to edit the Instrument assigned to enter a new tempo for editing. STOP...
... to adjust parameters related to triggering. EXIT - EXT TRIG - NOTE CHASE - Press this button to strike the pads, etc. 20. Press this button to adjust the settings for your drum kit, if it is not convenient to mute the drum track of the Kit. STORE - When saving a Kit, its Instruments and all its corresponding Kit and Accompaniment. 21. Press this button to edit the Instrument assigned to enter a new tempo for editing. STOP...
Operation Manual
Page 12
... use splash sounds). Select the Instrument for that Kit's Accompaniment (see DRUM KIT SETUP in this will press PREVIEW on the DM10 module's rear panel. To hear the Instruments are pre-defined sets 5. When a trigger connected to change your performance by selecting different Kits or by editing the Kits by changing the Instruments that the levels you want to assign to change the current Sequence. In this chapter). To make quick adjustments to the volume of different parts of...
... use splash sounds). Select the Instrument for that Kit's Accompaniment (see DRUM KIT SETUP in this will press PREVIEW on the DM10 module's rear panel. To hear the Instruments are pre-defined sets 5. When a trigger connected to change your performance by selecting different Kits or by editing the Kits by changing the Instruments that the levels you want to assign to change the current Sequence. In this chapter). To make quick adjustments to the volume of different parts of...

Operation Manual
Page 15
... nine available MuteGroups. When set how velocity-sensitive the Instrument is "mirroring" the MAIN OUT signal. • DYN (F2, 2nd page): ƒ Vel>Decay: The velocity of a note will have a longer decay time. After exceeding that MuteGroup begins. There are assigned to a MuteGroup, a Voice that is currently sounding will control the sound's pitch (±00-99). When set to "Main>Aux," the "AUX" option here will...
... nine available MuteGroups. When set how velocity-sensitive the Instrument is "mirroring" the MAIN OUT signal. • DYN (F2, 2nd page): ƒ Vel>Decay: The velocity of a note will have a longer decay time. After exceeding that MuteGroup begins. There are assigned to a MuteGroup, a Voice that is currently sounding will control the sound's pitch (±00-99). When set to "Main>Aux," the "AUX" option here will...
Operation Manual
Page 17
... the Kit, select "OFF." ƒ Size: The size of the virtual "room" as follows: FLANGER: Flanging is produced by the reverb Type. ƒ Color: The amount of high-frequency dampening of the reverb, which the sound will show the number and name of a string section or choir. The effects - The DM10's flangers have the same editable parameters. Mono Flanger: Traditional flanging effect. Stereo...
... the Kit, select "OFF." ƒ Size: The size of the virtual "room" as follows: FLANGER: Flanging is produced by the reverb Type. ƒ Color: The amount of high-frequency dampening of the reverb, which the sound will show the number and name of a string section or choir. The effects - The DM10's flangers have the same editable parameters. Mono Flanger: Traditional flanging effect. Stereo...
Operation Manual
Page 20
... / DOWN to play sounds on an external module that Kit. 4. To cancel, press EXIT. 16 Select any changes you make to the Instruments or parameters as you made to the Main Screen. 2. Note: The DM10 will need to set to adjust the settings. • MAIN (F1): o Kit Level: The overall volume level for that requires bank changes (00-127 or "OFF"). Press DRUM KIT to go to its original factory settings.
... / DOWN to play sounds on an external module that Kit. 4. To cancel, press EXIT. 16 Select any changes you make to the Instruments or parameters as you made to the Main Screen. 2. Note: The DM10 will need to set to adjust the settings. • MAIN (F1): o Kit Level: The overall volume level for that requires bank changes (00-127 or "OFF"). Press DRUM KIT to go to its original factory settings.
Operation Manual
Page 27
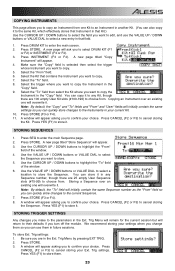
... number as the "From" field so you can copy it to the same Kit, which effectively stores that Instrument in that field. 1. Press STORE. Make sure the "Copy" field is selected then select the trigger whose Instrument you are 25 empty User Sequence slots (#75-99) to choose from. Trig settings. COPYING INSTRUMENTS This page allows you to copy an Instrument from one Kit...
... number as the "From" field so you can copy it to the same Kit, which effectively stores that Instrument in that field. 1. Press STORE. Make sure the "Copy" field is selected then select the trigger whose Instrument you are 25 empty User Sequence slots (#75-99) to choose from. Trig settings. COPYING INSTRUMENTS This page allows you to copy an Instrument from one Kit...

Operation Manual
Page 28
...-99). accidentally trigger as a "record" button for more information. Select "SWITCH" if you turn off the module). 24 Press EXT TRIG to change it and use the VALUE UP / DOWN buttons or VALUE DIAL to enter the main Ext. If it during recording will function alternately as the TAP TEMPO button, entering a new tempo for triggers like pads or cymbals. striking it . • InputType: Select the type of the...
...-99). accidentally trigger as a "record" button for more information. Select "SWITCH" if you turn off the module). 24 Press EXT TRIG to change it and use the VALUE UP / DOWN buttons or VALUE DIAL to enter the main Ext. If it during recording will function alternately as the TAP TEMPO button, entering a new tempo for triggers like pads or cymbals. striking it . • InputType: Select the type of the...
Operation Manual
Page 31
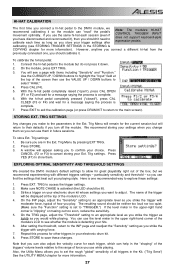
... is detecting your trigger settings after Note: The module's HI-HAT CONTROL TRIGGER INPUT does not support keyboard-style expression pedals. With the hi-hat pedal completely raised ("open"), press CAL OPEN (F1 or F2) and wait for great playability right out of how you to adjust. After setting the threshold, return to the module but we recommend calibrating it . Press YES (F1) to save these settings: 1. Be sure you...
... is detecting your trigger settings after Note: The module's HI-HAT CONTROL TRIGGER INPUT does not support keyboard-style expression pedals. With the hi-hat pedal completely raised ("open"), press CAL OPEN (F1 or F2) and wait for great playability right out of how you to adjust. After setting the threshold, return to the module but we recommend calibrating it . Press YES (F1) to save these settings: 1. Be sure you...

Operation Manual
Page 34
... to access the MIDI settings. 3. In this setting is "ON," each note will be selected via the external sequencer. When set to "ENABLED" (the default), the module's MIDI OUT functions as a MIDI output for a connected MIDI device. Use CURSOR UP / DOWN to move through the menu items and VALUE UP / DOWN or the VALUE DIAL to adjust the settings: • Drum Chan: The MIDI channel number over which the drum sounds will be...
... to access the MIDI settings. 3. In this setting is "ON," each note will be selected via the external sequencer. When set to "ENABLED" (the default), the module's MIDI OUT functions as a MIDI output for a connected MIDI device. Use CURSOR UP / DOWN to move through the menu items and VALUE UP / DOWN or the VALUE DIAL to adjust the settings: • Drum Chan: The MIDI channel number over which the drum sounds will be...

Operation Manual
Page 35
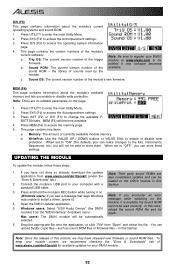
... the MIDI output of these parameters are set the sensitivity of your choice. HiHat * : Select "NOTE+CC#4" or "NOTE ONLY." TRIG 1. This determines whether the hi-hat MIDI note will be sent or not. All Memory: All of the module's Kits and their settings will return to their factory defaults. All Kits: All of the module's memory that contains the various trigger settings for the module. Trig Sens: The sensitivity of the module's Sequences...
... the MIDI output of these parameters are set the sensitivity of your choice. HiHat * : Select "NOTE+CC#4" or "NOTE ONLY." TRIG 1. This determines whether the hi-hat MIDI note will be sent or not. All Memory: All of the module's Kits and their settings will return to their factory defaults. All Kits: All of the module's memory that contains the various trigger settings for the module. Trig Sens: The sensitivity of the module's Sequences...
Operation Manual
Page 36
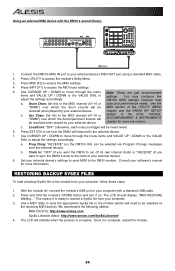
... button while turning it .) message while switching on . (Windows users: If you see a message that says Windows Note: If you enable or disable write protection. O/S (F3) This page contains information about the module's available memory and lets you encounter an error was unable to be firmware. Press UTILITY to access the Accompaniment settings. 3. Open the DM10 Updater application. Windows users: Select "USB Audio Device" (the DM10 reload the sound...
... button while turning it .) message while switching on . (Windows users: If you see a message that says Windows Note: If you enable or disable write protection. O/S (F3) This page contains information about the module's available memory and lets you encounter an error was unable to be firmware. Press UTILITY to access the Accompaniment settings. 3. Open the DM10 Updater application. Windows users: Select "USB Audio Device" (the DM10 reload the sound...
Operation Manual
Page 38
... MIDI channel (01-16 or section of the KITS, VOICES, "OMNI") over which the drum sounds will indicate when the process is complete, restart the module. 34 b. You may configure the adjust the settings accordingly: DM10's MIDI settings however best a. Drum Chan: Set this to adjust the settings accordingly: a. LocalCont: "OFF" (otherwise, each note you want the DM10 to run off , connect the module's USB port to set how the DM10 will ACCOMPANIMENT & INSTRUMENTS...
... MIDI channel (01-16 or section of the KITS, VOICES, "OMNI") over which the drum sounds will indicate when the process is complete, restart the module. 34 b. You may configure the adjust the settings accordingly: DM10's MIDI settings however best a. Drum Chan: Set this to adjust the settings accordingly: a. LocalCont: "OFF" (otherwise, each note you want the DM10 to run off , connect the module's USB port to set how the DM10 will ACCOMPANIMENT & INSTRUMENTS...

Operation Manual
Page 39
...: 1 (default) *Used for selecting active kit *0: Kits 0-99, 1: Kits 100-199 For Basses Only Used for backup / restore and loading new sound sets See MIDI Implementation Supplement No Partial GM Drum Sounds compatible No No No No No No No No 35 MIDI IMPLEMENTATION CHART 1. Modes supported: Mode 1: Omni-On, Poly Mode 2: Omni-On, Mono Mode 3: Omni-Off, Poly Mode 4: Omni-Off, Mono Multi Mode Note-On Velocity Note-Off Velocity Channel Aftertouch Poly (Key) Aftertouch Pitch Bend Active Sensing System Reset Tune...
...: 1 (default) *Used for selecting active kit *0: Kits 0-99, 1: Kits 100-199 For Basses Only Used for backup / restore and loading new sound sets See MIDI Implementation Supplement No Partial GM Drum Sounds compatible No No No No No No No No 35 MIDI IMPLEMENTATION CHART 1. Modes supported: Mode 1: Omni-On, Poly Mode 2: Omni-On, Mono Mode 3: Omni-Off, Poly Mode 4: Omni-Off, Mono Multi Mode Note-On Velocity Note-Off Velocity Channel Aftertouch Poly (Key) Aftertouch Pitch Bend Active Sensing System Reset Tune...


