
User Guide
Page 3
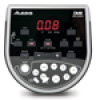
... pads currently being played. 7. START / STOP - KICK TYPE SWITCH - Connect the included cable snake to adjust the volumes of kick drum you can select the Pattern and the MIDI output format. 9. Enters Tempo Adjustment Mode. 4. VOLUME - HEADPHONES - Connect this 1/8" output. 5. Enters Voice Select Mode. 10. Press and hold to wall power. 2. to this port to a User Kit. VALUE +/- - FRONT PANEL FEATURES 1. VOLUME - Enters Pattern Select Mode where you are using with the module. Displays the current parameter values and indicator lights for setup instructions...
... pads currently being played. 7. START / STOP - KICK TYPE SWITCH - Connect the included cable snake to adjust the volumes of kick drum you can select the Pattern and the MIDI output format. 9. Enters Tempo Adjustment Mode. 4. VOLUME - HEADPHONES - Connect this 1/8" output. 5. Enters Voice Select Mode. 10. Press and hold to wall power. 2. to this port to a User Kit. VALUE +/- - FRONT PANEL FEATURES 1. VOLUME - Enters Pattern Select Mode where you are using with the module. Displays the current parameter values and indicator lights for setup instructions...
User Guide
Page 4
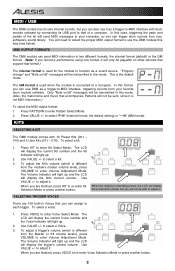
... is recording-armed, the LCD will display Selection Mode or press another button. 2 In this mode. This is the default mode The GM format is used for the module to function as a trigger-to-MIDI interface, triggering sounds from the module's master volume level), press VOLUME to enter Volume Adjustment Mode. to adjust it. To adjust the Kit's volume (which is connected to a computer. the current kit's volume, but you can assign to each trigger. MIDI / USB The DM6 module has its own internal sounds...
... is recording-armed, the LCD will display Selection Mode or press another button. 2 In this mode. This is the default mode The GM format is used for the module to function as a trigger-to-MIDI interface, triggering sounds from the module's master volume level), press VOLUME to enter Volume Adjustment Mode. to adjust it. To adjust the Kit's volume (which is connected to a computer. the current kit's volume, but you can assign to each trigger. MIDI / USB The DM6 module has its own internal sounds...
User Guide
Page 5
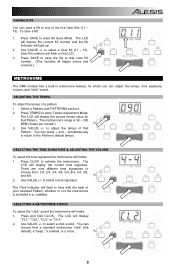
... 6/8. 2. Use VALUE +/- User Kit numbers will light up. 2. Press TEMPO to select a click sound. The LCD will make: 1. to select a User Kit (11 - 15). SELECTING A METRONOME SOUND To select the "click" sound the metronome will display the current time signature. to select a time signature. There are nine different time signatures to choose from a standard metronome "click" (the default), a "beep," a cowbell, or a voice. 3 Press SAVE to the Pattern's default tempo. Use VALUE +/- SELECTING THE TIME SIGNATURE & ADJUSTING THE VOLUME To select the time...
... 6/8. 2. Use VALUE +/- User Kit numbers will light up. 2. Press TEMPO to select a click sound. The LCD will make: 1. to select a User Kit (11 - 15). SELECTING A METRONOME SOUND To select the "click" sound the metronome will display the current time signature. to select a time signature. There are nine different time signatures to choose from a standard metronome "click" (the default), a "beep," a cowbell, or a voice. 3 Press SAVE to the Pattern's default tempo. Use VALUE +/- SELECTING THE TIME SIGNATURE & ADJUSTING THE VOLUME To select the time...

User Guide
Page 6
... display the current volume level. 3. The Volume Indicator will light up The Patterns and the MIDI IN (over a USB connection) use the same 16 MIDI channels, which is recording-armed, the value for that Pattern. When you , the tempo, or the Kit number. In this occurs, turn the metronome on again to re-enter Pattern Select Mode or press another button. To select a Pattern: 1. Use VALUE +/- then on...
... display the current volume level. 3. The Volume Indicator will light up The Patterns and the MIDI IN (over a USB connection) use the same 16 MIDI channels, which is recording-armed, the value for that Pattern. When you , the tempo, or the Kit number. In this occurs, turn the metronome on again to re-enter Pattern Select Mode or press another button. To select a Pattern: 1. Use VALUE +/- then on...
User Guide
Page 7
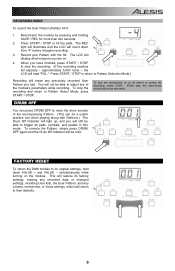
... to return to trigger all pads, cymbals, and pedals in this mode. Either way, the metronome sound will return to adjust any volume, metronome, or Voice settings, which will not be able to Pattern Selection Mode.) Recording will restore its original settings, hold down from "4" before or during the recording, press CLICK. FACTORY RESET To return the DM6 module to its factory settings, erasing any recorded data or changed settings, including User Kits, the User Pattern, and any...
... to return to trigger all pads, cymbals, and pedals in this mode. Either way, the metronome sound will return to adjust any volume, metronome, or Voice settings, which will not be able to Pattern Selection Mode.) Recording will restore its original settings, hold down from "4" before or during the recording, press CLICK. FACTORY RESET To return the DM6 module to its factory settings, erasing any recorded data or changed settings, including User Kits, the User Pattern, and any...
User Guide
Page 12
SPECIFICATIONS Triggers: 1 kick drum pad, 1 hi-hat pedal, 1 hit-hat cymbal, 1 crash cymbal, 1 ride cymbal, 1 dual-zone snare pad, 3 tom pads Voices: 108 voices Drum Kits: 10 preset kits, 5 user kits Patterns: Display: 40 preset patterns, 1 user pattern LCD Connections: Headphones, USB, Stereo Output, Mix Input, Power, Trigger Input connection for cable snake (25-pin D-sub to 8 TS 1/4" and 1 TRS 1/4" cable) Power Supply: AC adapter (9V), included www.alesis.com 7-51-0281-B
SPECIFICATIONS Triggers: 1 kick drum pad, 1 hi-hat pedal, 1 hit-hat cymbal, 1 crash cymbal, 1 ride cymbal, 1 dual-zone snare pad, 3 tom pads Voices: 108 voices Drum Kits: 10 preset kits, 5 user kits Patterns: Display: 40 preset patterns, 1 user pattern LCD Connections: Headphones, USB, Stereo Output, Mix Input, Power, Trigger Input connection for cable snake (25-pin D-sub to 8 TS 1/4" and 1 TRS 1/4" cable) Power Supply: AC adapter (9V), included www.alesis.com 7-51-0281-B


