
User Guide
Page 3
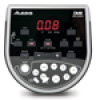
...USB cable. 7. Connect this port to this stereo 1/8" input. 6. See the included separate Assembly Guide for Kit, Voice, and Pattern. 12. VALUE +/- - TEMPO / TAP - Mutes or unmutes the drum part of each parameter. 3. Enters Voice Select Mode. 10. POWER SWITCH - STEREO OUTPUT - You can ...1. Turns the metronome on or off . 6. Press once to save the current Kit to enter Record Mode. PAD INDICATORS - PATTERN - VOLUME - Press and hold to a User Kit. You can connect a set of kick drum you can connect an optional speaker system, recording input, etc. Select "PAD" if...
...USB cable. 7. Connect this port to this stereo 1/8" input. 6. See the included separate Assembly Guide for Kit, Voice, and Pattern. 12. VALUE +/- - TEMPO / TAP - Mutes or unmutes the drum part of each parameter. 3. Enters Voice Select Mode. 10. POWER SWITCH - STEREO OUTPUT - You can ...1. Turns the metronome on or off . 6. Press once to save the current Kit to enter Record Mode. PAD INDICATORS - PATTERN - VOLUME - Press and hold to a User Kit. You can connect a set of kick drum you can connect an optional speaker system, recording input, etc. Select "PAD" if...
User Guide
Page 4
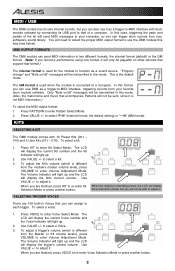
... interface with 10 Preset Kits (001 - 010) and 5 User Kits (011 - 015). This is the default mode The GM format is connected to select "P-N" (internal format, the default setting) or "--N" (GM format). KITS SELECTING A KIT The DM6 module comes with drum module software by connecting its... USB port to that accompanies Patterns will display the trigger's current volume. Press KIT to enter Pattern Select Mode. 2. The Volume Indicator will ...
... interface with 10 Preset Kits (001 - 010) and 5 User Kits (011 - 015). This is the default mode The GM format is connected to select "P-N" (internal format, the default setting) or "--N" (GM format). KITS SELECTING A KIT The DM6 module comes with drum module software by connecting its... USB port to that accompanies Patterns will display the trigger's current volume. Press KIT to enter Pattern Select Mode. 2. The Volume Indicator will ...

User Guide
Page 6
... to enter Volume Adjustment Mode. Press CLICK to enter Tempo Adjustment Mode. Use VALUE +/- to the Pattern's default tempo. 6. PATTERNS The DM6 module comes with the beat and the PAD INDICATORS will light according to what pads' sounds are finished, press PATTERN to adjust the tempo ... If this mode. 4 then on or off pattern. and - When you can also mute the accompanying Pattern (see DRUM OFF) or turn the module off . The LCD will display the Kit number and the REC light will light up. 2. In this mode, you are playing (a useful learning and practice tool...
... to enter Volume Adjustment Mode. Press CLICK to enter Tempo Adjustment Mode. Use VALUE +/- to the Pattern's default tempo. 6. PATTERNS The DM6 module comes with the beat and the PAD INDICATORS will light according to what pads' sounds are finished, press PATTERN to adjust the tempo ... If this mode. 4 then on or off pattern. and - When you can also mute the accompanying Pattern (see DRUM OFF) or turn the module off . The LCD will display the Kit number and the REC light will light up. 2. In this mode, you are playing (a useful learning and practice tool...
User Guide
Page 7
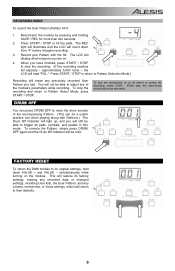
... / STOP. the LCD will display what measure you had. To turn the metronome on the module. To unmute the Pattern, simply press DRUM OFF again and the Drum Off Indicator will still be unlit. RECORDING MODE To record the User Pattern (Pattern #41): 1. Press START / STOP or hit the pads... module by pressing and holding SAVE / REC for more than two seconds. 2. FACTORY RESET To return the DM6 module to its factory settings, erasing any recorded data or changed settings, including User Kits, the User Pattern, and any volume, metronome, or Voice settings, which will not be able to trigger...
... / STOP. the LCD will display what measure you had. To turn the metronome on the module. To unmute the Pattern, simply press DRUM OFF again and the Drum Off Indicator will still be unlit. RECORDING MODE To record the User Pattern (Pattern #41): 1. Press START / STOP or hit the pads... module by pressing and holding SAVE / REC for more than two seconds. 2. FACTORY RESET To return the DM6 module to its factory settings, erasing any recorded data or changed settings, including User Kits, the User Pattern, and any volume, metronome, or Voice settings, which will not be able to trigger...
User Guide
Page 12
SPECIFICATIONS Triggers: 1 kick drum pad, 1 hi-hat pedal, 1 hit-hat cymbal, 1 crash cymbal, 1 ride cymbal, 1 dual-zone snare pad, 3 tom pads Voices: 108 voices Drum Kits: 10 preset kits, 5 user kits Patterns: Display: 40 preset patterns, 1 user pattern LCD Connections: Headphones, USB, Stereo Output, Mix Input, Power, Trigger Input connection for cable snake (25-pin D-sub to 8 TS 1/4" and 1 TRS 1/4" cable) Power Supply: AC adapter (9V), included www.alesis.com 7-51-0281-B
SPECIFICATIONS Triggers: 1 kick drum pad, 1 hi-hat pedal, 1 hit-hat cymbal, 1 crash cymbal, 1 ride cymbal, 1 dual-zone snare pad, 3 tom pads Voices: 108 voices Drum Kits: 10 preset kits, 5 user kits Patterns: Display: 40 preset patterns, 1 user pattern LCD Connections: Headphones, USB, Stereo Output, Mix Input, Power, Trigger Input connection for cable snake (25-pin D-sub to 8 TS 1/4" and 1 TRS 1/4" cable) Power Supply: AC adapter (9V), included www.alesis.com 7-51-0281-B


