
User Guide
Page 2
TABLE OF CONTENTS (1.0) Introduction 4 (1.1) Box Contents 4 (1.2) Support 4 (1.3) Setup 5 (1.3.1) Connection Diagram...5 (1.3.2) Drum Setup and Playing 6 (2.0) Features 7 (2.1) Top Panel 7 (2.2) Rear Panel 12 (2.3) Side Panel 13 (2.4) Bottom Panel 13 (3.0) Basic Functions 14 (3.1) Editing and Saving Drum Kits 14 (3.2) Playing Along With Songs 16 (3.3) Playing Along With Beats, Rhythms, and Patterns 17 2
TABLE OF CONTENTS (1.0) Introduction 4 (1.1) Box Contents 4 (1.2) Support 4 (1.3) Setup 5 (1.3.1) Connection Diagram...5 (1.3.2) Drum Setup and Playing 6 (2.0) Features 7 (2.1) Top Panel 7 (2.2) Rear Panel 12 (2.3) Side Panel 13 (2.4) Bottom Panel 13 (3.0) Basic Functions 14 (3.1) Editing and Saving Drum Kits 14 (3.2) Playing Along With Songs 16 (3.3) Playing Along With Beats, Rhythms, and Patterns 17 2
User Guide
Page 3
(4.0) Advanced Functions 18 (4.1) Adjusting Utility Settings 18 (4.2) Adjusting the Metronome 19 (4.3) Recording 20 (4.4) MIDI Settings 21 (4.5) Connecting to a Bluetooth® Device 23 (5.0) Appendix 24 (5.1) Velocity Curves 24 (5.2) Pad MIDI Note Numbers 25 (5.3) Kits ...26 (5.4) Sounds 27 (5.5) Technical Specifications 33 (5.6) Trademarks & Licenses 34 3
(4.0) Advanced Functions 18 (4.1) Adjusting Utility Settings 18 (4.2) Adjusting the Metronome 19 (4.3) Recording 20 (4.4) MIDI Settings 21 (4.5) Connecting to a Bluetooth® Device 23 (5.0) Appendix 24 (5.1) Velocity Curves 24 (5.2) Pad MIDI Note Numbers 25 (5.3) Kits ...26 (5.4) Sounds 27 (5.5) Technical Specifications 33 (5.6) Trademarks & Licenses 34 3
User Guide
Page 5
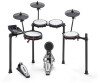
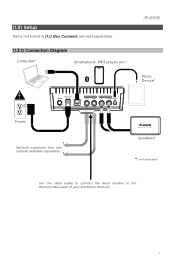
Speakers* * sold separately. (1.3.1) Connection Diagram Computer* Smartphone, MP3 player, etc.* Music Device* 9V POWER 0.5A USB TRIGGER INPUT CYM 2 TOM 4 AUDIO OUTPUT R L/MONO AUX IN Power Optional expansion tom and cymbals available separately. (1.3) Setup Items not listed in (1.1) Box Contents are sold separately Use the cable snake to connect the drum module to the drum/cymbal pads of your electronic drum kit. 5
Speakers* * sold separately. (1.3.1) Connection Diagram Computer* Smartphone, MP3 player, etc.* Music Device* 9V POWER 0.5A USB TRIGGER INPUT CYM 2 TOM 4 AUDIO OUTPUT R L/MONO AUX IN Power Optional expansion tom and cymbals available separately. (1.3) Setup Items not listed in (1.1) Box Contents are sold separately Use the cable snake to connect the drum module to the drum/cymbal pads of your electronic drum kit. 5
User Guide
Page 6
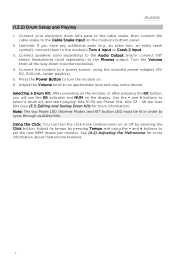
... electronic drum kit's pads to the cable snake, then connect the cable snake to the Cable Snake Input on the display. Connect the module to cycle through available Kits. Note: The top Mode LED (Normal Mode), and KIT button LED must be lit in order to a power source, using the - (1.3.2) Drum Setup and Playing 1. Connect speakers (sold separately) to the Audio Output and/or connect 1/8" stereo headphones (sold separately) to select a drum kit, and start playing! Selecting a Drum Kit: After powering on the module, or after pressing the Kit button...
... electronic drum kit's pads to the cable snake, then connect the cable snake to the Cable Snake Input on the display. Connect the module to cycle through available Kits. Note: The top Mode LED (Normal Mode), and KIT button LED must be lit in order to a power source, using the - (1.3.2) Drum Setup and Playing 1. Connect speakers (sold separately) to the Audio Output and/or connect 1/8" stereo headphones (sold separately) to select a drum kit, and start playing! Selecting a Drum Kit: After powering on the module, or after pressing the Kit button...

User Guide
Page 7
.... (2.0) Features (2.1) Top Panel 1 KIT VOICE SONG RHYTHM BEAT PATTERN 23 VOLUME MODE 4 SAVE START/ STOP CLICK RECORD PLAY/ PRACTICE UTILITY TEMPO DRUM MUTE NITRO MAXDRUM MODULE 1. Bluetooth® Press this button to pair to a Bluetooth® Device for more details. 3. Volume Adjusts the output volume of the three buttons to the left to Normal mode (Kit, Voice, Song) or Learning mode (Rhythm, Beat, Pattern), indicated by the LEDs. 7 Mode Press to the current settings and functions. 2. See (4.5) Connecting to...
.... (2.0) Features (2.1) Top Panel 1 KIT VOICE SONG RHYTHM BEAT PATTERN 23 VOLUME MODE 4 SAVE START/ STOP CLICK RECORD PLAY/ PRACTICE UTILITY TEMPO DRUM MUTE NITRO MAXDRUM MODULE 1. Bluetooth® Press this button to pair to a Bluetooth® Device for more details. 3. Volume Adjusts the output volume of the three buttons to the left to Normal mode (Kit, Voice, Song) or Learning mode (Rhythm, Beat, Pattern), indicated by the LEDs. 7 Mode Press to the current settings and functions. 2. See (4.5) Connecting to...

User Guide
Page 8
...-recorded beat pattern and keep score of your performance, press the Start/Stop button. 6. KIT VOICE SONG 5 67 RHYTHM BEAT PATTERN MODE SAVE UTILITY VOLUME START/ STOP CLICK RECORD PLAY/ PRACTICE TEMPO DRUM MUTE NITRO MAXDRUM MODULE 5. Voice / Beat In Normal Mode, press this button to enter the Voice Menu, where you can select a voice (drum sound) or adjust voice-related settings. Song / Pattern In Normal Mode, press this button to enter the Song Menu, where you can select a song or adjust song-related settings...
...-recorded beat pattern and keep score of your performance, press the Start/Stop button. 6. KIT VOICE SONG 5 67 RHYTHM BEAT PATTERN MODE SAVE UTILITY VOLUME START/ STOP CLICK RECORD PLAY/ PRACTICE TEMPO DRUM MUTE NITRO MAXDRUM MODULE 5. Voice / Beat In Normal Mode, press this button to enter the Voice Menu, where you can select a voice (drum sound) or adjust voice-related settings. Song / Pattern In Normal Mode, press this button to enter the Song Menu, where you can select a song or adjust song-related settings...
User Guide
Page 9
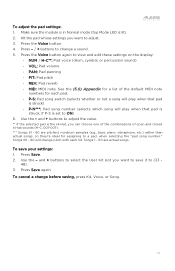
... change before saving, press Kit, Voice, or Song. To cancel a change the value of your performance. Start/Stop When in Kit or Voice mode, press the Save button to select an available save the current kit settings. Use the - / + buttons to save slot, and then press Save again. VOLUME KIT VOICE SONG RHYTHM BEAT PATTERN 10 MODE 8 SAVE UTILITY 9 START/ STOP CLICK 11 RECORD PLAY/ PRACTICE TEMPO DRUM MUTE NITRO MAXDRUM MODULE 8. Select a Song /Pattern/Rhythm/Beat using the - / + buttons. Use the - / + buttons to start or stop Song playback. Save...
... change before saving, press Kit, Voice, or Song. To cancel a change the value of your performance. Start/Stop When in Kit or Voice mode, press the Save button to select an available save the current kit settings. Use the - / + buttons to save slot, and then press Save again. VOLUME KIT VOICE SONG RHYTHM BEAT PATTERN 10 MODE 8 SAVE UTILITY 9 START/ STOP CLICK 11 RECORD PLAY/ PRACTICE TEMPO DRUM MUTE NITRO MAXDRUM MODULE 8. Select a Song /Pattern/Rhythm/Beat using the - / + buttons. Use the - / + buttons to start or stop Song playback. Save...
User Guide
Page 10
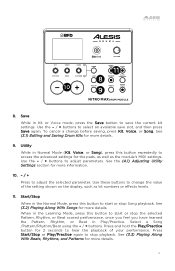
... o . Use the - / + buttons to change it without being scored. 16. Play/Practice In Normal Mode, press this to it . 14. VOLUME KIT RHYTHM VOICE BEAT SONG PATTERN MODE SAVE UTILITY START/ STOP CLICK 14 PLAY/ RECORD PRACTICE 12 15 TEMPO DRUM MUTE 13 16 NITRO MAXDRUM MODULE 12. See the (4.2) Adjusting the Metronome section for more information. 15. Drum Mute When this button can then play along to turn the click track (metronome) on while recording...
... o . Use the - / + buttons to change it without being scored. 16. Play/Practice In Normal Mode, press this to it . 14. VOLUME KIT RHYTHM VOICE BEAT SONG PATTERN MODE SAVE UTILITY START/ STOP CLICK 14 PLAY/ RECORD PRACTICE 12 15 TEMPO DRUM MUTE 13 16 NITRO MAXDRUM MODULE 12. See the (4.2) Adjusting the Metronome section for more information. 15. Drum Mute When this button can then play along to turn the click track (metronome) on while recording...
User Guide
Page 12
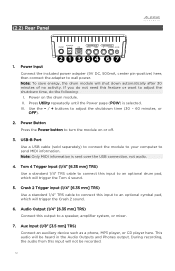
... adjust the shutdown time (30 - 60 minutes, or OFF). 2. Tom 4 Trigger Input (1/4" [6.35 mm] TRS) Use a standard 1/4" TRS cable to connect this input will be recorded. 12 (2.2) Rear Panel 9V POWER 0.5A USB TRIGGER INPUT CYM 2 TOM 4 AUDIO OUTPUT R L/MONO AUX IN 2 1 3 54 6 7 1. Press Utility repeatedly until the Power page (POW) is sent over the USB connection, not audio. 4. Power Button Press the Power button to send MIDI information. Note: Only MIDI information is selected. During recording, the audio from this input...
... adjust the shutdown time (30 - 60 minutes, or OFF). 2. Tom 4 Trigger Input (1/4" [6.35 mm] TRS) Use a standard 1/4" TRS cable to connect this input will be recorded. 12 (2.2) Rear Panel 9V POWER 0.5A USB TRIGGER INPUT CYM 2 TOM 4 AUDIO OUTPUT R L/MONO AUX IN 2 1 3 54 6 7 1. Press Utility repeatedly until the Power page (POW) is sent over the USB connection, not audio. 4. Power Button Press the Power button to send MIDI information. Note: Only MIDI information is selected. During recording, the audio from this input...
User Guide
Page 14
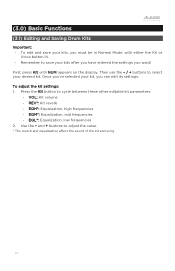
... kit. Once you've selected your kit, you want! and + buttons to adjust the value. * The reverb and equalization a ect the sound of the kit and song. 14 To adjust the kit settings: 1. (3.0) Basic Functions (3.1) Editing and Saving Drum Kits Important: • To edit and save your kits, you must be in Normal Mode, with either the Kit or Voice button lit. • Remember to save your kits after you have entered the settings you can edit its settings. Use...
... kit. Once you've selected your kit, you want! and + buttons to adjust the value. * The reverb and equalization a ect the sound of the kit and song. 14 To adjust the kit settings: 1. (3.0) Basic Functions (3.1) Editing and Saving Drum Kits Important: • To edit and save your kits, you must be in Normal Mode, with either the Kit or Voice button lit. • Remember to save your kits after you have entered the settings you can edit its settings. Use...
User Guide
Page 15
... adjust. 3. Press Save. 2. To cancel a change a sound. 5. Songs 66 - 80 will play when that pad is struck) • P-N***: Pad song number (selects which song will change pitch with each hit. Use the - Make sure the module is in Normal mode (top Mode LED is the Hi-Hat, you want to save your settings: 1. Press the Voice button. 4. Use the - Hit the pad whose settings you can choose one of the combinations of the default MIDI note numbers for assigning to change before saving, press Kit, Voice...
... adjust. 3. Press Save. 2. To cancel a change a sound. 5. Songs 66 - 80 will play when that pad is struck) • P-N***: Pad song number (selects which song will change pitch with each hit. Use the - Make sure the module is in Normal mode (top Mode LED is the Hi-Hat, you want to save your settings: 1. Press the Voice button. 4. Use the - Hit the pad whose settings you can choose one of the combinations of the default MIDI note numbers for assigning to change before saving, press Kit, Voice...

User Guide
Page 16
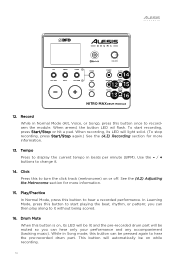
... Song settings. To select and play songs, you power the module o . Press the Song button until NUM appears on the display. and + buttons to adjust the BPM. and + buttons to select a song. 3. and + buttons to adjust the volume. It will return to its default volume setting when you must be in Normal Mode (Kit, Voice, Song). Adjust the tempo by pressing the Song button, then press the Song button repeatedly until DRM appears on the display. Use the - Adjust the volume of the drum part...
... Song settings. To select and play songs, you power the module o . Press the Song button until NUM appears on the display. and + buttons to adjust the BPM. and + buttons to select a song. 3. and + buttons to adjust the volume. It will return to its default volume setting when you must be in Normal Mode (Kit, Voice, Song). Adjust the tempo by pressing the Song button, then press the Song button repeatedly until DRM appears on the display. Use the - Adjust the volume of the drum part...

User Guide
Page 17
... recording was made. To practice without being scored, press Play/Practice (PRA will play : • Beat (BEA): Snare drum only • Rhythm (RHM): Full kit • Pattern (PTN): Full kit plus musical accompaniment 2. At the end, you will repeat so you want to play once without the drum part. To adjust the Learning Mode settings: Each Learning Mode has di erent adjustable settings. Play while scoring your performance...
... recording was made. To practice without being scored, press Play/Practice (PRA will play : • Beat (BEA): Snare drum only • Rhythm (RHM): Full kit • Pattern (PTN): Full kit plus musical accompaniment 2. At the end, you will repeat so you want to play once without the drum part. To adjust the Learning Mode settings: Each Learning Mode has di erent adjustable settings. Play while scoring your performance...
User Guide
Page 18
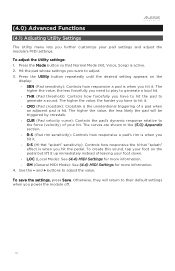
... hit. Otherwise, they will be triggered by crosstalk. • CUR (Pad velocity curve): Controls the pad's dynamic response relative to hit it up immediately instead of your foot down. • LOC (Local Mode): See (4.4) MIDI Settings for more information. • GM (General MIDI Mode): See (4.4) MIDI Settings for more information. 4. Press the Mode button so that Normal Mode (Kit, Voice, Song) is when you power the module o . 18 The higher the value...
... hit. Otherwise, they will be triggered by crosstalk. • CUR (Pad velocity curve): Controls the pad's dynamic response relative to hit it up immediately instead of your foot down. • LOC (Local Mode): See (4.4) MIDI Settings for more information. • GM (General MIDI Mode): See (4.4) MIDI Settings for more information. 4. Press the Mode button so that Normal Mode (Kit, Voice, Song) is when you power the module o . 18 The higher the value...
User Guide
Page 19
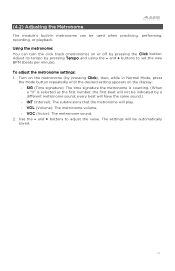
... (Time signature): The time signature the metronome is counting. (When a "0" is selected as the first number, the first beat will not be automatically saved. 19 Use the - The settings will play. • VOL (Volume): The metronome volume. • VOC (Voice): The metronome sound. 2. and + buttons to adjust the value. and + buttons to set the new BPM (beats per minute). (4.2) Adjusting the Metronome The module's built-in Normal Mode, press the Mode button repeatedly...
... (Time signature): The time signature the metronome is counting. (When a "0" is selected as the first number, the first beat will not be automatically saved. 19 Use the - The settings will play. • VOL (Volume): The metronome volume. • VOC (Voice): The metronome sound. 2. and + buttons to adjust the value. and + buttons to set the new BPM (beats per minute). (4.2) Adjusting the Metronome The module's built-in Normal Mode, press the Mode button repeatedly...
User Guide
Page 20
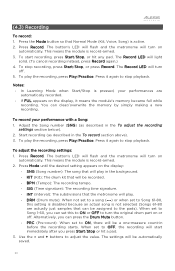
... a pad. 3. When set to OFF, the recording will be assigned to turn on automatically. Use the - Notes: • In Learning Mode when Start/Stop is active. 2. (4.3) Recording To record: 1. Press Record. To stop playback. The Record LED will turn o. 5. To play the recording, press Play/Practice. Press it again to adjust the value. To record your performances are actually just samples that Normal Mode (Kit, Voice, Song) is pressed, your performance with a Song: 1. To play the recording...
... a pad. 3. When set to OFF, the recording will be assigned to turn on automatically. Use the - Notes: • In Learning Mode when Start/Stop is active. 2. (4.3) Recording To record: 1. Press Record. To stop playback. The Record LED will turn o. 5. To play the recording, press Play/Practice. Press it again to adjust the value. To record your performances are actually just samples that Normal Mode (Kit, Voice, Song) is pressed, your performance with a Song: 1. To play the recording...

User Guide
Page 21
...set to the module's USB port, bypassing the drum module's sound library. (4.4) MIDI Settings To change the MIDI note number sent by each pad, see the section (3.1) Editing and Saving Drum Kits > To adjust the pad settings. o When set to Channel 10, and start recording. To record to have an instrument plugin (like BFD player) inserted into the instrument track or MIDI track. 3. Note: Be sure to recording software (DAW): 1. and + buttons to adjust. 2. Stop recording in a computer connected to OFF, playing your electronic drum kit will use the module's internal drum sounds...
...set to the module's USB port, bypassing the drum module's sound library. (4.4) MIDI Settings To change the MIDI note number sent by each pad, see the section (3.1) Editing and Saving Drum Kits > To adjust the pad settings. o When set to Channel 10, and start recording. To record to have an instrument plugin (like BFD player) inserted into the instrument track or MIDI track. 3. Note: Be sure to recording software (DAW): 1. and + buttons to adjust. 2. Stop recording in a computer connected to OFF, playing your electronic drum kit will use the module's internal drum sounds...

User Guide
Page 22
... not be sent out of BFD Player. 5. In MIDI Input Device, select "Alesis Nitro Max". 7. Play your BFD Player software. 4. Open your Nitro Max Kit and enjoy! 22 Close the settings window. 8. Use a USB cable (sold separately) to connect to the USB port on the module's rear panel to use BFD player as your laptop's headphone output or audio interface's output. Be sure that your headphones are connected to whatever audio source you would like to an available...
... not be sent out of BFD Player. 5. In MIDI Input Device, select "Alesis Nitro Max". 7. Play your BFD Player software. 4. Open your Nitro Max Kit and enjoy! 22 Close the settings window. 8. Use a USB cable (sold separately) to connect to the USB port on the module's rear panel to use BFD player as your laptop's headphone output or audio interface's output. Be sure that your headphones are connected to whatever audio source you would like to an available...
User Guide
Page 23
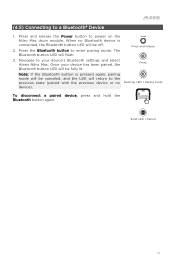
.... When no device). BLUETOOTH ALESIS NITRO MAX Solid LED = Paired 23 Note: If the Bluetooth button is connected, the Bluetooth button LED will flash. 3. Press the Bluetooth button to a Bluetooth® Device 1. Navigate to your device has been paired, the Bluetooth button LED will return to power on the Nitro Max drum module. Once your device's Bluetooth settings and select Alesis Nitro Max. POWER Press and release Press Flashing...
.... When no device). BLUETOOTH ALESIS NITRO MAX Solid LED = Paired 23 Note: If the Bluetooth button is connected, the Bluetooth button LED will flash. 3. Press the Bluetooth button to a Bluetooth® Device 1. Navigate to your device has been paired, the Bluetooth button LED will return to power on the Nitro Max drum module. Once your device's Bluetooth settings and select Alesis Nitro Max. POWER Press and release Press Flashing...
User Guide
Page 33
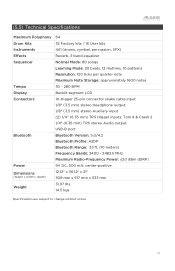
... Factory kits / 16 User kits Instruments 441 (drums, cymbal, percussion, SFX) Effects Reverb, 3-band equalizer Sequencer Normal Mode: 80 songs Learning Mode: 20 beats, 12 rhythms, 10 patterns Resolution: 120 ticks per quarter note Maximum Note Storage: approximately 1600 notes Tempo 30 - 280 BPM Display Backlit segment LCD Connectors 10-trigger 25-pin connector snake cable input 1/8" (3.5 mm) stereo Headphone output 1/8" (3.5 mm) stereo Auxiliary input (2) 1/4" (6.35 mm) TRS trigger inputs: Tom 4 & Crash 2 1/4" (6.35 mm) TRS stereo Audio output USB...
... Factory kits / 16 User kits Instruments 441 (drums, cymbal, percussion, SFX) Effects Reverb, 3-band equalizer Sequencer Normal Mode: 80 songs Learning Mode: 20 beats, 12 rhythms, 10 patterns Resolution: 120 ticks per quarter note Maximum Note Storage: approximately 1600 notes Tempo 30 - 280 BPM Display Backlit segment LCD Connectors 10-trigger 25-pin connector snake cable input 1/8" (3.5 mm) stereo Headphone output 1/8" (3.5 mm) stereo Auxiliary input (2) 1/4" (6.35 mm) TRS trigger inputs: Tom 4 & Crash 2 1/4" (6.35 mm) TRS stereo Audio output USB...


