User Guide
Page 6
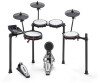
...on or o by pressing Tempo and using the included power adapter (9V DC, 500 mA, center positive). 5. Selecting a Drum Kit: After powering on . 6. and + buttons to set the new BPM (beats per minute). Using the Click: You can turn the module on the module, or after pressing ...additional pads (e.g., an extra tom, an extra crash cymbal), connect them to an appropriate level and play some drums! Connect the module to cycle through available Kits. Connect your electronic drum kit's pads to the cable snake, then connect the cable snake to the Phones output. Connect speakers (sold ...
...on or o by pressing Tempo and using the included power adapter (9V DC, 500 mA, center positive). 5. Selecting a Drum Kit: After powering on . 6. and + buttons to set the new BPM (beats per minute). Using the Click: You can turn the module on the module, or after pressing ...additional pads (e.g., an extra tom, an extra crash cymbal), connect them to an appropriate level and play some drums! Connect the module to cycle through available Kits. Connect your electronic drum kit's pads to the cable snake, then connect the cable snake to the Phones output. Connect speakers (sold ...

User Guide
Page 21
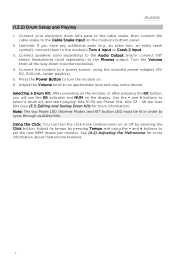
... adjust. 2. Hit the pad whose settings you want to ON, Channel 10 in a computer connected to Channel 10, and start recording. (4.4) MIDI Settings To change the MIDI note number sent by each pad, see the section (3.1) Editing and Saving Drum Kits > To adjust the pad settings. o GM (General MIDI Mode): When set to OFF, playing your Nitro Max kit! 5.
... adjust. 2. Hit the pad whose settings you want to ON, Channel 10 in a computer connected to Channel 10, and start recording. (4.4) MIDI Settings To change the MIDI note number sent by each pad, see the section (3.1) Editing and Saving Drum Kits > To adjust the pad settings. o GM (General MIDI Mode): When set to OFF, playing your Nitro Max kit! 5.

